Identify and Remediate Critical Missing Patches with Saner CSRM
Below is an overview of the key actions you can perform to address missing patches:
- With the user-friendly, step-by-step wizard create remediation tasks for missing patches. This streamlined approach simplifies the process of addressing vulnerabilities and enabling efficient patch deployment.
- View the severity of missing patches associated with specific rules, facilitating effective vulnerability management. By prioritizing the application for high-severity patches, organizations can mitigate critical security risks that pose significant threats.
- Understand the regions affected by specific rules that provides valuable insights into the geographic distribution misconfigurations or anomalies. This information helps in identifying persistent anomalies and enables targeted corrective actions based on regional trends.
- Tracing the severity and regions impacted by specific rules, providing detailed visibility for timely and precise corrective actions. By addressing vulnerabilities with a focused strategy, organizations can maintain compliance with security standards and enhance their overall security posture.
Salient Highlights
AI Assistant Integration
The summarization grid in the various dashboards enables the AI assistant to retrieve responses related to the relevant data.
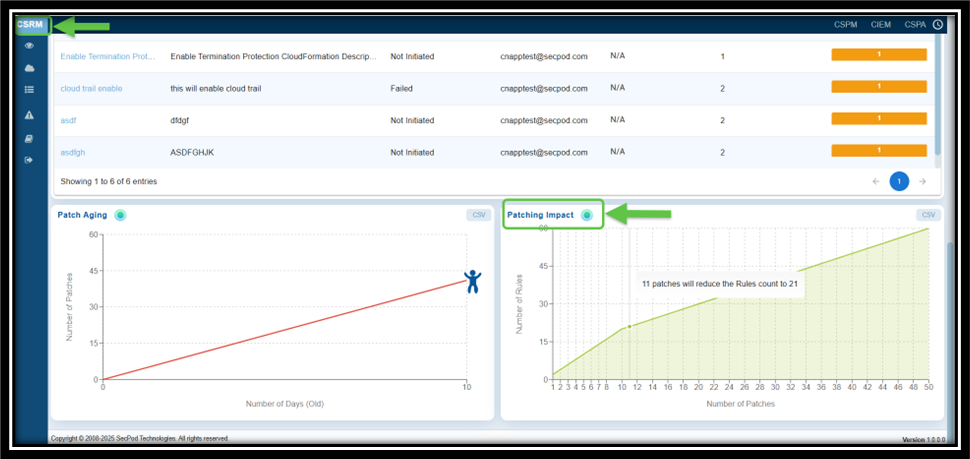
By clicking the green icon within the summarization grid, the AI assistant dynamically fetches and displays the summary in a tooltip within the dashboard.
Compliance-driven Remediation
Leverages “SecPod Default Benchmarks” to address compliance requirements with pre-defined rules aligned to industry standards.
Actionable Insights
Highlights critical vulnerabilities in “Top 10 Missing Patches” widget and offers granular details such as affected rules, services, severity levels, regions, and resource counts.
Granular Resource Insights
Users can drill down into remediation details, such as the “Remediation ID”, affected rules, and impacted regions.
Real-time Monitoring and Updates
Continuously scans for misconfigurations, vulnerabilities, and missing patches. Reflects live data and remediation progress in real-time, ensuring up-to-date decision-making.
Automated Patch Remediation
Flexible Rule Management(built-in rules) assist in fixing misconfigurations promptly after they are detected. This functionality supports faster remediation by helping IT teams to spend less time on repetitive patch management tasks. Teams also have the flexibility to fine-tune, pause, or reset automation rules as needed.
Explore the Dashboard Views
| Component | What it Conveys? |
|---|---|
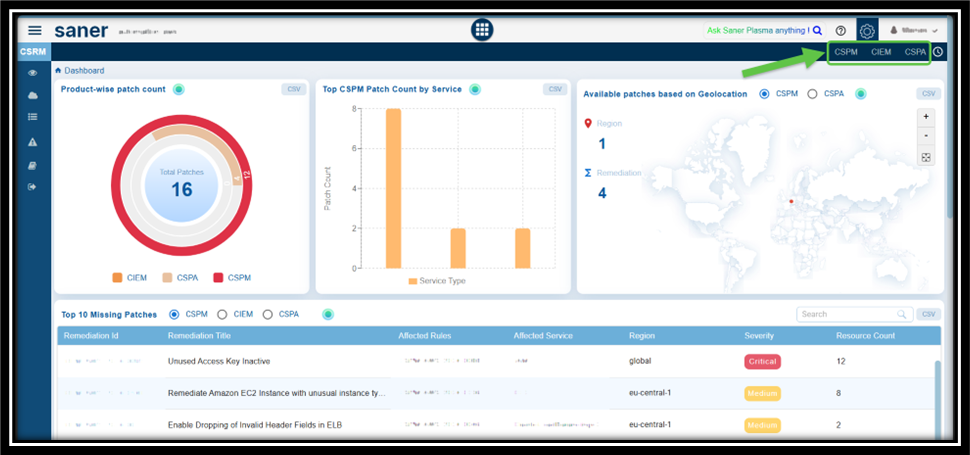
| Product-wise Patch Count | The “Product-wise patch count” view provides an overview of the patches distributed across different tools, specifically CSPM, CSPA, and CIEM. The view allows for focused investigation into areas that have not been scanned or where no patches have been applied. This ensures that patches are prioritized and applied based on the severity of vulnerabilities. The concentric chart visually represents the patch counts for each tool. The color coding is as follows: Orange: CIEM Grey: CSPA Red: CSPM Additionally users have an option to open the details of the view in a spreadsheet(CSV). |
| Top Patch Count by Service | This chart visualizes the distribution of patches related to Cloud Security Posture Management (CSPM) across various services. It is represented as a bar chart, where the Y-axis displays the number of patches, and the X-axis represents different service types. The bar height indicates the total number of patches applied to a specific service. You can choose the relevant tool: CSPM or CSPA and view the corresponding details. Additionally, the chart offers insight into which services have the highest patch counts, helping prioritize the resolution of the most critical vulnerabilities or misconfigurations. Any disparities in the patch distribution suggest that certain services may require more extensive remediation efforts or further attention in terms of scanning. |
| Available Patches based on Geolocation | This visualization helps to identify the remediation count across the different states or regions on the geographical map. You can choose the relevant tool: CSPM or CSPA and view the corresponding details in the map. |
| Top 10 Missing Patches | “Top 10 Missing Patches” offers a prioritized view for IT teams to address the most critical vulnerabilities in their environment. It presents essential information such as Remediation ID, Title, Affected Rules, Affected Service, Region, Severity, and Resource Count, providing a quick and actionable overview for effective patch management. The block helps prioritize risks by highlighting the most critical issues that require immediate attention, helping teams focus on high-severity vulnerabilities. You can also have a consolidated view across tools like Cloud Security Posture Management(CSPM), Cloud Security Posture Anomaly(CSPA), and Cloud Infrastructure Entitlement Management(CIEM), enabling a unified strategy for patching. Detailed insights linked to the Remediation ID streamlines decision making and helps administrators understand the full scope of a vulnerability, including affected rules, services, profiles, and regions. This facilitates better planning and resource allocation. By clicking on the Remediation ID link you can access additional details such as the affected rules, affected services, profiles, and regions associated to the selected patch. Alongside, the interface to create patching task appears that includes several steps to configure a remediation task, such as choosing a remediation template, selecting resources, scheduling the job, and reviewing the patch. The interface guides users through a structured process to apply patches systematically, ensuring clarity and minimizing errors. |
| Job Status | The completed patching tasks are displayed in the view showing the overall status of each patch, including details such as the owner, region, resource count, and severity distribution (high, medium, low) for the selected tool: CSPM, CIEM, or CSPA. The view presents information on the remediation task, including the remediation ID, resource ID, issue ID, region, template ID, and overall status. Additionally, you have the option to retrieve specific details by entering information into the search box. |
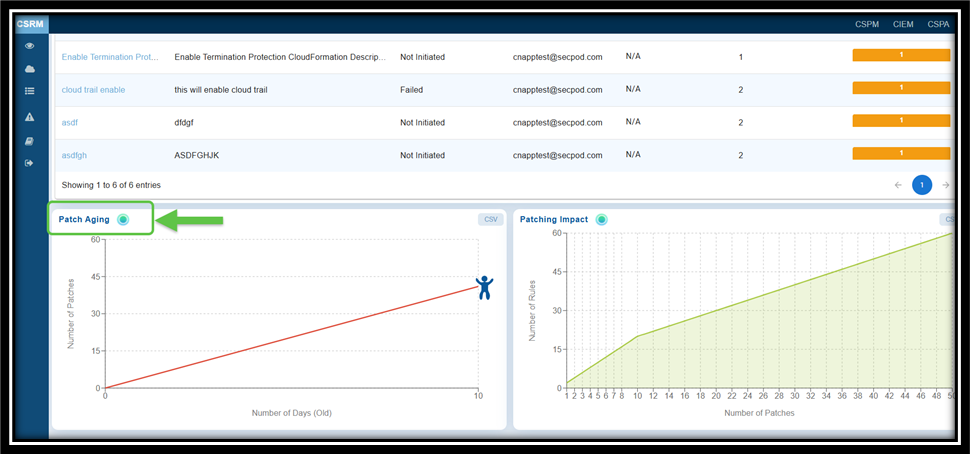
| Patch Aging | The “Patch Aging” chart visually represents the duration during which patches remain unapplied in an IT environment. It illustrates the relationship between the number of pending patches and the number of days they have been outstanding. This chart assists organizations in tracking and managing their patch deployment timelines. An upward trend indicates delays in patch deployment, which increases the organization’s exposure to vulnerabilities over an extended period. The creative visual employs characters or icons along the timeline to depict different stages of patch aging, including growth, decline, and subsequent resurgence. |
| Patching Impact | The chart helps you to prioritize patches that have the maximum impact, ensuring critical vulnerabilities are addressed first. The graph also illustrates the relationship between the number of patches applied and the reduction in the number of rules. X-Axis indicates the number of patches applied Y-axis indicates the number of rules affected The point that you highlight by moving your cursor indicates the impact of patching on reducing vulnerabilities or misconfigurations |
Learn How To
How to View the Compliance Severity Across Cloud Providers at Organization-level?

From the Organization-level Dashboard, you can view the distribution of patches across various cloud security tools(CIEM, CSPM, and CSPA) for different cloud providers(AWS, Azure, or GCP). The concentric chart format provides a clear visual representation, allowing focused investigation and quicker remediation decisions for AWS, Azure, and GCP environments.
Steps to View Patch Distribution:
Step 1: Navigate to the Organization-Level Dashboard.
Step 2: Go straight to the Patch Distribution view.
Step 3: Select the desired cloud provider from the options available:
- AWS
- Azure
- GCP
Step 4: Examine the concentric chart to understand how patches are distributed across the tools.
What You Can Analyze?
The Patch Distribution chart provides a consolidated view of patch counts across CIEM, CSPA, and CSPM, helping you quickly assess the patching status of your cloud environments. It enables you to identify environments that have not been scanned and areas where patches are either unavailable or not yet applied, allowing you to effectively prioritize patching activities based on vulnerability exposure and severity.
How to Quickly Access the Necessary Tool for Remediation and Begin Patching Tasks?
Choose the Tool and Remediate

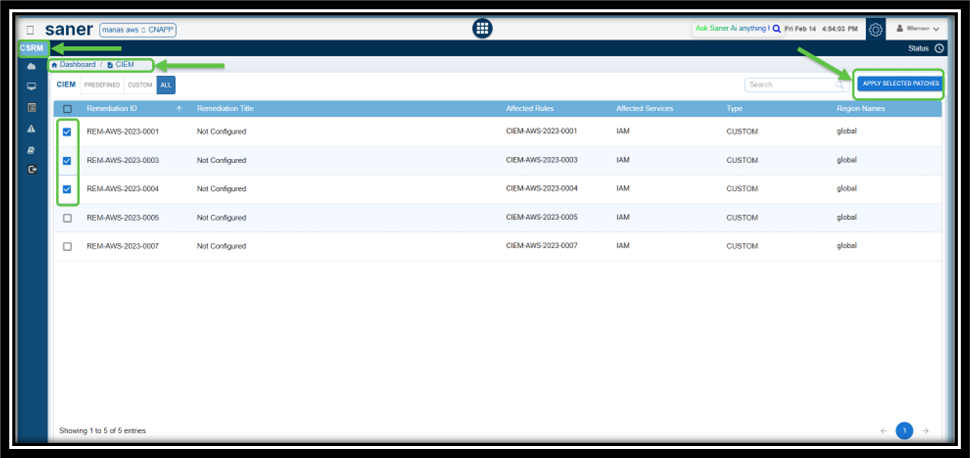
Select the relevant tool: CSPM, CIEM, or CSPA(displayed as links) from the top-right of the dashboard to access the section in CSRM for remediation.
For example, if you select CIEM, then the CIEM tabular listing opens for you to begin the patching activities.
How to Address Missing Patches Via Remediation Tasks?
Overview
Addressing missing patches by creating remediation tasks is crucial for maintaining the security and stability of IT infrastructure. Saner CSRM provides a wizard-based approach to creating a remediation task for the missing patches.
Pre-requisite to Initiate the Remediation Task
- Navigate directly to the Top 10 Missing Patches block in the CSRM dashboard.
- Choose the relevant tool: CSPM, CIEM, or CSPA to see the corresponding missing patches.
- Click the Remediation Id link to initiate the process of creating a remediation task.
The Create Patching Task window opens.
Step1: Select Resources
- From the list of Affected resources, choose the ones you want to remediate
- Use the checkbox to select or deselect resources as needed
- Click Next Step to proceed
Step2: Choose the Remediation Template to Apply
- Select the appropriate option to Review or configure the remediation settings for your patching task.
- Once satisfied with the configuration, click Next Step.
Step3: Schedule Job
- Enter the Task Name and Description in the required fields.
- Use the dropdown to select one of the Remediation schedule:
- Immediate – To apply the remediation immediately
- Select Date & Time – To schedule the remediation for a specific time
- After entering the schedule details, click Next Step.
Step4: Review and Consent
- Admin Users: Get to see the Consent checkbox and directly approve and execute the rollback task
- Regular Users: Consent checkbox appears in disabled mode. Users need to create the Rollback task and the system auto-routes the task to Admin for review and approval
- Carefully review the patching task settings and configurations.
- Provide your consent by selecting the checkbox that confirms settings have been reviewed and aligned with security and operational requirements.
- Click Create Task to finalize and submit the patching task.
Step5: Monitor Remediation Task
- Once created, the patch remediation task appears in the Remediation Status block on the CSRM (Cloud Security Remediation Management) dashboard.
- Use this section to observe the progress and status(such as Pending Approval, Not Initiated, In Progress, Success, Failed, or Completed) of your patch remediation task.
What do the different stages of patch remediation status mean?
— Pending Approval: The remediation job requires approval before execution. This stage ensures that all necessary stakeholders review the job and its impact before proceeding, reducing the risk of unintended consequences.
— Not Initiated: The remediation job is created but not yet started. This status indicates that prerequisites are not met, or the job is scheduled to start at a later time.
— In Progress: The remediation job is currently being executed. The system is actively applying fixes or patches to address the identified vulnerabilities or issues.
— Success: The remediation job has been completed successfully, and all targeted issues have been resolved as expected. No further action is required for this job.
— Failed: The remediation job did not complete due to errors or issues during execution. This status requires investigation to determine the root cause and potentially retry or escalate the job.
— Completed: status typically indicates that the remediation job has completed While “Completed” may overlap with “Success,” it could also include scenarios where the job ended with partial success or manual interventions.
What to do when you encounter an error message when creating a patching task?
You encounter the error message during patch task creation, typically when the target resources are invalid or inactive in the system, remediation template is not configured correctly, or schedule details are incorrectly specified.
As a precursory step, go ahead and revisit the previous steps:
- Select Resources: Ensure the target resources are valid and active in the system
- Rem Template: Verify the selected remediation template is configured correctly
- Schedule Job: Double-check if the scheduling details, such as time, are correctly filled and conflict-free
If the issue still persists, click “Contact Support” in the interface to directly notify SecPod’s support team. Provide them with:
- A detailed description of the steps leading to the error
- Affected resources and templates used
- Logs or screenshots, including this error screen
- Any specific error codes or IDs visible in the logs
How to View the Severity of a Missing Patch Affected by a Rule?
Overview
Viewing the severity of a missing patch affected by a rule is critical for effective vulnerability management and prioritization. By viewing the severity of missing patches in Saner CSRM, you can prioritize the application of critical patches that address significant vulnerabilities.
Step1: Access the Top 10 Missing Patches Grid
Navigate to the Top 10 Missing Patches block in Saner CSRM dashboard that displays the most critical patches yet to be applied.
Step2: Locate the Patch
In the search box, key in the Rule number(for example, 2023-0038) and press the enter key.
Step3: Review Severity and Affected Rules
In the results view, check the Severity column that indicates if the patch is of High, Medium, or Low severity.
You can also review the Affected Rules section, which lists the rules impacted by the missing patch.
Step4[Optional]: Analyze Additional Details
Apart from the severity, the detailed view also provides insight into:
Affected Services: services impacted by the missing patch
Regions: geographic locations that comprise of affected resources
Resource Count: number of resources affected by the rule
How do I Get to Know the Regions Impacted by a Specific Rule?
Understanding the regions affected by a specific rule offers insight into those areas and helps identify persistent vulnerabilities over time.
From Saner CSRM, you can trace the severity and regions impacted by the rule and take the appropriate corrective action.
Step1: Search by a Specific Rule
- Navigate to the Top 10 Missing Patches block on your dashboard
- In the Search Box, key in the Rule Number you want to locate
- The system filters and displays the patches relevant to the entered rule number
Step2: Examine the Results Displayed in the Block
Look for the patch details related to your rule. The grid view displays information that includes Remediation ID, Title, Affected Rules, Region, and Severity.
Step3: Locate the Regions where the Rule Applies
Click on the value within the Region column to see the regions for which the rule applies. To take further action, click on the Remediation ID link. This allows you to:
- View the detailed patch information
- Create a Remediation or Patch Task to address the missing patch for the rule
How to Monitor the Overall Status of the Remediation Job?
Overview
Monitoring the status of remediation jobs ensures that patches are applied as intended and that remediation tasks are completed successfully. Saner CSRM enables proactively tracking job statuses, such as ongoing, partial, successful, or failed, teams can quickly identify and resolve issues like failed deployments, misconfigurations in the patching process, connectivity problems, or other errors. Overall, this process enhances the organization’s security posture by prioritizing critical patches.
Options to View the Overall Status of the Remediation Job
You can choose to view the overall status of the remediation job using one of the options:
Option 1: From the “Top 10 Missing Patches” Block
Step1: Access the Additional Details Page
Navigate to the “Top 10 Missing Patches” block on the CSRM Dashboard.
Follow the Remediation ID link corresponding to any tool from the “Top 10 Missing Patches” block within the CSRM Dashboard page.
Step2: View the Overall Status
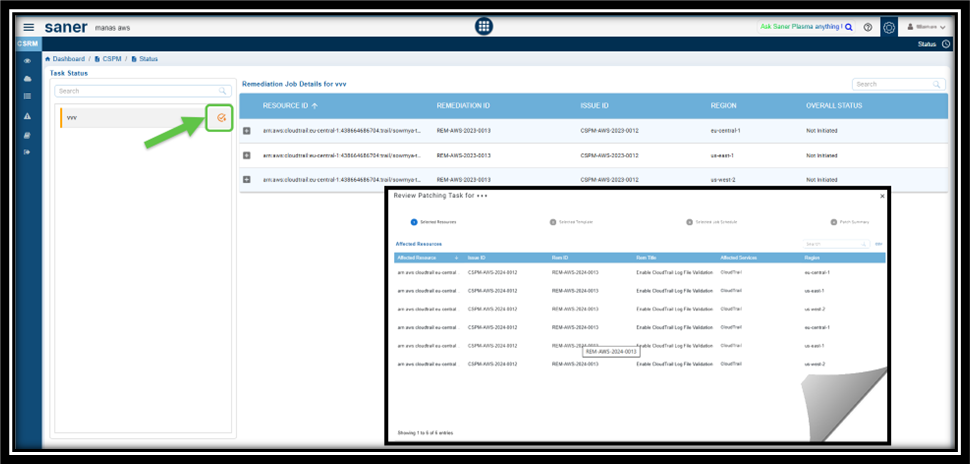
In the Additional Details page, click the Status link on the top-right of the page to view the overall status of the remediation job.
The remediation job details that display in the columns include:
— Resource ID
— Remediation ID
— Issue ID
— Region
— Overall Status
Step3: Drill-down for Details
Use the “+” symbol next to the entries to expand and view details such as:
Function Name: Describes the specific remediation function applied to the resource. For example, “cloudtrail-update_trail” function suggests that the remediation task involves updating the “CloudTrail” settings for the resource.
Status: Tracks progress of the current state the remediation job is in (e.g., Pending Approval, Not Initiated, In Progress, Success, Failed, Completed).
Reason: Explains the context of the current status of the job.
Option 2: From the “Remediation Status” Block
Look directly into the Overall Status column within the Remediation Status block to gain insight into the status of the remediation job across tools: CIEM, CSPM, CSPA.
How to Create a Patching Task for Items Currently in “Approval Pending” State?
You can create a patch task for items that are in the “Approval Pending” state.
Step 1: Identify the “Approval Pending” Tasks
- From the dashboard navigate to the Remediation Status block and see the tasks marked as Approval Pending from the Overall Status column.
- Click on the task(displayed as a link) under the Name column. The Remediation Job Details page opens for the relevant task.
Step 2: Review the Patching Task
- From the Task Status sidebar in Remediation Job Details page, click on the Approval Pending button
- Follow the wizard to review the patching task
- Approve the task
The patching task has been successfully approved for items in the “Approval Pending” state. Once approved, the task proceeds with the remediation process defined in the system.
How to Configure Automation Rule to Remediate Misconfigurations?
Overview
Saner Cloud offers built-in rules that assist in fixing misconfigurations promptly after they are detected. When the system is set up for automated remediation, the rule engine activates and manages the entire patch remediation process, from scanning to deployment, automatically.
The ability to schedule patches on a daily, weekly, or monthly basis eliminates the need for manual intervention, allowing for effortless completion of patch remediation tasks.
Additionally, you can modify the automation rules at any time, pause or resume them as needed, or remove the existing rule and create a new configuration from scratch.
Step1: Specify the Tool for Which You Want to Setup the Automation
From the top-right of Saner CSRM Dashboard page, choose the relevant tool such as, CSRM, CSPM, or CIEM, for which you want to configure the automation remediation.
For explanation purpose, CSPM is taken as an example.
Step2: Select the Remediation ID(s) that You Want to Create the Automation Task For
Click the Automation link on the top-right of the page.
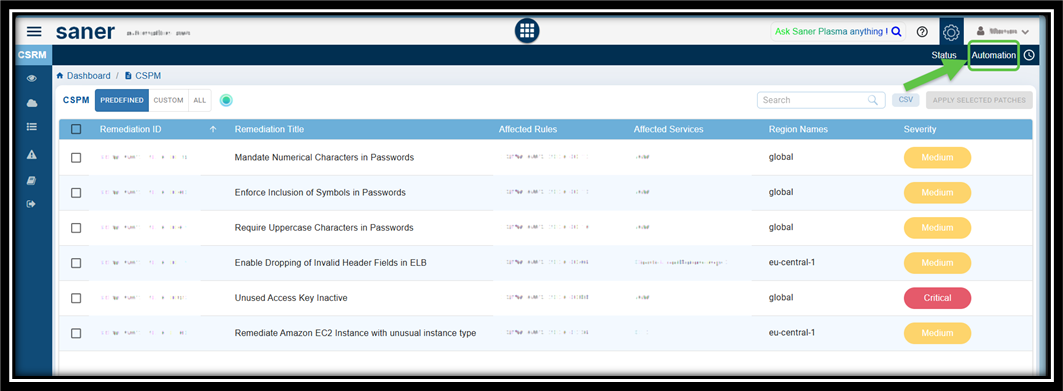
Select the Remediation ID from the CSPM Automation page and click the Create Automation Rule button. The Create Automation Task window opens.

Step3: Choose the Rem Template to Apply
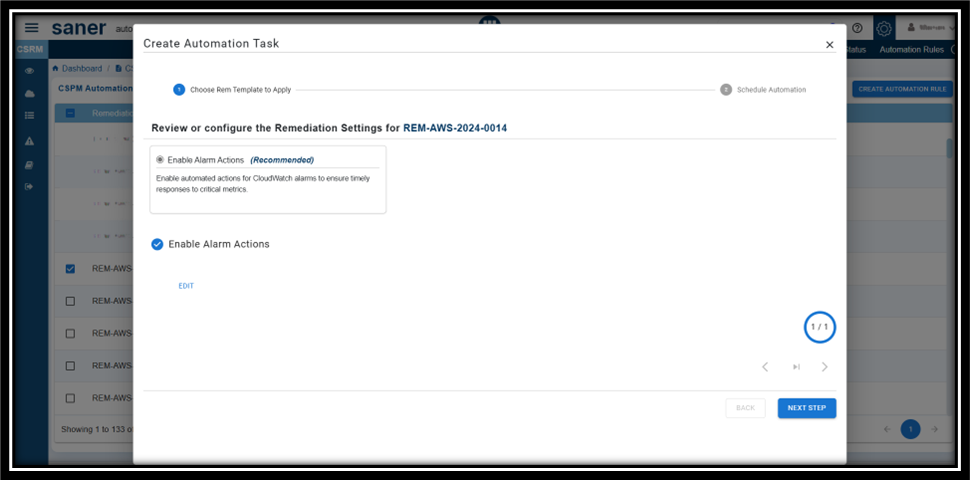
Within the Create Automation Task window, review the remediation settings for the id you selected. Make changes if any and proceed to the next step.
Step4: Provide the Name and Description to Your Automation Task
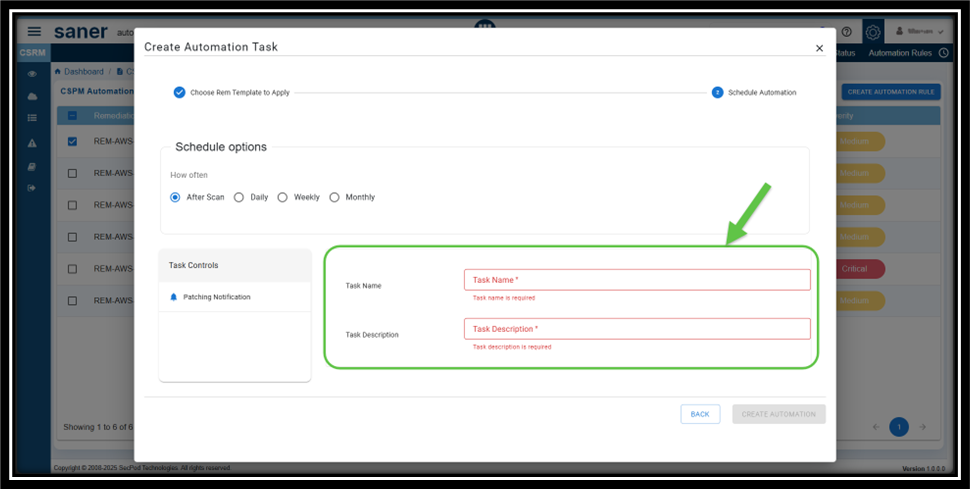
From the Create Automation Task window, click Next Step and proceed to provide the Name and Description for your automation task.
Step5: Setup the Schedule Options for Patching Process
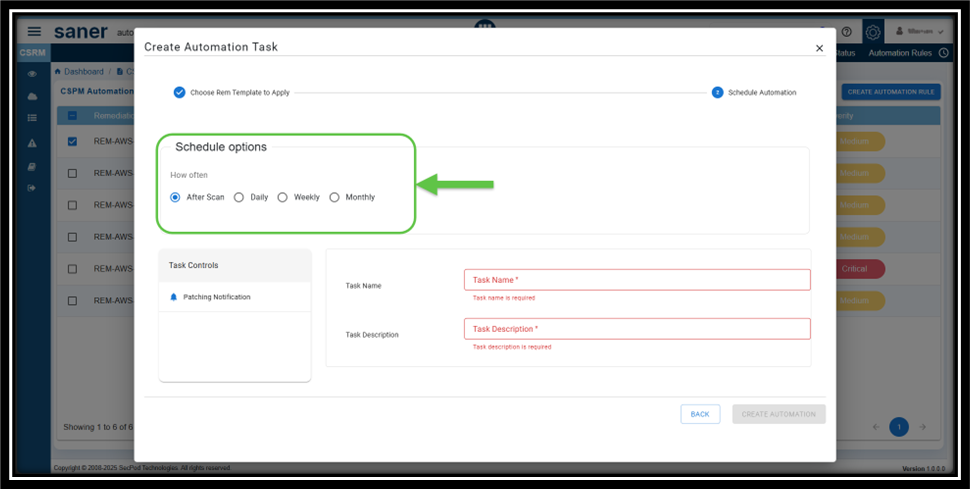
Setting up the automated patching, ensures that the remediation takes at scheduled intervals.
You can set up the scan to run on a daily or recurring basis and also alternate between weekly or monthly intervals.
Here’s a breakdown of how often the remediation takes place:
- After Scan: Determines that the remediation takes place after every scan
- Daily: The remediation takes place every day at the same time you specify
- Weekly: The sync runs for the specified week, day(s) at the same time
- Monthly: The sync takes place once a month, on the specified week(s), day(s), and time
Step6: Configure to Receive Alerts on Patching Progress
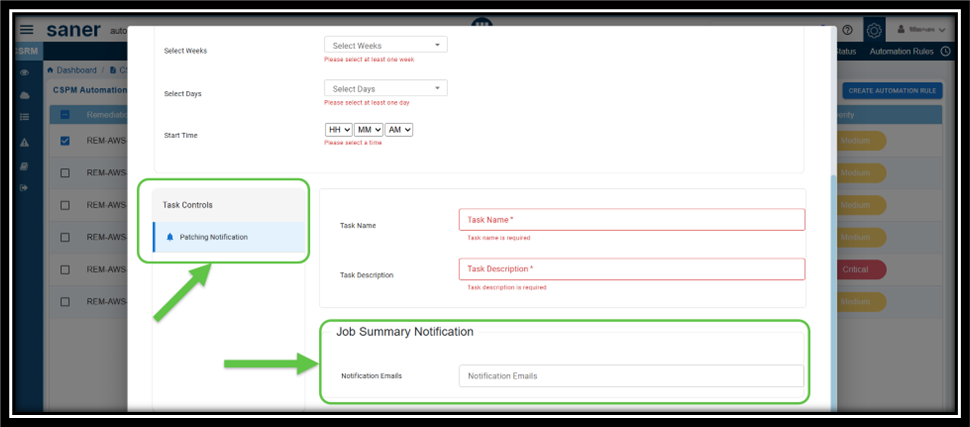
From the Task Controls panel, click the Patching Notification button. The Job Summary Notification panel gets enabled for you to provide the recipient email ids.
Step7: Complete Automation Configuration
After providing all the configuration details to setup the remediation automation, go ahead and click the Create Automation button.
How to Evaluate Remediation Effort with Patching Impact Chart?
The Chart plots the number of security rules fixed against the number of patches applied, offering a clear understanding on the effectiveness of remediation efforts.
You can also prioritize patches that have the maximum impact, ensuring critical anomalies are addressed first. The graph also illustrates the relationship between the number of patches applied and the reduction in the number of rules.
- X-Axis indicates the number of patches applied
- Y-axis indicates the number of rules affected. The point that you highlight by moving your cursor indicates the impact of patching on reducing vulnerabilities or misconfigurations.
How to Prioritize and Address Older and High-Risk Anomalies with Patch Aging?
Overview
A time-based line plot shows the correlation between the number of pending patches and their age in days, helping teams address older, high-risk vulnerabilities first.
Access the Patching Aging Chart
From the Saner CSRM dashboard, navigate straight to the Patching Aging block for further analysis.
What to Interpret from the Patching Aging Chart?
The “Patch Aging” chart visually represents the duration during which patches remain unapplied in an IT environment. It illustrates the relationship between the number of pending patches and the number of days they have been outstanding.
This chart assists organizations in tracking and managing their patch deployment timelines. An upward trend indicates delays in patch deployment, which increases the organization’s exposure to vulnerabilities over an extended period. The creative visual employs characters or icons along the timeline to depict different stages of patch aging, including growth, decline, and subsequent resurgence.
Commonly Asked Questions
What does the Product-wise patch count in CSRM represent?
The product-wise patch count displays the total number of missing patches across CSPM, CSPA, and CIEM identified during vulnerability scans.
How is the Product-wise patch count calculated?
After the completion of every scan, the number of missing patches are identified for each product and categorized based on severity(High, Medium, and Low).
How often is the patch count updated?
Patch count is updated after every vulnerability scan or remediation job providing real-time visibility of missing patches.
Can I view details about specific missing patches?
Yes, clicking on a specific patch in the dashboard (e.g., through its Remediation ID link) provides detailed information, including the affected rules, services, profiles, and regions.
How can I view the remediation status for specific resources or services?
The “Overall Status” column within the “Remediation Status” dashboard block provides information on the progress of the remediation job for the resources or services within a specific product.
How can I automate Patch Remediation?
Saner Cloud offers built-in rules that assist in fixing misconfigurations promptly after they are detected. When the system is set up for automated remediation, the rule engine activates and manages the entire patch remediation process—from scanning to deployment—automatically.
How to identify the remediation count across different regions or states product-wise?
From the “Geographical Map” view on the dashboard identify the remediation count across the different states or regions. You can choose the relevant tool: CSPM or CSPA and view the corresponding details in the map.
How do I initiate the patch remediation workflow?
You can address the missing patches by creating remediation tasks and Saner CSPM provides a wizard-based approach to creating a remediation task for the missing patches.
Click here for more details on how to address missing patches via remediation tasks.
How is the severity of missing patches determined?
Severity is classified as High, Medium, or Low based on the vulnerability or risk addressed by the patch.
How can I access additional details about a specific missing patch?
Clicking on the Remediation ID link in the grid view provides expanded details, including:
— The regions where the patch needs to be applied
— The affected rules and their descriptions
— The services and profiles impacted
What actions can I take directly from the “Top 10 Missing Patches” section?
From the “Top 10 Missing Patches” section, you can:
— Review the detailed patch information
— Initiate patch remediation workflows
— Track the status of remediation jobs for each patch
What can I infer from the “Remediation Status” dashboard block?
The “Remediation Status” block provides a visual summary of the progress and outcomes of all ongoing and completed remediation jobs. It helps track the effectiveness and status of patching and configuration updates across your environment.
How can I view detailed information about a specific remediation job?
By clicking on the specific Remediation Id from the “Top 10 Missing Patches” dashboard view, you can access details such as:
— Remediation ID: Unique identifier of the job
— Remediation Services: The services targeted by the job
From the Remediation Status dashboard view, get an overall status of the patch remediation job details. Just click the link corresponding to a remediation name and access details associated to the specific remediation job such as:
Reasons for failure:
— Issue ID
— Resource ID
— Overall Status such as: Not Initiated, Ongoing, Success, Failed, etc.
— Function Name
— Status of the specific job
What should I do if a remediation job fails?
If a remediation job fails:
- Open the job details by clicking on the Remediation ID link.
- Review the reason for failure.
- Make necessary adjustments, such as reconfiguring the job or addressing environmental issues.
What insights can I gain from the Patch Aging View?
The Patch Aging View helps:
— Understand how many patches have been outstanding the longest
— Identify trends in how quickly your organization remediates vulnerabilities
What are the common patch aging categories displayed?
The Patch Aging View helps:
— # of days for Recently identified patches
— # of days for Patches that are not yet applied and might require immediate attention
— # of days for Older patches which are not yet applied and may expose resources to higher risks
— # of days(upto 30 days), Critical patches that have been neglected for an extended period, posing significant security threats
What insights can I gain from the Patching Impact Chart?
“Patching Impact” chart illustrates the relationship between the number of patches applied and the corresponding reduction in the number of rules or vulnerabilities. The y-axis represents the “Number of Rules,” while the x-axis tracks the “Number of Patches.”
The downward trend indicates that as more patches are applied, the number of affected rules decreases. This emphasizes the importance of patching in mitigating vulnerabilities.
How does Aged patches impact security posture of your cloud infrastructure?
Any delay in patch deployment increases the organization’s exposure to vulnerabilities over an extended period and results in making your cloud infrastructure an easy target for attackers.
What are the different stages of remediation status and what do each signify?
— Pending Approval: The remediation job requires approval before execution. This stage ensures that all necessary stakeholders review the job and its impact before proceeding, reducing the risk of unintended consequences.
— Not Initiated: The remediation job is created but not yet started. This status indicates that prerequisites are not met, or the job is scheduled to start at a later time.
— In Progress: The remediation job is currently being executed. The system is actively applying fixes or patches to address the identified vulnerabilities or issues.
— Success: The remediation job has been completed successfully, and all targeted issues have been resolved as expected. No further action is required for this job.
— Failed: The remediation job did not complete due to errors or issues during execution. This status requires investigation to determine the root cause and potentially retry or escalate the job.
— Completed: status typically indicates that the remediation job has completed While “Completed” may overlap with “Success,” it could also include scenarios where the job ended with partial success or manual interventions.
Which patches should I apply first to cover and fix maximum misconfiguration?
By prioritizing remediation patches that have the maximum impact, you can make sure to address the maximum number of vulnerabilities or misconfigurations.
Why doesn’t the CIEM resource display on “Geographical Map”?
The geographical map is created to show resources based on their distribution in specific regions. However, global resources do not have a designated location, so they cannot be mapped geographically. CIEM includes global resources, and since these are not linked to any particular region, they do not appear on the geographical map.
Where can I see the detailed status of each remediation task by resource ID?
You can view the details of the Remediation Job by clicking the Status link located at the top-right corner of the Details page for the selected Remediation ID and tool.
Related Topics

