The Saner Network Scanner helps you identify vulnerabilities and misconfigurations across all IP-enabled devices in your environment without requiring additional hardware. It uses existing endpoints within your network as distributed scanners to perform agentless assessments.
The scanner features enables you to specify what to scan (including vulnerabilities, misconfigurations, services, and exposures), how to scan (covering ports, protocol depth, and authentication methods), and when to scan (either on-demand or through scheduled tasks). It supports both unauthenticated and authenticated scanning, allowing for lightweight discovery as well as more in-depth inspections using protocol-based credentials like SSH, SMB, and HTTP/HTTPS.
Scan execution is managed through designated network scanners that can be reused for multiple tasks. These scanners can also be configured as Global Scanners, enabling sharing across various accounts or organizations. This ensures consistent coverage, even in environments without dedicated scanning infrastructure.
Results are collected, normalized, and analysed to provide actionable insights into vulnerabilities, misconfigurations, assets, and your overall security posture.
Key Concepts
Understanding the following core components helps you effectively configure and manage network scanning.
Network Scanner
A network scanner is a designated endpoint that performs scanning operations across your network.
- Scanners execute scan tasks against defined targets (IP addresses or ranges)
- Any eligible device in your environment can be designated as a scanner
- Scanners can be reused across multiple scan tasks
Global Scanner
A Global Scanner is a network scanner that can be shared across multiple accounts or an entire organization.
- Enables centralized scanner usage across environments
- Useful when certain accounts or sites do not have dedicated scanners
- Helps ensure consistent scan coverage without duplicating setup
Scan Policy
A scan policy defines what to scan and how the scan is performed.
- Controls vulnerability detection, misconfiguration checks, and discovery
- Defines scan parameters such as ports, protocols, depth, and authentication
- Can be reused across multiple scan tasks
Saner provides:
- Default policies for common use cases
- Custom policies for environment-specific requirements
Scan Credentials
Scan credentials are used to perform authenticated scans for deeper visibility.
- Enable access to systems for accurate detection of vulnerabilities and configurations
- Managed centrally and reused across tasks
Supported credential types include:
- SSH (Linux/Unix systems)
- SMB (Windows systems)
- HTTP/HTTPS
Scan Task
A scan task is a configured job that defines what to scan, how to scan, and when to scan.
Each task includes:
- Target devices (IP addresses or ranges)
- Scan policy
- Assigned scanners
- Optional credentials
- Execution schedule
Multi-Scanner Execution
Network Scanner supports assigning multiple scanners to a single scan task.
- Workload is distributed automatically across scanners
- Improves scan performance and reduces execution time
- Enables efficient scanning of large environments
Prerequisites
Ensure the following requirements are met before using Network Scanner.
Service provision
To access Network Scanner, at least one of the following services must be provisioned for your account:
- Vulnerability Management
- Compliance Management
- Asset Exposure
Supported platforms for scanners:
- Windows (64-bit)
- Linux (64-bit)
- macOS (Intel-based)
Not supported as scanners:
- Windows (32-bit)
- Linux (32-bit and ARM-based distributions)
- Alpine Linux
- macOS (ARM-based)
- AIX
Additional requirements:
- Device must be online and reachable
- Must have network access to target IP ranges
Get Familiar with the Interface Layout
The Network Scanner page is structured with the following key menus to streamline the configuration and management of scanning operations:
Provides an overview of scan tasks, scanner status, and recent activity, along with quick actions.
Add and manage network scanners, designate devices as global scanners for use across multiple organizations, sites, or accounts.
Manage authentication credentials (SSH, SMB, HTTP/HTTPS) used for authenticated scanning.
Create and manage scan policies that define what to scan and how scans get executed.
View detailed records of scan activities for auditing and troubleshooting.
Start a new scan task using a guided multi-step process.
Scan Tasks Overview on the Homepage
All the configured scan tasks are displayed in a table, where you can run a scan to start it immediately, download available scan results, use the More Options (…) menu to edit or delete a task, and view the progress bar to track the status of scan execution.
Set Up Scanners
Network scanners are designated devices that execute scan tasks across your network.
(Optional) Use Recommended Devices
You can filter and select devices recommended by Saner for better scan performance.
The Show only recommended devices is enabled by default. This allow Saner’s recommendation engine to display the suggested devices that you can designate as Network Scanners.
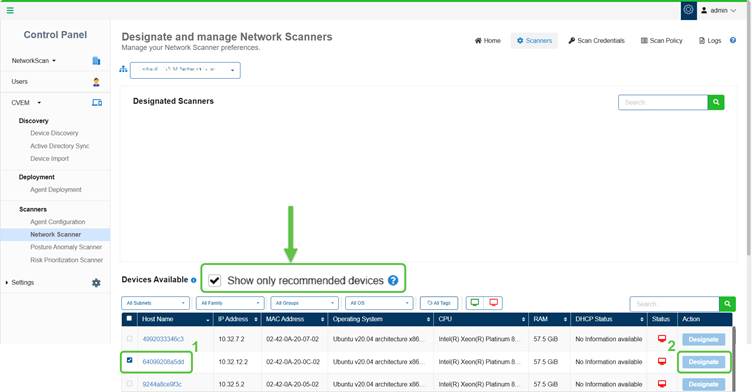
Select a Device and Click Designate
Step1: In the Devices Available section, select one or more devices that you want to designate as a network scanner by clicking the checkbox.
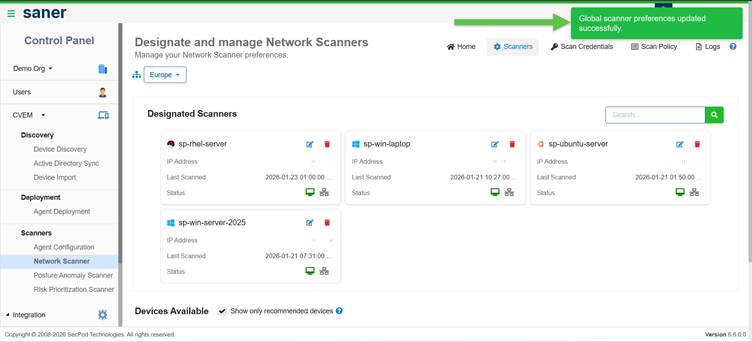
Step2: Click Designate under the Action column. The selected device moves to the Designated Scanners section displaying a success message.
Configure Global Scanners
You can designate scanners as Global Scanners to make them available across multiple accounts or an entire organization.
To configure a Global Scanner:
- Go to Network Scanner → Scanners
- In the Designated Scanners section, click the Edit Configuration icon
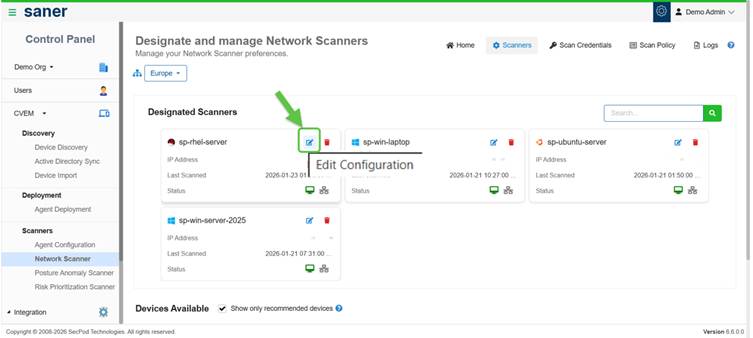
- Enable Global Scanner by selecting:
- A specific account or
- An entire organization

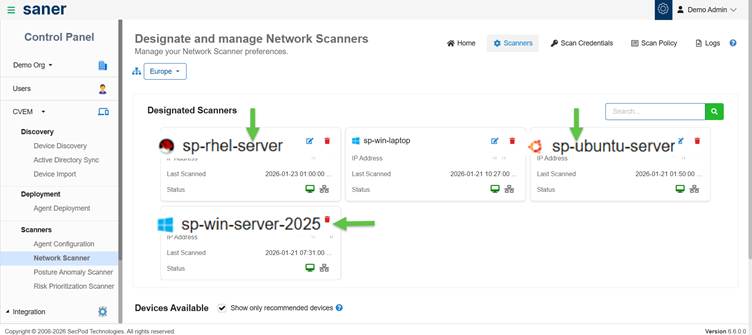
Once configured:
- The scanner becomes available across selected scopes
- Accounts without dedicated scanners can reuse these scanners
Key Considerations
- Ensure scanners are online and reachable
- Verify scanners have network access to target devices
- Use Global Scanners to centralize scanning across environments
Configure Scan Credentials
Scan credentials enable authenticated scanning, allowing deeper visibility into systems and more accurate detection of vulnerabilities and misconfigurations.
When to Use Credentials?
Use credentials when:
- You need deeper inspection beyond network-level scanning
- Scan policies include authenticated checks
- Target systems require authentication for access
Supported Credential Types
- SSH – for Linux/Unix systems
- SMB – for Windows systems
- HTTP/HTTPS – for web-based authentication
Note: Authenticated scans provide more accurate detection of vulnerabilities and misconfigurations.
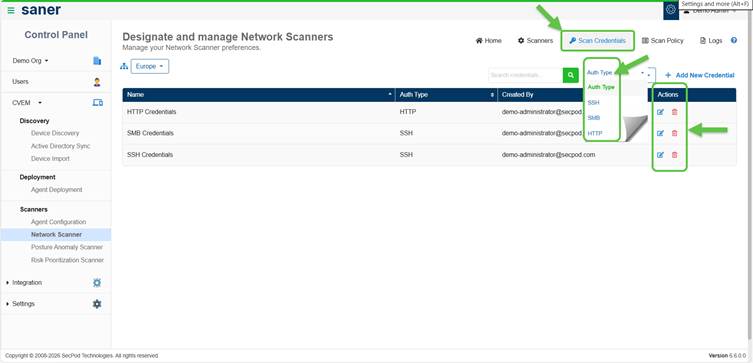
Add a Scan Credential
- Navigate to Network Scanner → Scan Credentials
- Click Add New Credential

- Provide the following details:
- Credential Name
- Credential Type (SSH / SMB / HTTP/HTTPS)
- Authentication details based on type:
- Username and password
- Private key and passphrase (for SSH, if applicable)
- Click Save Credential
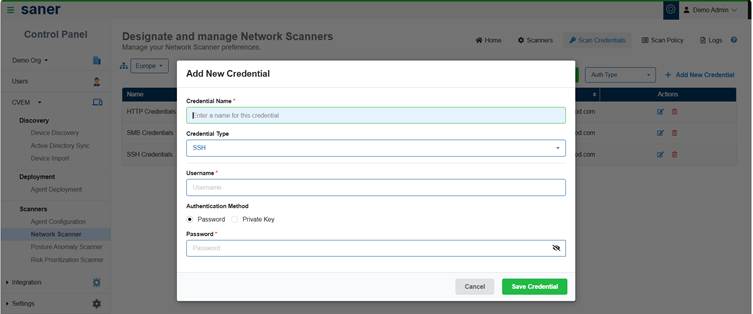
The credential is now available for use in scan tasks.

Manage Credentials
From the Scan Credentials page, you can:
- Search for existing credentials
- Edit credential details
- Delete credentials that are no longer required
Key Considerations
- Credentials are required only if the selected scan policy includes authenticated checks
- Ensure credentials have sufficient permissions for accurate scan results
- Use authenticated scanning to improve detection accuracy
Define and Manage Scan Policies
Scan policies define what to scan. They act as reusable templates for configuring network scan tasks.
Use Default or Create Custom Policy
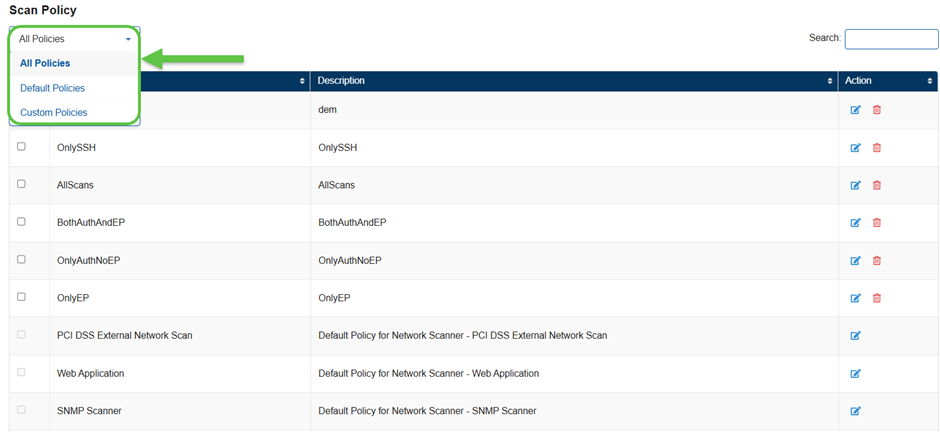
Use Default Policies
Saner provides built-in Default Policies for common scanning scenarios.
- Ready to use out of the box
- Can be customized by enabling or disabling checks
Create a Custom Scan Policy
When should you create a custom policy?
Create a custom policy whenever you need to modify or tailor the scripts within specific family categories to meet your requirements.
How to Create a Custom Policy?
- Navigate to Network Scanner → Scan Policy
- Click New Policy.
The Script Selection page displays.
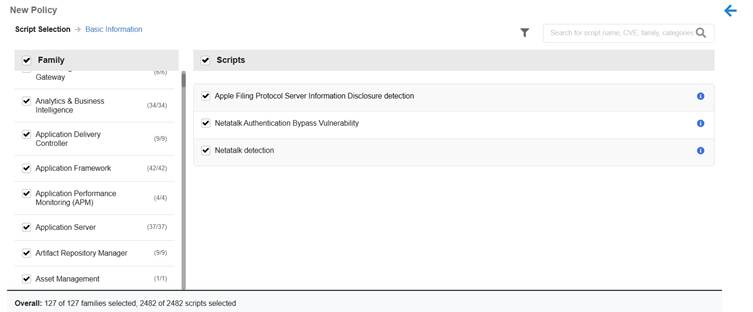
How is the Script Selection Page Organized?
The page is divided into two panels for efficient policy configuration.
- Left Panel (Family Column):
- Displays a list of script families
- Includes checkboxes to control inclusion in the policy
- All families are selected by default
- Right Panel (Scripts View):
- Dynamically shows scripts related to the selected family
- Enables detailed review and refinement of script selections.
Key Benefits:
- Simplifies selection of relevant technology families
- Allows choosing specific scripts for detection, monitoring, or enforcement
- Supports customization of scan policies based on infrastructure and security requirements
- Review the scripts from the list and customize accordingly. Click on the Next button.
The Policy Basic Information page displays.
- Provide the Policy Information:
- Name
- Description
- Click Create Policy
The policy is now available for use in scan tasks.
Customize an Existing Policy
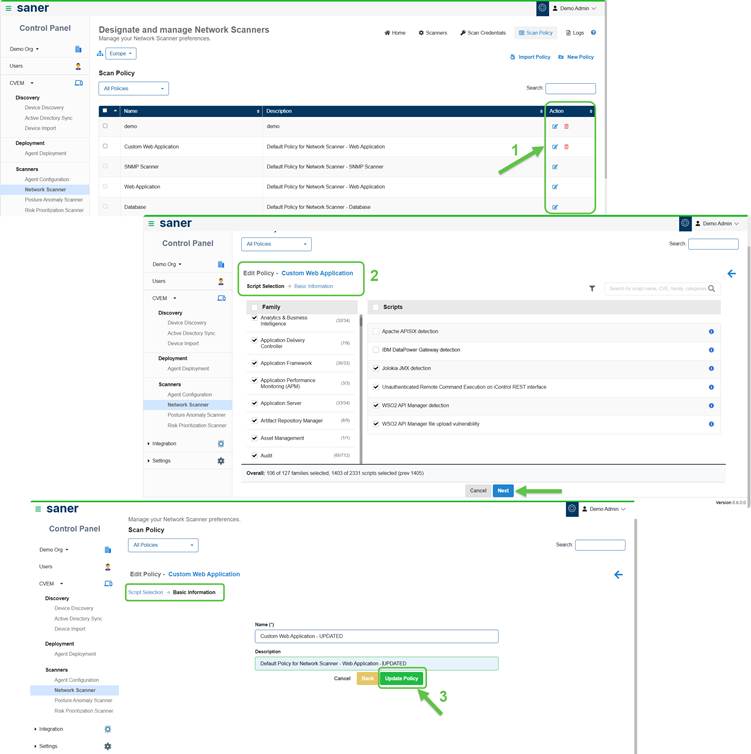
You can modify policies based on your needs:
- Enable or disable specific checks
- Update policy name or description
Note: Default policies cannot be deleted; however you have an option to create a new custom policy from the default policy.
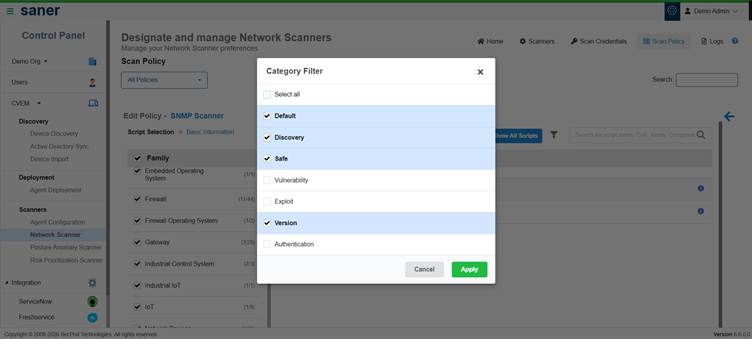
How to Use the Category Filter for Policies?
- Use the Category Filter to refine scripts based on scanning requirements
- Scripts organized into categories allows easy selection
- Select one or more categories and click Apply
- Review the scripts displayed for the selected categories
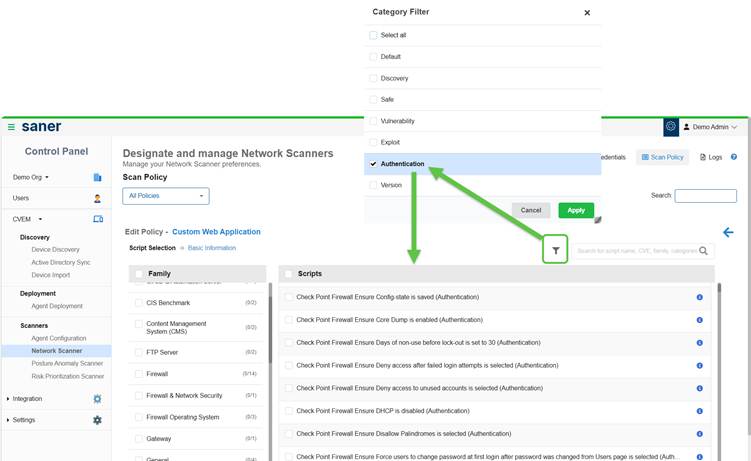
- Exclude(clear the checkbox) unwanted scripts and click Apply to update the policy configuration
Note that on selecting the Authentication option from the Category filter, all the scripts that support authentication display on the screen.
View Additional Contextual Details
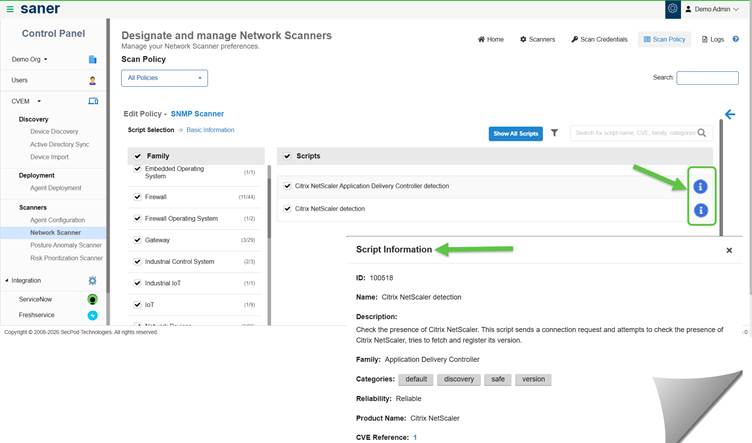
For Script Details and Guidance:
- Click the Info button on the Edit Policy scripts page. This opens a detailed view.
- Access relevant explanations and guidance for the selected feature or action
- Understand functionality without navigating away from the current screen
- Improve decision-making while configuring scripts
Import a Policy
You can reuse policies across environments by importing them from other accounts or organizations.
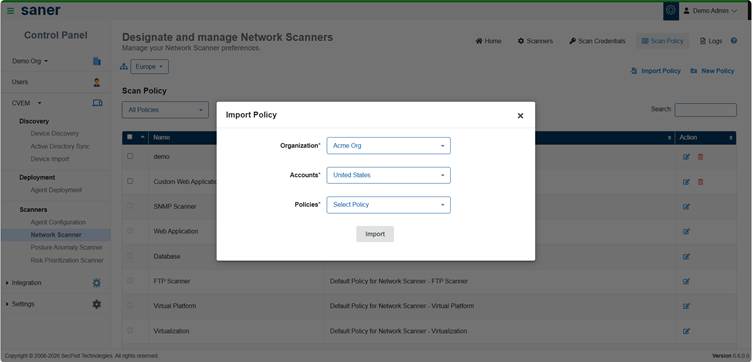
- Click Import Policy from the Scan policy page
- Select organization, account, and policy
- Click Import
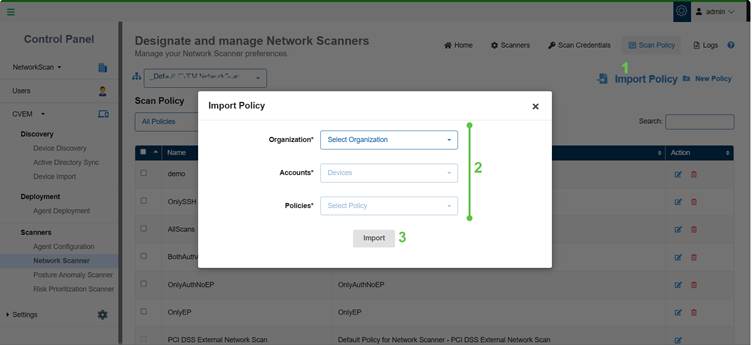
Note: If the policy does not exist within the organization from which you choose, then an error message displays.
Create a Scan Task
A scan task defines what to scan, how to scan, and when to scan. It combines scanners, policies, targets, and scheduling into a single execution workflow.
Before You Begin
Make sure that:
- At least one scanner is configured
- A scan policy is available
Create a Scan Task
Navigate to Network Scanner Homepage → Create New Task
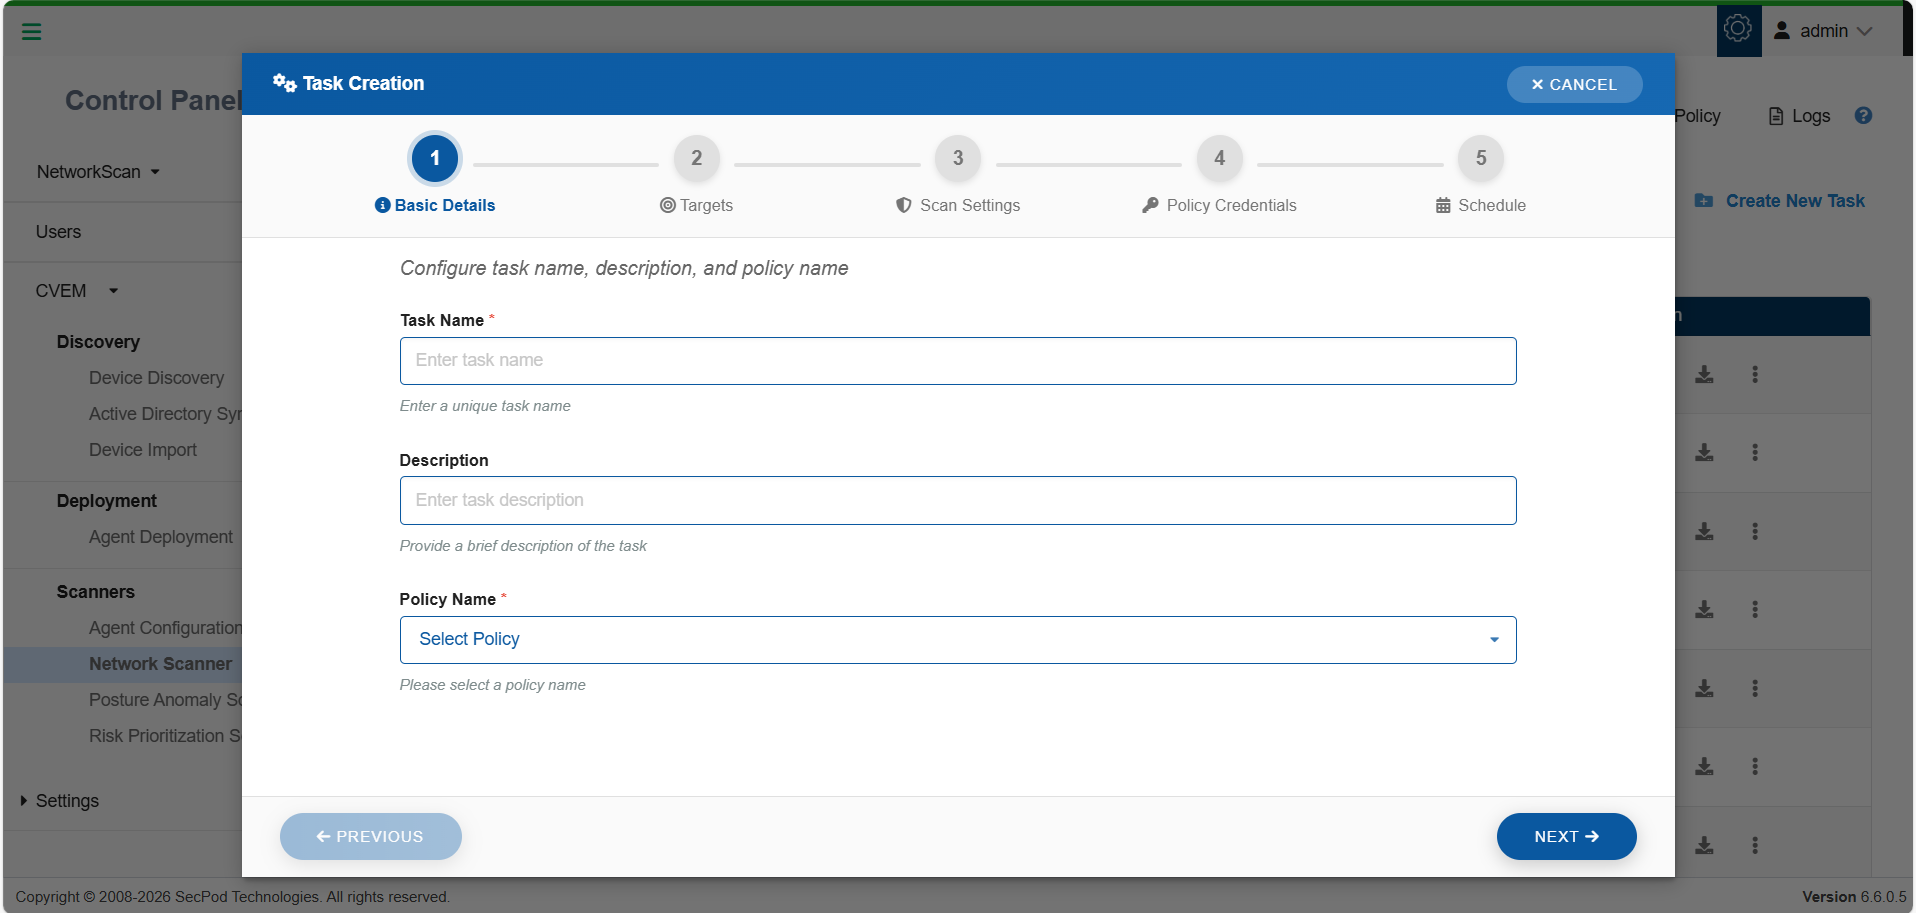
Step 1: Basic Details

- Enter a Task Name and Description
- Select a Scan Policy
Make sure that you provide a name of minimum 4 characters, else the system restricts you from proceeding to the next step and displays a message.
Step 2: Define Targets
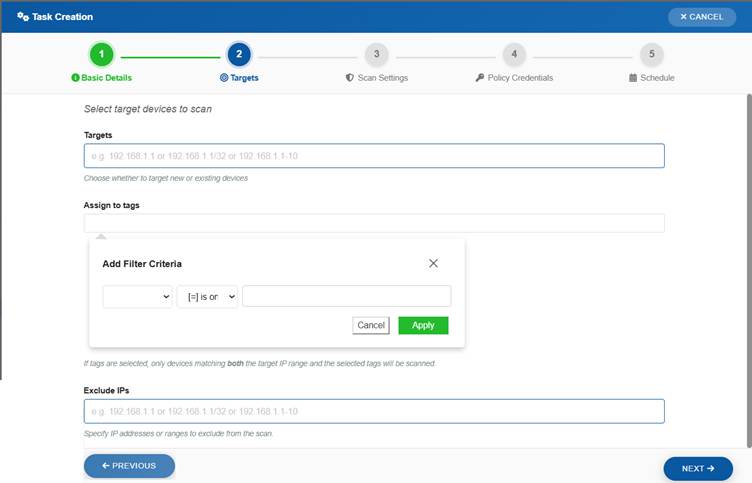
Specify the devices to scan:
- Enter IP addresses or ranges (CIDR or range format or Tags criteria)
- Example: 192.168.1.1, 192.168.1.1/32, 192.168.1.1–192.168.1.10
- Optionally exclude specific IPs
- Optionally assign Tags to filter target devices so that only devices matching both the IP range and selected tags are scanned
Step 3: Configure Scan Settings
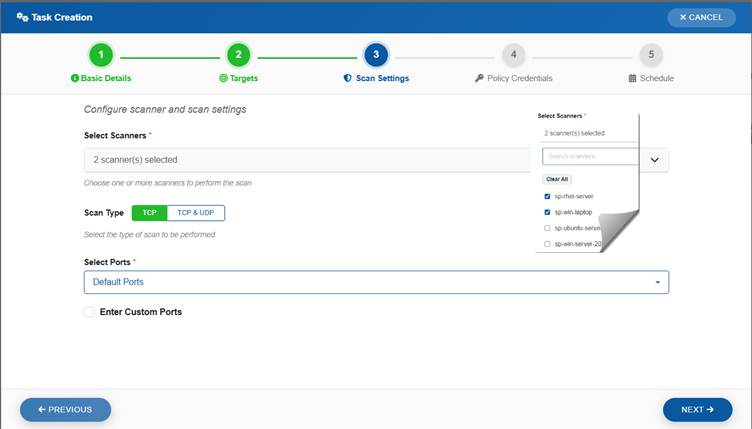
- Select one or more Scanners.
Note that Multi-scanner support is available only when the Saner agent version is 6.6 or later. - Choose scan type:
- TCP
- TCP & UDP
Note that the Scan time might slightly increase for UDP Scan.
- Select ports:
Note that clicking the guidance icon displays all the ports to be scanned within each category(Default, Top 1000, Top 500, Top 100).- Default or predefined sets
- Custom ports (optional)
If you want to specify your own set of custom ports, select the checkbox Enter Custom Ports and specify the TCP and UDP ports that you want scanned by the Network Scanner.
Multi-Scanner Execution
You can assign multiple scanners to a single scan task:
- Workload distributes automatically
- Reduces scan time
- Improves performance for large environments
[Optional]Configure Web Application Paths
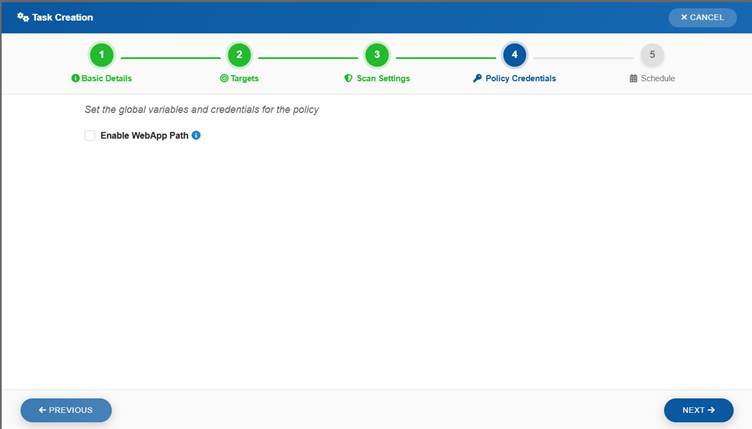
- Specify absolute paths to web applications using the WebApp Path field
- This step is optional and can be skipped if no web applications exist
- Enable the WebApp Path option by selecting the checkbox
- Use available predefined paths for common endpoints (if listed)
- Add custom paths by entering the absolute path in Add Custom WebApp Path
- Click Add to include the custom path in the configuration
Step 4: Assign Credentials (Optional)
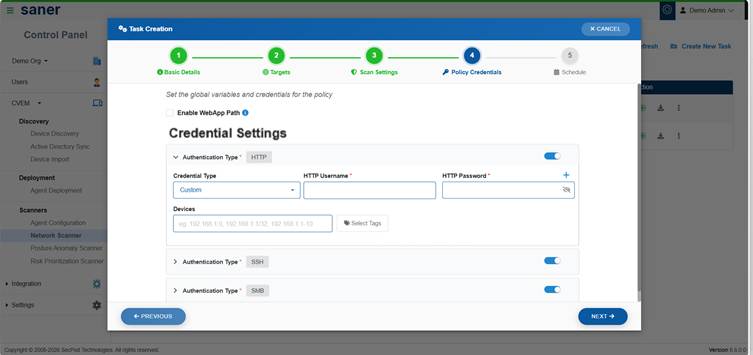
- Select credentials for authenticated scanning
- You have an option to either create new credentials or use the existing credentials
Step 5: Schedule Execution
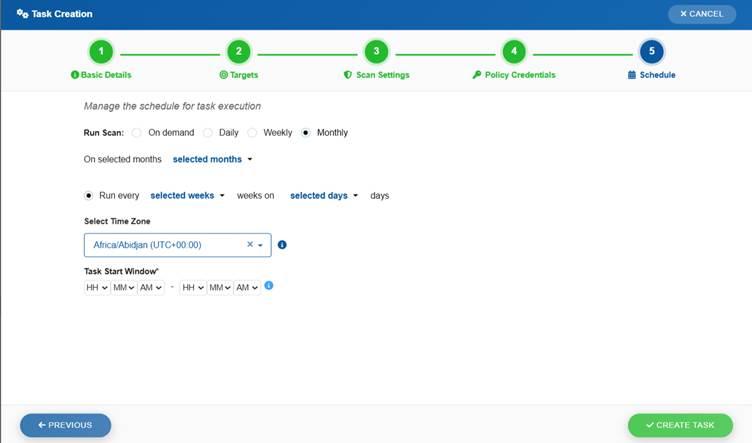
Choose how the scan must run:
- On-demand (manual execution)
- Scheduled execution:
- Daily
- Weekly
- Monthly
You can also configure:
- Timezone: setting ensures that the scan runs at the correct local time
- Task Start Window:lets you define the acceptable start and end times using drop-down options
This guarantees that the task only begins within the specified execution window.
Complete the Scan task creation process by clicking the Create Task button. All the configured network scan tasks display in the table within the Designate and Manage Network Scanners page.
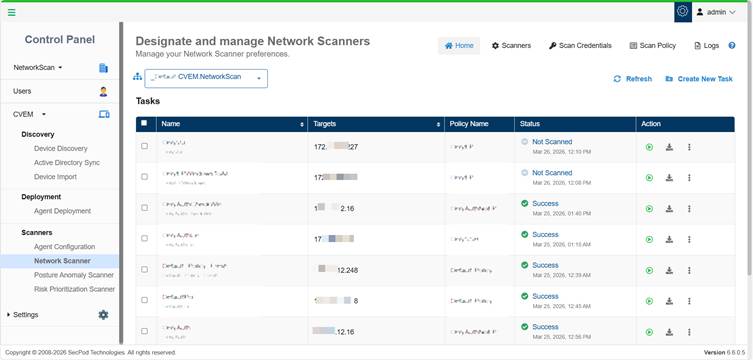
View Created Scan Tasks
All the configured scan tasks are displayed in the Designate and Manage Network Scanners page. Each task displays:
- Task name
- Associated policy
- Target scope
- Scanner status
- Execution status

Take a Look at the Key Scan Task Actions
After creating a scan task, you can monitor its execution, track progress, and manage task operations.
From the task list, you can:
- Run Scan – start execution
- Stop Scan – abort a running task
- Edit Task – update configuration
- Delete Task – remove the task
- Download Results – view the downloaded PDF report or export scan report
Run a Scan
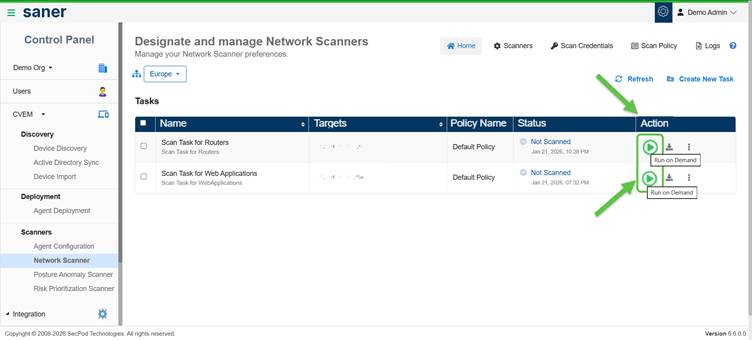
- Click Run on Demand scan to start execution immediately
- The task status changes to Ongoing
View Scan Results
Network scan results provide visibility into vulnerabilities, misconfigurations, assets, and network exposure across scanned devices.
Results are automatically stored and made available across different views in the platform.
Where to View Results?
You can access scan results from the following sections:
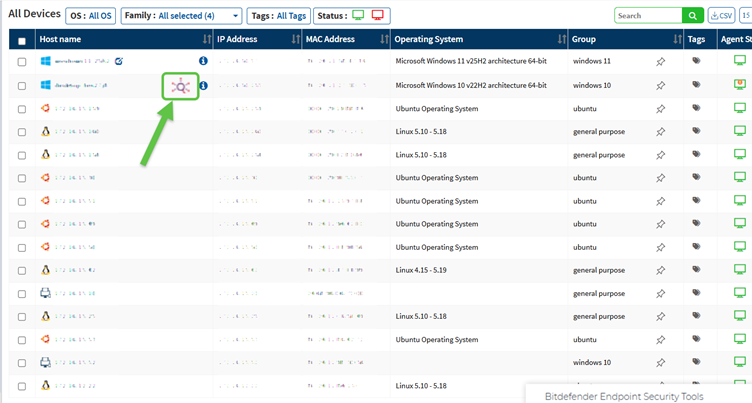
Device Details
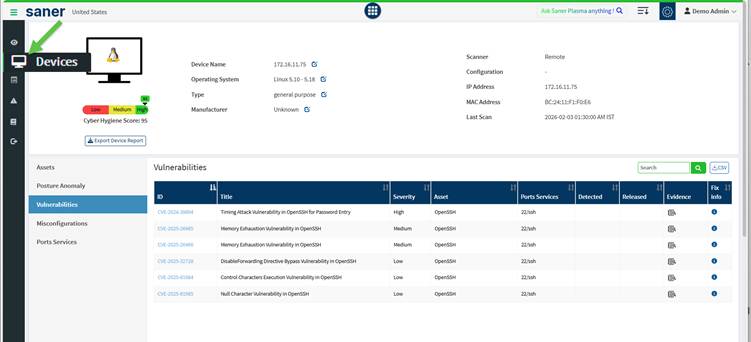
Navigate to Devices → Device Details to view detailed information for each scanned device.
You can see:
- Cyber Hygiene Score (CHS)
- Assets
- Posture Anomaly
- Vulnerabilities
- Misconfigurations
- Ports Services
This view provides a complete view of the network scanned devices.
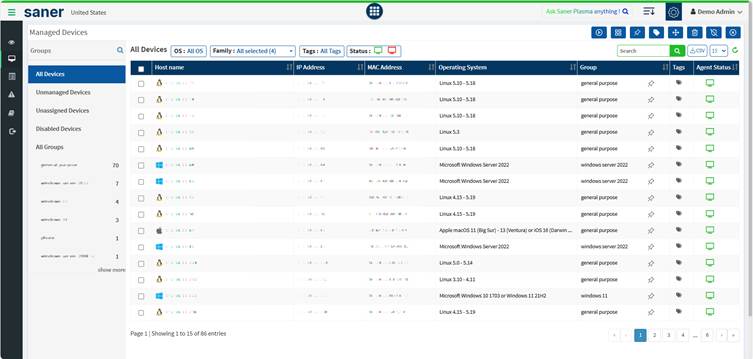
For devices managed by the Network Scanner, the icon displays next to the device name in the Host name column. This icon signifies that its a network device without a Saner Agent installed.
Vulnerability Management
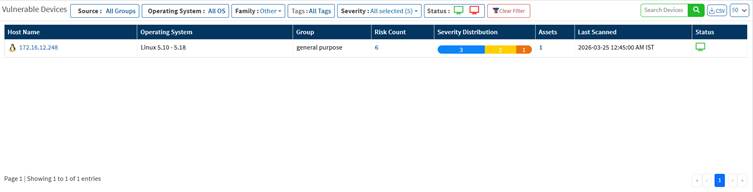
Navigate to the Vulnerability Management dashboard to:
- View vulnerable devices
- Analyze severity distribution (Critical, High, Medium, Low)
- Identify high-risk assets
- Track overall risk posture
Compliance Management
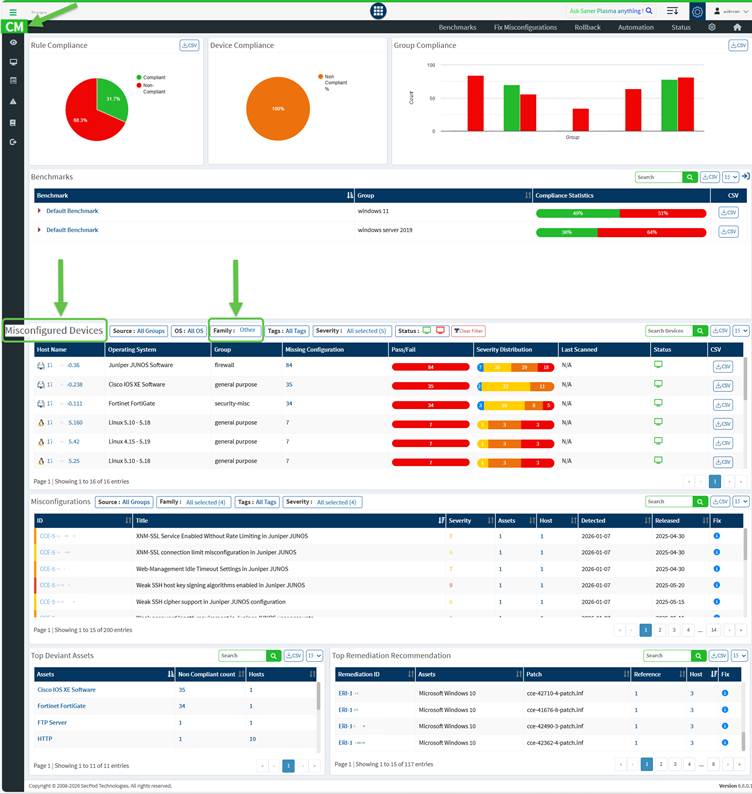
Navigate to the Compliance Management dashboard to:
- View misconfigured devices
- Analyze configuration issues
- Track compliance posture
Asset and Exposure Insights

Network Scanner also contributes to asset visibility by identifying:
- Installed software and services
- Open ports and exposed services
Key Indicators
From scan results, you can quickly assess:
- Overall risk level of devices
- Critical vulnerabilities requiring immediate attention
- Misconfigurations impacting compliance
- Network exposure through open ports and services
Monitor Scan Progress and Access Task Status Details
Once you Complete the Scan run for the task you created, get an understanding of what the different statuses mean and access the detailed status information of the scanner task.
Track Task Status
Each scan task displays a status indicating its execution state:
| Status | Description |
|---|---|
| Not Scanned | Task has not been executed |
| Ongoing | Scan is in progress |
| Success | Scan completed successfully |
| Failed | Scan execution failed |
| Aborted | Scan was stopped manually |
View Detailed Scan Status
Click on the task status to view detailed execution information.
You can monitor:
- Scanner availability (online/offline)
- Targets scanned vs pending
- Scan progress and duration
- Script execution and result upload status
View Scanner-Level Details
From the detailed status view, you can:
- Expand individual scanners
- View scan duration and progress
- Check targets processed by each scanner
- Monitor last and next execution details
Refresh Scan Status
Use the refresh option to view the latest scan progress and results.
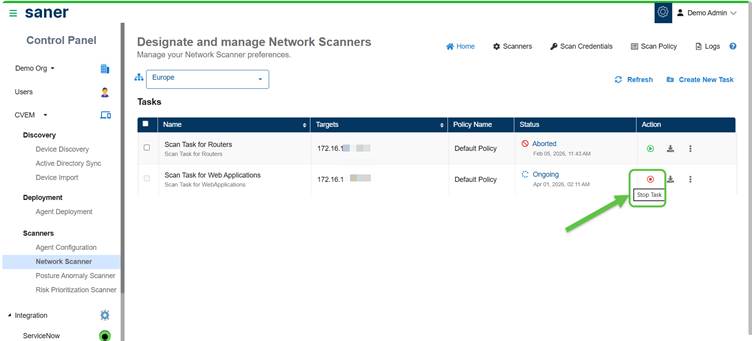
Abort and Restart a Scanner Task
Stop an ongoing scanner task by clicking the Stop Task button under the Actions column. The status of the task then changes to Aborted. If you want to restart the task, then just click the Run on Demand (arrow with circle) button once again.
Download Scan Reports
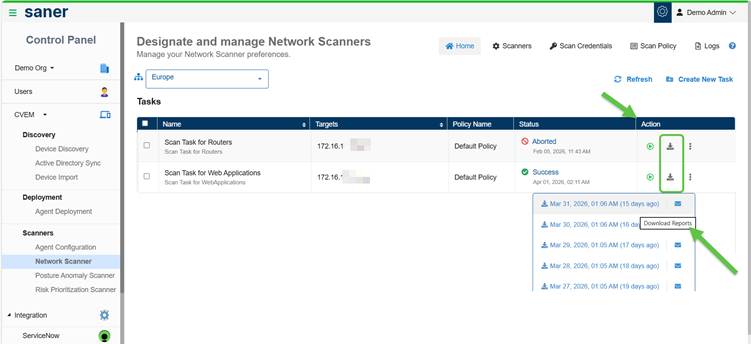
From the Designate and Manage Network Scanners page, click the Download button under the Action column for the corresponding network scan task. This downloads the last five network scan reports.
Distribute the Report Via Email
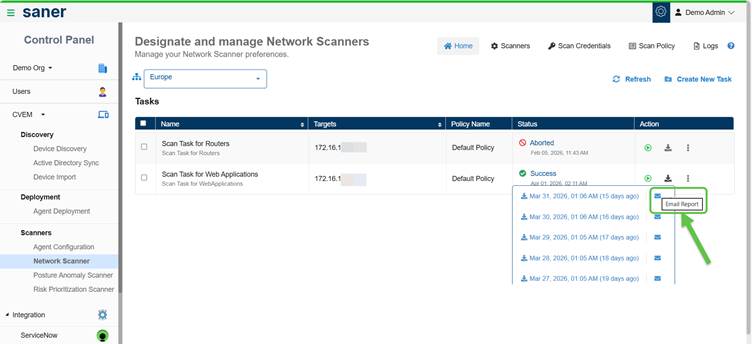
You have an option to distribute the report over email to various recipients after downloading. Just click the Email Report button and key in the email address.
Review the Logs
The Logs section provides a record of all activities performed within Network Scanner, helping you track actions and troubleshoot issues. Each action has a unique job code assigned.
Access Logs
Navigate to Network Scanner → Logs to view activity records.
What Can You View?
Each log entry includes:
- Job Code (unique identifier for the activity)
- Date and time
- Organization and account
- User who performed the action
- Action description
Filter Logs
You can filter logs to quickly find relevant entries:
- Account – view logs for specific accounts
- User – track actions by specific users
- Date range – filter logs within a selected time period
Additional Actions
- Clear filters to reset the view
- Adjust the number of log entries displayed per page
When to Use Logs?
Use logs to:
- Investigate scan failures or issues
- Audit user activity
- Validate configuration changes
- Track scan execution history
Job Codes Used in Network Scanner
| Job Code | Description |
| 14000 | Network Scanner Management |
| 14001 | Initiate Discovery Scan |
| 14002 | Add Discovery Scan Configuration |
| 14003 | Update Discovery Scan Configuration |
| 14004 | Delete Discovery Scan Configuration |
| 14005 | Upload Discovery Scan Data |
| 14006 | Failed to Upload Discovery Scan Data |
| 14007 | Add Network Scan Device |
| 14008 | Failed to Add Network Scan Device |
| 14009 | Updated Network Scan Device |
| 14010 | Failed to Update Network Scan Device |
| 14011 | Failed to Add Discovery Scan Configuration |
| 14012 | Failed to Update Discovery Scan Configuration |
| 14013 | Failed to Delete Discovery Scan Configuration |
| 14014 | Stop Network Scan |
| 14015 | Delete Device |
| 14016 | Failed to Delete Device |
| 14017 | Rename Network Scan Device |
| 14018 | Failed to Rename Network Scan Device |
| 14019 | Updated Device as Network Scanner |
| 14020 | Failed to Update Device as Network Scanner |
| 14021 | Removed Device as Network Scanner |
| 14022 | Failed to Remove Device as Network Scanner |
| 14023 | Initiate Network Scan |
| 14024 | Add Network Scan Configuration |
| 14025 | Failed to Add Network Scan Configuration |
| 14026 | Update Network Scan Configuration |
| 14027 | Failed to Update Network Scan Configuration |
| 14028 | Delete Network Scan Configuration |
| 14029 | Failed to Delete Network Scan Configuration |
| 14030 | Add Network Scan Policy |
| 14031 | Failed to Add Network Scan Policy |
| 14032 | Update Network Scan Policy |
| 14033 | Failed to Update Network Scan Policy |
| 14034 | Delete Network Scan Policy |
| 14035 | Failed to Delete Network Scan Policy |
| 14042 | Stop Discovery Scan |
| 14043 | Imported Network Scan Policy |
| 14044 | Failed to Import Network Scan Policy |
| 14045 | Assign Scan Configuration |
| 14046 | Failed to Assign Scan Configuration |
| 14047 | Discovery Scan Failed |
| 14048 | Network Scan Failed |
| 14049 | Unassign Scan Configuration |
| 14050 | Failed to Unassign Scan Configuration |
Understand Network Scanner Icons
The following table describes the different icons displayed in the Designated Network Scanner section.
| Icon | Description |
|---|---|
| | Starts the Network Scan. If this icon is disabled, understand that the device is either shut down or the Saner Agent on the device is inactive. |
| | Aborts the ongoing Network Scan. |
| Indicates that the Saner Agent on the designated network scanner is active. | |
| Indicates an inactive Saner Agent on the designated network scanner. | |
| Indicates that the Network Scanner is active and scanning. | |
| Indicates that the last Network Scan was aborted. | |
| Indicates that the Network Scanner is idle. | |
| Provides details of the last network scan. | |
| Deletes the Network Scanner. | |
| | Indicates that the scanner has been assigned to other accounts and is functioning as a global scanner, making it accessible across multiple organizations and accounts. |
References
Network Scanner Product Support Matrix – SecPod – Documentation
Privilege levels for authenticated scans using Saner Network Scanner – SecPod – Documentation

