At the core of Cloud Infrastructure Entitlement Management (CIEM) is the Principle of Least Privilege (PoLP), which ensures that every user, role, service, or application is granted only the minimum permissions necessary to perform its functions. Poor management of these permissions, particularly when accounts have excessive privileges, can lead to insider threats, privilege escalation, and data breaches.
This article demonstrates how CIEM tools like SanerCloud can detect and remediate risky entitlements across AWS.
Follow the links to learn more:
Real-World Scenario of Over-Permissioned Developer Role in AWS
What’s Involved in Detecting and Fixing Excessively Authorized Accounts?
See What You’re Protecting from the Dashboard
Identify and Assess Top 10 Users with Excessive Permissions
Review Excessive Permission Summary Across Identity Types
Determine if a Policy has Excessive Permission
Get a Visual of the Relationships between Different Identities
View any Infrastructure in CIEM by Type and Usage
Know the Infrastructure Usage Across Different Users, Groups, Policies, and Roles
Use Evidence to Address Policies with Excessive Permission
Know the Excessive Permissions on a Specific Service
Severity Status to Prioritize Misconfiguration
Initiate Remediation for Different Identities from CIEM
See the Active Version for an IAM Policy
Real-World Scenario of Over-Permissioned Developer Role in AWS
A DevOps engineer working in AWS was assigned the “PowerUserAccess” policy to simplify infrastructure testing. Months later, the engineer moved to a different team, but the permissions remained intact. Now, this unused but powerful role becomes an exploitable risk if the credentials were to be compromised.
CIEM detects this risk by:
- Mapping effective permissions across roles, groups, and inherited policies
- Correlating with activity logs from services like CloudTrail and Azure Monitor
- Flagging unused or high-risk entitlements
What’s Involved in Detecting and Fixing Excessively Authorized Accounts?
Data Collection through IAM Inventory Fetching
The process starts with collecting data through the IAM inventory fetching, which is handled by the core ingestion pipeline. Cloud Connectors authenticate with your AWS and Azure accounts to gather IAM-related metadata. This metadata includes user and role permissions, group memberships, trust policies, and both attached and inline policies. Once the data is collected, it is normalized and stored in the internal Identity store, serving as the foundation for identifying accounts with excessive authorizations.
Entitlement Scanner for “Privilege” Misconfiguration Detection
The Entitlement Scanner, which is part of the CIEM module, identifies privilege misconfigurations by applying both static and contextual rules. For example, it checks to ensure that IAM users do not have full access to all services. The rule engine evaluates various conditions, such as overly permissive access (like using wildcards or having admin-level policies), unused or dormant identities, cross-account access without proper constraints, and violations of the principle of least privilege. Any misconfigurations that are identified, are flagged and assigned severity ratings to help prioritize them.
Flagging Over-privileged Entities on the UI
The CIEM UI layer visually highlights overprivileged identities by querying the Identity Store for potential misconfigurations. The frontend presents this information through interactive dashboards, which display affected users, roles, or groups, the severity level of each risk, and the specific rules that have been violated, along with contextual risk details. This approach allows security teams to quickly identify and assess high-risk identity configurations.
Remediation Trigger and Redirection to CSRM Module
When a user initiates a remediation action by clicking “Remediate,” the request is directed to the Cloud Security Remediation Management (CSRM) module. At this point, the system gathers relevant metadata about the misconfiguration along with predefined remediation templates, such as policy pruning or user disablement. It may also prompt the user for any necessary inputs or confirmations, such as selecting an updated IAM policy, to ensure that the remediation is executed accurately and securely.
Example flow of an Overprivileged IAM User
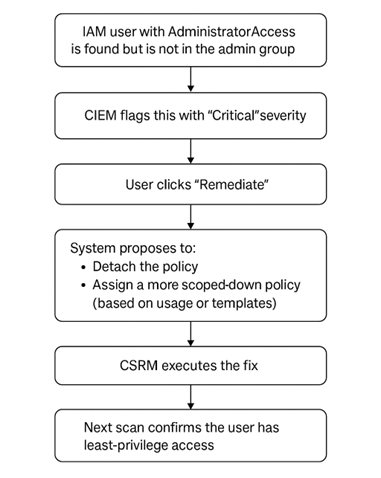
In this example flow, an IAM user has been identified with “AdministratorAccess” permissions but is not part of the designated admin group. CIEM recognizes this as a critical issue and flags it with high severity. When the user initiates the remediation process by clicking “Remediate,” the system provides options to detach the overly permissive policy and replace it with a more restrictive policy. This can be based on actual usage patterns or predefined templates. The CSRM module then carries out the selected remediation. In the subsequent scan, the system confirms that the user’s permissions have been successfully adjusted to ensure least-privilege access.
Remediation Execution by Fixing Identity Risks
The CSRM Function Engine manages the execution of remediation actions to address identity risks. Once a remediation function is selected, it is executed using cloud-native APIs like AWS IAM or Azure AD Graph. The actions carried out may include detaching risky policies, removing unused permissions, converting users to roles for improved access control, or disabling and rotating access keys to enhance security.
Status Updated in UI and Cloud
After remediation, the Scanner conducts a follow-up scan to verify that the risky permission has been removed from the identity. Once this is confirmed, the issue status is updated to “Resolved.” The user interface (UI) is then refreshed to reflect the new status and display the corrected, healthy configuration, providing clear visibility into the successful remediation.
Get Started
After you login, choose the organization(for example, Cloud Security) and your Saner Cloud account for AWS to which you have onboarded your cloud provider account from the landing page.
Next, click the App Launcher(on top of the page) and choose CIEM(Cloud Infrastructure Entitlement Management).
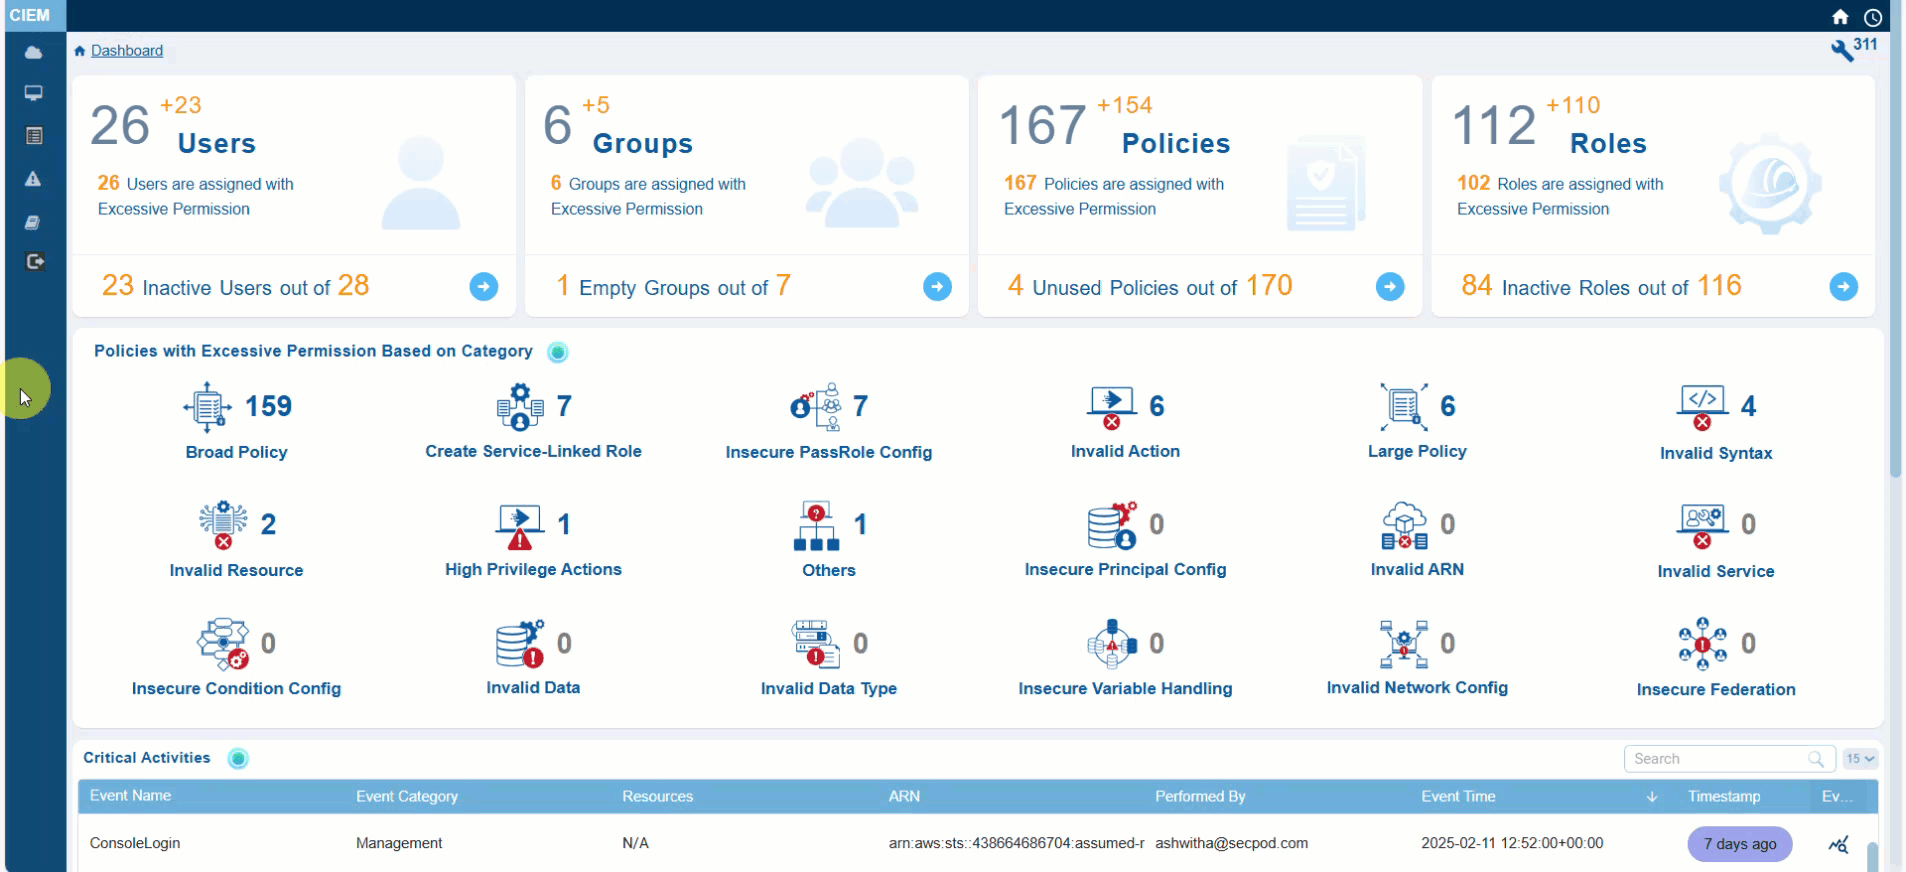
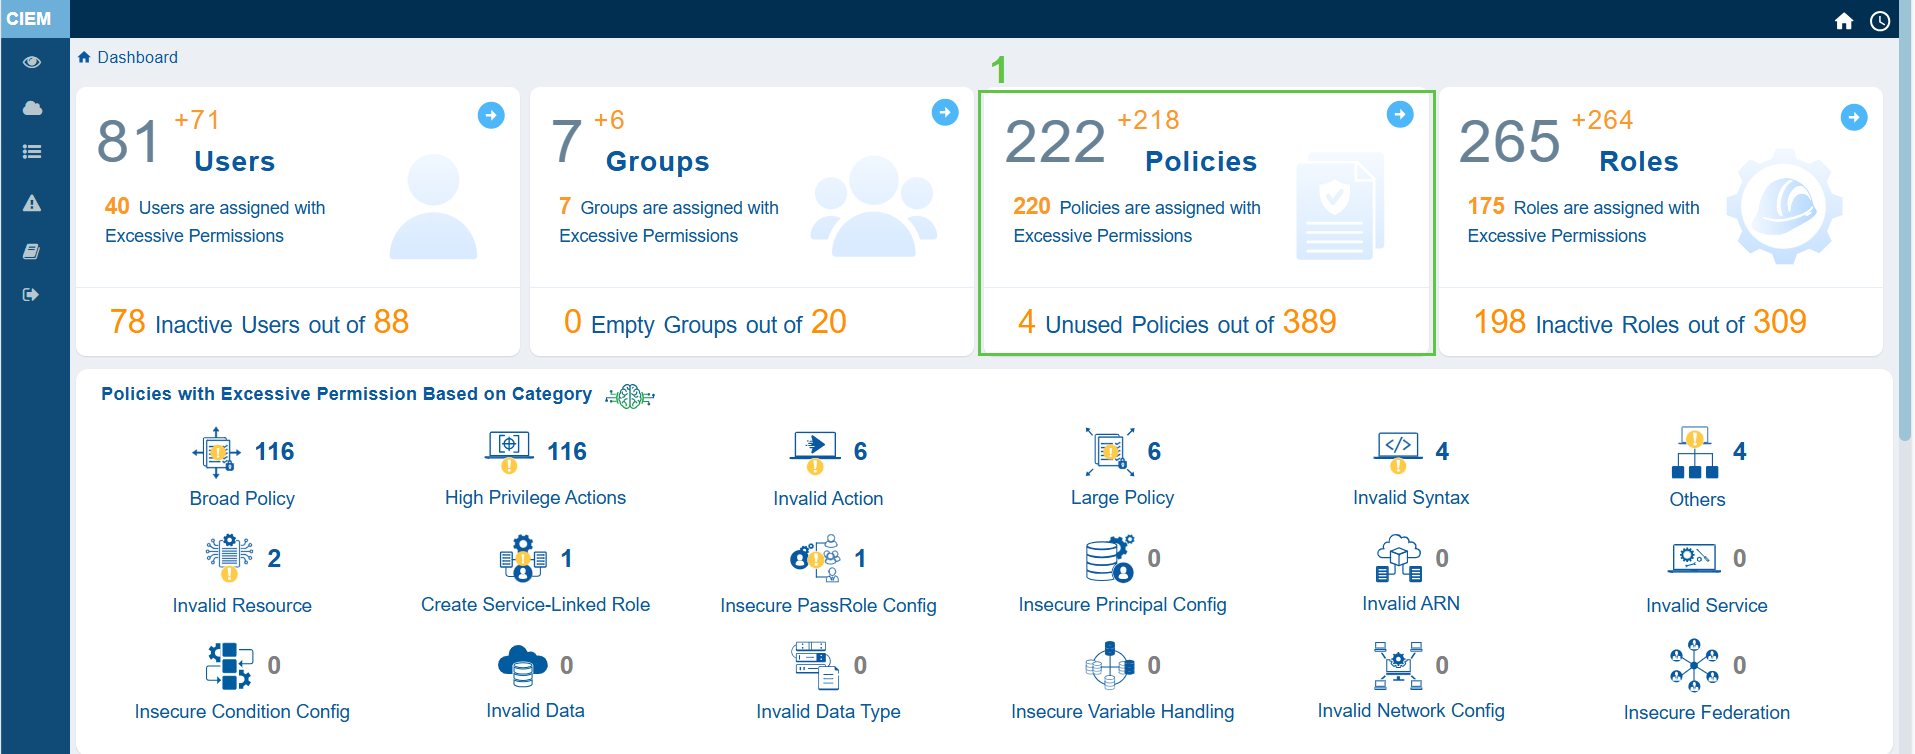
See What You’re Protecting from the Dashboard
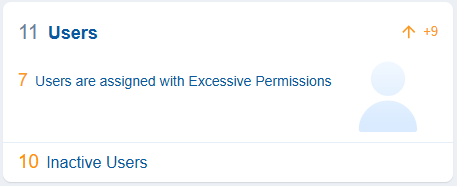
The primary action in CIEM is to get an overview of the Inactive Users, Groups, and Over-Privileged Roles, and Policies. Additionally, the system also provides insight into the excessive permissions across different categories.
Review Excessive Permission Summary Across Identity Types

Users
Helps you monitor dormant user accounts, which can be a security risk even without excessive permissions.
Inactive users in cloud entitlements refer to accounts or user identities that have access to cloud resources but have not been active, meaning they have not logged in, used, or performed any actions for a considerably long period. This inactivity can pose potential risks to the security and efficiency of your cloud environment. With Saner CIEM, users can identify inactive accounts on specific cloud platforms(AWS or Azure).
The dashboard view presents the count of users who have not been active and pose a security risk(for example, credential, compromise, unmonitored access attempts, and more). Additionally, the dashboard also presents unused or excessive permissions that result in privilege escalation or account compromise issues.
Clicking the numbers, text or icon on the block, navigates to the detailed contextual view providing a breakdown on the user and their associated permissions.
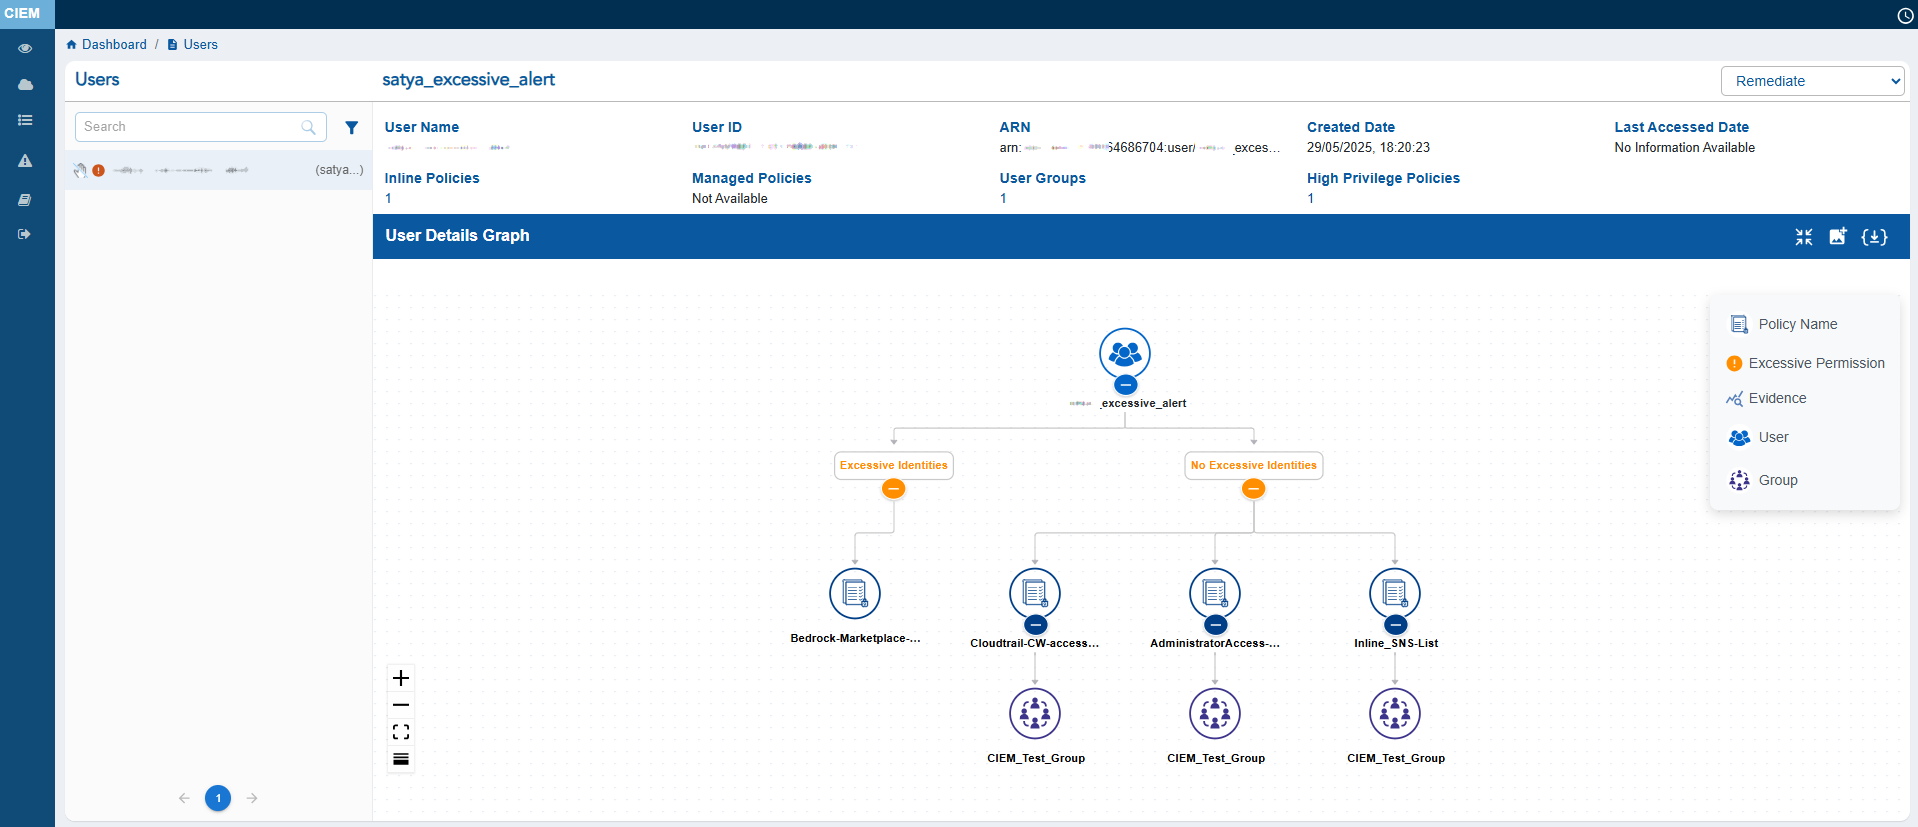
The User Details view provides a consolidated snapshot of an Azure user’s identity attributes and access relationships. It displays key metadata such as the User ID, Display Name, Created Date, Last Accessed Date, associated Entra Roles, RBAC Roles, and User Groups.
The main feature of the page is the User Details Graph, which visually maps the user’s linked groups, roles, and privileges. This helps administrators easily understand hierarchical access paths and inherited permissions at a glance.
The left panel lists all users and includes status icons that indicate their security state: the Hand icon represents Inactive users, the Red icon highlights users with Excessive permissions, and the Green icon identifies Active users. Click the filter button next to the Search box to display the related Unused, Excessive users.
Overall, this view helps security teams assess an individual user’s access footprint and identify potential risks efficiently.
Clicking any metadata item that contains a link(for example, Managed Policies, High Privilege Policies or User Groups) drills down further into another contextual view showing associated metadata.
Clicking any metadata item that contains a link(for example, Managed Policies, High Privilege Policies or User Groups) drills down further into another contextual view showing associated metadata.
Groups
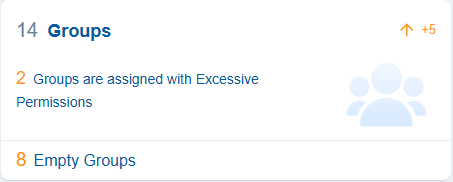
Groups in cloud entitlements refer to collections of user accounts that facilitate management of access rights and permissions in cloud environments. Saner CIEM helps you monitor dormant Groups that can be a security risk even without excessive permissions.
The dashboard view presents the count of groups having excessive permissions in the associated cloud service.
Clicking the numbers, text, or icon on the block navigates to the detailed contextual view providing a breakdown on the group and their associated permissions.
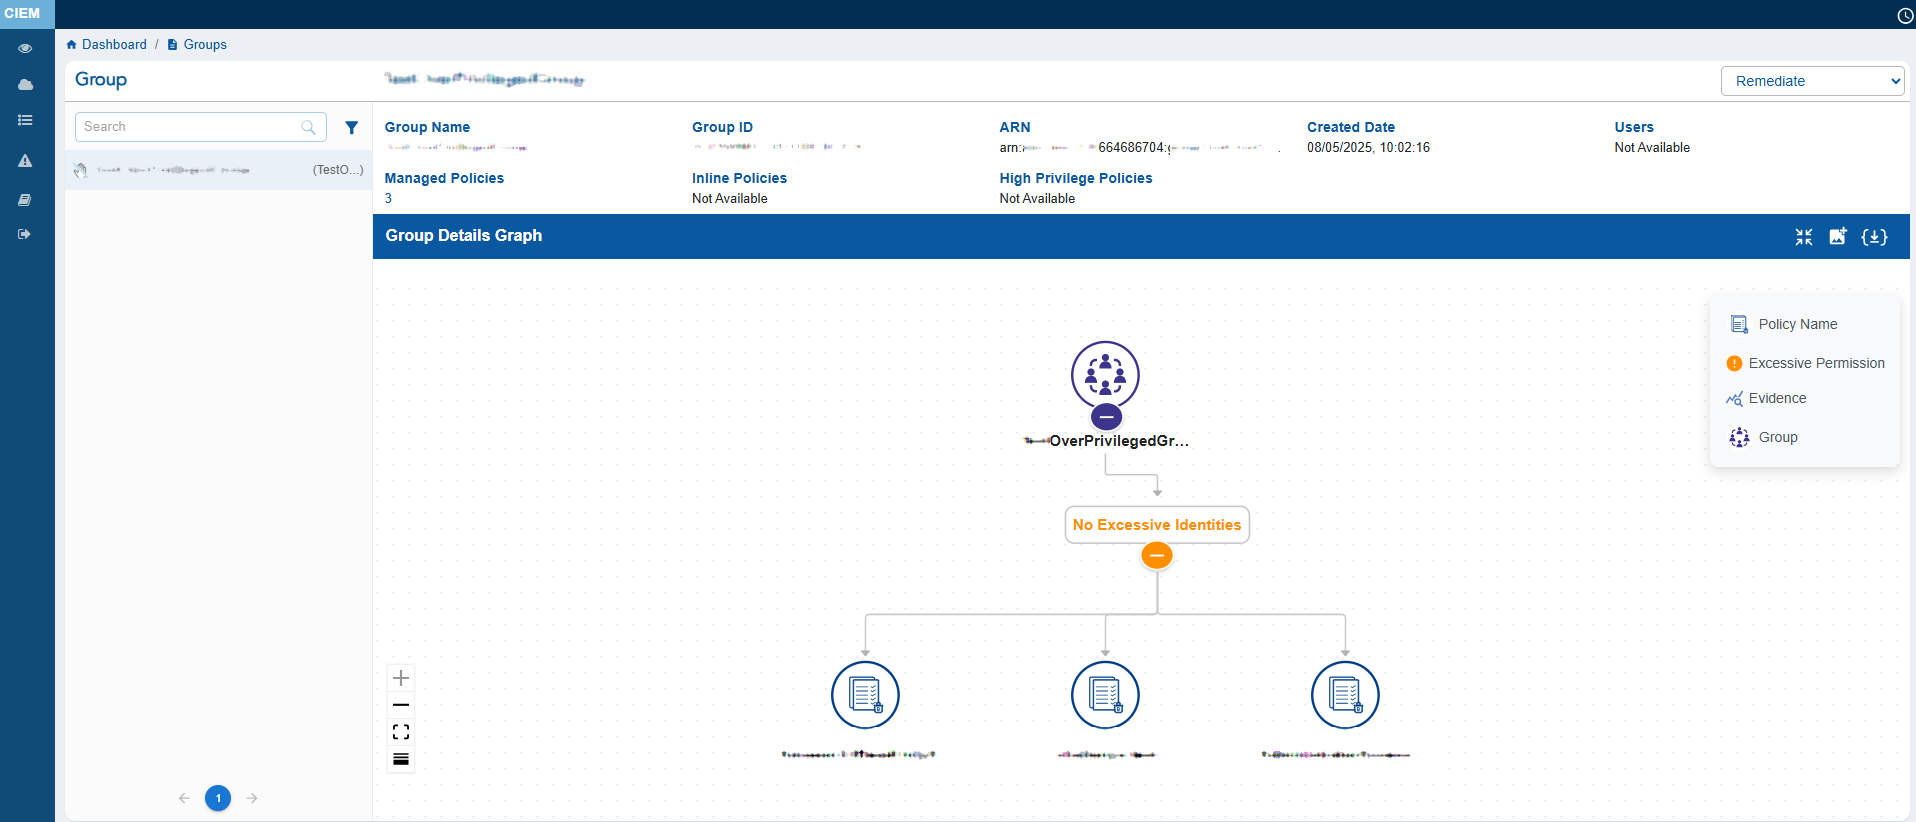
The Group Details view provides a consolidated snapshot of an Azure user’s identity attributes and access relationships. It displays key metadata such as the Group ID, Display Name, Description, Created Date, associated Entra Policies, Entra Roles, RBAC Roles, and High Privilege Roles.
The main feature of the page is the Group Details Graph, which visually maps the group’s linked users, roles, and policies. This helps administrators easily understand hierarchical access paths and inherited permissions at a glance.
The left panel lists all groups and includes status icons that indicate their security state: the Hand icon represents Inactive groups, the Red icon highlights groups with Excessive permissions, and the Green icon identifies Active groups. Click the filter button next to the Search box to display the related Unused, Excessive groups.
Overall, this view helps security teams assess a group’s access footprint and identify potential risks efficiently.
Clicking any metadata item that contains a link (for example, User List) drills down further into another contextual view showing associated metadata such as user assignments, group details, or linked resources.
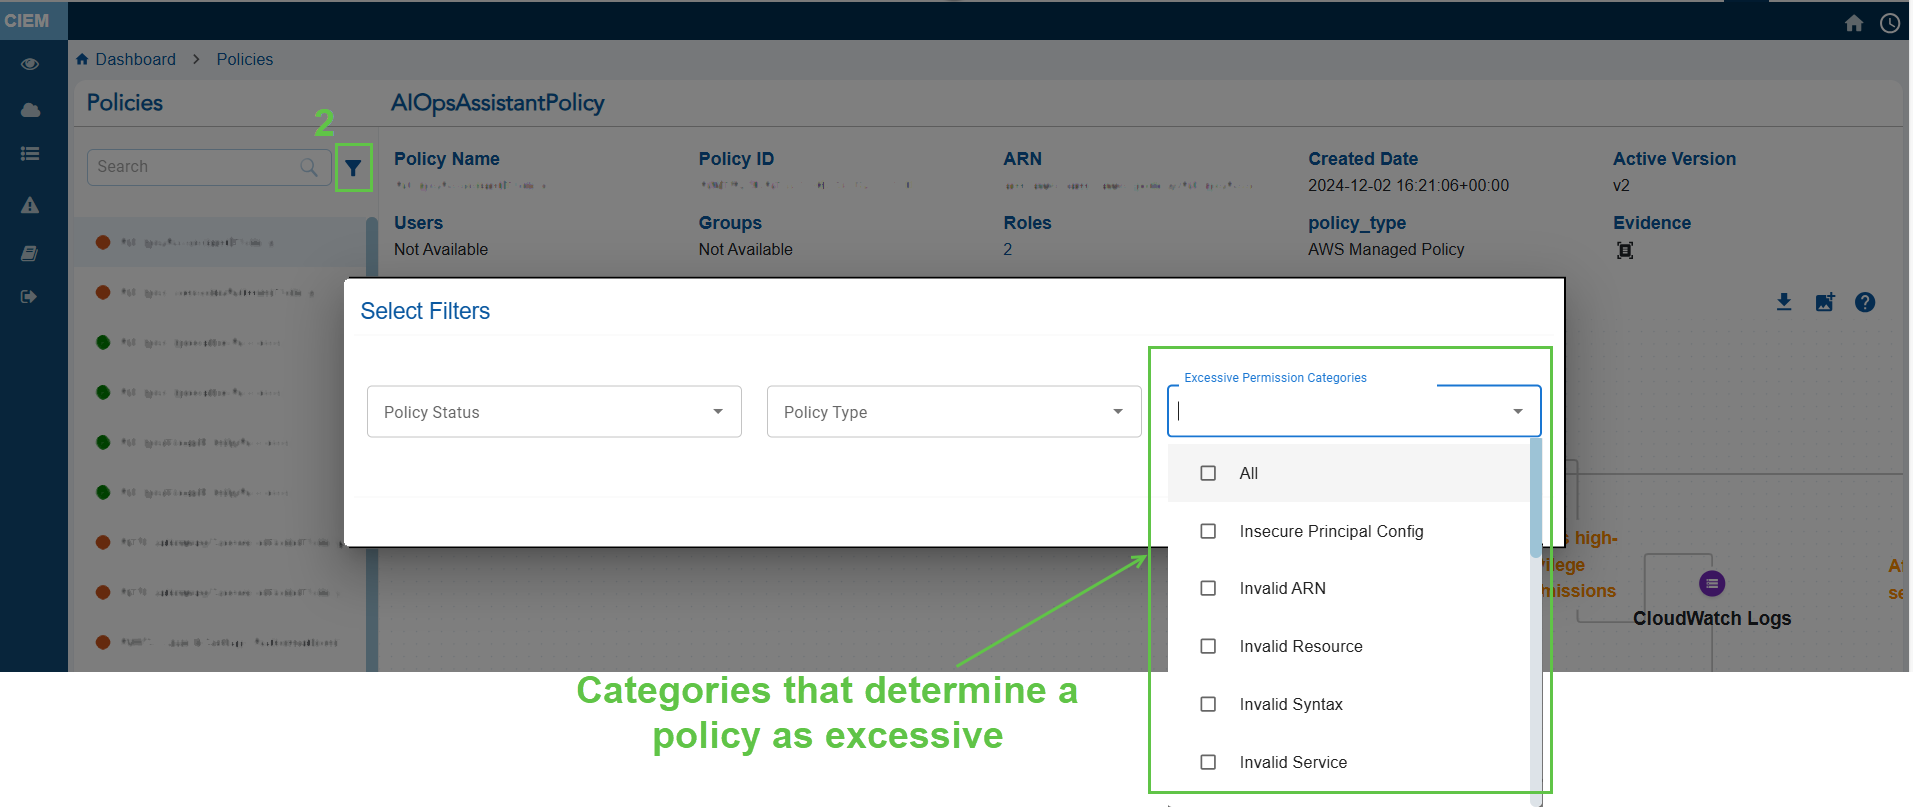
Policies

A policy establishes the rules and permissions that govern access to resources in a cloud environment. These policies are crucial for managing security, ensuring compliance, and enforcing governance within cloud infrastructure. Saner CIEM helps you monitor Unused Policies, which can be a security risk even without excessive permissions. .
Clicking the numbers, text, or icon on the block navigates the user to the detailed view providing a providing a concise visualization of what’s described in each policy:
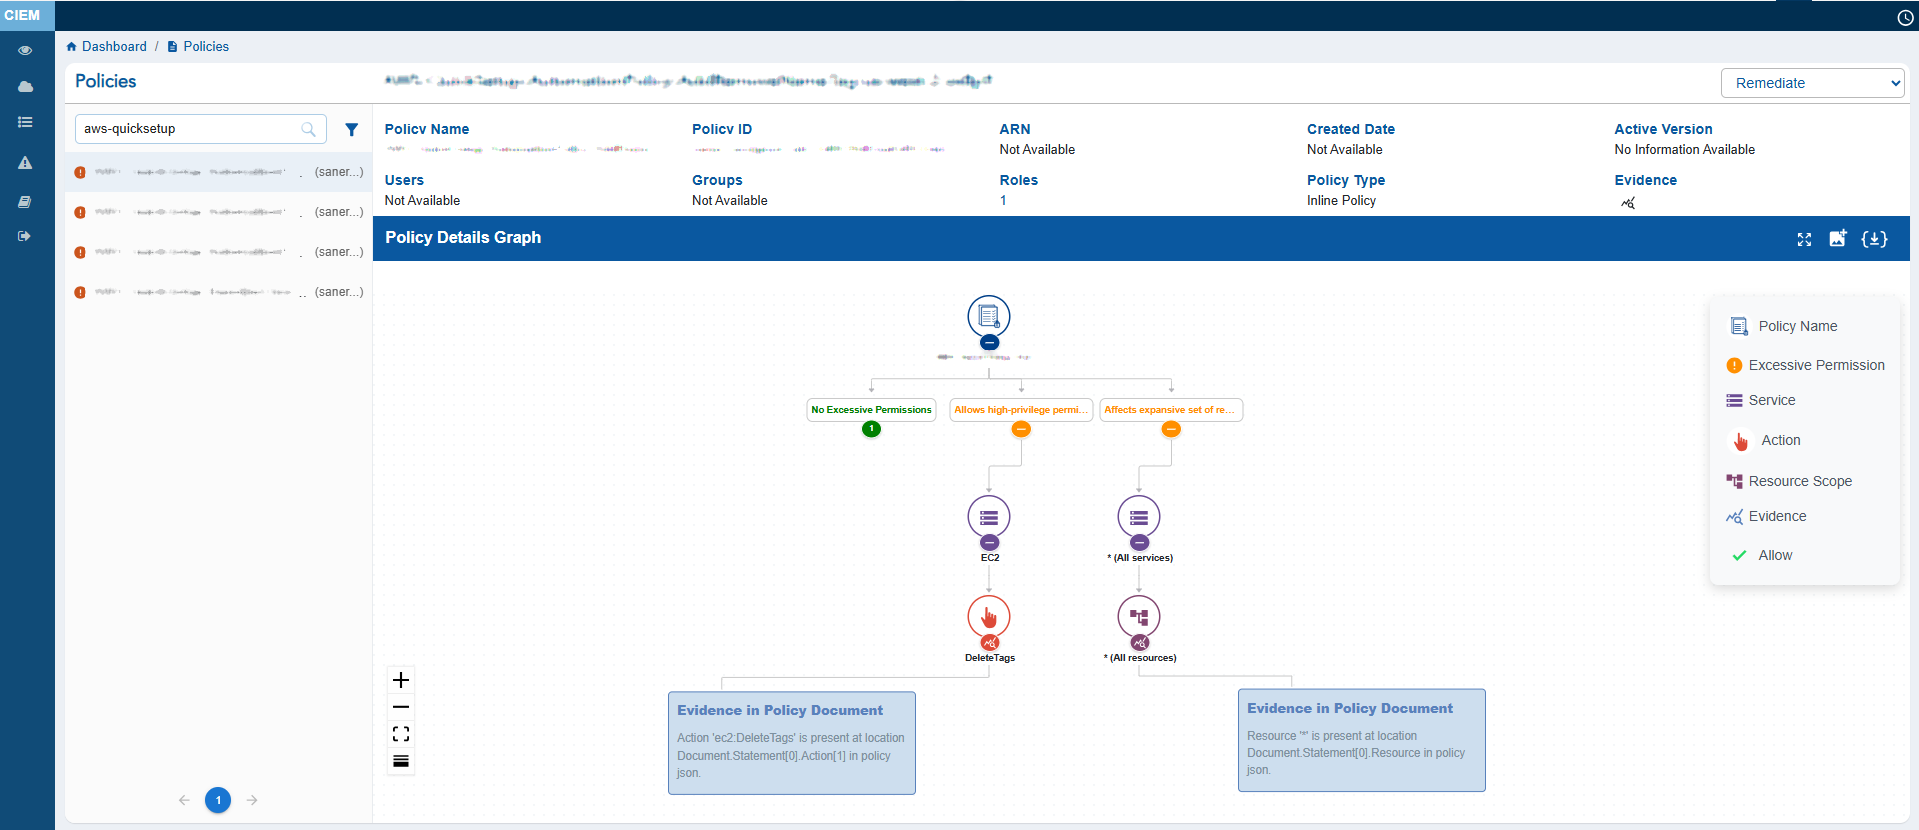
1) Policy Information that include: Name, ID, ARN, Created Date, Roles, Users and Groups, Policy Type, and Evidence for Excessive Permission
2) Policy Details that include: Services, Resources, and Effect(allow or deny access to policies)
3) Policy Details Graph that shows a visual representation of the role connected with the policy
User can either choose to expand or collapse the full graph with “Expand All button”, or the can also choose to expand each node separately. The graph can also be viewed in Vertical as well as Horizontal view, just with a click of a button.
Roles
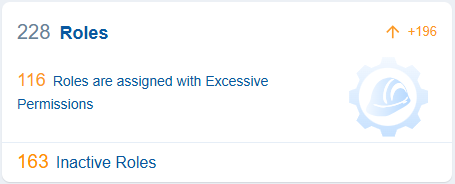
Roles in cloud entitlements outline a specific set of permissions that determine the actions a user, group, or service can perform on resources within the cloud environment. Roles are a fundamental part of identity and access management (IAM) systems.
Saner CIEM helps you monitor Inactive Roles, which can be a security risk even without excessive permissions.
The dashboard block displays the number of inactive IAM (Identity Access Management) roles in your AWS account, making them unused or obsolete. If a role remains inactive for an extended period, it can create unnecessary access points, which could lead to authentication-based attacks.
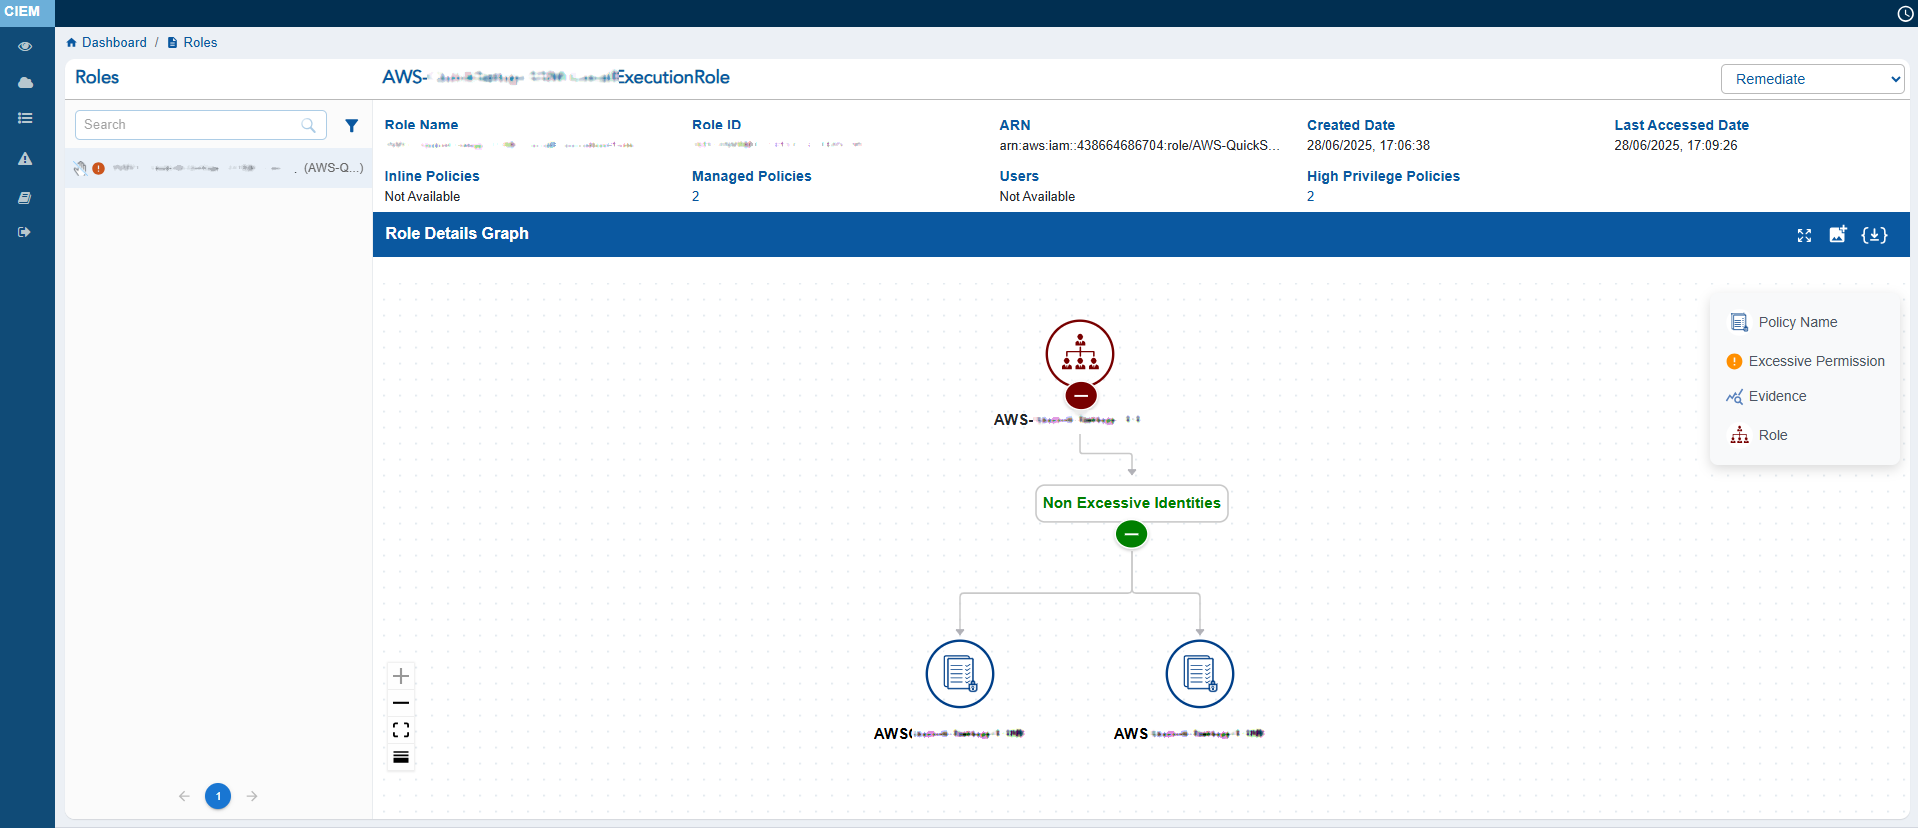
Clicking the numbers, text, or icon on the block navigates to the detailed view providing a breakdown on the role and their associated permissions.
Key details include:
1) Role overview with Name, ID, ARN, Created Date, Last Accessed Date, and policies that may allow high-privilege actions, etc.
2) Visual representation of the association between the role and its policies, making it easier to understand the intricate relationships between them.
Identify and Assess Top 10 Users with Excessive Permissions
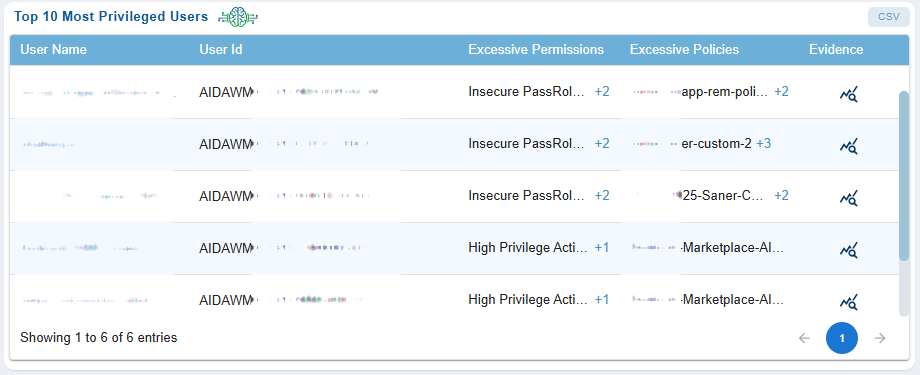
The “Top 10 Most Privileged Users” dashboard allows security teams to quickly identify and assess users with excessive privileges by providing clear visibility into their permissions, attached policies, and supporting evidence. This capability enables effective risk evaluation, supports the enforcement of least-privilege policies, and facilitates timely remediation of over-privileged user accounts.
The dashboard offers a consolidated view of highly privileged accounts, displaying the User Name and User ID. It highlights the count of Excessive Permissions (clickable), which reveals the list of excessive permissions held by each user, and the count of Excessive Policies (clickable), which shows the policies associated with those permissions. An Evidence icon is also available for each user, which opens a pop-up window containing detailed supporting evidence.
Determine if a Policy has Excessive Permission
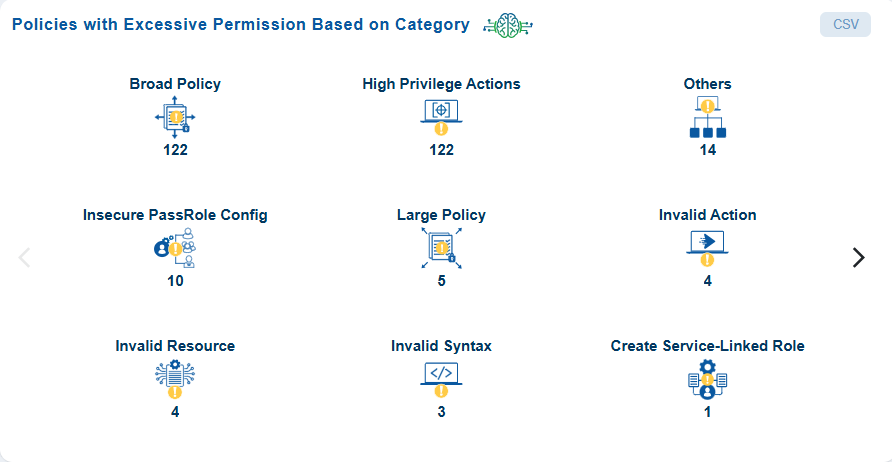
Quickly Identify Policy Categories with Excessive Permissions
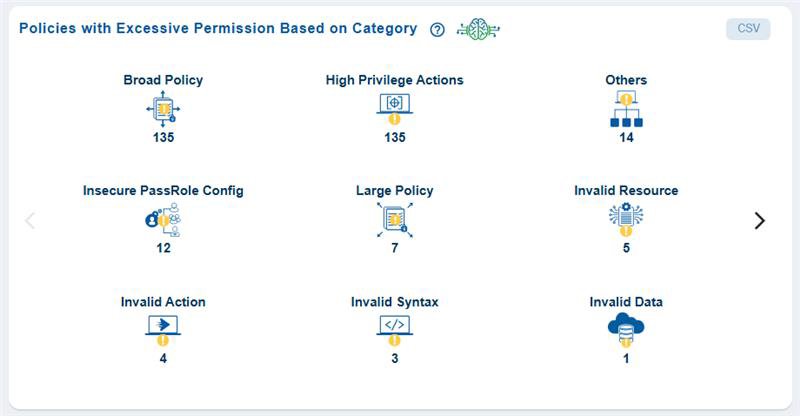
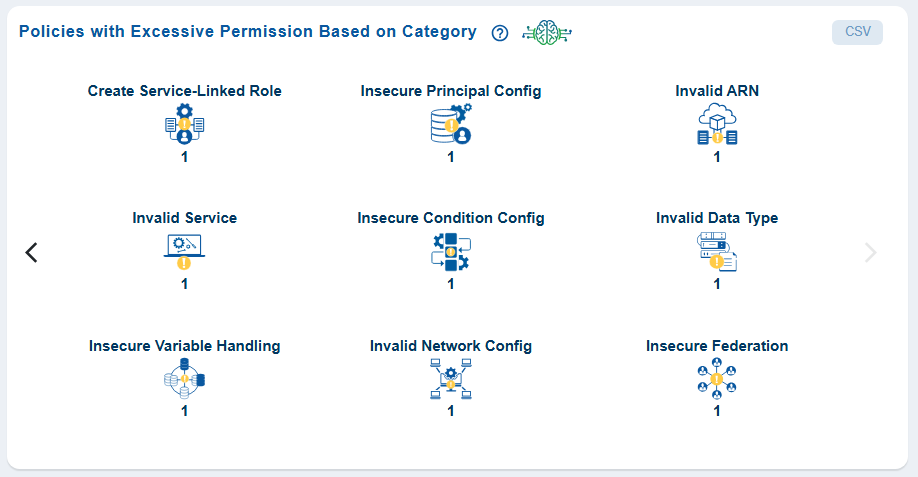
From the dashboard, go straight to the dashboard block Policies with Excessive Permission Based on Category and view the policy categories that Saner CIEM has automatically identified and listed as Excessive for your immediate use.
Get a Visual of the Relationships between Different Identities
With the Details Map get a visual of the relationships between a user, group, role, or service account and its entitlements, policies, and permissions in a cloud environment. This helps security teams understand how an identity can access resources and identify potential risks or policy misconfigurations.
The Details Map presents an interactive tree view of policies, permissions, services, and resources linked to each identity such as, Users, Groups, Policies, or Roles, within the AWS environment.

View any Infrastructure in CIEM by Type and Usage
Saner CIEM enables viewing by Type and Usage for any Users, Groups, Roles, or Policies that’s crucial for gaining insights into their purpose and utilization in a cloud environment.
Step 1: Launch Cloud Entitlements
After you login, select Cloud Security from the landing page. Next, click the App Launcher(on top of the page) and choose CIEM(Cloud Infrastructure Entitlement Management).
Step 2: Navigate to the Details Page to Access Type and Usage Filters
Click any block as needed from CIEM dashboard and navigate to the details page. On the left-hand side of the page, use the filters to narrow down your search.
Step 3: Use the Filters to Narrow Down Your Search
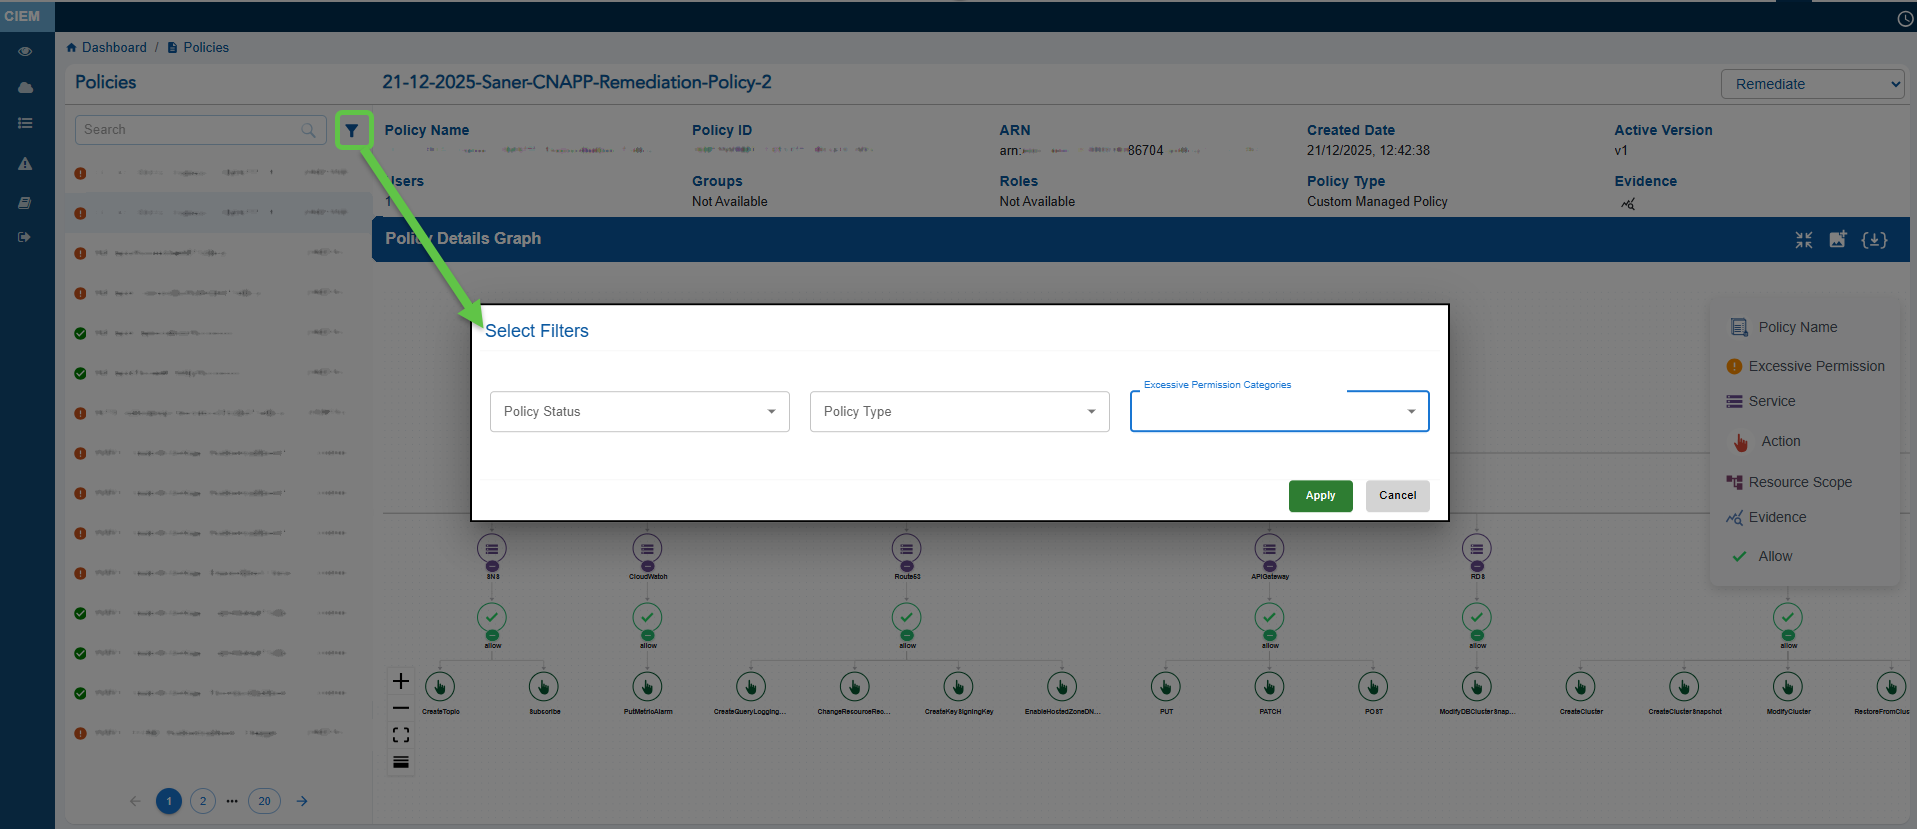
Click the Filter button on the side pane and combine filters to narrow down your results.
Filtering Options Available for the Different Identities:
| Identity | Filter Options |
|---|---|
| Users | Unused, Excessive |
| Groups | Unused, Excessive |
| Policies | Policy Status, Policy Type, Permission Categories (Excessive) |
| Roles | Role Status, Role Type, Permission Categories |
Know the Infrastructure Usage Across Different Users, Groups, Policies, and Roles
Knowing “Usage”, amounts to knowing the “Risk”. The Usage data in CIEM helps identify identities with excessive or inactive privileges. Searching by independent criteria or combining the filters help narrow down the search for focussed results.
As an example, the following video shows the infrastructure usage for different users.
Use Evidence to Address Policies with Excessive Permission
When reviewing a policy, use the “Evidence for Excessive Permission” that pinpoints unnecessary permissions in AWS IAM policies and helps you understand and address excessive permission.
Step 1: Launch Cloud Entitlements

After you login, select Cloud Security from the landing page. Next, click the App Launcher(on top of the page) and choose CIEM(Cloud Infrastructure Entitlement Management).
Step 2: Access the Evidence for Excessive Permission Popup

- From the CIEM dashboard, click the “Policies” block to open the detailed statistics page
- From the left-hand-side, filter by Permission Categories(Excessive). This lists all the policies that have excessive permissions.
- Click the Evidence for Excessive Permission icon and analyze the information from the pop-up
Step 3: Analyze the Evidence Information
- Look at the “Reference Path” to understand where in the policy structure the excessive permission is defined
- Review the “Response” to identify the action that may be unnecessarily allowed or denied
| Evidence Path | Structured representation of the policy’s JSON document, highlighting where the permission is defined. For example, “Policies.PolicyVersionList.Document.Action” refers to the Action field in the policy’s Document structure where permissions like “s3:ReplicateDelete” are specified. |
| Response | Specific permission or action evaluated for excessive access. For example, ” s3:ReplicateDelete” indicates a permission related to s3 bucket replication. |
Know the Excessive Permissions on a Specific Service
Excessive permissions in cloud security occur when users or applications have more access than necessary to perform their tasks.
For instance, actions like deleting an S3 bucket or terminating an EC2 instance are considered high-privilege actions and are typically not granted to everyone with access to the AWS account. Instead, these permissions are reserved for a select few individuals, such as administrators or site owners. When managing these high-privilege actions among team members, there is a risk that a team member who is expected to have only read-only access may inadvertently be granted permissions to perform high-privilege actions. In this case, that team member is said to have excessive permissions.
This poses significant security risks, as it allows insiders to exploit permissions or for hackers to take control through phishing attacks.
Click here to learn more about the Excessive Permission Categories evaluated across the different cloud services.
Step 1: Launch Cloud Entitlements
After you login, select Cloud Security from the landing page. Next, click the App Launcher(on top of the page) and choose CIEM(Cloud Infrastructure Entitlement Management).
Step 2: Access the Infrastructure for Which You Want to Review Excessive Permissions

From the CIEM dashboard, click on any of the Identity blocks(user/role/group/policy) to open the additional details page.
Step 3: Access the Details Map to View the Requisite Service

Severity Status to Prioritize Misconfiguration
Any misconfigurations identified, are flagged and assigned severity status to help prioritize them.
Initiate Remediation for Different Identities from CIEM
Overview
By identifying overly permissive roles, unused accounts, and insecure policies, Saner CIEM helps organizations proactively reduce their cloud attack surface. It supports revoking unnecessary permissions, bulk removal of unused entitlements through remediation actions, or enforcing security best practices.
Step1: Initiate the Patching Task
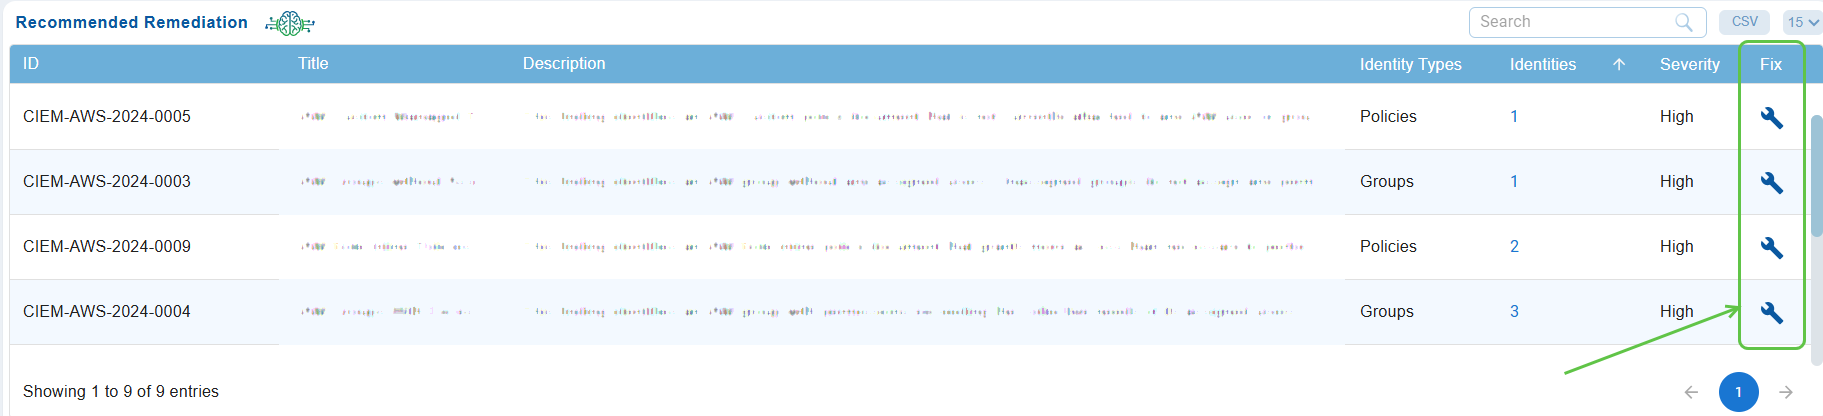
From the Recommended Remediation block on the dashboard, click the icon (displayed as a wrench).
Step2: Select the Relevant Tab to Apply Patching Tasks
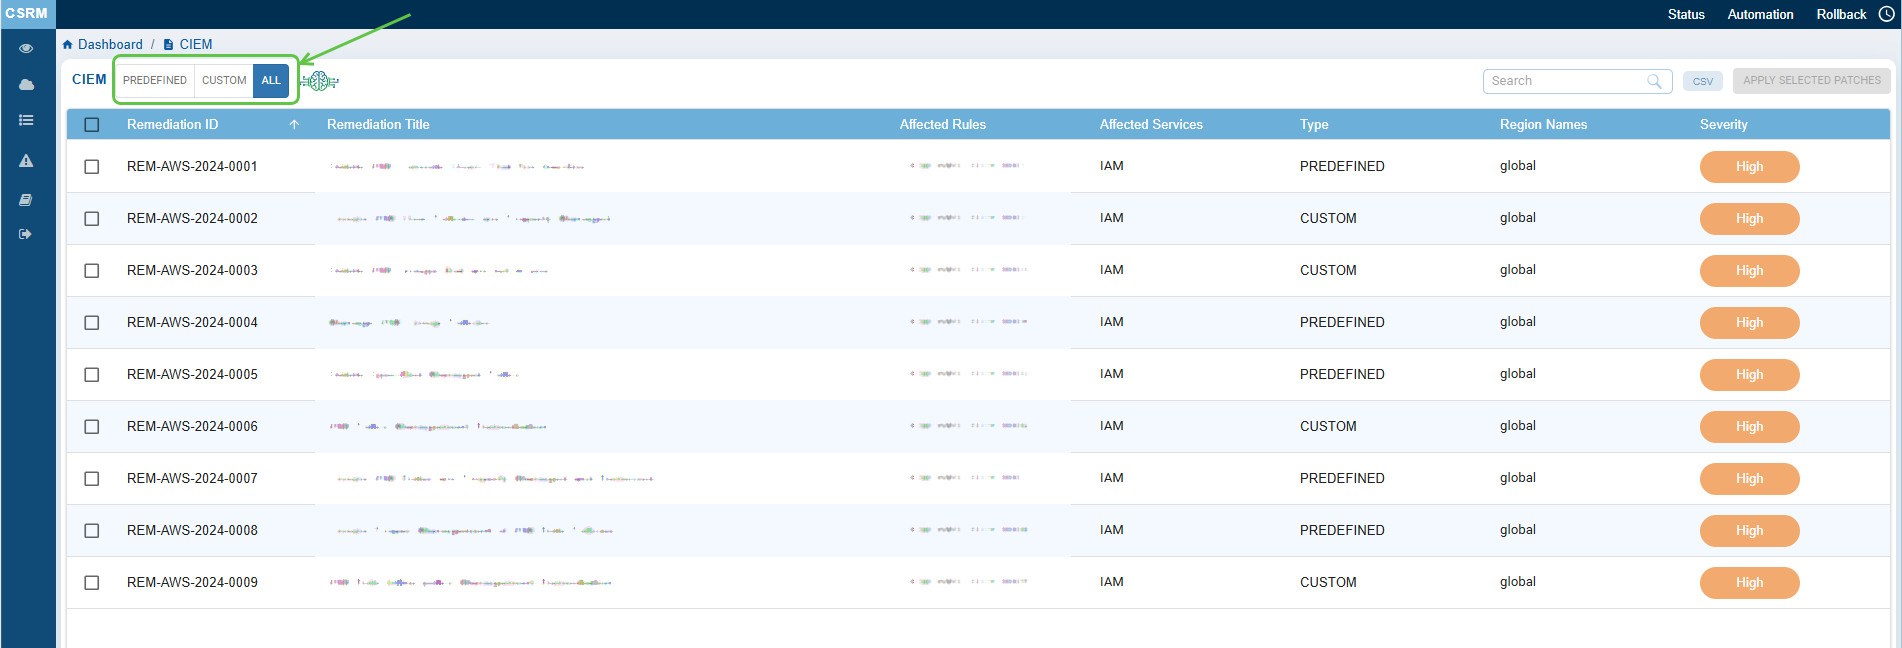
- Predefined: Displays all fixes that use default values. Choose the relevant fixes and proceed with remediation.
- Custom: Shows user-defined fixes, allowing you to modify the fixes before applying them.
- All: Displays a combination of both predefined and custom fixes. You can select from the entire range of fixes available and proceed with remediation.
Step3: Automatic Redirection to CSRM
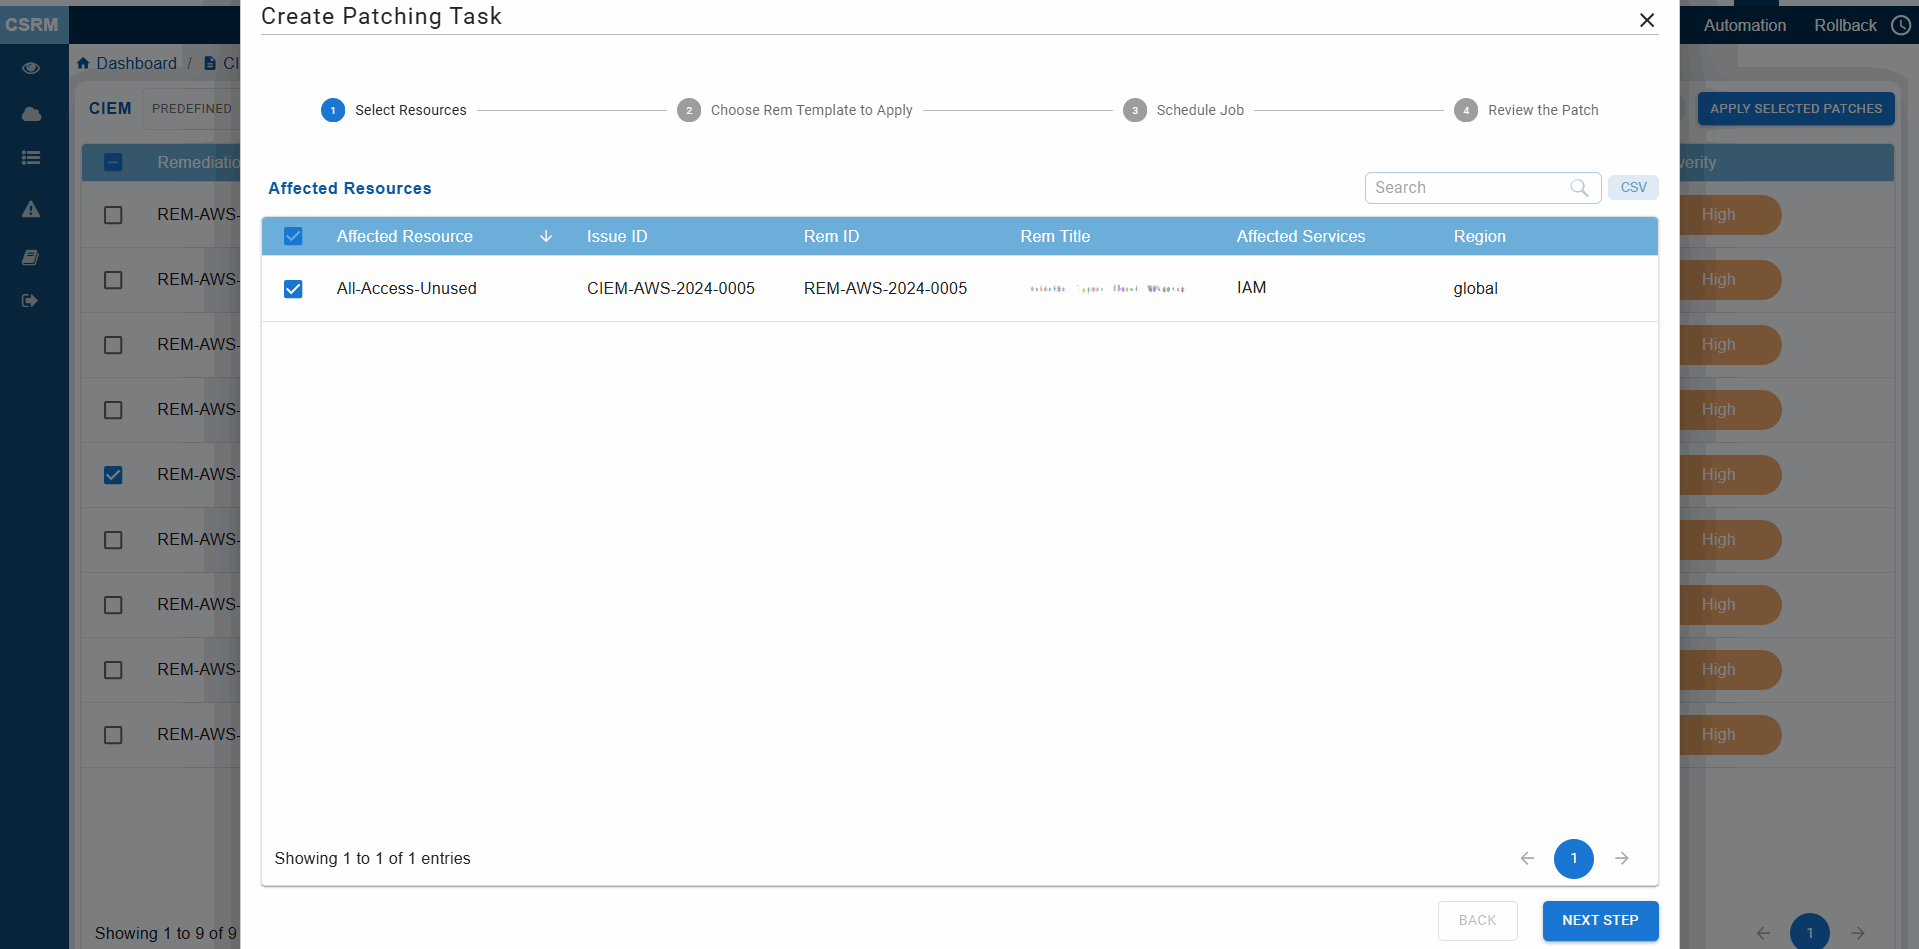
Clicking the fix icon automatically redirects you to CSRM with the CIEM module opened, allowing you to directly create the patching task using guided remediation.
Step4: Follow the Guided Remediation Steps
Go through the guided remediation for selecting and applying the necessary patches.
Address Critical Activities Using Evidence
In Cloud Infrastructure Entitlement Management (CIEM), critical activities refer to high-risk identity and access operations that significantly impacts cloud security if misused. These activities include privilege escalation (such as attaching Administrator Access), modifying or disabling IAM policies, creating access keys or service tokens, and accessing sensitive services like S3, KMS, or Secrets Manager.
What are the Recommended Critical Events to Monitor?
Click here for a detailed list of critical events with description and security implication.
What are the High-Privilege Actions in AWS?
Click here to read more about which actions are considered high-privilege in Critical Activity Logs in AWS and more.
Step 1: Launch Cloud Entitlements
After you login, select Cloud Security from the landing page. Next, click the App Launcher(on top of the page) and choose CIEM(Cloud Infrastructure Entitlement Management).
Step 2: Access the Critical Activities

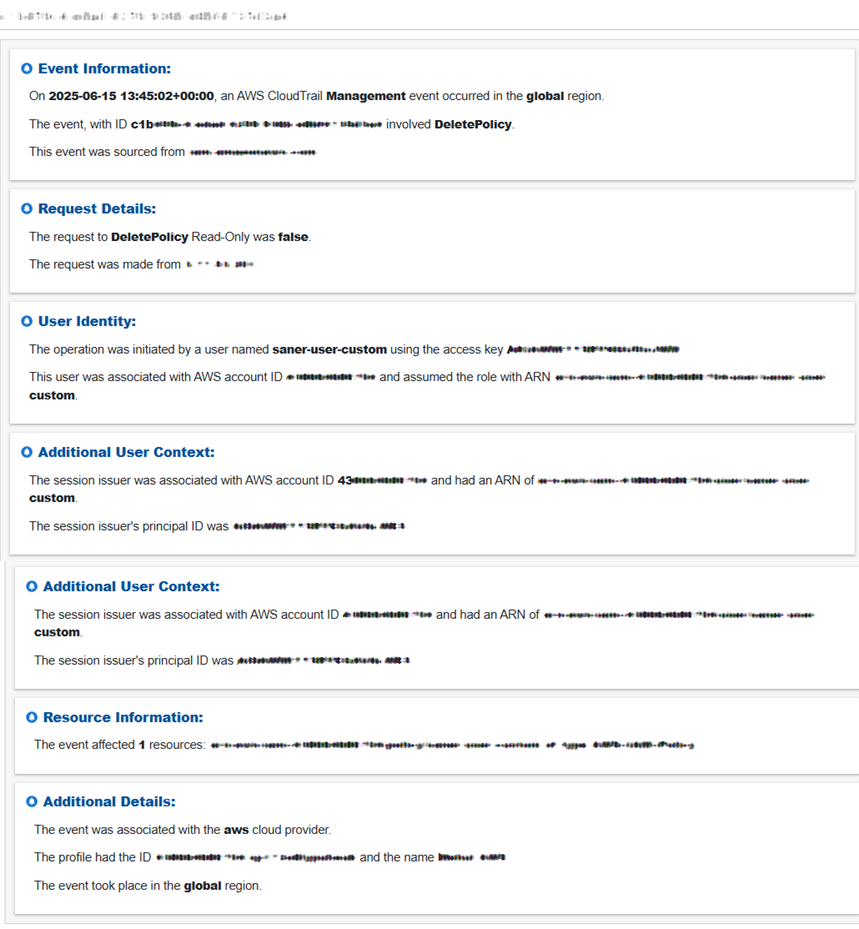
A quick look at what the columns represent:
| Column | What it conveys? |
|---|---|
| Event Name | Specific action or operation performed(for example, createuser/deleteinstance/updatepolicy). The details provide security teams with a clear understanding of what occured during the logged in event and enables focus on critical operations. |
| Event Category | Categorized the type of event(for example, authentication/access control/data access/configuration) that helps identify and prioritize events based on security relevance. For example, access control change might call for immediate review. |
| Resources | Specific cloud resources affected by the action such as EC2/S3/Database/Virtual Machines. Provides insight into the assets targeted/accessed/modified. Critical for tracking the potential impact of the event in cloud environment |
| ARN | Unique identifier for resources in cloud platform like AWS. Enables precise identification of affected resources involved in an incident. |
| Performed By | Identity(user/role/service) responsible for initiating the event. Identifies who/what triggered the action |
| Event Time | Time stamp of when the event occured. Critical to analyze sequence of events during incidents. |
| Timestamp | The specific time and context of when a high-risk identity or access operation took place. Critical to analyze sequence of events during incidents. |
| Evidence | Verifiable evidence, such as logs, timestamps, activity traces, or event metadata, confirming that a critical identity-related activity occurred in the cloud environment. |
Step 3: What Do You See In the Evidence?
Click the icon under the Evidence column in the Critical Activities block to view the evidence information.
Step 4: See the Total Count of Resources with Critical Activities
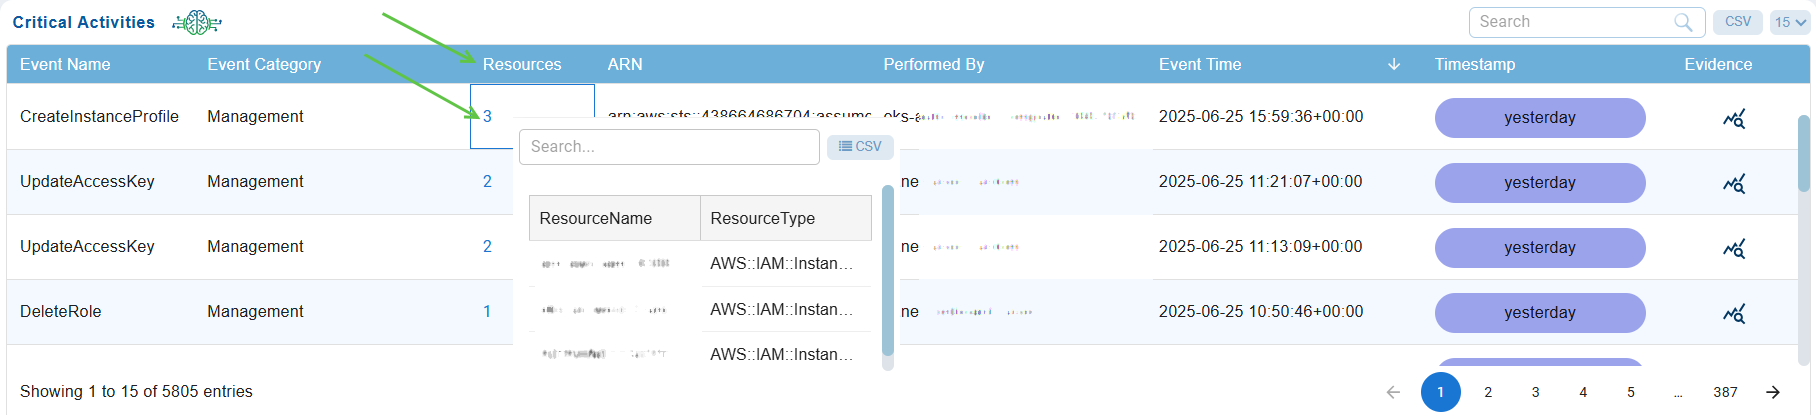
Under the “Resources” column, just go ahead and click on the count to see the resources and types.
Step 5: Filter with Specific Search Criteria for Analysis
Users have an additional capability to filter critical activity logs with specific search criteria. From the search box within the Critical Activities block, key in your search criteria to retrieve the relevant information. Analyze the information for troubleshooting or subsequent action.
Step 6: Filter with Specific Search Criteria for Analysis
Users have an additional capability to filter critical activity logs with specific search criteria. From the search box within the Critical Activities block, key in your search criteria to retrieve the relevant information. Analyze the information for troubleshooting or subsequent action.
See the Active Version for an IAM Policy
Overview
Excessive permissions can lead to unauthorized access, data breaches, or misuse of resources, so identifying them is critical. Saner CIEM helps identify excessive permissions and ensures your resources are only accessible by those who need them, reducing security risks.
Step 1: Launch Cloud Entitlements
After you login, select Cloud Security from the landing page. Next, click the App Launcher(on top of the page) and choose CIEM(Cloud Infrastructure Entitlement Management).
Step 2: Access the IAM Policy for Which You Want to See the Active Version

From the CIEM dashboard, click the Policies block and navigate to the Details page that displays the specific version(Active Version) of an IAM policy that is currently in effect for the user, group, or role to which the policy is attached.
Step 3: View the Active Version of the IAM Policy

By default, the first version of a policy is the active version when the policy is created. Subsequent versions are inactive until explicitly set as active from the appropriate cloud provider.
Commonly Asked Questions
Commonly Asked Questions
What are inactive users in the context of cloud entitlements?
Inactive users, in the context of cloud entitlements, refer to accounts or identities in your cloud environment that meet the following criteria:
— They have not engaged in any activities, such as accessing resources or executing tasks.
— They have not logged in or authenticated within a specified time frame.
How do I identify inactive users?
The dashboard view — Users — presents the count of IAM (Identity Access Management) users who have not been active and pose a security risk. Clicking the link navigates to the detailed view providing a breakdown on the user and their associated AWS permissions.
Key details include:
1) User Information with Name, ID, ARN, Created date, Last accessed date, Inline policies, Custom Managed policies, User groups, and High privilege policies
2) Policy details with Name, Association link to the user, ARN, Services, Resources, and Effect(allow or deny access to users)
3) Policy Details Graph displaying a visual representation of the user connected with the policy
What actions should I take for inactive users?
For inactive accounts, you can take the following recommended actions:
1. Implement Temporary Suspension Policies: Automatically deactivate accounts after a specified period of inactivity.
2. Disable Accounts to prevent further usage while you investigate whether the accounts are still relevant.
3. Revoke Permissions to remove access to sensitive resources to protect information.
4. Delete Accounts to permanently remove accounts that are no longer necessary.
What is Cloud Infrastructure Entitlement Management (CIEM) and why is it important?
Cloud Infrastructure Entitlement Management (CIEM) is a specialized security practice focused on managing and securing access to cloud resources by controlling entitlements — permissions, roles, and privileges assigned to users, groups, applications, and services. With Saner CIEM, users can enforce least privilege access across the AWS or Azure environment.
How do I monitor newly granted and decremented Excessive permission for my cloud Users, Groups, Policies and Roles, from Dashboard?
The Evidence for Excessive Permission that can be accessed from the detailed statistics page from any view in the CIEM dashboard provides information on the Excessive permission across Users, Groups, Roles, or Policies.
How do I check recent identity-based activities in my cloud infra that I should be concerned about?
Look into the Critical activity logs for cloud entitlements that capture important events related to identity and access management (IAM), resource permissions, and user or service activities within a cloud environment. In Saner CIEM, these critical activity logs are vital for ensuring security, compliance, and visibility into the actions performed by users, groups, roles, and services. By using these logs, users can monitor events and take prompt action to mitigate risks, enforce compliance, and improve operational efficiency.
How do I find CIEM rule that is most critical but also mostly broken?
You can find these rules in the “All Findings” table, which shows any broken rules along with the maximum number of affected resources in the “Affected Resources” column. The rule’s criticality can be determined by its Severity, also listed in the same table.
How do I get detailed analysis of Users, Groups, Policies and Roles with Excessive permission?
The Evidence for Excessive Permission that can be accessed from the detailed statistics page from any view in the CIEM dashboard provides information on the Excessive permission across Users, Groups, Roles, or Policies.
How do I know why Saner Cloud has marked a CIEM Policy as Excessive one?
When reviewing a policy , use the “Evidence for Excessive Permission” that pinpoints unnecessary permissions in AWS IAM policies and helps you understand and address excessive permission.
Access the Evidence for Excessive Permission popup from the detailed statistics page for a policy. To interpret the information:
1) Look at the “Reference Path” to understand where in the policy structure the excessive permission is defined
2) Review the “Response” to identify the action that may be unnecessarily allowed or denied
— Reference Path is the structured representation of the policy’s JSON document, highlighting where the permission is defined. For example, “Policies.PolicyVersionList.Document.Action” refers to the Action field in the policy’s Document structure where permissions like “s3:ReplicateDelete” are specified.
— Response is the specific permission or action evaluated for excessive access. For example,
“s3:ReplicateDelete” indicates a permission related to s3 bucket replication.
I want to know the increase in count for excessive permissions by date? How can I get that?
After each scan, the increased count displays in the CIEM dashboard. Just hover over the different identities(users/groups/roles/policies) to see the updated count since the last scan date.
How can I view policies by “Type” and “Usage” for any identity(User/Group/Role/Policy)?
You can filter policies based on the following categories from the Detailed statistics page:
— All: Displays all policies irrespective of type or status
— Excessive: Shows policies that have excessive permissions, meaning they grant more access than necessary.
— Unused: Lists policies that are attached but haven’t been used for any action or resource access in a specified period.
— Inline: Highlights policies that are directly embedded within a user, group, or role rather than being standalone entities.
— Managed Policies: Focuses on standalone policies, either customer-managed or AWS-managed.
I want to see a combination of “Unused Inline Policies” or “Excessive Permissions in Managed Policies”. How can I do that?
Navigate to the Detailed Statistics page for a policy by clicking on the Policy block in the dashboard. Within the Policy Details page, from the Filter drop-down list on the side pane, combine filters to narrow down your results.
For example, select the following combination within a policy:
Managed + Excessive: Displays excessive permissions in managed policies
Inline + Unused: Displays unused inline policies
How do I determine if a policy is considered to have excessive permission?
When reviewing a policy , use the “Evidence for Excessive Permission” that pinpoints unnecessary permissions in AWS IAM policies and helps you understand and address excessive permission.
Access the Evidence for Excessive Permission popup from the detailed statistics page for a policy. To interpret the information:
1) Look at the “Reference Path” to understand where in the policy structure the excessive permission is defined
2) Review the “Response” to identify the action that may be unnecessarily allowed or denied
— Reference Path is the structured representation of the policy’s JSON document, highlighting where the permission is defined. For example, “Policies.PolicyVersionList.Document.Action” refers to the Action field in the policy’s Document structure where permissions like “s3:ReplicateDelete” are specified.
— Response is the specific permission or action evaluated for excessive access. For example, ” s3:ReplicateDelete” indicates a permission related to s3 bucket replication.
I want to know the difference between an “Allow” and a “Deny” Effect?
By default, AWS denies all actions unless explicitly allowed.
— Deny: Explicitly blocks access, overriding any “Allow” permissions.
— Allow: Grants access to specified actions and resources.
I want to know what is ARN and its role in policies?
ARN stands for “Amazon Resource Name”, a unique identifier for AWS resources. Policies use ARNs to specify resources. Example: arn:aws:s3:::my-bucket
How can I view or manage different versions of a policy or configuration associated with an identity (such as a user, role, or group)?
Within the Identity details page, the “Version” drop-down allows users to switch between different versions of a policy to review changes over time or compare settings.
Where can I find the Active Version for an IAM policy?
From the CIEM dashboard, click the Policy block and navigate to the Details page that displays the specific version(Active Version) of an IAM policy that is currently in effect for the identity (such as a user, group, or role) to which the policy is attached.
By default, the first version of a policy is the active version when the policy is created. Subsequent versions are inactive until explicitly set as active.
How do I get to know the excessive permission on a specific bucket?
From the Identity details page, you can search by one of the following in the Policy Details section:
1) Amazon Resource Name(ARN)
2) Cloud service provider(for example, AWS)
3) Resource Type(for example, IAM)
4) Unique Account ID where the resource resides(for example, 438664686704)
5) Resource Path that contains the specific IAM group(for example, CIEM_Test_Group)
I want to view policies, permissions, and services linked to each identity. Where can I get this from?
Within the Identity details page, the Policy Details Map presents an interactive tree view of policies, permissions, services, and resources linked to each User, Group, or Role within the AWS environment.
For quick analysis of events, I need vital piece of information. Where can I get it from?
Saner CIEM dashboard provides Critical Activity Logs that contain information about Events, Request details, User identity, Additional user context, Resource information and more. Users have an additional capability to filter critical activity logs with specific search criteria.
How do I proceed with remediation or fixes for the findings?
From Saner CIEM dashboard, click the Fix icon pertaining to a finding for guidance or recommended steps for resolving the issue.
I want to quickly analyze the identities based on complete and current information of findings. How does Saner CIEM enable me to do this?
You can directly view the breakdown of findings from the All Findings block in Saner CIEM dashboard. Alternatively, you can export the findings to a CSV spreadsheet, select the necessary identities and findings and proceed with the remediation.
How is the principle of least privilege applied in Saner CIEM?
By default, AWS denies all actions unless explicitly allowed. Within the Policy Details section for an identity, you’ll find the options applied for a resource.
— Allow: Grants access to specified actions and resources.
— Deny: Explicitly blocks access, overriding any “Allow” permissions.
I’d like to analyze if the access is effective enough? How do I do that?
Within the Identity details page, the Policy Details Map presents an interactive tree view of policies, permissions, services, and resources linked to each User, Group, or Role within the AWS environment and helps organizations and teams to determine who has access to what. By analyzing the effective permissions from this inbuilt topographic map of identities and their access across, users can mitigate unauthorized access.
I want to understand the key capability of Saner CIEM
The centralized dashboard in Saner CIEM helps businesses surveil and manage cloud entitlements and privilege policies. With enhanced visibility organizations can eliminate redundant, dormant, or overprivileged identities.
What key challenges can I overcome with Saner CIEM?
Saner CIEM helps identify Over-permissive access and ensure users and services have only minimum required privileges.
What do I utilize for surveillance and managing cloud entitlements?
Saner CIEM provides “Identity” that denotes a user, group, or role with permissions assigned to access cloud resources and helps in surveillance and managing cloud entitlements.
How can I utilize policies to govern access and permissions in cloud environment?
Policies contain a set of rules and configurations that you can leverage to govern access and permissions in the cloud environment.
How to Know the Excessive Permissions on a Specific Bucket?
Click to read about the excessive permissions on a specific bucket or service.

