Saner helps IT administrators gain visibility and control over devices in their IT environment. The Managed Device page serves as a central hub where you can manage devices across your organization.
From the Managed Device page, you can create groups, assign tags, disable devices, and perform other key tasks.
This guide provides the information you need to use the features on the Managed Device page to manage your devices effectively.
Access the Managed Device page
To open the Managed Device page in Saner, follow these steps:
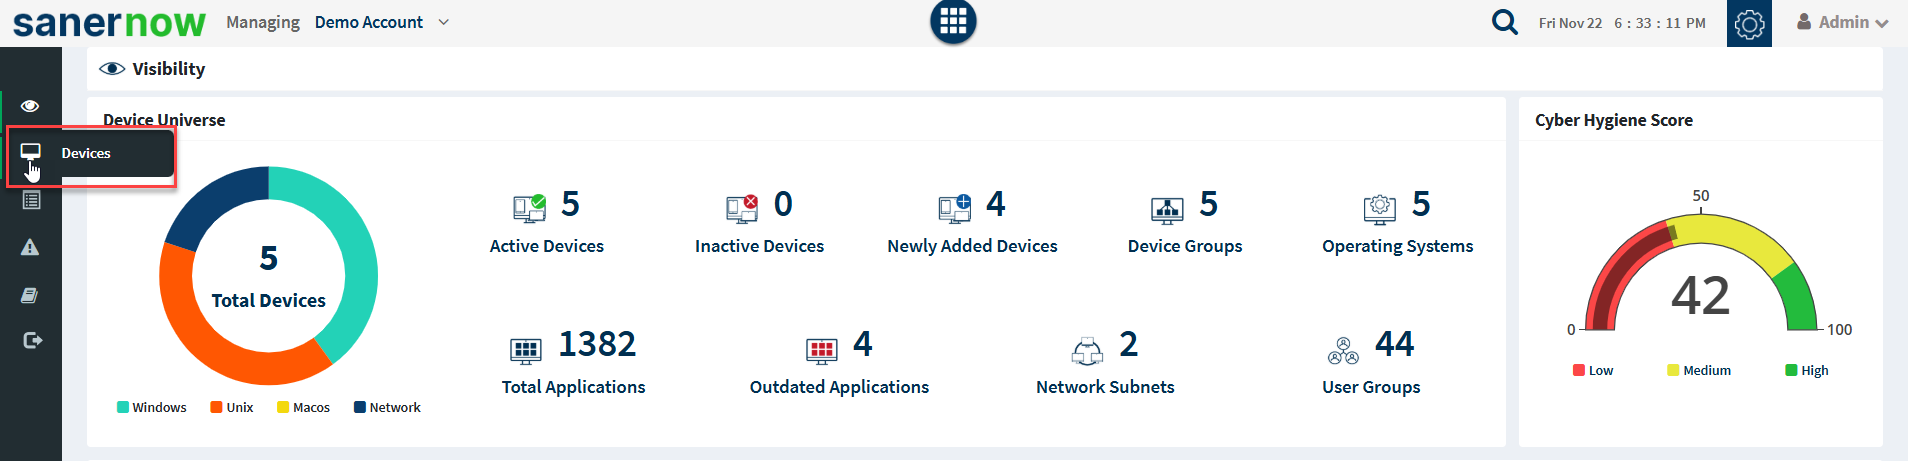
1: Sign in to the Saner web console, and select the account you want to use.
2: On the Saner Unified Dashboard page, select the Managed Device ![]() icon.
icon.
Explore the Managed Device page
You can use the Managed Device page in Saner to perform various actions on devices within an account. The sections below explain how to use its features to manage your devices effectively.
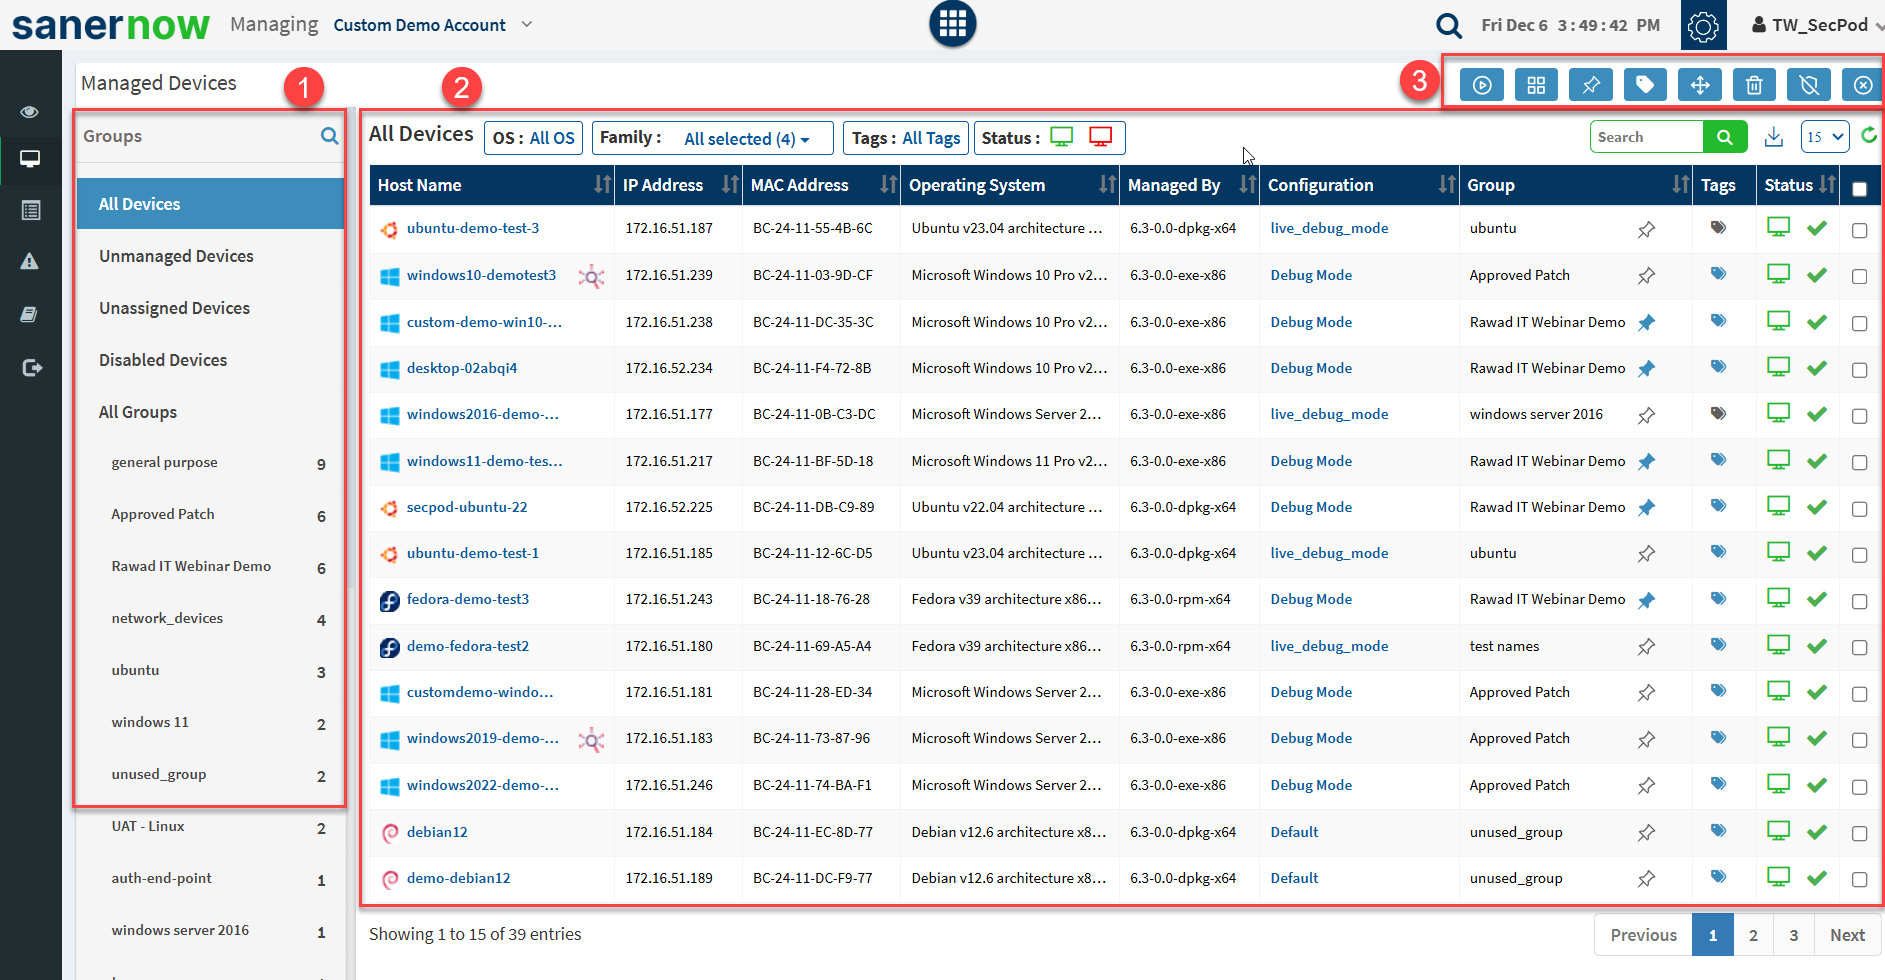
The Managed Device page is divided into three sections:
- Groups
- All Devices
- Action Buttons
Groups
Saner includes two types of groups: default groups and custom groups. You can view both types in the left pane of the Managed Device page.
Groups help you organize devices for easier administration. They enable system administrators to perform tasks such as deploying software, managing patches, and handling other device management operations.
Saner automatically creates default groups based on operating systems. For example, groups such as Windows 7, Windows 8, Ubuntu, and CentOS are default groups. Each default group includes devices that run the corresponding operating system.
Custom groups are created by users to meet specific organizational needs.
| Note You can’t modify or delete Default Groups. Only Custom Groups can be modified or deleted. |
You can create custom groups based on your organization’s needs. During group creation, you can define criteria to automatically move devices into the appropriate custom group.
Group categories
The Groups section on the Managed Device page in Saner displays the following categories:
- All Devices
- Unmanaged Devices
- Unassigned Devices
- Disabled Devices
- All Groups
All Devices
Lists devices managed by the Saner Agent or Saner Network Scanner.
Unmanaged Devices
Lists devices that are not managed by the Saner Agent.
Unassigned Devices
Lists devices where the Saner Agent couldn’t determine the operating system.
Disabled Devices
Lists devices that have been disabled by a system administrator.
All Groups
Lists both default and custom groups in Saner. The number of devices in each group appears next to the group name. Refer to the Action Buttons section to learn more about modifying Custom Groups.
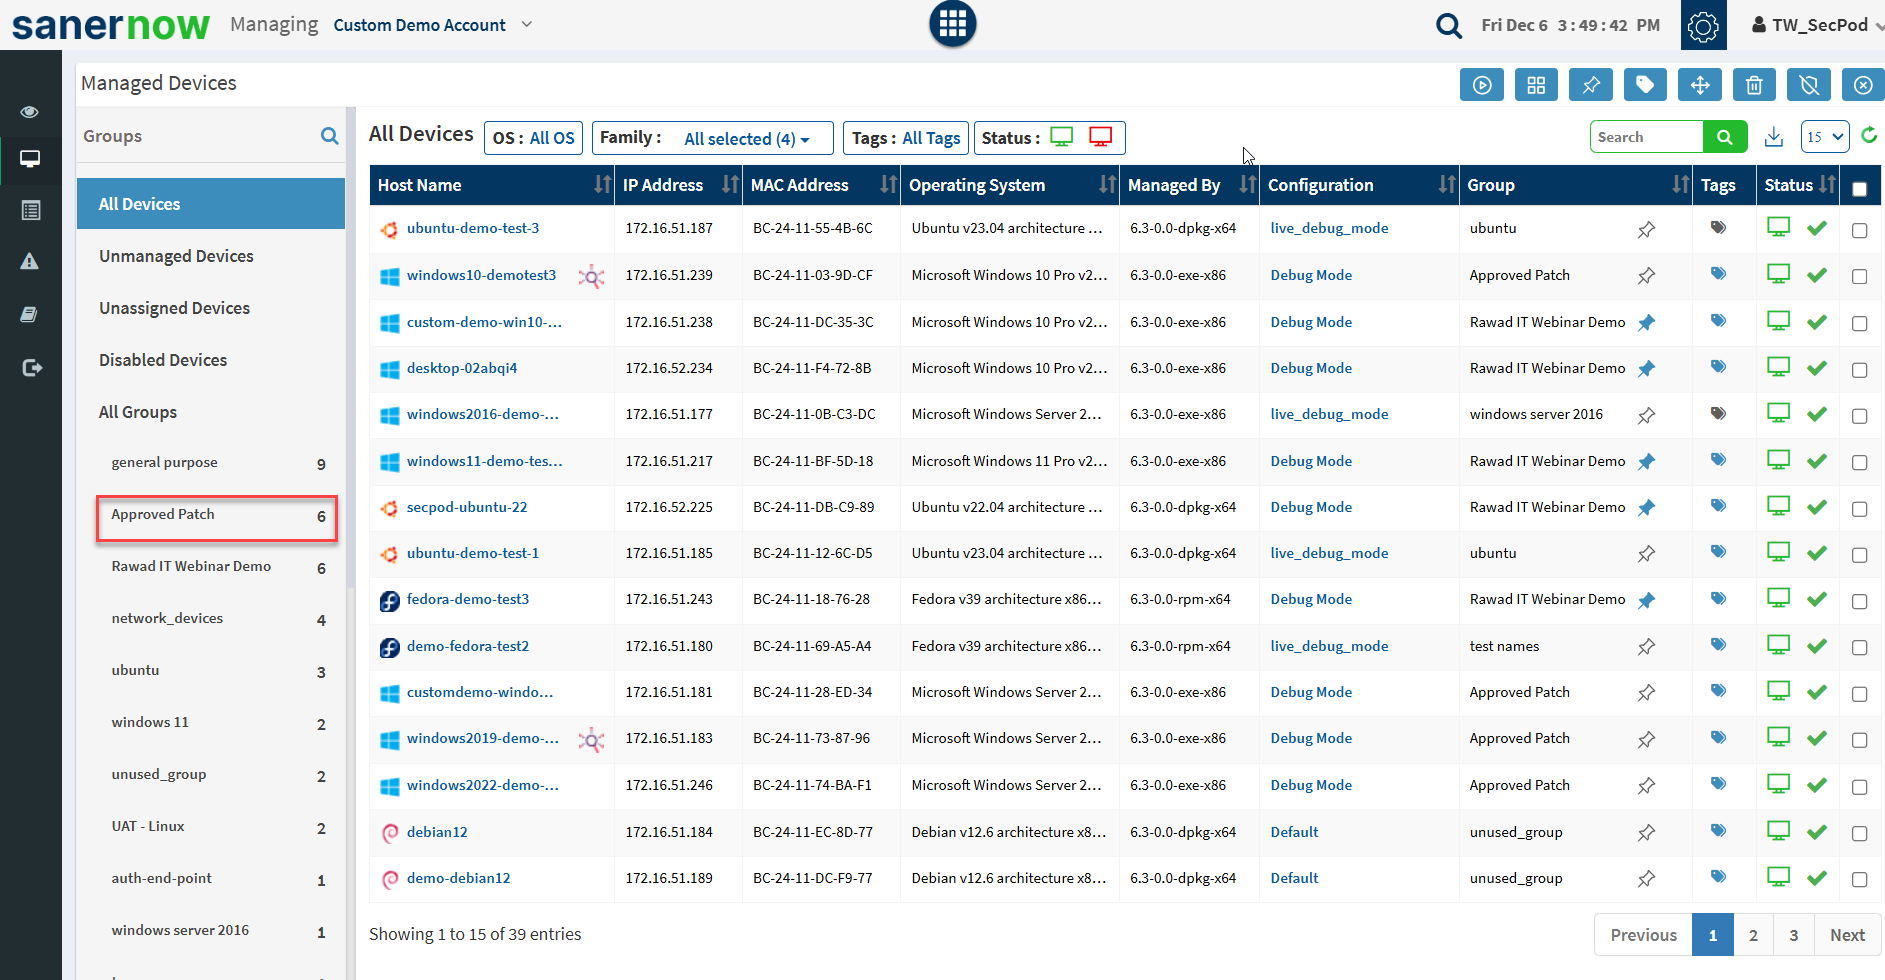
The All Devices pane displays devices managed by the Saner Agent or Saner Network Scanner in a table format.
Column descriptions
- Host Name
Displays the hostname of the device. - IP Address
Displays the IP address of the device. - MAC Address
Displays the MAC address of the device. - Operating System
Displays the operating system running on the device. If the operating system is outdated, the name appears in red. - Managed By
Indicates whether the device is managed by the Saner Agent or Saner Network Scanner.- If managed by the Saner Agent, the agent version appears next to the group.
- If managed by the Saner Network Scanner, an icon appears next to the device.
- Configuration
Displays the configuration assigned to the Saner Agent on the device. For devices managed by the Saner Network Scanner, the network scan configuration is shown.- If the Saner Agent uses the default configuration, you can’t edit it.
- If a custom agent configuration is applied, the Edit option is available to account admins and organization admins.
- Regular users can view the agent configuration and network scan configuration but can’t edit them.
- Group
Displays the group the device belongs to. An icon appears next to the group name to indicate whether the device is pinned to the group.
| Icons | Status |
| The device is pinned to the group and can’t be moved. | |
| The device isn’t pinned to the group and can be moved. |
Tags – This column displays whether the device has default or custom tags.
| Icons | Status |
 | The device has default tags applied. |
 | The device has custom tags applied. |
- Status
Displays the device status and the status of the Saner Agent running on the device. Refer to the Agent Status Icons section to learn more about the various icons displayed in this column.
Agent status icons
A unique icon represents the status of each activity performed by the Saner Agent on a device. The following icons appear on the Managed Device page to indicate actions performed by the Saner Agent.
| Icon | Description |
| The Saner Agent on the device is being upgraded. | |
| The Saner Agent upgrade request was aborted. | |
| The Saner Agent on the device is being upgraded. | |
| The Saner Agent on the device is being upgraded. | |
| The Saner Agent on the device has failed. | |
 | The Saner Agent on the device is active and functioning properly. |
| The Saner Agent on the device is deactivated. | |
 | An uninstall request for the Saner Agent has been issued. |
 | The Saner Agent has received a scan request and will start scanning the device. |
 | The Saner Agent is scanning the device. The scan includes a vulnerability scan, a compliance scan, and a detailed system information scan. |
 | The Saner Agent has completed the vulnerability scan and is now performing the missing patches scan on the device. |
 | All scans—vulnerability, compliance, missing patches, install patches, and detailed system information—were successfully completed on the device. |
 | The Saner Agent scan failed on the device. This means that one or more of the following scans failed: vulnerability scan, compliance scan, or detailed system information scan. |
| The Saner Agent scan on the device has stopped. One of the following scans was interrupted: vulnerability scan, compliance scan, or detailed system information scan. | |
| The Saner Agent is downloading content from the Saner Cloud Server. In an on-premises setup, the Saner Agent downloads content from the Saner On-Premises Server. | |
| The Saner Agent has downloaded content from the Saner Cloud Server. | |
| The Saner Agent has started a remediation task on the device. | |
 | The Saner Agent has completed a remediation task on the device. |
 | The Saner Agent failed to complete the remediation task on the device. |
| The remediation task initiated on the device has stopped. |
| The remediation task does not apply to the device. |
| The Saner Agent has completed the remediation task on the device. A reboot is required. | |
 | Host peer verification is enabled, and a valid certificate is present on the device. |
 | Server certificate validation is disabled on the device. |
 | Server certificate validation failed on the device. |
| The Saner Agent Service has started on the device. | |
| The Saner Agent service has stopped on the device. | |
 | The device with the Saner Agent installed is active (online). |
 | The device with the Saner Agent installed is inactive (offline). |
 | The device is active (online), but a reboot is required. |
 | The device is inactive (offline), but a reboot is required. |
 | The device is active (online) and hasn’t been scanned in over seven days. |
 | The device is inactive (offline) and hasn’t been scanned in over seven days. |
| This icon indicates that the device with the Saner Agent installed is offline. | |
 | Important folders required by the Saner Agent are missing. |
 | Valid proxy settings are applied to the Saner Agent. |
 | Invalid proxy settings have been applied to the Saner Agent. |
 | The Saner Agent is performing a rollback action on the device. |
 | The rollback action initiated by the Saner Agent on the device has failed. |
Endpoint device icons
Saner supports a variety of endpoints and network devices. Each device is represented by a unique icon on the Managed Device page.
| Icon | Description |
| Represents devices running the Windows operating system | |
 | Represents devices running the macOS operating system. |
| Represents devices running the Ubuntu operating system. | |
| Represents devices running the Red Hat operating system. | |
| Represents devices running the Linux operating system. | |
 | Represents devices running the Fedora operating system. |
| Represents devices running the CentOS operating system. | |
 | Represents devices running the Debian operating system. |
| Represents devices running the Mint operating system. | |
| Represents devices running the Alma OS operating system. | |
| Represents devices running the Alpine operating system. | |
| Represents devices running the Rocky operating system. | |
| Represents devices running the Open Suse operating system. | |
| Represents devices running the Amazon Linux operating system. | |
| Represents devices running the AIX operating system. | |
 | Represents wireless access point devices on the Managed Device page. |
 | Represents wireless access point devices on the Managed Device page. |
 | Represents bridge devices on the Managed Device page. |
 | Represents broadband routers on the Managed Device page. |
 | Represents routers on the Managed Device page. |
 | Represents firewall devices on the Managed Device page |
 | Represents switch devices on the Managed Device page. |
 | Represents telecom devices on the Managed Device page. |
 | Represents terminal server devices on the Managed Device page. |
 | Represents terminal devices on the Managed Device page. |
 | Represents VoIP adapter devices on the Managed Device page. |
 | Represents VoIP phone devices on the Managed Device page. |
 | Represents gaming console devices on the Managed Device page. |
 | Represents general-purpose devices on the Managed Device page. |
 | Represents load balancer devices on the Managed Device page. |
 | Represents media devices on the Managed Device page. |
 | Represents network scanner devices on the Managed Device page. |
 | Represents PBX devices on the Managed Device page. |
 | Represents PDA devices on the Managed Device page. |
 | Represents phone devices on the Managed Device page. |
 | Represents power devices on the Managed Device page. |
 | Represents print server devices on the Managed Device page. |
 | Represents printer devices on the Managed Device page. |
 | Represents the proxy server on the Managed Device page. |
 | Represents remote management devices on the Managed Device page. |
 | Represents miscellaneous security devices on the Managed Device page. |
 | Represents specialized devices on the Managed Device page. |
 | Represents storage devices on the Managed Device page. |
Manage devices with action buttons
| Button | Usage |
 | Used to initiate a scan on the selected device. |
 | Used to create a group in Saner. |
 | Used to pin/unpin a device from a group in Saner. |
 | Used to create tags for selected devices. |
 | Used to move selected device from one group/account to another group/account |
 | Used to delete a selected device. |
 | Used to uninstall Saner Agent from a selected device. |
 | Used to disable a selected device. |
 | Used to enable a disabled device. |
Scan a device from the Managed Device page
Follow the below steps to scan a device from the Managed Device page.
1: Click the checkbox next to the Status column to select the device. You can choose one or more devices to scan.
2: Click the ![]() button to launch the scan on the devices.
button to launch the scan on the devices.
A confirmation message appears on the screen.
3: Click OK to launch the scan.
The Saner Agent will begin the scan on the selected device(s). Refer to the Agent Status Icons table to understand the actions performed by the Saner Agent on the device.
| Note Scans can only be launched for devices managed by the Saner Agent. Any scan requests for remotely managed devices will be ignored. |
Create groups from the Managed Device page
Follow the below steps to create a group from the Managed Device page.
1: Click the ![]() button on the top right to create a group.
button on the top right to create a group.
A pop-up window appears on the screen.
2: Provide a name for the group in the Group Name text box.
3: Briefly describe the newly created group in the Group Description text box. Both Step 3 and Step 4 are mandatory.
You need to specify whether you want to specify a OR or AND condition to the various criteria applied to the group. You can define multiple criteria while creating the group.
4:Click the + button in the group criteria section to add additional criteria and the – button to delete the criteria.
5: Apply the chosen group criteria to All Devices or Unassigned Devices.
All Devices – These are the devices on which Saner Agent is installed and active.
Unassigned Devices – These devices don’t have Saner Agent installed on them.
6: Click the Show Devices button. All the devices matching the specified criteria are listed.
7: Click the Create Group button to create the group.
The group is created and appears on the left side of the page. The number of devices in the group is displayed right next to the group.
Understand group criteria in Saner
Custom Groups can be modified using Group Criteria – a set of conditions that allows you to filter devices based on the following criteria:
- Host Name
- IP Address
- Operating System
- Family
- Device Type
- Tags
You can filter the results by specifying the conditions below to the Group Criteria.
| Condition | Usage |
| equals | When used will display devices where the filter applied matches the specified value. |
| contains | When used will display devices where the filter |
| does not contain | When used will display devices where the applied filter does not have the specified value. |
| starts with | When used will display devices where the applied filter starts with the specified value. |
| ends with | When used will display devices where the applied filter ends with the specified value. |
| Note Filters can’t be applied to the following group criteria – a. IP address (You can only provide the IP address for the device using a CIDR notation.) b. Tags |
Modify groups in Saner
Both the Default and Custom groups are listed together in Saner under All Groups on the Managed Device page.
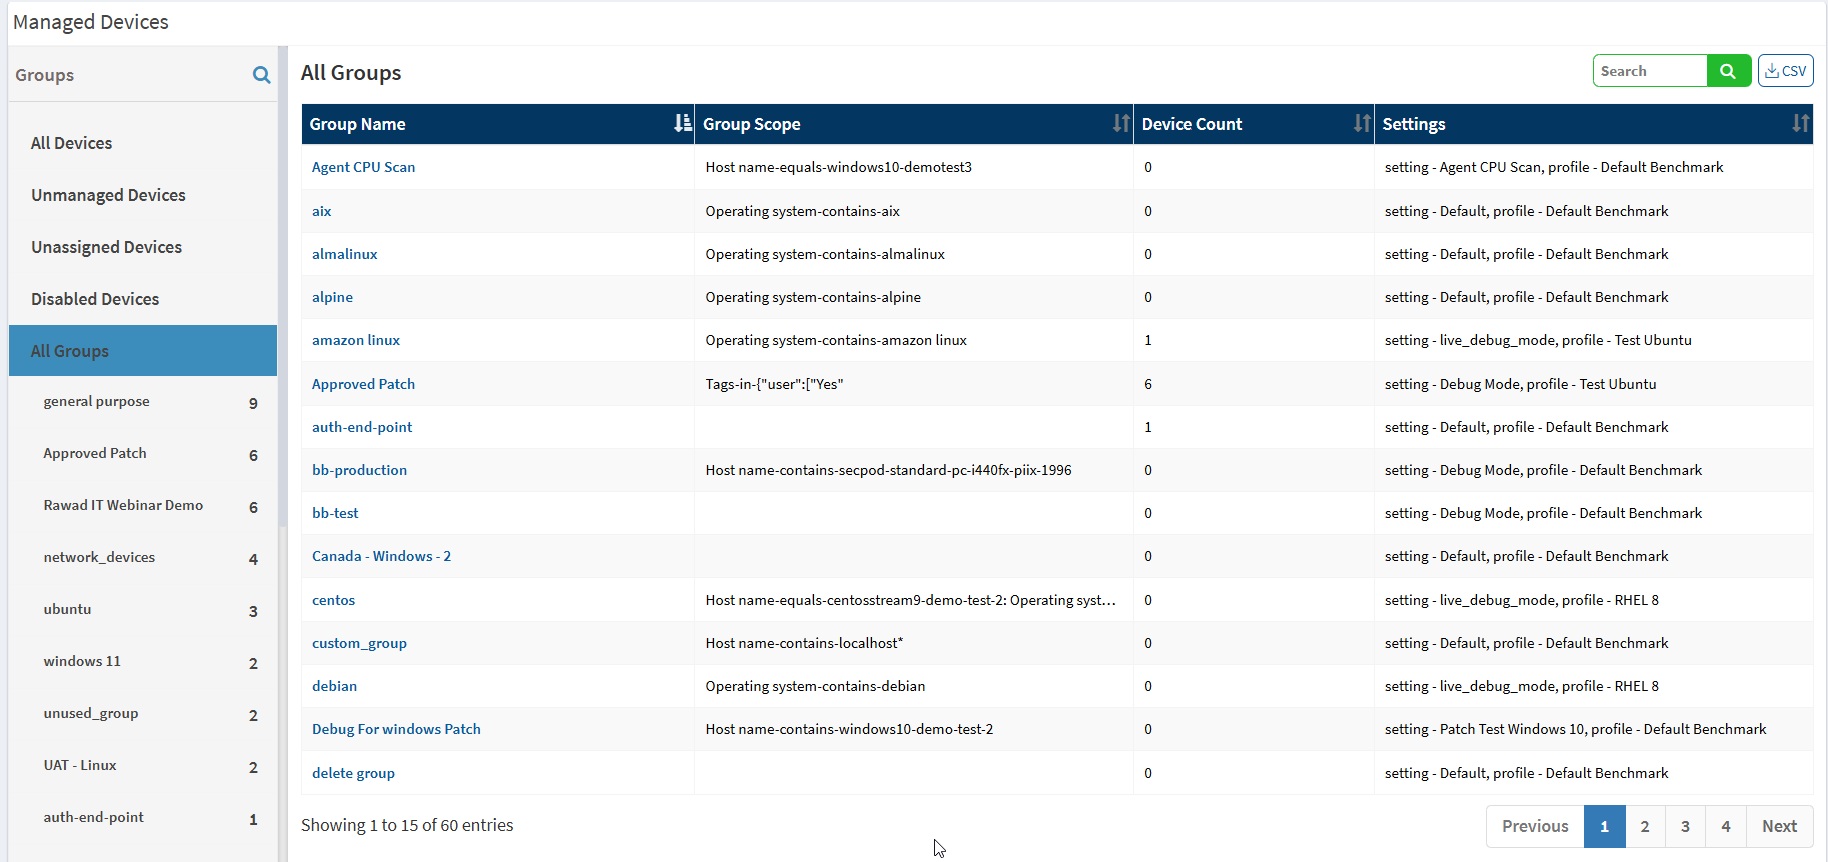
The All Groups table displays the following information.
| Column Name | Information Displayed |
| Group Name | The name assigned to the group. |
| Group Scope | The scope defined during the creation of the group. |
| Device Count | The number of devices part of the group. |
| Settings | The Saner Agent profile and Compliance benchmark settings assigned to the group. |
Select the group you want to modify from the list, then click the ![]() button. You can add new criteria or delete existing criteria from the selected group.
button. You can add new criteria or delete existing criteria from the selected group.
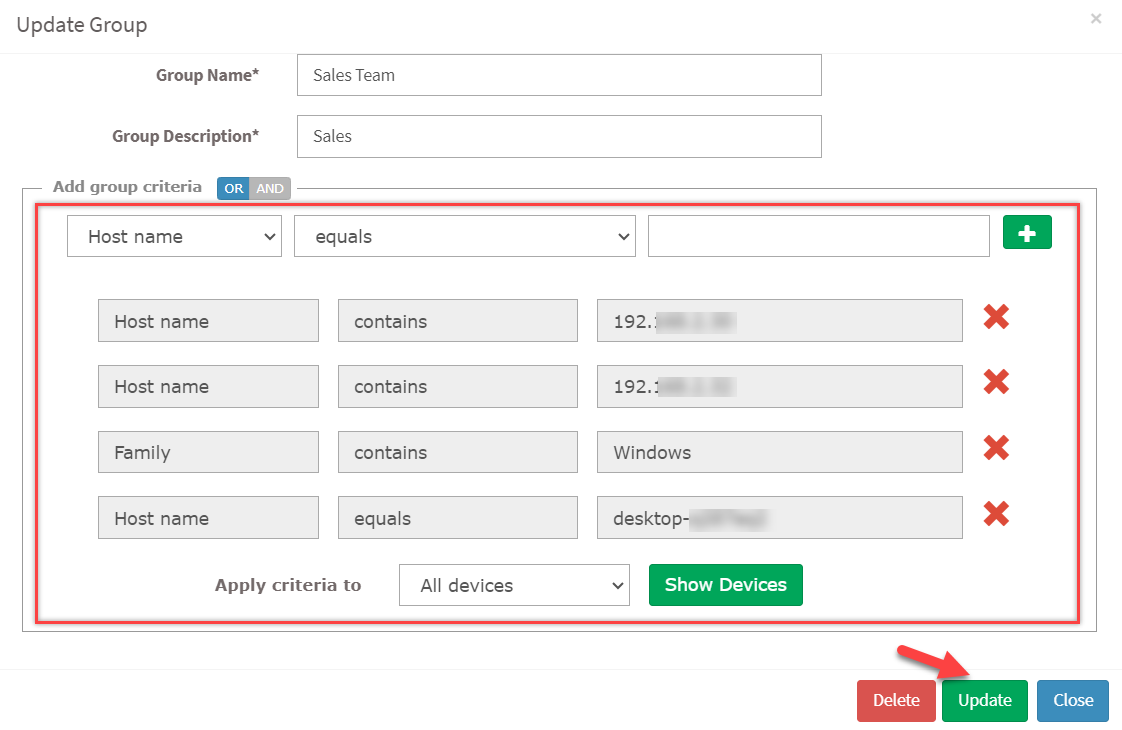
Click the Update button to save the changes. You will see two notification messages on the right side of the screen confirming the changes in the group.
If you want to delete a Custom Group, click the Delete button. All the devices belonging to the group will not be deleted.
Pin a device in Saner
You can choose to pin a device to a group permanently. When a device is pinned to a group, it won’t be moved to other groups, even if it matches their criteria.
Follow the below steps to pin a device to a group.
1: Select the device from the All Devices pane you want to pin to the group.
2: Click the ![]() icon to pin the device. A confirmation message appears on the screen. Click the Add button to pin the device to the group.
icon to pin the device. A confirmation message appears on the screen. Click the Add button to pin the device to the group.
Once the device is pinned, an ![]() icon appears next to the device. If the device is not pinned to any group, an
icon appears next to the device. If the device is not pinned to any group, an ![]() icon appears next to the device. To unpin a device, click the
icon appears next to the device. To unpin a device, click the ![]() icon. The device gets unpinned from the group.
icon. The device gets unpinned from the group.
Create device Tags for devices in Saner
The Managed Device page allows you to create device tags for one or more devices. By default, Saner applies 14 default tags to all devices. Two types of icons appear next to the devices in the Tags column on the Managed Device page.
The fourteen default tags are as follows:
- name
- ip_address
- mac_address
- os
- manufacturer
- serial_number
- subcategory
- group
- os_version
- os_service_pack
- ram
- disk_space
- cpu_name
- cpu_core_count
| Icon | Status |
| Device has default tags applied to it. |
| Device has custom tags applied to it. |
You can create device tags for one or more devices on the Managed Device page. Follow the below steps to create device tags for a device.
1: Select the device you want to add device tags by clicking the checkbox displayed next to them. You can select one or more devices by selecting multiple checkboxes.
2: Click the ![]() icon to create tags.
icon to create tags.
A pop up window appears on the screen.
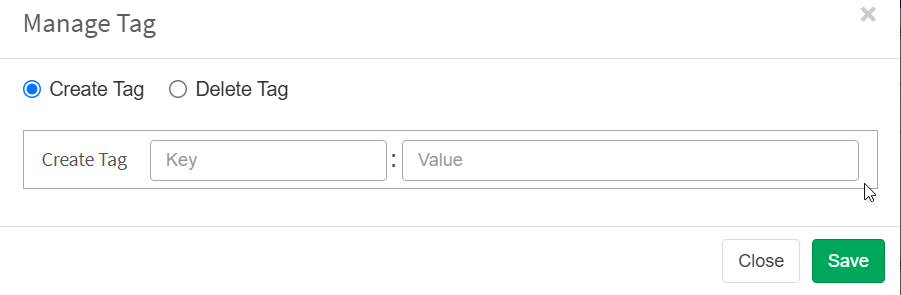
3: In the Create Tag input box, enter the name of the tag you want and specify the tag’s value in the Value input box.
Click the Save button.
The device tag gets added to the device.
You can follow the above steps to create tags for multiple devices listed on the Managed Device page.
| Note Default tags appear grayed out and can’t be edited or deleted. Only custom tags, which appear in blue, can be edited or deleted. |
Move devices in Saner
The Managed Device page allows you to move devices. The devices can be moved from
- From existing Organization to another Organization.
- From existing Account to another Account.
- From existing Group to another group
Follow the below steps to move a device.
1: Click the checkbox displayed next to the device that you want to move.
2: Click the ![]() button to move the device. A pop up window appears on the screen.
button to move the device. A pop up window appears on the screen.
3: Specify the Organization, Account, and Group where the device should be moved to. You can also specify if you want to pin the device after it is moved.
4: Click the Move Device button. A confirmation message gets displayed on the right side of the screen confirming the device move to the specified location.
| Note Pinned devices can’t be moved unless they are unpinned. |
Delete devices in Saner
All devices in Saner—both active and inactive—are listed on the Managed Devices page.
Follow these steps to delete an active or inactive device from the Managed Devices page.
1: Select the checkbox next to the device you want to delete.
2: Click the ![]() button.
button.
A pop-up screen appears on the screen.
3: Click Delete on the pop-up screen.
A confirmation message appears on the screen asking you to confirm the removal of the device(s)
3: Click OK button to delete the device from Saner.
| Note To delete multiple devices, select the checkboxes next to the devices you want to delete from Saner. |
Automatically delete inactive devices using conditions
Saner can automatically delete devices that have been inactive for a specified period. You can define conditions such as the number of days a device has been inactive or the number of scans in which it has not been detected.
Follow the steps below to create a policy for deleting inactive devices in Saner.
1: Click the ![]() button.
button.
A pop appears on the screen.
2: Click Delete Inactive Device.
The Delete Policy pop-up appears.
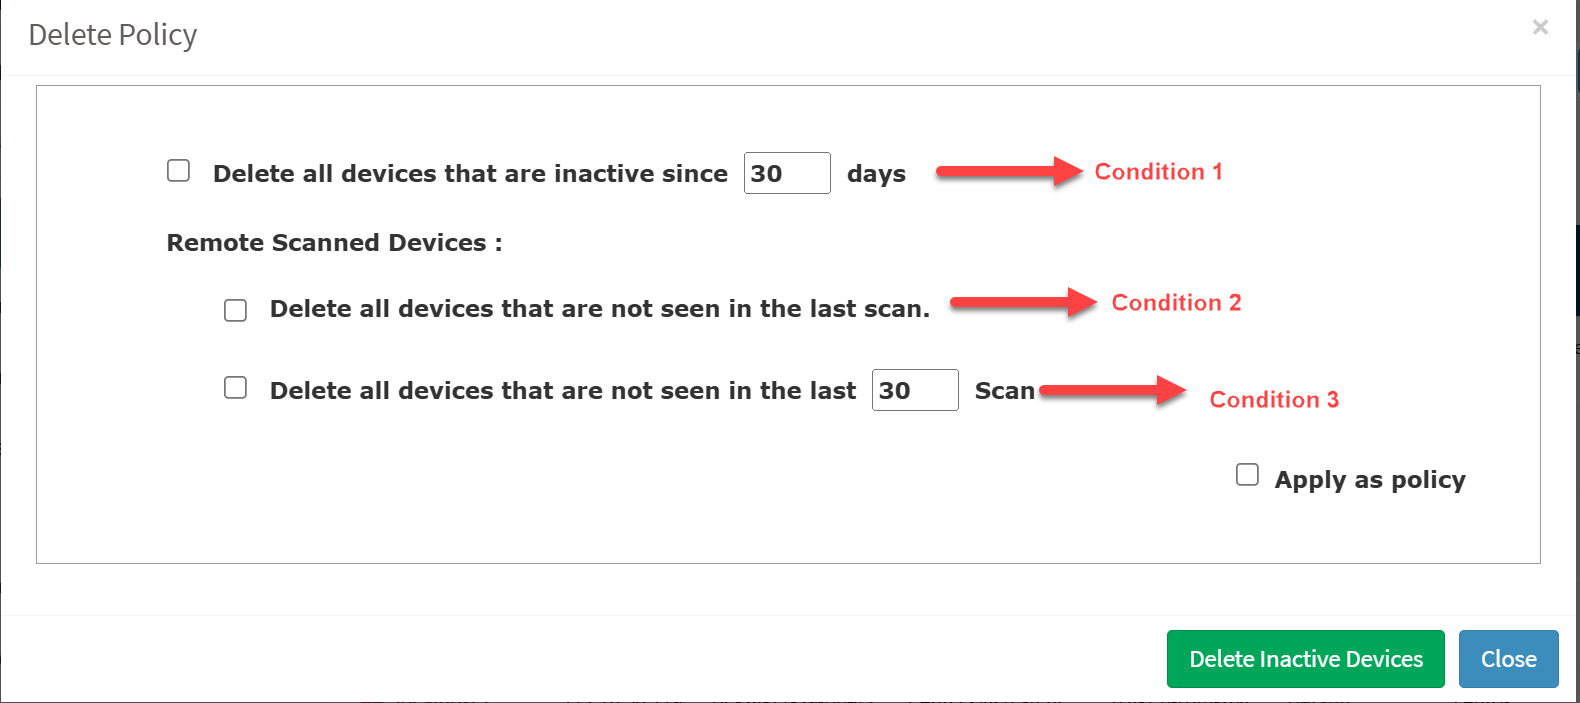
The Delete Policy window lists three conditions that Saner should check before deleting a device. You can select one or more conditions from the list.
- The first condition lets you define how many days a device must remain inactive. If the condition is met, Saner deletes the device. This applies only to devices with the Saner Agent installed.
- The second condition lets you delete remotely scanned devices (network devices) that haven’t been detected since the last scan.
- The third condition lets you specify how many consecutive scans a network device was not detected in. If the condition is met, Saner deletes the device.
3: Select the condition or conditions as per your requirements.
4: Click Delete Inactive Devices.
A pop-up message appears on the screen.
5: Click OK. Saner deletes the inactive devices that meet the selected condition.
Delete inactive devices by using a delete policy
You can delete devices in Saner by specifying a delete policy. In the delete policy, you can specify how many days a device must be inactive before Saner automatically deletes it.
Follow the steps below to create a policy for deleting inactive devices in Saner.
1: Click the ![]() button.
button.
A pop appears on the screen.
2: Click Delete Inactive Device.
The Delete Policy pop-up appears.
The Delete Policy window lists three conditions that Saner should check before deleting a device. You can select one or more conditions from the list.
- The first condition lets you define how many days a device must remain inactive. If the condition is met, Saner deletes the device. This applies only to devices with the Saner Agent installed.
- The second condition lets you delete remotely scanned devices (network devices) that haven’t been detected since the last scan.
- The third condition lets you specify how many consecutive scans a network device was not detected in. If the condition is met, Saner deletes the device.
3: Select the condition or conditions as per your requirements.
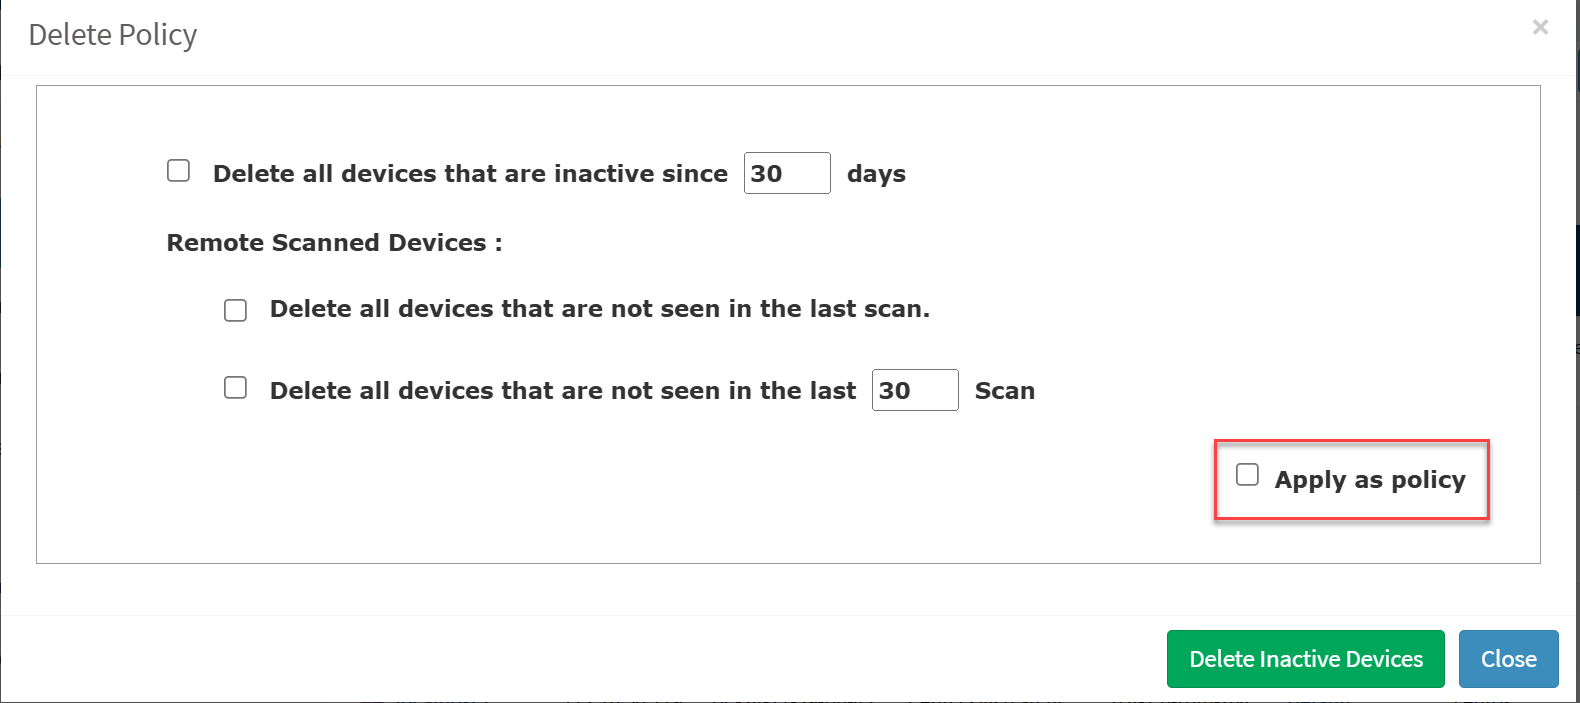
4: Select the Apply as policy check box.
A pop-up message appears on the screen.
5: Click the OK button to save the policy. Saner will run the policy periodically to check if any inactive devices meet the specified condition and delete them.

