The Saner CSRP(Cloud Security Risk Prioritization) framework offers a structured method for assessing, analyzing, and managing risks within cloud environments. It allows organizations to view risks at both the organization and account levels, classify these risks based on scoring criteria, and align them with security practices and industry frameworks like MITRE ATT&CK.
With detailed dashboards, decision trees, and remediation options, the CSRP framework assists teams in identifying exploitable risks, evaluating their potential technical impacts, and prioritizing actions for critical resources. Furthermore, it supports customized reporting and visualization, allowing organizations to continuously monitor risks, assess the possibility of automation, and ensure that remediation efforts align with business priorities.
Get Started
This section walks you through the essentials of using the Cloud Security Risk Prioritization (CSRP) Dashboard effectively. To start with, review the prerequisites to ensure smooth access. You can access the CSRP Dashboard through the Overall Account-Level Dashboard, or directly via the App Launcher.
From the organization-level dashboard, you can explore risk prioritization across various action categories and analyze cloud resource counts segmented by mission prevalence: Essential, Support, and Minimal. At the account level, you can go deeper into specific views, such as resource counts across priority levels, exploitable risks, the technical impact of misconfigurations, and the risks affecting your essential resources.
This guided entry point provides a clear path for prioritizing risks with precision throughout your organization and accounts.
Before accessing CSRP(Cloud Security Risk Prioritization), make sure that the necessary prerequisites are met. Once you are ready, you can easily access CSRP within Saner Cloud to identify and prioritize the most critical risks that need immediate remediation.
Pre-requisites
Cloud Security Risk Prioritization (CSRP) is an independent tool that functions alongside other tools such as Cloud Security Posture Management (CSPM), Cloud Security Posture Anomaly (CSPA), Cloud Infrastructure Entitlement Management (CIEM), and Cloud Security Remediation Management (CSRM). As a standalone tool, it can be enabled or disabled from the service provisioning section within the account settings of each user.
REMEMBER: CSRP requires CSPM to be active(enabled) in order to function. You can then choose to enable or disable CSRP during the service provisioning process and accordingly the tool appears in the App Launcher.
Access the CSRP(Cloud Security Risk Prioritization) Dashboard
You can access the CSRP Dashboard through 2 entry points: the Overall Account-Level Dashboard or directly via the App Launcher.
EntryPoint 1: From the Overall Account-Level Dashboard

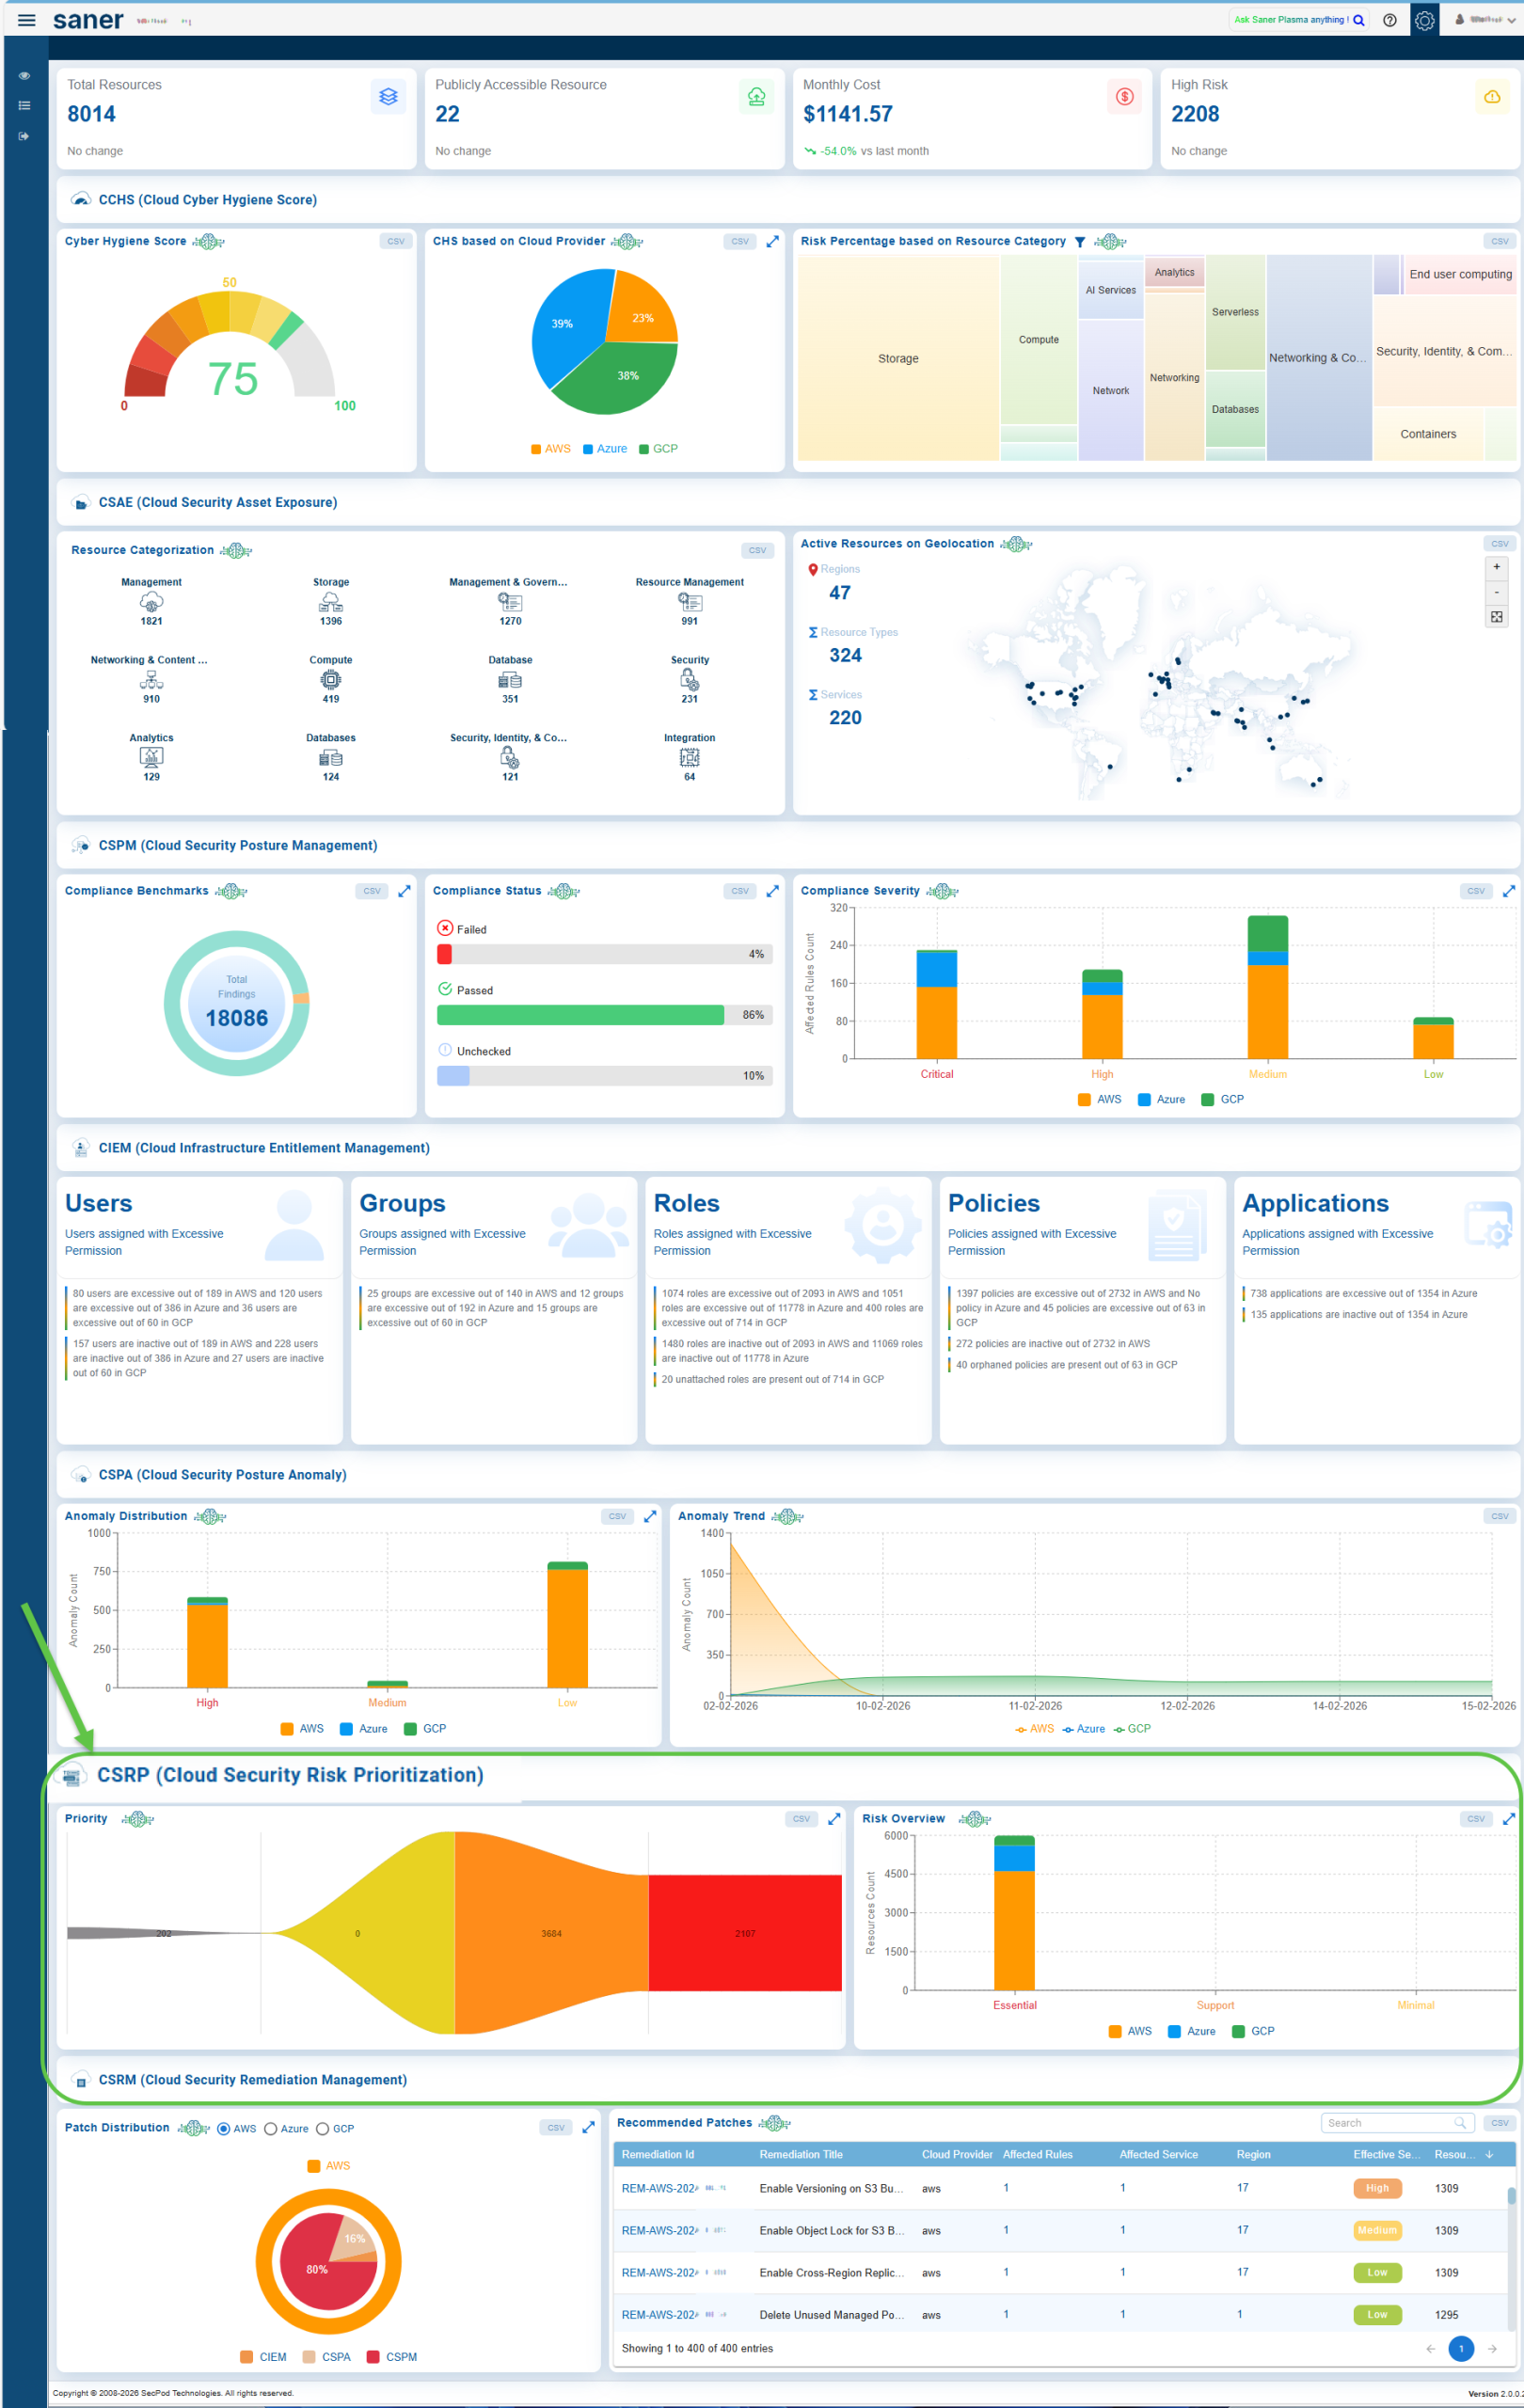
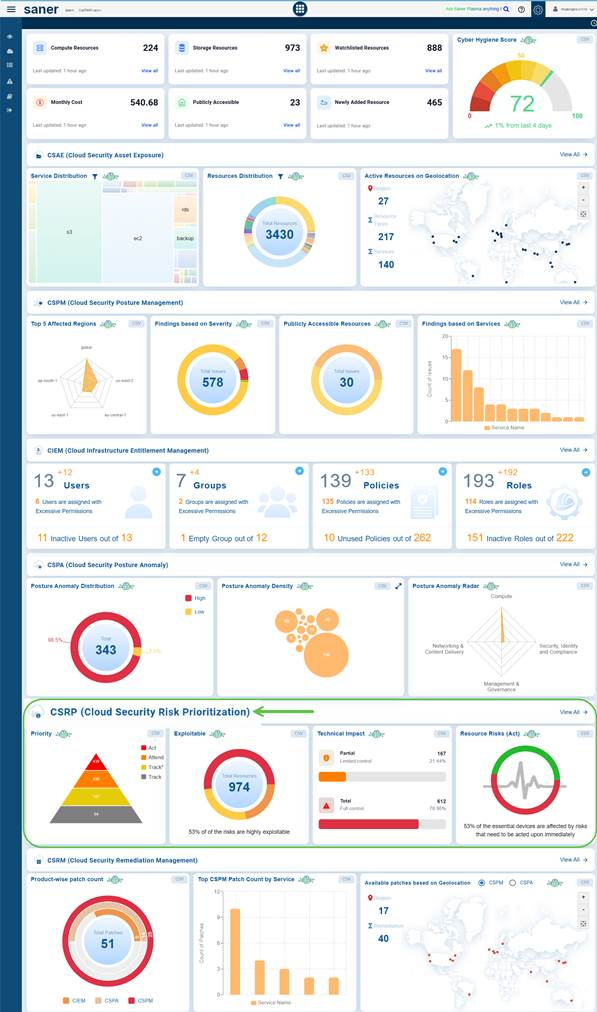
To access CSRP from the overall account-level dashboard, scroll down to the CSRP(Cloud Security Risk Prioritization) section.
To get redirected to the Cloud Security Risk Prioritization dashboard, click the View All link on the right.
EntryPoint 2: From the App Launcher

From the App Launcher, select Cloud Security Risk Prioritization(CSRP).
Glance at Risk Prioritization Views from the Organization and Overall Account-level Dashboard
The Risk Prioritization Views provide a consolidated perspective of security risks, enabling organizations to focus on what matters most. At the organization level, the dashboard highlights risk prioritization across different action categories and shows resource distribution for cloud providers grouped under mission prevalence categories such as Essential, Support, and Minimal.
At the account level, the dashboard provides a deeper drill-down, allowing you to view the resource count across priority levels, identify exploitable anomalies, assess the technical impact of potential exploits, and pinpoint risks that directly affect essential resources.
Risk Prioritization View in Overall Account-level Dashboard
View the Resource Count Across Priority Levels
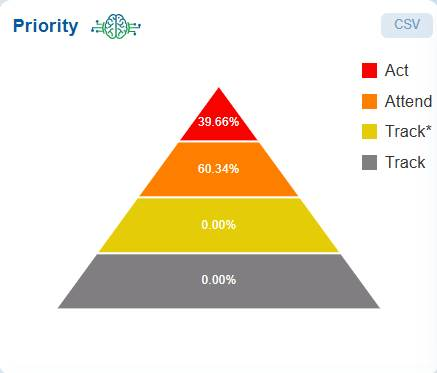
The Priority pyramid chart organizes risks into four prioritized categories: Act, Attend, Track*, and Track. This framework is designed to guide remediation efforts effectively.
A real-time view of the dashboard chart:
Hover over each category to see the percentage of risks.
At the top of the pyramid, the risks classified are as Act, which require immediate remediation due to their critical nature. The next category, Attend indicate the need for timely attention, though they are not urgent.
The Track* category includes lower-priority risks that should be monitored closely but do not require immediate fixes. Lastly, the Track category consists of risks that should be recorded and reviewed periodically to prevent escalation.
This prioritization framework helps security teams allocate resources efficiently, ensuring that the most critical threats are addressed first while still maintaining oversight of less urgent risks.
View the Exploitable Count
The dashboard chart emphasizes the importance of risk prioritization based on exploitability.
Click here for an overview of exploitable risks.
View the Technical Impact of Exploiting an Anomaly
The Technical Impact block displays the distribution of misconfigurations based on the extent of control the adversary gets over the component.
Click here to assess the full versus limited technical impact of exploiting an anomaly.
View the Risks Affecting Essential Resources
The dashboard chart highlights resources impacted by critical risks requiring immediate remediation (ACT category) and distinguishes them from those that remain unaffected.
Click here to identify the risks affecting essential resources.
Understand Saner CSRP Classification Based on Scoring Decision
Saner CSRP uses the Stakeholder-Specific Vulnerability Categorization (SSVC) decision tree model of CISA to prioritize risks into 4 possible decisions (Act, Attend, Track*, and Track).
Note: In the context of Cloud Security Risk Prioritization, the terms vulnerability and misconfiguration are considered equivalent and are used interchangeably.
Act
The misconfiguration requires attention from the organization’s internal, supervisory-level, and leadership-level individuals. Necessary actions include requesting assistance or information about the misconfiguration and publishing a notification either internally and/or externally. Typically, internal groups would meet to determine the overall response and execute agreed-upon actions. Cybersecurity & Infrastructure Security Agency recommends remediating Act misconfigurations as soon as possible.
Attend
The misconfiguration requires attention from the organization’s internal, supervisory-level individuals. Necessary actions include requesting assistance or information about the misconfiguration and may involve publishing a notification either internally and/or externally. Cybersecurity & Infrastructure Security Agency recommends remediating Attend misconfigurations sooner than standard update timelines.
Track*
The misconfiguration contains specific characteristics that may require closer monitoring for changes. Cybersecurity & Infrastructure Security Agency recommends remediating Track* misconfigurations within standard update timelines.
Track
The misconfiguration does not require action currently. The organization would continue tracking and reassessing the misconfiguration until new information becomes available. Cybersecurity & Infrastructure Security Agency recommends remediating Track misconfigurations within standard update timelines.
Follow the link to read more on how to navigate and explore the risk categories in Saner CSRP.
Configure Questionnaire and Assess Security Practices Across Core Domains for an Account
The questionnaire is designed to assist organizations in configuring and evaluating their security posture by addressing various domains of cybersecurity. It provides a fixed set of closed-ended questions with predefined answer options (e.g., Yes/No), making it efficient for data comparison and analysis. Users can also assign mission-critical values and categorize responses, enabling a prioritized view of security areas that require immediate attention.
After completing the configurations and saving, the system automatically runs the scan with the configurations and displays the details in the CSRP dashboard accordingly.
Access the Questionnaire

Click the icon on the top-right of the Saner CSRP dashboard to open the questionnaire. Answering questions from each category in the questionnaire helps categorize risks effectively and produce accurate results.
Complete the Configuration
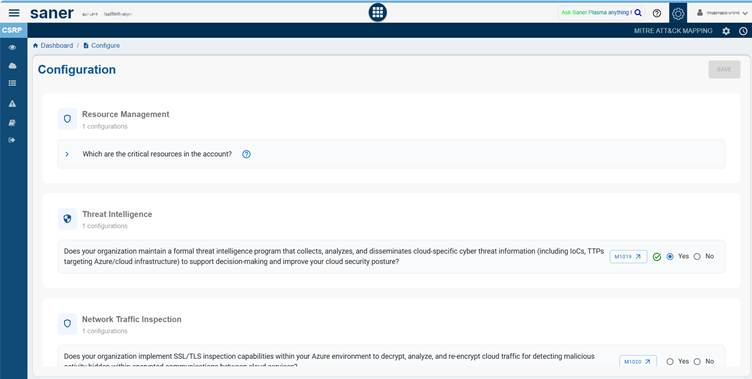
Each section includes task-oriented configurations aimed at ensuring robust protection, compliance, and a proactive defense against threats.
MITRE recommends specific mitigation methods to improve the security of cloud environments. In the configuration questionnaire, only those mitigation checks that cannot be automated are included, while the automated checks are excluded. This approach ensures that manual validation concentrates on areas where automation is not possible, aligning the questionnaire with MITRE’s recommended security practices.
As an example, Resource Management and User Training sections are explained. You can follow the same approach to complete the remaining sections of the questionnaire.
Expand the various sections of the questionnaire to provide your response.
Resource Management
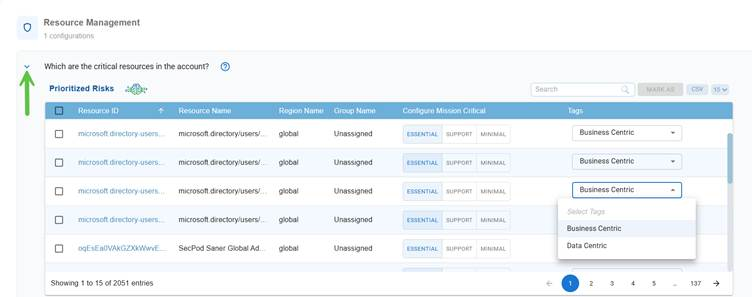
Configuration to identify the critical resources in the account.
Click on the downward arrow to display the Prioritized Risks pane.
Within the Prioritized Risks pane, under the Configure Mission Critical column, click on one of the values(Essential, Support, or Minimal) to configure the status indicating if the risk impacts mission-critical resources. This helps security teams understand the potential business impact of each finding.
Select the tag category(Business Centric or Data Centric) corresponding to a resource from the drop-down list in Tags column.
Click the link to read more on how the configured tags help to Assess and Prioritize Risks Across Resource Categories from the dashboard.
User Training

Configuration to confirm if your organization provides regular security awareness training to employees and contractors.
Clicking on the reference MITRE ID (M1017) navigates you to the MITRE ATT&CK framework where you gain insight into User Training information.
Use the slider(Yes) and turn it on or off to enable or disable the User Training configuration. On turning on the configuration, it evaluates your organization provides regular security awareness training to employees and contractors specifically covering cloud security threats, including phishing attacks targeting cloud accounts, social engineering tactics used against cloud services, and proper cloud account security practices.
Save Your Updates
Just click the Save button on the top-right of the questionnaire.
Map Risks to MITRE ATT&CK for Threat-Informed Defense
The MITRE ATT&CK framework supports a threat-informed approach to cloud security by aligning identified risks with real-world adversary tactics and techniques. By mapping misconfigurations to known attacker behaviors, organizations can effectively prioritize remediation efforts, enhance threat detection capabilities, and improve incident response. This standardized methodology facilitates clearer communication among security teams, and makes sure to focus on high-impact risks, and supports the development of defense tailored to actual attacker strategies in cloud environments.
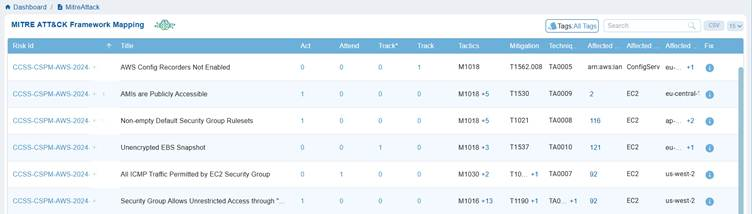
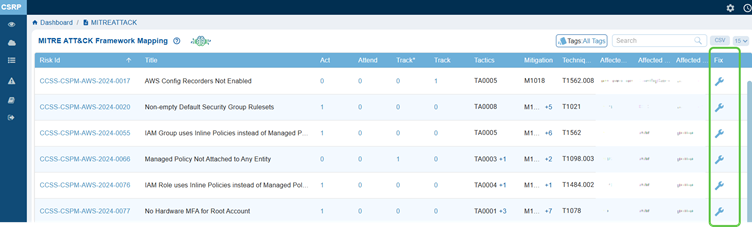
Saner CSRP uses the MITRE ATT&CK Framework Mapping and provides a consolidated view of identified cloud risks aligned with adversarial tactics, techniques, and mitigation strategies in a tabular format. Each risk is mapped to ATT&CK identifiers, showing the impacted assets, affected regions, and recommended fixes. This helps security teams quickly understand how risks relate to real-world attacker behaviours, prioritize response actions, and strengthen defences with a threat-informed approach.
Access the MITRE ATT&CK Framework Mapping

Access the MITRE ATT&CK Framework Mapping from the top-right hand side of the CSRP dashboard.
This opens the MITRE ATT&CK Framework Mapping table. Each column provides details on the identified cloud risks as described:
Identify and Map Cloud Risks to MITRE ATT&CK Behavior with ID and Title
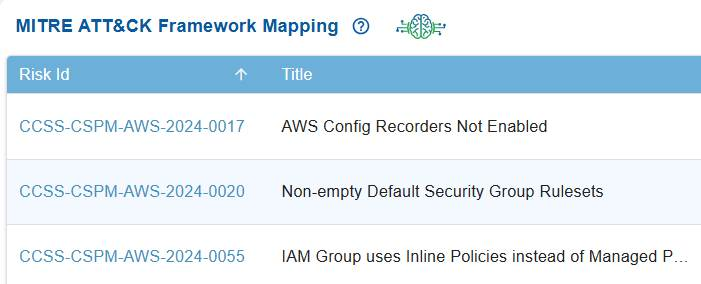
In Saner CSRP MITRE ATT&CK Framework Mapping view, the Risk ID serves as a unique reference for tracking security issues, while the Title describes the specific cloud misconfiguration or weakness, such as disabled AWS Config Recorders or insecure security group rules etc.
Each of these risks is mapped to relevant MITRE ATT&CK tactics, techniques, and mitigations, showing how they can be exploited by adversaries and what defensive actions are recommended. This linkage helps translate cloud risks into the context of real-world attacker actions, helping organizations to prioritize and address them more effectively.
Prioritize and Manage Risks Using Action Categories
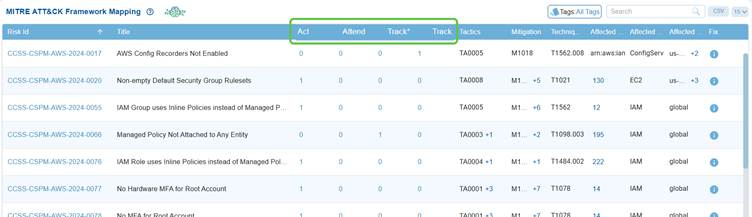
Saner CSRP MITRE ATT&CK Framework Mapping view, the columns Act, Attend, Track*, and Track categorize risks to guide response and remediation efforts.
Act highlights risks that need immediate fixing due to their severity or exploitability, while Attend marks those requiring review and further assessment. Track* is used for risks under closer monitoring because of their higher exposure or links to multiple attacker techniques, and Track covers risks that are monitored on a general basis.
This structured approach helps teams prioritize actions, ensuring the most critical threats are addressed first while maintaining visibility on lower-priority risks.
Understand the MITRE Tactics and Techniques Exploited by Each Risk and Corresponding Mitigation Strategy
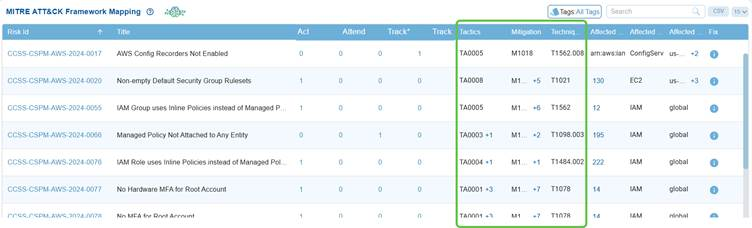
In the MITRE ATT&CK framework, each tactic code represents an attacker’s objective, each technique code describes the specific method used to achieve that objective, and each mitigation code outlines the recommended defense.
For example in Saner CSRP MITRE ATT&CK Framework Mappingdashboard view, the tactic TA0005 (Defense Evasion) reflects the attacker’s goal of avoiding detection, the technique T1562.008 (Disable Cloud Logs) shows how they might achieve it, and the mitigation M1018 (User Account Management) suggests a defensive action to counter the risk. Together, these codes create a clear mapping from attacker goals to actions and the corresponding defensive strategies.
Here’s a simple visual mapping of how MITRE ATT&CK Tactic (goal) connects to a Technique (method) and then links to a Mitigation (defense measure) based on Saner CSRP MITRE ATT&CK Framework Mapping.

Saner CSRP provides the codes for each Risk ID across the 3 code categories. Move your cursor over the code in Tactics, Mitigation, and Techniques Exploited columns to see the additional associated tactics, techniques, or mitigations beyond the one currently displayed.
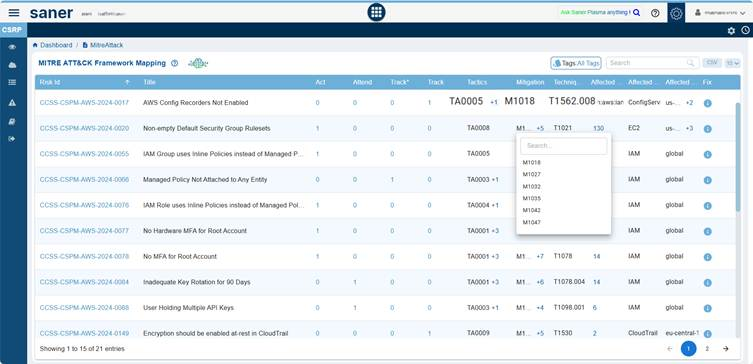
For example:
- M1018 +5 → shows User Account Management plus 5 more mitigations linked to that risk.
- TA0005 +1 → shows Defense Evasion plus 1 additional tactic related to that risk.
This helps avoid clutter by showing only the primary mapping while still allowing access to all related MITRE ATT&CK entries through expansion.
View the Impacted Resources, Services, and Regions
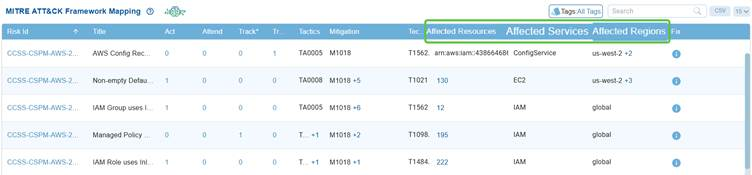
In the Saner CSRP MITRE ATT&CK Framework Mapping view, the Affected Resources, Services, and Regions columns show where and how risks impact the cloud environment. Affected Resources indicate the specific assets or instances exposed, Affected Services identify the cloud services such as IAM, EC2, or ConfigService that adversaries could target, and Affected Regions highlight the geographic scope of the exposure, whether limited to a region like us-west-2 or spanning globally. Together, they provide context on the scale and location of misconfigurations, linking ATT&CK techniques to real-world cloud assets that attackers may exploit.
Remediate Risks from MITRE ATT&CK Framework Mapping
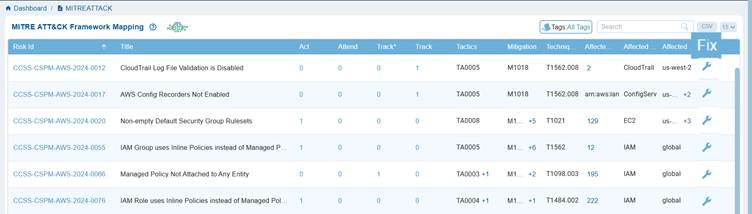
In the Saner CSRP MITRE ATT&CK Framework Mapping view, the Fix column provides direct access to remediation guidance for each identified risk. It links the mapped risk, tactic, and technique to actionable steps that security teams can take to mitigate or eliminate the risk.
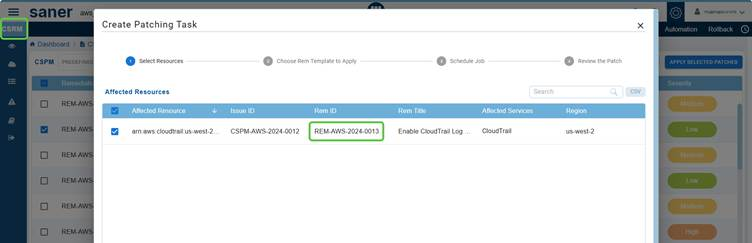
Clicking the Fix icon corresponding to a risk redirects you to Saner CSRM to begin your patching activities.
Explore the Account-level Dashboard Views
Saner CSRP dashboard provides a comprehensive view of your organization’s risk posture, allowing you to identify, analyze, and prioritize threats on a large scale. You can view prioritized risks directly on the dashboard and analyze them using CISA decision points. Additionally, you can gain an overview of exploitable risks and review the distribution of risk factors based on automatable reliability.
The dashboard delivers actionable insights, enabling you to identify risks that affect essential resources, assess risks across different categories, and review AWS, Azure, or GCP resources based on associated risks. This confirms that your security strategy remains focused on what matters most.
View the Prioritized Risks from the Account-level Dashboard

The Saner Cloud Risk Prioritization(CSRP) dashboard block displays the most severe risks identified within the account. The system automatically scans the account on a regular basis and categorizes the identified risks into four categories using the Stakeholder-Specific Vulnerability Categorization (SSVC) framework.
Clicking on each category(Act, Attend, Track*, and Track) takes you to the corresponding page, where you get a detailed view of the risks.
A look at what each category indicates:
Act(Immediate Action)

This category in the dashboard highlights risks that demand immediate action to mitigate critical threats.
In this case, the dashboard displays the current count as 435, with a 0.25% downward trend, signalling that potential high-priority issues have decreased compared to the last scan.
Note that the count is subject to change based on the scan run.
The Cybersecurity & Infrastructure Security Agency (CISA) recommends that you remediate Act related issues as quickly as possible.
Attend(Needs Attention)

Risks in this category are not critical but still require timely resolution to avoid escalation. In this case, the dashboard view displays the count stands at 333 indicating that these issues need attention. Click the three dots on the right side of this block to open the Prioritized Risks in the Attend category and begin addressing the high-severity risks.
The Cybersecurity & Infrastructure Security Agency (CISA) advises remediating Attend misconfigurations sooner than standard update timelines.
Track*(Being Observed)

This section covers risks that are being observed(monitored) for changes.
In this case, the dashboard view displays a count of 197 placing emphasis on monitoring potential risks closely. Click the three dots on the right side of this block to open the Prioritized Risks in the Track* category and begin addressing the high-severity risks.
Note that the count is subject to change based on the scan run.
The Cybersecurity & Infrastructure Security Agency (CISA) recommends remediating Track* misconfigurations within standard update timelines.
Track (Under Control)

This category reflects risks that are well-managed and stable, requiring no immediate action.
In this case, the dashboard displays a count of 67 indicating risks are being successfully managed and kept under control.
Note that the count is subject to change based on the scan run.
Click the three dots on the right side of this block to open the Prioritized Risks in the Track category and begin addressing the high-severity risks.
The Cybersecurity & Infrastructure Security Agency (CISA) recommends remediating Track related issues within standard update timelines.
Analyze Risks with CISA Decision Points

CISA uses decision points and associated values for risk scoring. These decision points include Exploitable, Automatable, Technical Impact, and Resource Risks.
Saner CSRP utilizes CISA’s decision points within the cloud dashboard views to deliver actionable insights for prioritizing security efforts based on risk assessments. These decision points assist organizations in determining which issues are most critical, considering both their potential for exploitation and their impact on high-value assets. This enables organizations to concentrate their resources on the most urgent security concerns.
Get an Overview of Exploitable Risks
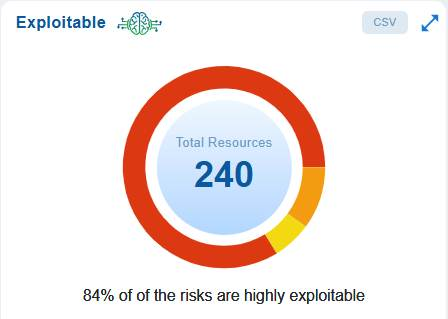
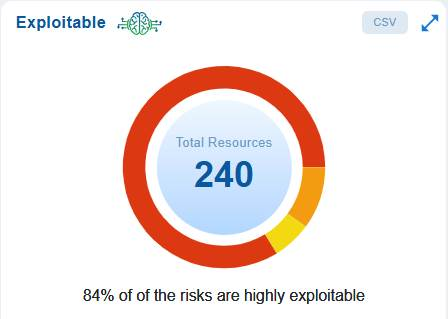
The “Exploitable” measure determines the present state of risk exploitation and displays the resource distribution in the Exploitable dashboard block as a pie chart with different color shades. The risk count is expressed in percentage and categorized into High, Medium, and Low.
To get a full view of the chart, just click the double-arrow icon at the top-right corner of the dashboard block.
The dashboard chart emphasizes the importance of risk prioritization based on exploitability.
In this case, out of a total of 240 resources, 84% of the identified risks are highly exploitable, indicating that attackers can easily take advantage of these issues if they are not addressed. Since the exploitability of these risks directly influences the likelihood of a successful attack, it is essential to prioritize the remediation of these high-risk items over those that are less exploitable.
Note that the count is subject to change based on the scan run.
Click to learn how to remediate risks in the Exploitable category.
Review Risk Factor Distribution Based on Automatable Reliability
The term “automatable” refers to how easily and quickly a cyber threat actor can automate the exploitation events. It addresses the question, “Can an attacker easily automate the creation of exploitation events for this risk?” Several factors determine if an actor can quickly trigger multiple exploitation events. These factors include the complexity of the attack, the specific code that the actor needs to write or configure, and the typical network deployment of the vulnerable system, including how exposed the system usually is.
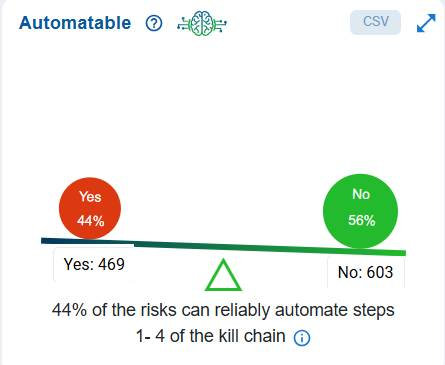
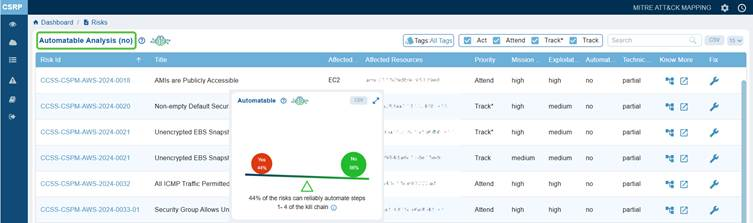
The Automatable block displays the distribution of risks based on the reliability of triggering multiple exploitation events.
| If the value is | Then |
| No | The attacker cannot automate the creation of exploitation events for this risk |
| Yes | The attacker can easily automate the creation of exploitation events for this risk |
The dashboard chart illustrates the prioritization of risks from an automation perspective. In this case, it indicates that 44% or 439 of the identified risks are automatable across steps 1–4 of the kill chain, meaning that the remaining 56% or 603 are not automatable. As a result, attackers cannot currently depend on automation to exploit these risks at scale, which lowers the likelihood of widespread and rapid compromise. However, even though automation is not a factor for the non-automatable attacks, these risks still require attention if they can be exploited through manual efforts.
To see the series of steps that trace stages of a cyber-attack, move your cursor over the information icon.

Click to read more on the 4 crucial kill chain steps that trace stages of a cyber attack.
Click to learn how to remediate risks in the Automatable category.
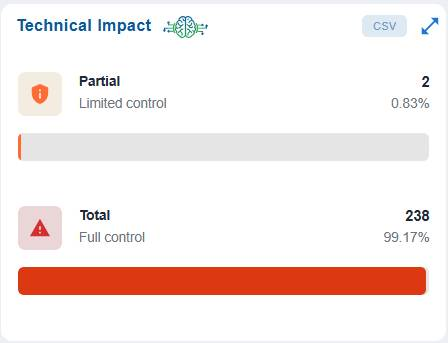
Assess Full Versus Limited Technical Impact of Exploiting an Anomaly
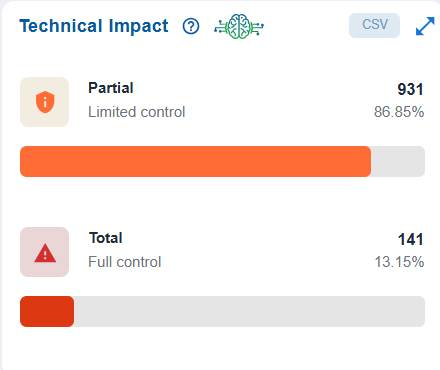
The Technical Impact block presents a clear breakdown of the severity of potential impacts on resources. It highlights that Partial (Limited Control) and Total (Full Control) resources,enabling stakeholders to assess the distribution of control risks and prioritize mitigation efforts accordingly.
For example, Partial (Limited Control) with 931 resources(86.85%) indicates that the majority of affected resources only allow limited control, meaning the impact of exploitation is somewhat constrained.
Total (Full Control) with 141 resources (13.15%) indicates a smaller portion of resources would grant full control if compromised, representing a higher-severity risk.
| If the value is | What it means |
| Partial | The threat actor either gains limited control or experiences information exposure due to the misconfiguration. Additionally, there is a low likelihood of achieving complete control because repeated attempts to exploit the cloud organization are often impractical. One example of limited control is a denial-of-service attack. |
| Total | At the organization level, the system gives the adversary total control over the behavior of the software. In other words, it discloses all the information on the infrastructure that contains the misconfiguration. |
Click to learn how to remediate risks in the Technical Impact category.
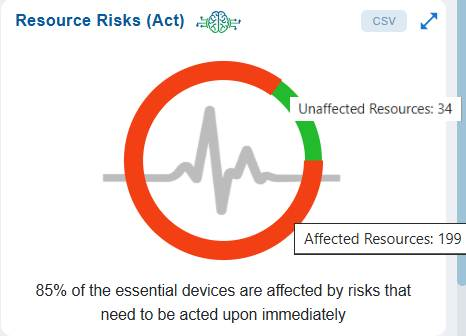
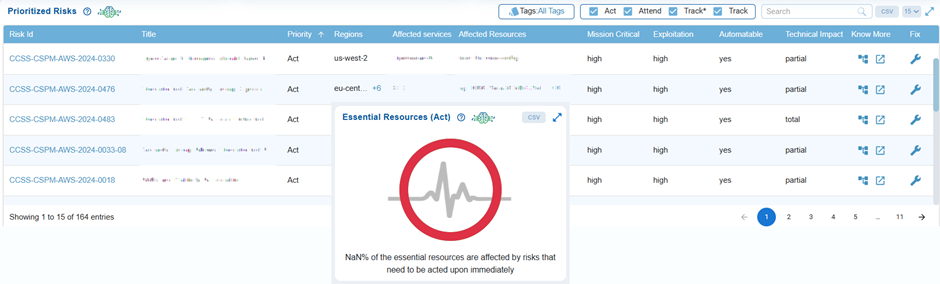
Identify the Risks Affecting Essential Resources
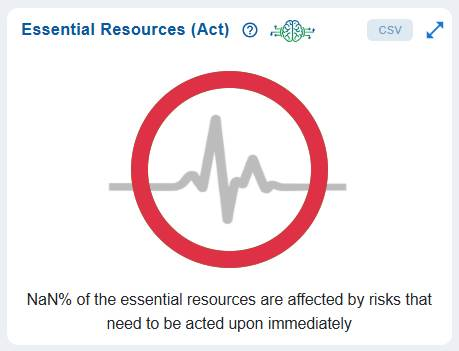
Essential Resources (Act) focuses on identifying and prioritizing risks that directly impact essential resources within the Act category. Since these resources are crucial for operations, any risks affecting them present a significant threat to both security and business continuity.
The dashboard chart reveals that 85% (199 resources) are affected by critical risks that require immediate remediation, while only 15% (34 resources) remain unaffected. Because these resources are vital to operations, addressing their risks is a top priority to prevent severe disruptions and ensure overall resilience.
Move your cursor over the chart to see the distribution of affected and unaffected resources.
Follow the links to read more on how to Act on Risks Affecting Essential Resources:
View the Detailed Breakdown of a Specific Cloud Cyber Security Standard (CCSS) Risk Finding
Click to learn how to remediate risks in the Essential Resources category
Assess and Prioritize Risks Across Resource Categories
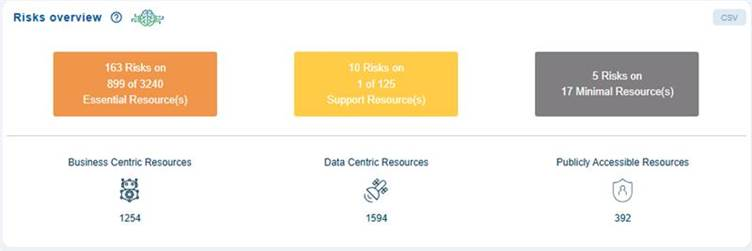
The Risks Overview view highlights the distribution of security risks based on criticality and type across different cloud resources. This view helps prioritize mitigation by focusing first on high-value and high-risk areas. The breakdown also classifies resources into business-centric, data-centric, and publicly accessible categories, each with its own share of potential exposure.
The dashboard block summarizes security risks across different categories of resources in a cloud environment. At the top, there are three colored boxes showing the number of risks and affected resources in three classifications:
- Essential Resources: For example, displays over 160 risks across hundreds of essential resources out of a larger pool.
- Support Resources: For example, displays about 10 risks impacting a small subset of support resources.
- Minimal Resources: For example, displays only a handful of risks on a small number of minimal resources.
Below the colored boxes, there is a breakdown of resources by type, each with associated counts. For example, Business-centric has a count of over 1200 resources, Data-Centric has a count of over 1500 resources, and over 300 resources associated with Publicly Accessible Resources.
Clicking on the Essential Resources or Publicly Accessible Resources redirects you to the Prioritized Risks view for subsequent action.
Assess Risk Distribution on Essential Resources
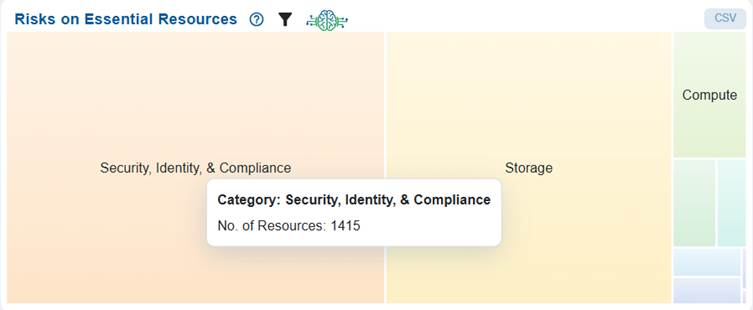
The Risks on Essential Resources chart utilizes a heat map to illustrate the proportion of risk associated with various types of resources, including Compute, Databases, Networking & Content Delivery, Analytics, Security & Compliance, and Storage.
Each block in the chart represents a resource category, with its size and shading indicating the relative level of risk. For example, the Security, Identity, & Compliance category comprises of around 1415 resources that’s at risk.
This visualization effectively highlights which categories contribute most to organizational risk, allowing for better prioritization of remediation efforts across different resource types.
Review and Prioritize Resources Based on Associated Risks
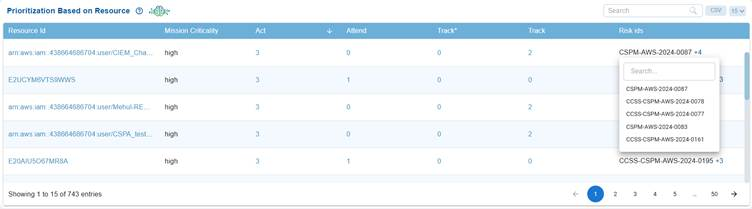
The Prioritization Based on Resource tabular view on the dashboard highlights the criticality (high, medium, or low) of AWS, Azure, or GCP resources, their current activity count, and associates them with specific risk IDs for monitoring and remediation.
For each resource, key attributes such as “Act”, “Attend”, “Track”, and “Track*” values indicate the resource count for monitoring. Resources are mapped to multiple risk IDs, which can be expanded using the “+” sign to view all associated risks. Additionally, you can use the search box to retrieve results for specific risks.
Clicking on the links for resource id and activity count(act, attend, track, track*) navigates you to the prioritized risk page for subsequent evaluation and action.
The interface supports search, pagination, and CSV export, allowing you to quickly identify and prioritize high-criticality resources that require attention based on their risk exposure.
View the Detailed Breakdown of a Specific Cloud Cyber Security Standard (CCSS) Risk Finding
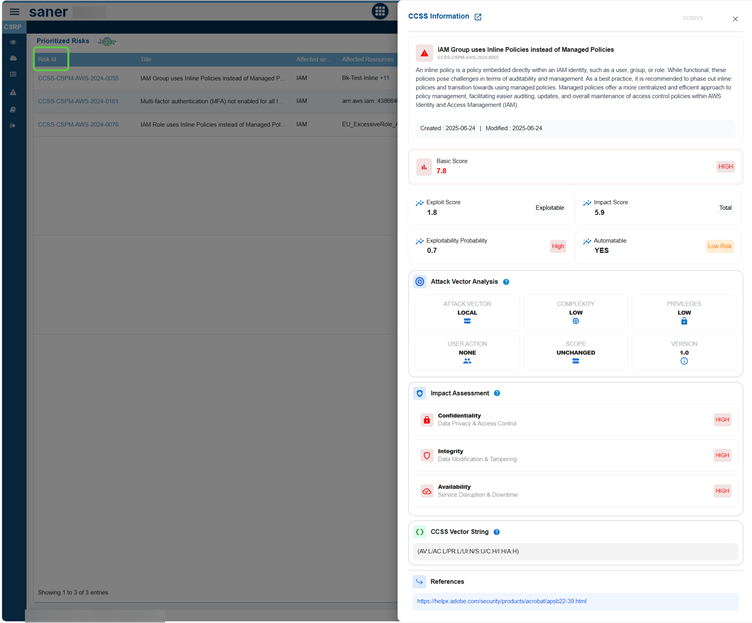
The CCSS Information in the screenshot provides a comprehensive risk profile for a specific security issue version by evaluating severity, exploitability, and business impact to facilitate effective prioritization. It includes the risk title and description, along with scoring metrics such as basic, exploit, and impact scores. Additionally, it assesses the probability of exploitability and the potential for automation.
The report breaks down attack vector attributes, including complexity, required privileges, and user interaction. It also includes an impact assessment covering confidentiality, integrity, and availability. Furthermore, a standardized CCSS vector string is presented for consistency, along with external references for remediation guidance.
In summary, it offers a structured overview of risks to help security teams identify and address the most critical issues first.
Manage Prioritized Risks at Account-level
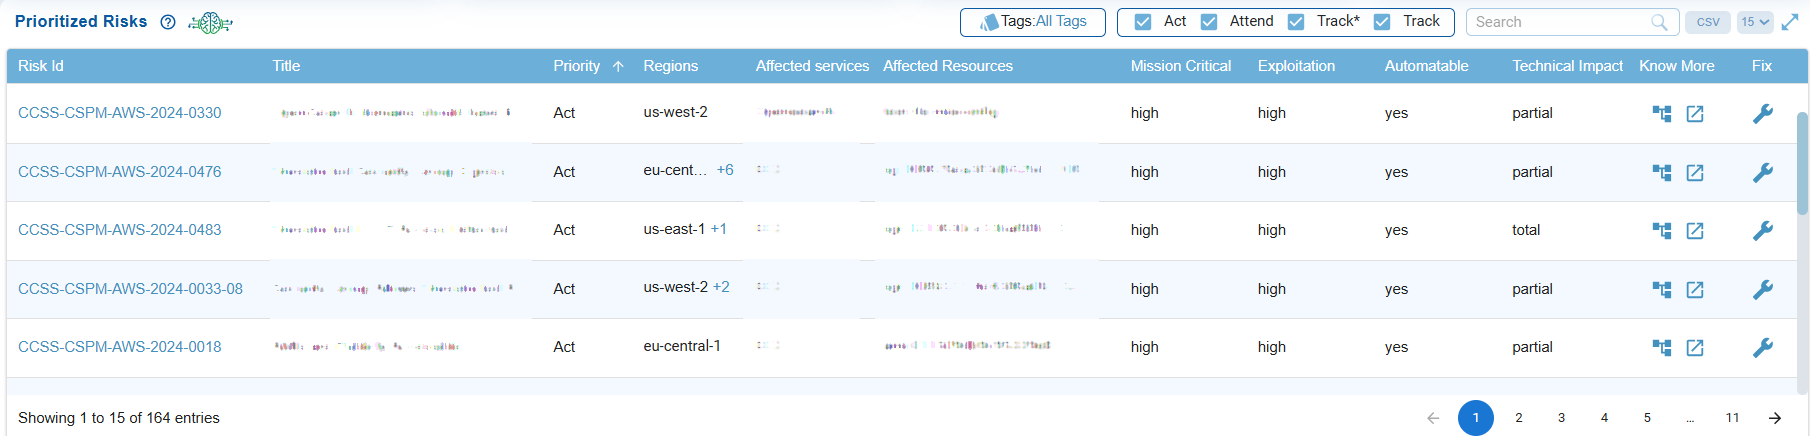
The Prioritized Risks view provides a centralized and prioritized list of security risks, including key attributes such as priority level, exploitability, and technical impact. It assists security teams in quickly identifying which risks require immediate action (Act), need closer monitoring (Attend), should be tracked on an ongoing basis (Track), or remediating misconfigurations within standard update timelines (Track*). This ensures that remediation efforts are focused on the most critical threats.
Each column helps with risk prioritization and remediation planning as described:
Identify Risks by ID and Title
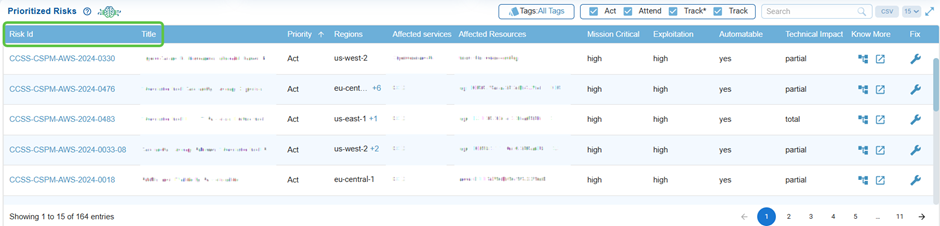
Every risk is assigned a unique Risk ID and a descriptive title, allowing teams to easily identify and reference specific issues, such as weak password policies or IAM misconfigurations.
Click on the Risk Id link to view the detailed breakdown of a specific cloud risk finding.
Review Affected Services and Resources
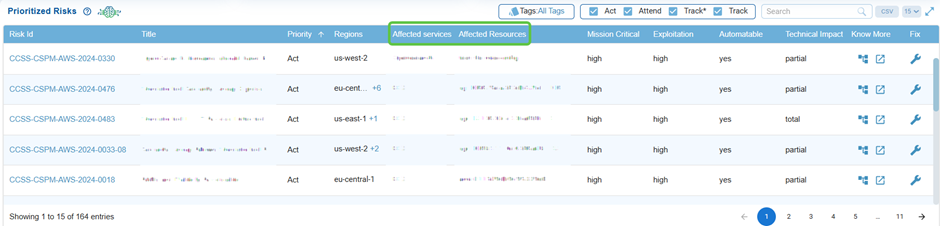
These columns indicate the cloud services and resources affected by the risk, helping teams to evaluate the scope and prioritize critical assets more effectively.
Know the Priority for Action

Risks are categorized as Act, Attend, Track*, or Track, which helps prioritize urgency in remediation, making sure that high-severity risks are addressed first.
Evaluate Mission Critical Risks
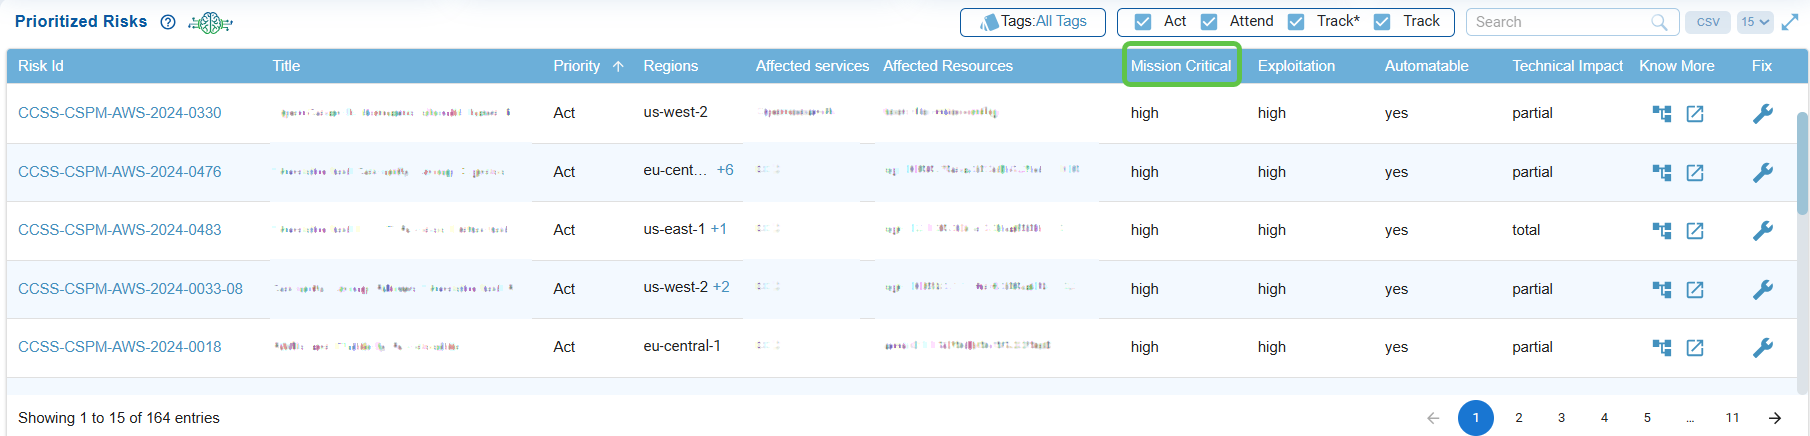
The status(low, medium, or high) indicates if the risk impacts mission-critical systems, helping security teams understand the potential business impact of each finding.
Assess Exploitation Likelihood
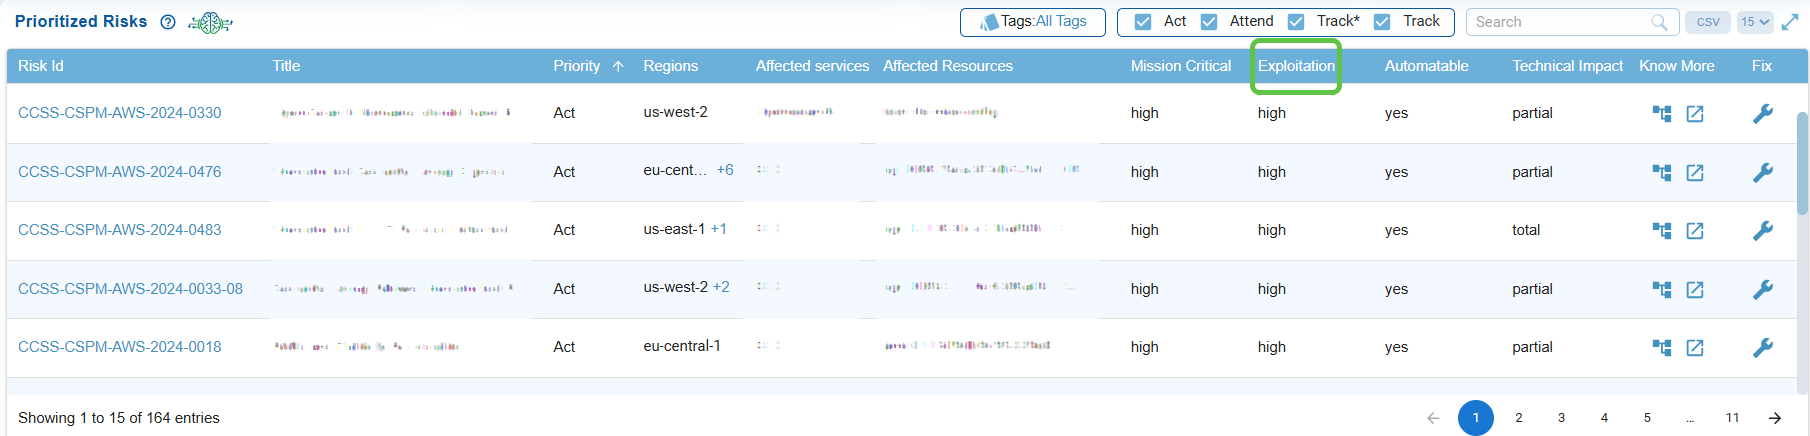
Determines the ease with at which a risk could be exploited (low, medium, or high), supporting decisions on which misconfigurations demand faster remediation.
Check Automation Feasibility
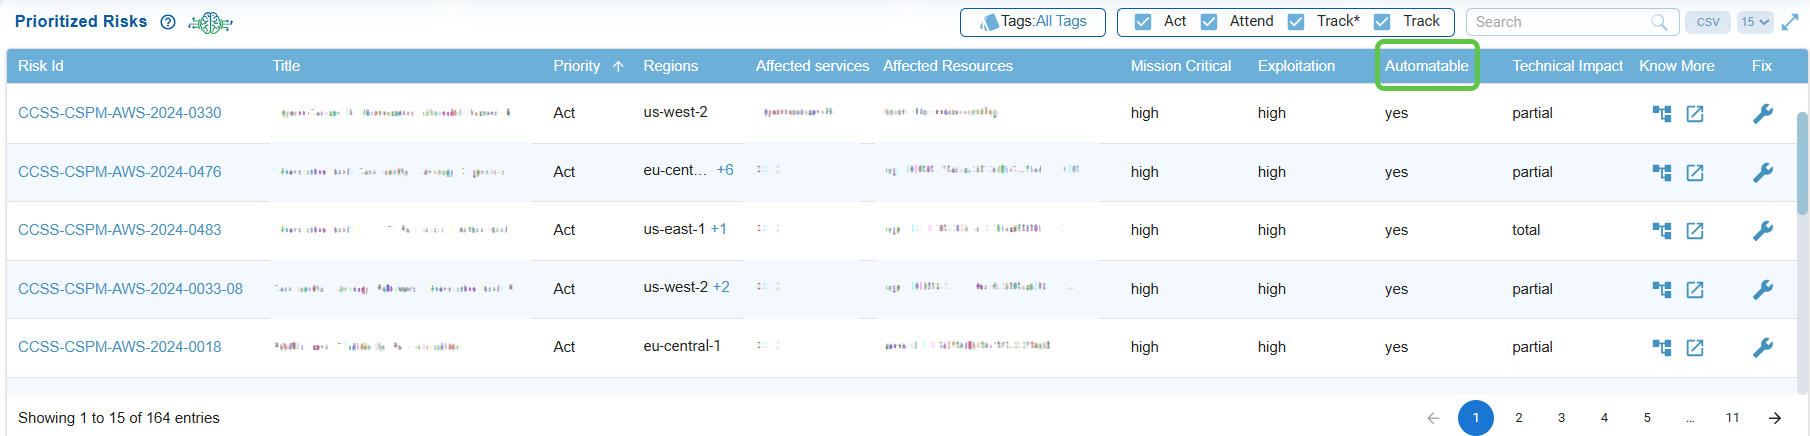
Indicates if the risk can be exploited through automated methods, emphasizing higher urgency if automation is possible.
Click here to read more…
Analyze Technical Impact
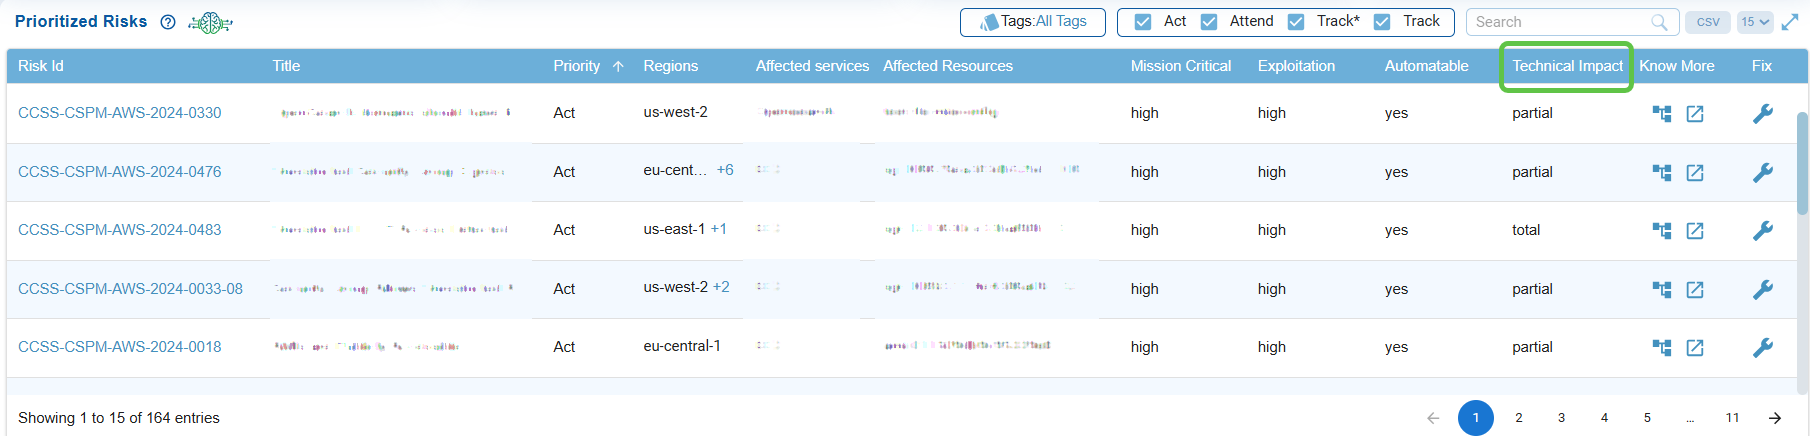
Indicates if the risk can be exploited through automated methods, emphasizing higher urgency if automation is possible.
Click here to read more…
Explore Details from the Decision Tree and Further Examination
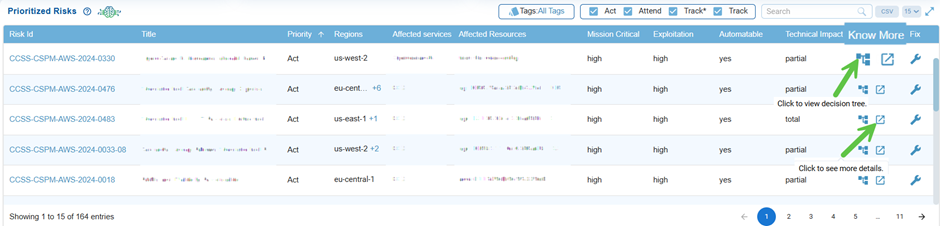
From the Prioritized Risks tabular view in the dashboard, explore details from the Know More column. Under the Know More column, observe the 2 icons: Decision Tree and Further Examination.
Decision Tree
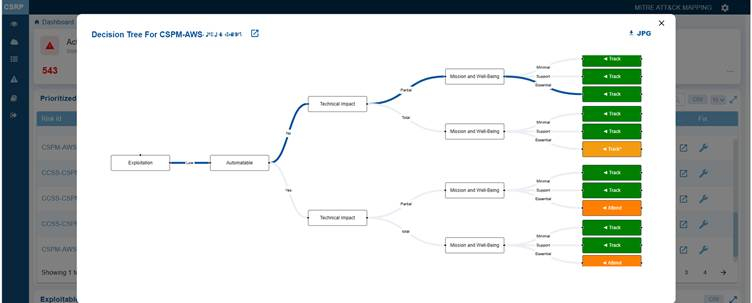
Clicking the Decision tree icon corresponding to a risk opens a logical visualization indicating the origin of the risk or issue, its dependencies, and contributing factors. This visualization is valuable for root-cause analysis and provides a step-by-step breakdown.
The Decision Tree illustrates the factors influencing the decision for risk prioritization, classifying the misconfiguration into one of the following categories: Act, Attend, Track*, and Track.
You also have an option to download and open the tree in JPEG format by clicking the JPG icon on the top right of the pop-up window.
Click the Further Examination button next to the Risk id in the Decision tree window to see more details on the misconfiguration risk.
Further Examination to Mitigate Misconfiguration Risk
Clicking the More Details button for further examination icon under the Know More column in Prioritized Risks view opens up the Risk Summary view from which you can examine the following:
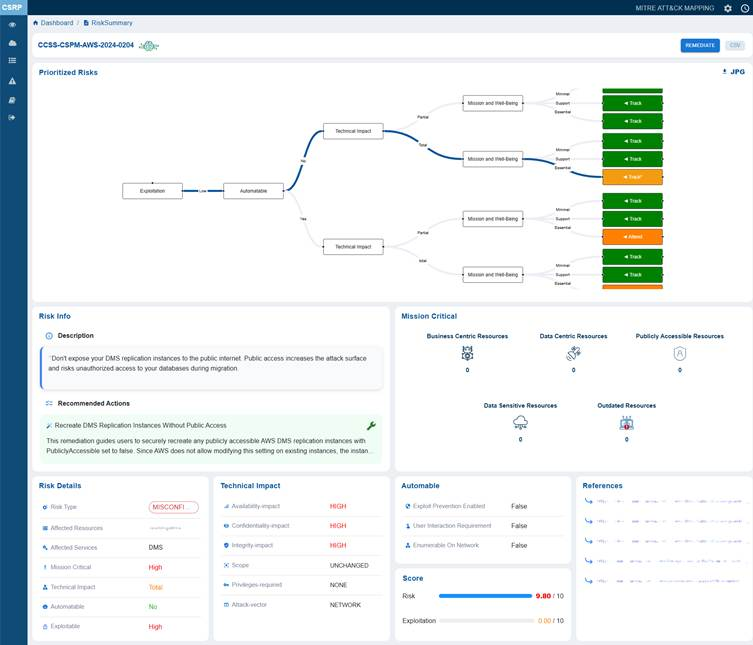
Trace Exploitation Path to Business Impact from Prioritized Risk Summary Visualization
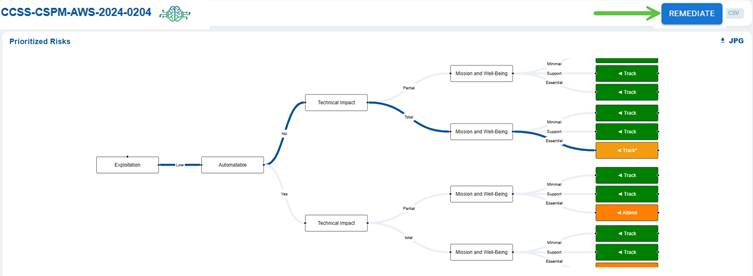
This section visualizes the potential exploitation flow of the misconfiguration risk. It shows how an exploitation event can lead to a technical impact and further escalate to affect mission and well-being. Each branch of the flow ends with viewable tags such as Track or Attend, guiding security teams on what actions to prioritize for monitoring and remediation.
Note: The REMEDIATE button located in the top-right corner above the Decision Tree, becomes active only when a remediation is available for the associated risk ID or rule.
Understand and Mitigate the Identified Risk from Risk Info
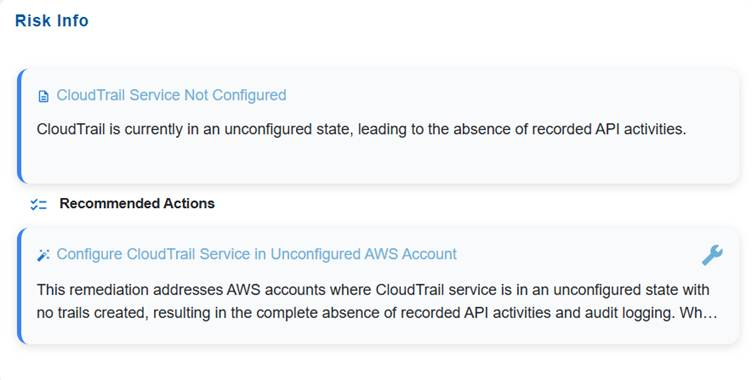
The Risk Info block is intended to give a concise yet complete overview of an identified risk. It captures the title and description to define the nature and context of the issue, and includes recommended actions to guide remediation or mitigation efforts. This ensures stakeholders quickly understand what the risk is and how to address it.
The Recommended Actions block outlines the remediation actions and provides the Fix icon to automatically redirect you to the relevant tool in Saner CSRP for resolution. Click to read more on How to Remediate in Saner Cloud?.
Review Mission Critical Resource Exposure
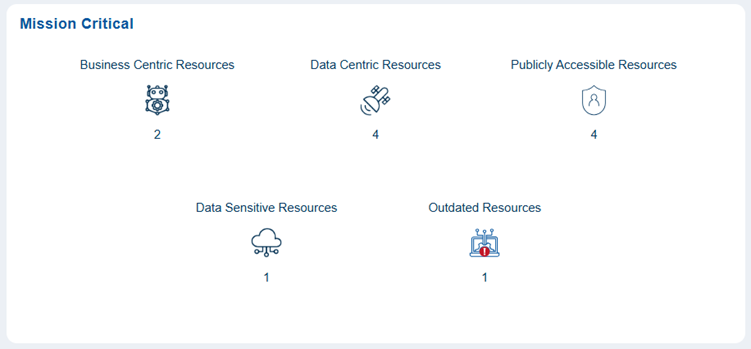
The mission-critical block displays a diverse range of resources, each with unique risk considerations. It includes a combination of business-centric resources essential for daily operations, meaning any disruption could directly affect productivity and service continuity. Additionally, it encompasses data-centric resources that manage significant information processing and storage.
This block also contains publicly accessible resources, which increase exposure to external interactions, as well as data-sensitive resources that require enhanced Review and Prioritization due to confidentiality risks. Furthermore, outdated resources may present reliability or security concerns if they are not updated.
For example, the mission critical block showing 2 business-centric resources, 4 data-centric resources, 4 publicly accessible resources, 1 data-sensitive resource, and 1 outdated resource, represents a balanced mix of operational, data, and public-facing components.
Review Core Risk Attributes from Risk Details
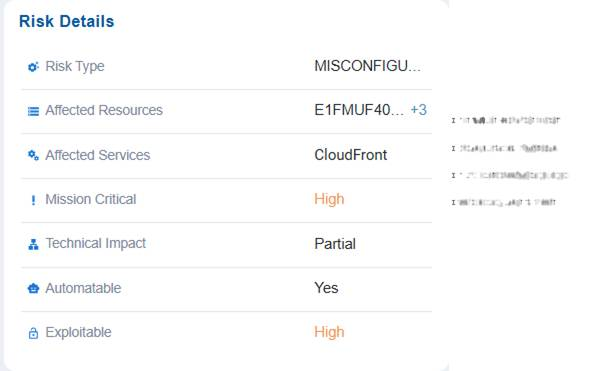
The Risk Details block offers a structured overview of identified risks by outlining their type, the affected resources and services, and if they are mission-critical. It also emphasizes the technical impact of each risk, along with indicators representing if the risk can be automated or is easily exploitable.
This organized breakdown assists in prioritizing remediation efforts, understanding exposure levels, and aligning mitigation strategies with business impact.
Note that you have an option to view and choose the appropriate resource by clicking the + symbol in the Affected Resources value.
For example, a misconfiguration risk has been identified in resource X within the CloudFront service carries high mission criticality, meaning it could significantly affect core operations if exploited. The technical impact is partial, so while not a complete failure, it could still disrupt functions or expose vulnerabilities. The risk is marked as highly exploitable, making it an attractive target for attackers. Since it is automatable, remediation can be streamlined through automated fixes or security tools, reducing response time compared to manual intervention.
Assess Technical Impact of Misconfiguration
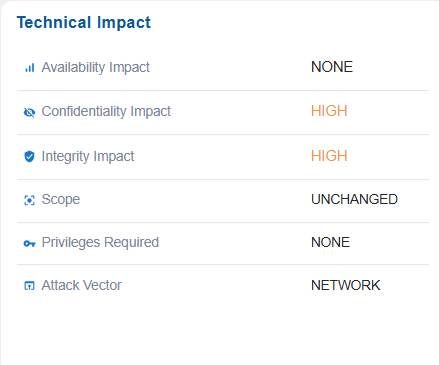
The Technical Impact block presents a structured assessment of how a misconfiguration or risk affects system operations. It details the impact on availability, confidentiality, and integrity, specifies which components are affected, identifies any required privileges needed to exploit the issue, and describes the attack vector through which the risk can be realized. This information enables stakeholders to understand the severity and nature of the technical consequences, prioritize mitigation efforts, and align security controls with the potential business impact.
For example, issue has no impact on system availability(NONE) indicates services continue running normally. However, it poses a high risk to confidentiality and integrity, meaning sensitive data could be exposed or altered. The scope is unchanged, indicating the misconfiguration affects only the current resource and does not extend to other components. No privileges are required to exploit it, making it easier for an attacker to target, and the attack vector is network-based, meaning it can be exploited remotely over the network.
Determine Exploitability Automation Potential

In this case, the Automatable section assesses if the exploit can be automated. In this case, the dashboard indicates that exploit prevention, user interaction requirement, and network enumeration are all set to false, suggesting exploitation would not require additional interaction but also cannot be automatically prevented using existing security controls.
Note: If set to True, the “Exploit Prevention Enabled” option indicates that protective mechanisms are in place to block exploitation, making the system more secure. When “User Interaction Requirement” is set to True, it means that user action is necessary for exploitation to occur, which reduces the likelihood of automated attacks. On the other hand, if “Enumerable on Network” is True, the vulnerability becomes discoverable over the network, increasing the risk of large-scale automated exploitation.
Measure Risk Severity and Exploitation Likelihood
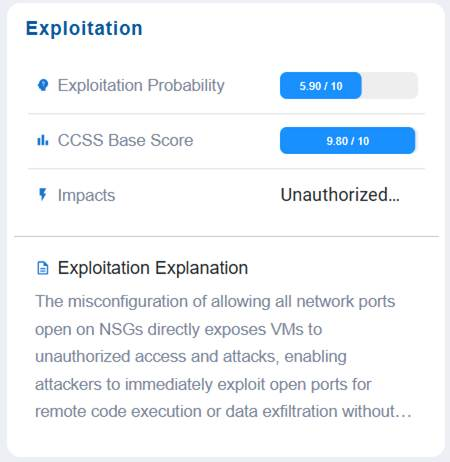
The Exploitation block helps assess and communicate the likelihood and severity of a risk being exploited. It captures the exploitation probability, the CCSS base score as a standardized severity rating, the potential impacts of a successful exploit, and a clear exploitation explanation to describe how and why the risk could be leveraged by an attacker.
This structured view helps stakeholders gauge both the feasibility and consequences of exploitation, supporting informed prioritization and remediation planning.
In this example, the Exploitation block values indicate that the issue has a moderate likelihood of exploitation (5.90/10), but carries an extremely high severity score (CCSS 9.80/10), meaning the potential consequences are critical. If successfully exploited, it could lead to unauthorized access or actions, posing a major security concern. The exploitation explanation provides context on how the weakness might be leveraged, emphasizing the need for prioritized remediation despite its moderate probability, since the impact would be highly damaging.
Utilize Reference Material to Support Secure Remediation
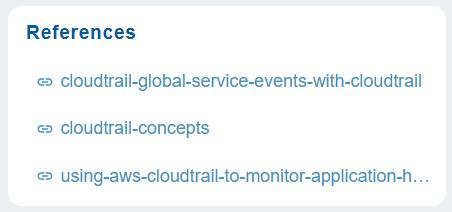
In this case, the References section provides direct links to relevant documentation to support remediation.
In this example, references are provided for cloudtrain concepts and so on. Click on the link(as shown in the screenshot) to open the relevant documentation.
Take Action with Remediation Options
Saner CSRP helps you to enhance your security posture by addressing risks with targeted remediation strategies. Focus on tackling misconfigurations from the Prioritized Risks List, mitigating exposures in the Exploitable and Automatable categories, and resolving issues that have significant Technical Impact. Additionally, look into essential resources that are critical to mission operations, align your actions with the MITRE ATT&CK framework, and utilize Recommended Actions to efficiently and effectively reduce risks.
You have an option to initiate the risk remediation from the different dashboards views as described:
Remediate Risks from the Prioritized Risks List
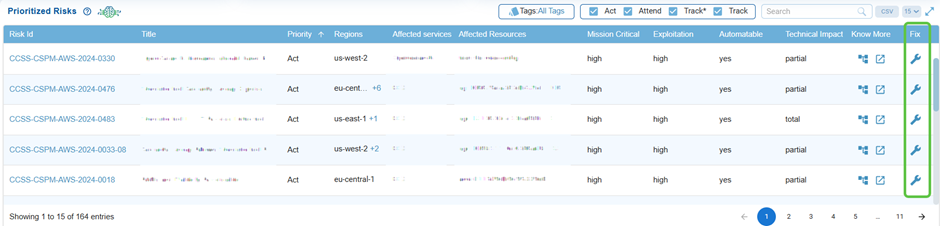
By clicking the Fix icon (indicated as wrench) corresponding to a risk id, Saner CSRP automatically redirects you to the relevant tool for resolution. Click to read more on How to Remediate in Saner Cloud?.
Remediate Risks in the Exploitable Category
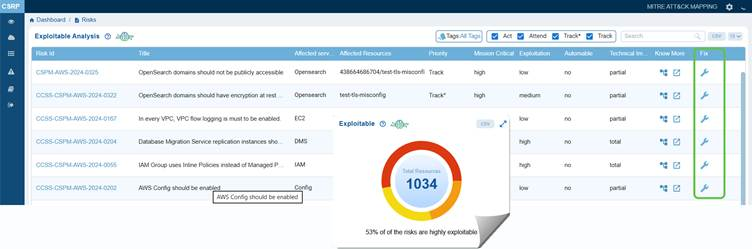
Click the Exploitable chart from the CSRP dashboard to open the Exploitable Analysis page from which you can begin your remediation tasks.
By clicking the Fix icon (indicated as wrench) corresponding to a risk id, Saner CSRP automatically redirects you to the relevant tool for resolution. Click to read more on How to Remediate in Saner Cloud?.
Remediate Risks in the Automatable Category
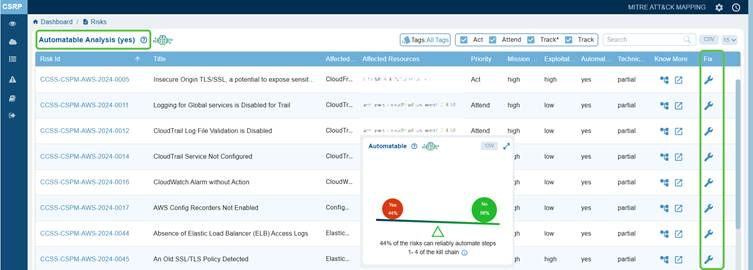
Click on Yes or No from the Automatable chartdashboard view to open the Automatable Analysis page from which you can begin your remediation tasks.
By clicking the Fix icon (indicated as wrench) corresponding to a risk id, Saner CSRP automatically redirects you to the relevant tool for resolution. Click to read more on How to Remediate in Saner Cloud?.
To see the series of steps that trace stages of a cyber-attack, move your cursor over the information icon.
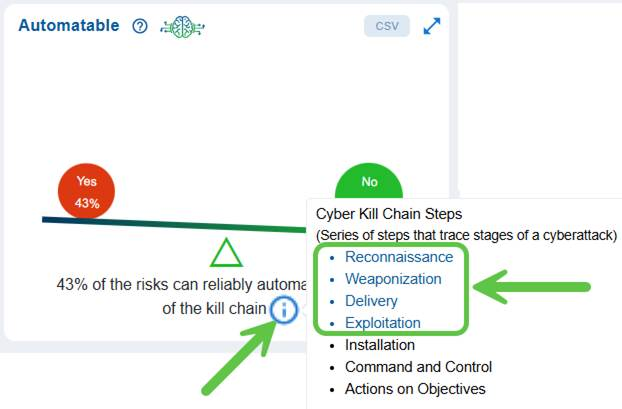
Here’s the 4 kill chain steps with attacker goals, common indicators, and quick examples:
Reconnaissance
The attacker gathers information about the target (public facing systems, employee names, software versions, and network topology) to find weaknesses and plan an approach. Indicators include unusual scanning, OSINT activity, or targeted social-media research. Example: scanning a company’s subdomains and LinkedIn to identify a software used widely by the target.
Weaponization
The attacker builds the exploit or malicious payload tailored to the target (malicious documents, malware with a specific exploit, or customized phishing content). Indicators are creation of exploit kits, bespoke payloads, or staging infrastructure. Example: embedding a zero-day exploit into a seemingly benign invoice document.
Delivery
The attacker sends the weapon to the target via a chosen channel (email phishing, drive-by download, USB drop, supply-chain injection). Indicators include suspicious emails, unexpected attachments/links, or anomalous web traffic. Example: a phishing email with a malicious attachment sent to finance staff.
Exploitation
The delivered weapon is triggered to exploit a vulnerability or human weakness, allowing code execution or unauthorized access (exploiting unpatched software, executing a macro, or credential abuse). Indicators include failed/successful exploit attempts, unusual process launches, or privilege escalations. Example: opening the malicious document runs a macro that drops and executes malware.
Remediate Risks in the Technical Impact Category
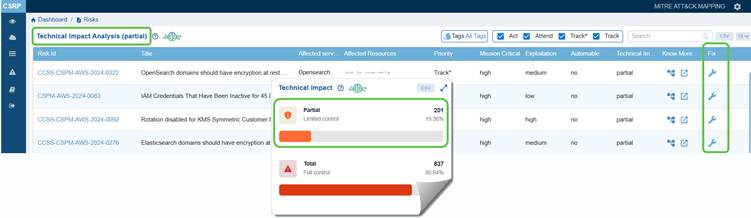
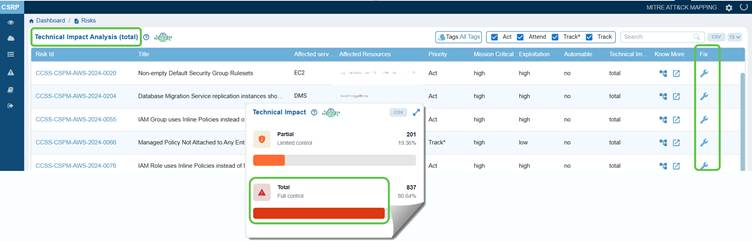
Click on Partial or Total from the Technical Impact chartdashboard view to open the Technical Impact Analysis page from which you can begin your remediation tasks.
By clicking the Fix icon (indicated as wrench) corresponding to a risk id, Saner CSRP automatically redirects you to the relevant tool for resolution. Click to read more on How to Remediate in Saner Cloud?.
Remediate Risks on Essential Resources
Click the Essential Risks(Act) chart from the CSRP dashboard to open the Prioritized Risks page and begin your remediation tasks then on.
Remediate Risks from MITRE ATT&CK Framework Mapping
From the CSRP Dashboard, access the MITRE ATT&CK Framework Mapping view. The Fix column provides direct access to remediation guidance for each identified risk. It links the mapped risk, tactic, and technique to actionable steps that security teams can take to mitigate or eliminate the misconfiguration.
Click to read more on how to remediate risks from MITRE ATT&CK Framework Mapping view.
Remediate Risks from Recommended Actions
Remediate Risks from the Prioritized Risk Summary Visualization
Filter Risks by Tags for Targeted Analysis
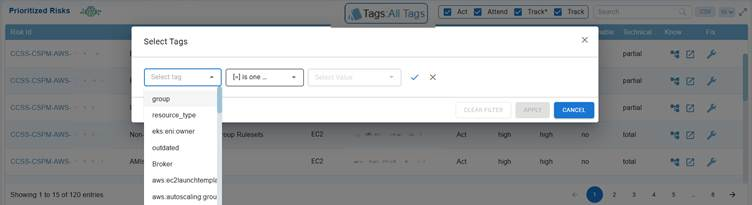
Users have an option to narrow down the list of risks based on relevant attributes, making it easier to focus on specific environments, resource groups, or configurations. Options to clear filters, apply filters, or cancel allow full control over tag-based filtering.
Generate Reports and Visualizations
With Saner CSRP Reports and visualizations, you can effectively monitor and communicate risk insights by using both pre-built and customizable reporting options. You can access risk prioritization through ready-made reports for quick summaries, as well as create custom reports tailored to your organization’s specific risk landscape. This functionality simplifies decision-making, improves visibility, and promotes informed actions in risk management.
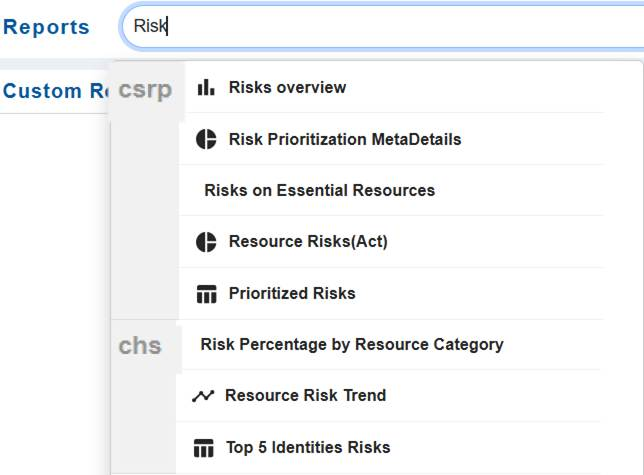
Access Risk Prioritization from Canned Reports
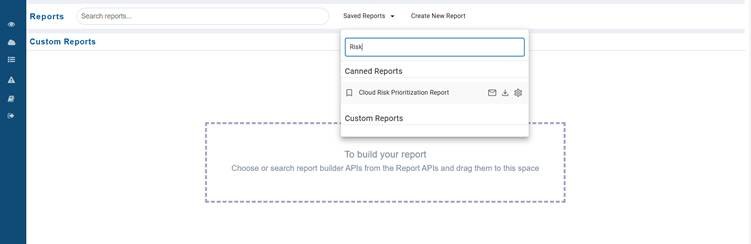
Step1: Navigate to Cloud Reports.
Step2: Expand the Saved Reports drop-down.
Step3: From the Canned Reports section, click on the necessary report from the drop-down menu to open the report in a widget.
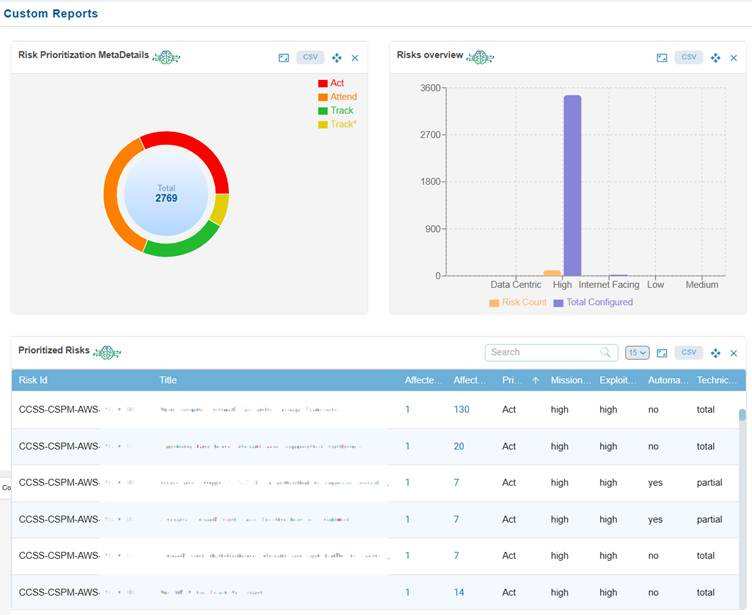
Create Custom Report Views for Risks
Just go ahead and key in the report name within the Report APIs textbox. The system extracts the report from the Cloud Infra dashboard and embeds in the Custom Reports section.
Click to read more on how to manage report views for a user account in saner cloud.
Configure Risk Based Cloud Security Alerts
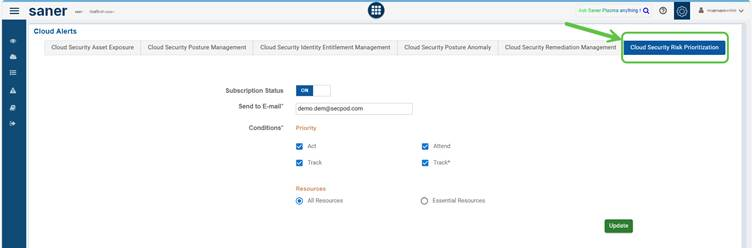
Cloud security risk prioritization alerts assist teams in focusing on what matters most by sending notifications based on urgency and the importance of resources.
You have an option to enable or disable subscriptions, direct alerts to specific email addresses, and set conditions such as Act (requires immediate action), Attend (needs attention), and Track (for ongoing monitoring).
Alerts can be customized to cover all resources or be limited to essential ones to minimize distractions. This approach makes sure that critical threats are promptly addressed while still maintaining visibility into lower-priority risks.
Click here to read more about Saner Cloud Alerts.
Monitor and Analyze Audit Logs for Risk Prioritization
Audit logs are essential to keep track of activities happening in Saner Cloud Application, as they offer detailed visibility into login activities, scans, and configuration changes. These logs help track important actions, such as when a scan begins and ends, as well as updates to configurations for risk prioritization and cloud hygiene scores. This improved oversight facilitates better decision-making based on accurate information.
With Saner Cloud, users can customize and filter audit logs to view specific activities, such as scan-related events, across different organizations, accounts, or users.
How to Filter Audit Logs to Focus on Specific Events?
Audit logs can use the following filters to focus on specific events:
Select Organization
Choose the organization whose logs you want to review.
Select Accounts
Narrow down logs to specific accounts within the selected organization.
Select Users
View actions performed by particular users.
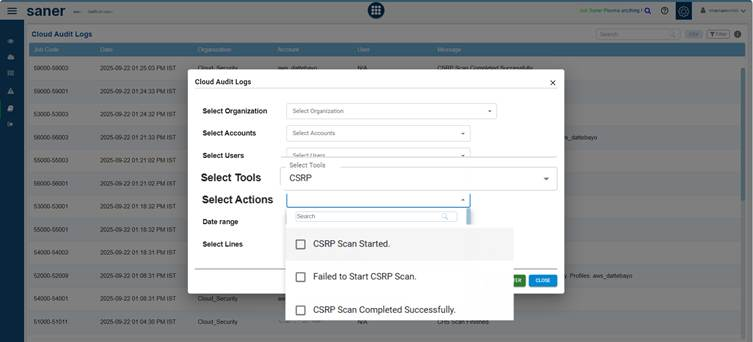
Select Tools
Filter logs by tools, in this case, select the CSRP tool.
Select Actions
Narrow down audit log results to specific events of interest, making it easier to monitor critical operations and troubleshoot issues.
Focus on specific activities, such as:
- CSRP Scan Started: when a scan initiated
- Failed to Start CSRP Scan:when a scan fails to begin
- CSRP Scan Completed Successfully: when a scan finishes without errors
- CSRP Configuration Saved: when scan configuration saves without errors
- Failed to Save CSRP Configuration: when scan configuration fails to save due to errors
Date Range
Define the time period for which you want to retrieve the logs.
Select Lines
Set the limit on the number of number of rows that display in the Cloud Audit Logs list.
Click to know the Job Code and Event Categorization in Cloud Security Risk Prioritization.
Commonly Asked Questions
What are inactive users in the context of cloud entitlements?
Inactive users are accounts or identities in your cloud environment that have not demonstrated any form of usage or interaction over a period of time. This inactivity is determined by two conditions: the user has not performed actions such as accessing resources or executing tasks, and they have not logged in or authenticated within a defined time window. When both conditions are met, the account is considered inactive and may require review to ensure it does not introduce unnecessary risk.
How does the system determine whether a user is inactive?
The system classifies a user as inactive by checking for two signals: the absence of activity (like using services, performing operations, or interacting with cloud resources) and the lack of login or authentication events within a preset timeframe. If a user has neither interacted with resources nor authenticated recently, they meet the system’s criteria for inactivity and may be flagged for further examination.
Why is it important to identify inactive users in a cloud environment?
Identifying inactive users is essential because unused accounts often continue to hold entitlements, sometimes even high-privilege roles. If left unmonitored, these dormant accounts can create security gaps, increase the attack surface, and lead to unauthorized access if compromised. Regularly detecting inactive users helps organizations uphold the principle of least privilege, maintain entitlement hygiene, and reduce unnecessary exposure.
What actions should be taken when inactive users are identified?
Common follow-up actions include reviewing their assigned permissions, disabling the account, removing unnecessary roles, or fully deprovisioning the identity if it is no longer needed. Many organizations also enforce automated workflows that escalate or notify administrators when a user remains inactive for a certain period, ensuring timely remediation.
How long must a user remain inactive before being classified as inactive?
The file indicates that inactivity is based on whether a user has logged in or authenticated within a specified time frame. While the exact duration is not provided, the system uses this predefined window to determine when an account is considered inactive. Once a user shows no authentication activity during this period, they fall under the “inactive” category and may require attention.
Do inactive users still retain their entitlements or roles?
Unless an organization has automated cleanup policies, inactive users generally continue to retain their previously assigned roles and entitlements. This is why detecting and handling inactive accounts is critical—permissions may remain active long after the user has stopped legitimately accessing cloud resources, potentially enabling misuse or privilege escalation.
Can inactivity detection be automated or configured?
Most cloud entitlement systems allow administrators to configure inactivity thresholds, monitoring rules, and automated alerts. This means the defined timeframe, detection logic, and follow-up actions can typically be tailored to organizational needs. Automation ensures consistency in identifying dormant accounts and helps prevent oversight.
What are the risks of not removing inactive users from cloud entitlements?
Leaving inactive users unaddressed can lead to significant security vulnerabilities. Dormant accounts often go unnoticed and may still carry privileged entitlements, making them attractive targets for attackers. If compromised, these accounts could be used for lateral movement, unauthorized access, or privilege abuse. Inactivity also complicates audit readiness and weakens overall identity governance.

