Overview of Rollback in CSRM
Rolling back restores the original remediation configuration and ensures balanced recovery. It is crucial to maintain a strong security posture and avoid reintroducing vulnerabilities.
Rollback in Cloud Security Remediation Management (CSRM) provides you with the flexibility to reverse previously implemented remediation actions, helping to quickly restore stability and functionality to the cloud environment while promoting continuous security refinement.
Recommendation: Consider rolling back as a temporary solution, as its essential to follow up with an alternative mitigation strategy to address the underlying misconfigurations without compromising the security posture.
Access Rollback via CSPM, CIEM, or CSPA from CSRM
From SanerCloud CSRM, you have an option to navigate across CSPM, CSPA, or CIEM and access the Rollback functionality.
Choose the Remediation Jobs that You Want to Rollback
Click the checkbox(es) to select one or more remediation jobs and click the Revert Selected Patches button.
Complete the Rollback Task
After identifying the remediation jobs that you want to rollback, follow the 3-step process to complete the rollback task.
Step1: Select the Resources
Step2: Schedule Rollback
Step3: View the Rollback Summary
Step1: Select the Resources
Select the resources from the list and click “Next Step” to proceed further.
Step2: Schedule the Rollback Job
1. Enter the Task Name and Description in the required fields
Make sure that you enter a minimum of 3 characters in the Name and Description in-order to proceed to the next step.
2. From the dropdown, select one of the Remediation schedules:
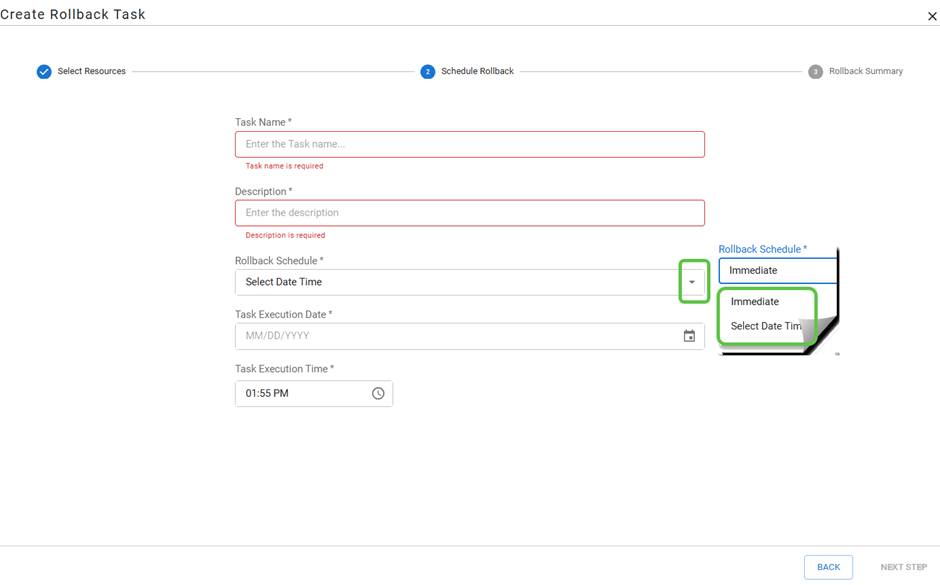
- [Job-based Rollback]Immediate – To apply the rollback immediately
- [Automated Rollback]Select Date & Time – To schedule the rollback for a specific time
3. After entering the schedule details, click Next Step
Step3: Review and Consent to Complete the Rollback Task
- Admin Users: “Consent” checkbox enabled for admins to directly approve and execute the rollback task
- Regular Users: The “Consent“ checkbox displays in a disabled mode. Users must create the rollback task, and the system automatically routes the task to the admin for review and approval.
After scheduling the rollback job, review the details from the summary. Click the Back button in case you want to make changes. If everything looks correct, click the Consent check box followed by the Create Rollback button if you want to proceed further.
View the Rollback Task Job Status
On completing the rollback task successfully, the system reverts the remediation to its original state. Observe the Job Status as success(indicated by a green circle with a tick mark) in the Rollback tab and Overall Status column displaying the value “Success”.
If you completed the rollback activity without providing the consent, then the task moves into Approval Pending state, and you get to view the task in the Task Status section.
[Optional] Approve or Reject the Rollback Task
The system allows you to approve or reject the rollback task only if you have completed the task without providing the consent. Doing this moves the task into the Approval Pending state.
You have an option to approve or reject the rollback task from the Task Status section in the Remediation Job Details page.
Once approved, the rollback task appears in the Job Status list(indicated by a green circle with a tick mark). If rejected, the task disappears from the list.

