The Saner platform equips IT teams with tools to keep devices up to date and protect infrastructure from cyberattacks. To manage the Saner platform effectively, IT administrators must perform specific tasks.
The Control Panel page offers features that help IT administrators and security teams:
a. Create organizations and accounts
b. Add new users and update existing user permissions
c. Discover and manage devices
This guide provides the information you need to use the Control Panel page and manage your Saner platform efficiently.
Access Control Panel
1. Sign in to the Saner web console as an Admin, Org Manager, or Account Manager.
2. Select the Control Panel icon ![]() located on the right side of the Unified Dashboard page.
located on the right side of the Unified Dashboard page.
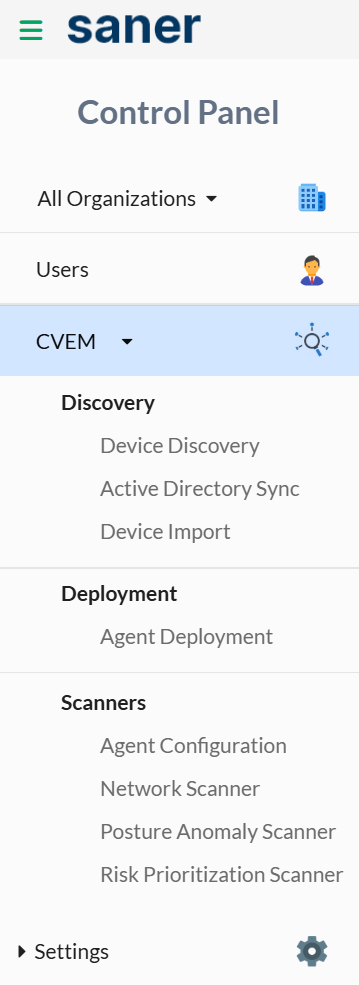
The Control Panel page displays a navigation panel on the left, listing all available features grouped into the following sections:
a. Organization and account management
b. Users
c. Discovery
d. Deployment
e. Scanners
f. Settings
Organization and Account Management
In Saner, an organization is a dedicated space that can contain one or more accounts. An account includes devices, device groups, and user groups managed by the Account Manager. After installation, the Saner Agent automatically assigns the device to the appropriate account.
List all Organizations
| User access level: You must be signed in as an Admin or Organization Manager to view all organizations. |
On the Control Panel page, select the drop-down menu next to the organization![]() icon, and then select All Organizations.
icon, and then select All Organizations.
The All Organizations page appears on the right side of the screen. It displays the total number of organizations, as well as the number of subscriptions assigned and the number of subscriptions available.
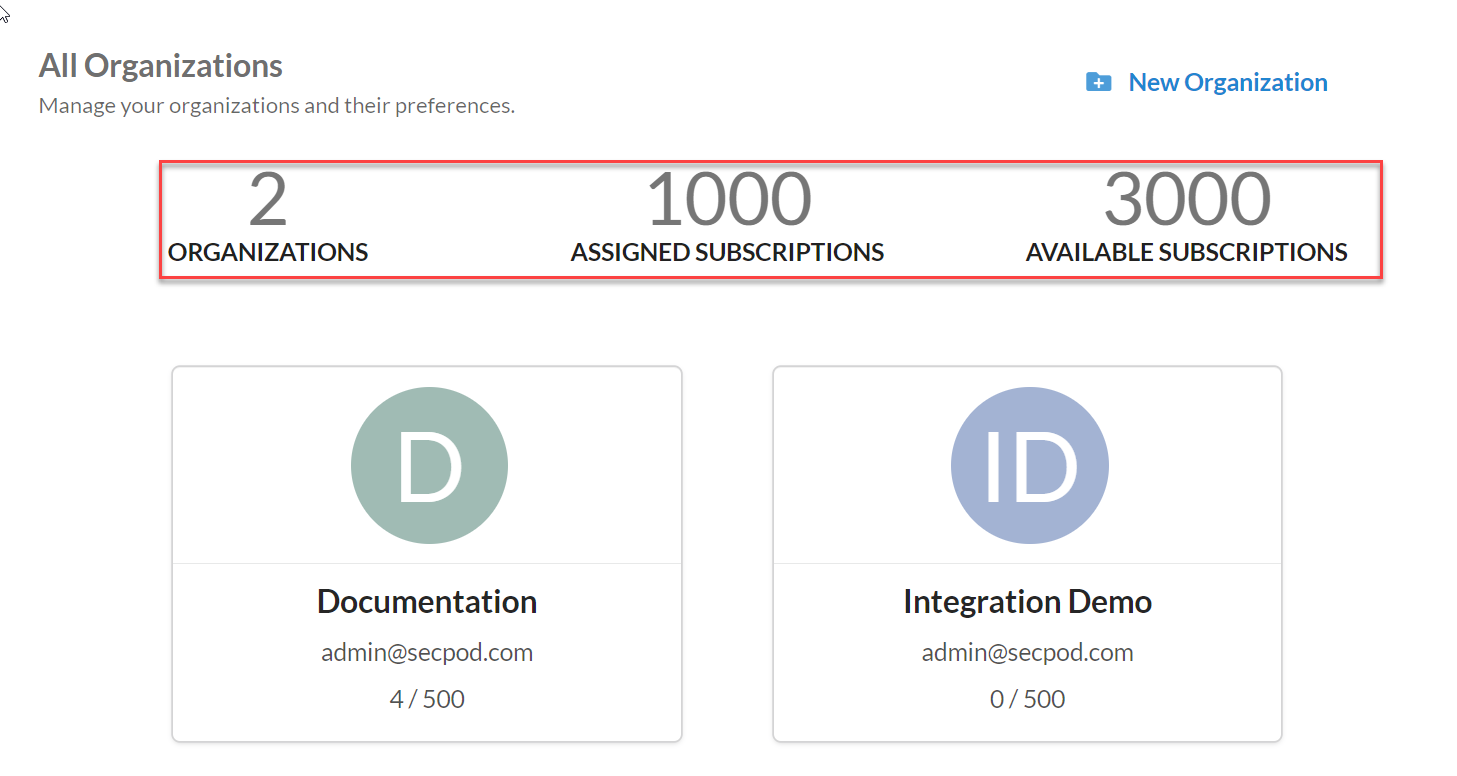
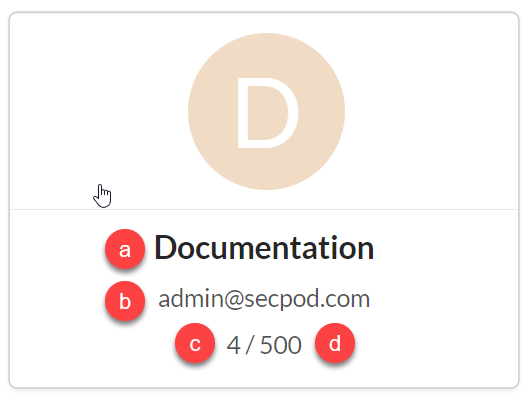
Each square tile on the All Organizations page represents an existing organization and displays the following information:
a. Organization name
b. Organization manager’s email address
c. Number of subscriptions used
d. Number of subscriptions available
| Attribute | Description |
| Name | (Required) The name of the organization. |
| Allowed subscriptions | (Required) The total number of subscriptions assigned to the organization. |
| Expiry date | (Required) The date the organization expires. When it expires, all associated accounts also expire. |
| Tools provision | The Saner tools assigned to the organization. |
Add an Organization
| User access level: You must be signed in as an Admin or Organization Manager to add an organization. |
1. Sign in to the Saner web console.
2. Go to the Control Panel page.
3. Select the drop-down menu next to the organization ![]() icon, and then select All Organizations.
icon, and then select All Organizations.
The All Organizations page appears on the right side.
4. Select New Organization.
The Onboard Your Organization page appears.
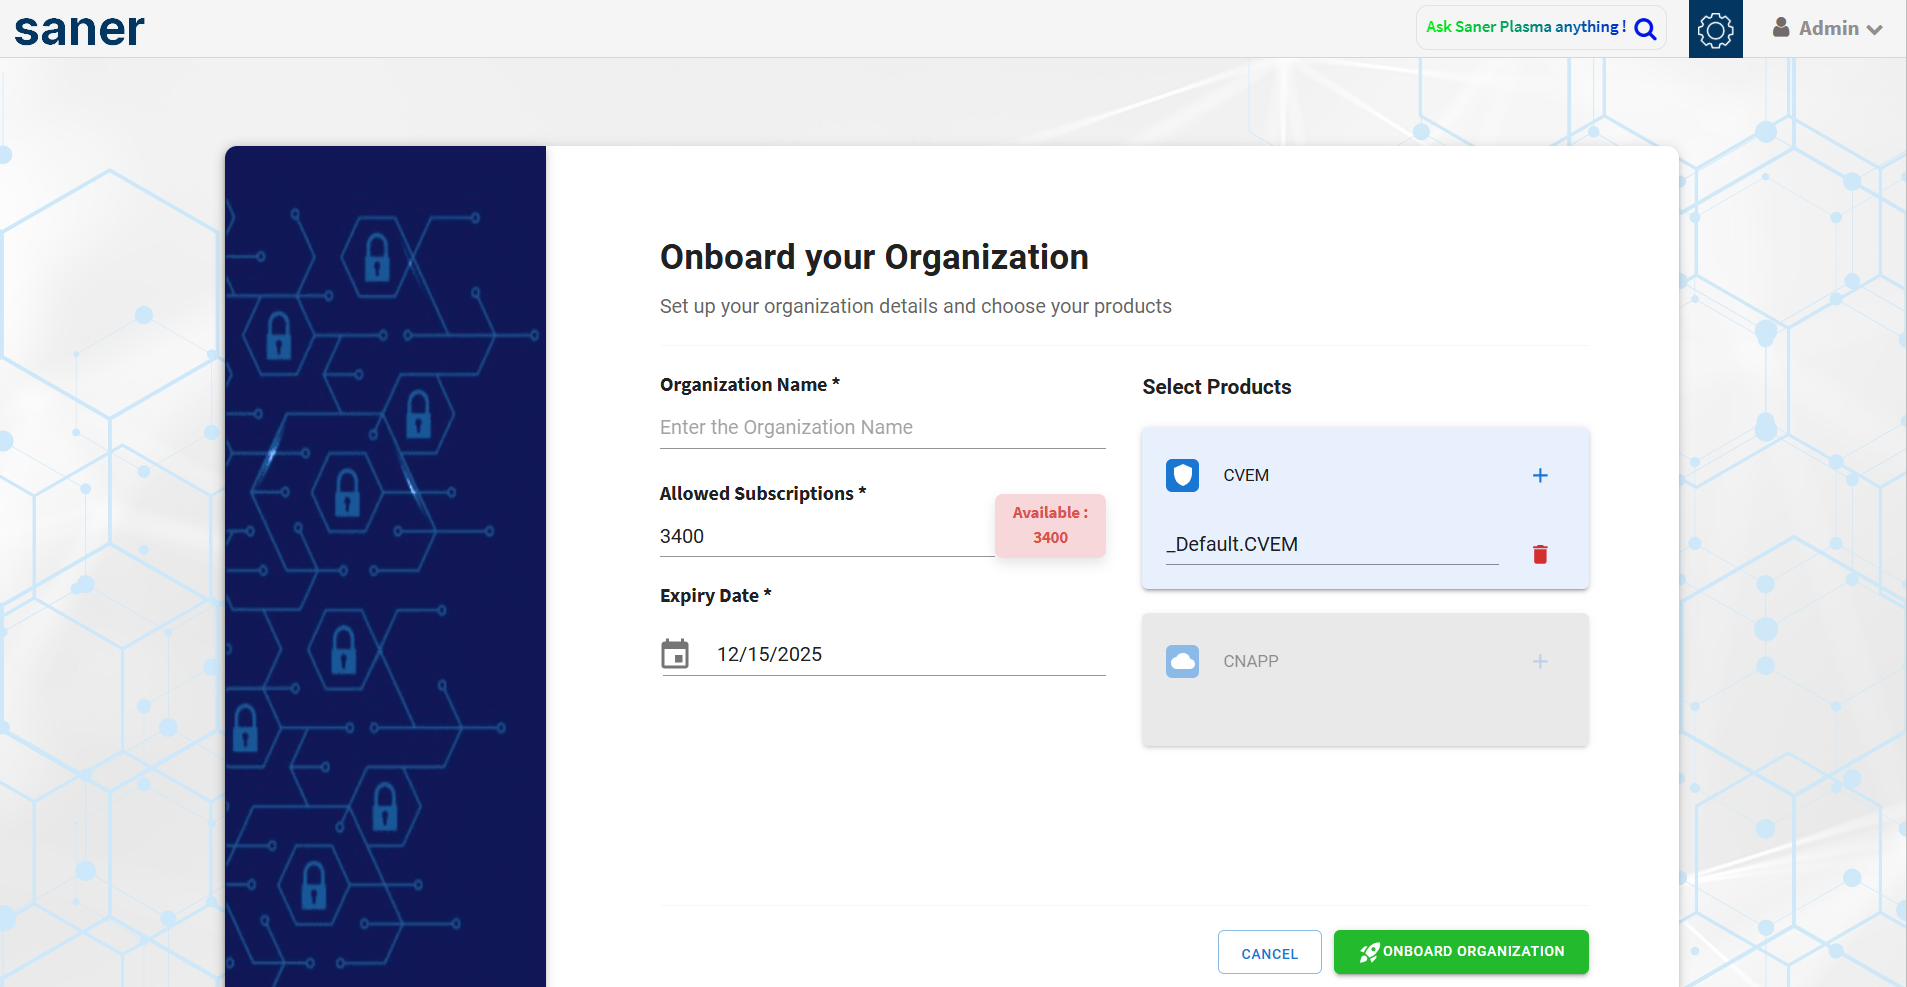
5. In the Organization Name box, enter a name that meets the following criteria:
- Between 4 and 50 characters.
- May include letters, numbers, hyphens (-), underscores (_), and periods (.).
5. In the Allowed Subscriptions box, enter the number of subscriptions to assign to the organization.
The total number of available subscriptions appears in red above the Allowed Subscriptions box.
6. In the Expiry Date box, select the expiration date for the organization.
7. In the Select Products box, select the Saner tools to assign.
Tools you’ve subscribed to are selectable; unsubscribed tools appear dimmed.
8. Select ONBOARD ORGANIZATION.
Saner creates the organization, and the newly created organization appears on the All Organizations page.
| Note: During organization creation, Saner automatically creates an account within the organization. |
Modify an Organization
| User access level: You must be signed in as an Admin or Organization Manager to modify an organization. |
1. Sign in to the Saner web console and go to the Control Panel page.
The Control Panel page appears.
2. Select the drop-down menu next to the organization ![]() icon and then select All Organizations.
icon and then select All Organizations.
The All Organizations page appears on the right side.
3. Hover over the organization you want to modify
The Edit ![]() and Delete
and Delete ![]() button appears.
button appears.
4. Select Edit.
The Modify Organization Preferences page appears.
5. On the Modify Organization Preferences page, you can update the following attributes:
- Organization Name
- Email ID
- Organization Identity
- Allowed Subscriptions
- Expiry Date
- Provision Tools
6. Select Update after making your changes
Saner saves the updates to the organization.
Delete an Organization
| User access level: You must be signed in as an Admin or Organization Manager to delete an organization. |
1. Sign in to the Saner web console and go to the Control Panel page.
The Control Panel page appears.
2. Select the drop-down menu next to the organization ![]() icon and then select All Organizations.
icon and then select All Organizations.
The All Organizations page appears on the right side.
3. Hover over the organization you want to modify
The Edit ![]() and Delete
and Delete ![]() button appears.
button appears.
4. Select ![]()
5. In the Delete Organization confirmation dialog, select Delete.
Saner deletes the organization.
| Important: Deleting an organization also deletes all accounts associated with it, along with their data, from Saner. The Saner Agents installed on devices linked to the deleted accounts enter an inactive state and must be uninstalled manually. |
List Accounts
| User access level: You must be signed in either as an Admin, Super Admin, or Organization Manager to list an account. |
1. Sign in to the Saner web console, and go to the Control Panel page.
The Control Panel page appears.
2. Select the drop-down menu next to the ![]() icon and and then choose the organization you want to work with.
icon and and then choose the organization you want to work with.
The Accounts page appears on the right side and lists all accounts associated with the selected organization.
The Accounts page displays a table with the following information:
| Column Name | Description |
| Account Name | The name of the account. |
| Email ID | The sign-in ID of the account manager. |
| Subscription |
The number of subscriptions used by the account. Saner supports two subscription types: Auto Increment and Custom. In the Auto Increment type, Saner automatically assigns a new subscription to each Saner Agent until all available subscriptions are used. In the Custom type, Saner assigns subscriptions from a specified pool |
| Expiry Date |
The date the account expires. An account cannot remain active beyond the organization’s expiry date. If an account is expired, it appears with the label Expired in red. |
| Action |
The actions you can perform on the account. These include editing, deleting, and viewing account details. |
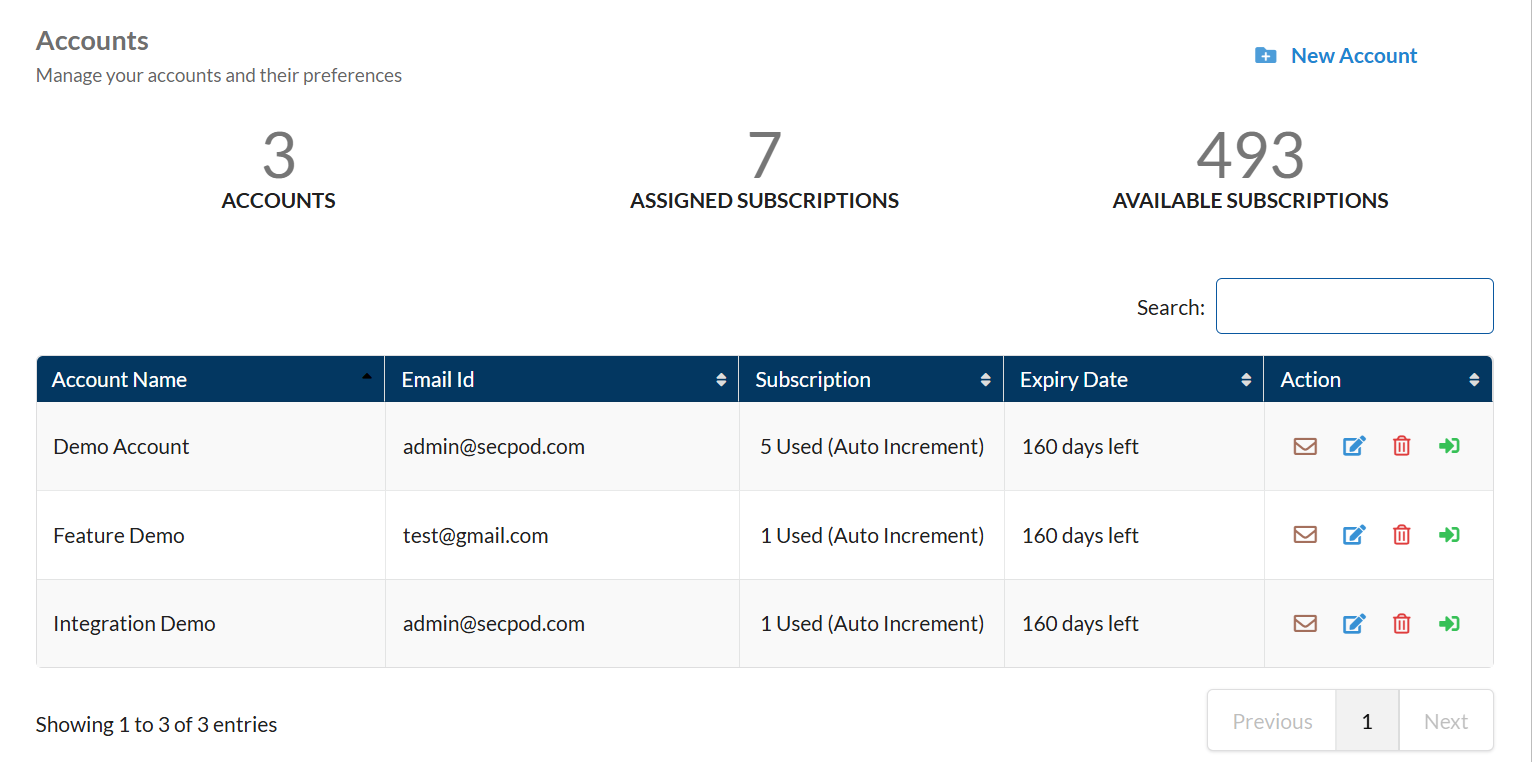
The total number of accounts in the selected organization, the number of subscriptions in use, and the number of available subscriptions appear above the account details table..
Add an Account
| User access level: You must be signed in as an Admin or Organization Manager to create an account. |
1. Sign in to the Saner web console, and go to the Control Panel page.
The Control Panel page appears.
2. Select the drop-down menu next to the ![]() icon and select the organization you want to work with.
icon and select the organization you want to work with.
The Accounts page appears on the right side.
3. In the Account Name box, enter a name for the account.
The account name must meet the following criteria:
- Contain at least 3 characters and no more than 127 characters.
- Use only alphanumeric characters, along with these special characters: hyphen (-), underscore (_), and period (.).
4. In the Email ID box, enter the email address where account-related alerts and reports should be sent.
5. Under Allowed Subscriptions, select either Auto Increment or Custom as the subscription type.
6. To automatically update Saner Agents to the latest version, turn on Agent auto update.
7. To require a password during Saner Agent uninstallation, turn on Password protect agent, and then enter a password.
8. Select Create.
Saner creates the account, which then appears on the Accounts page.
| Note: All Saner tools provisioned for the parent organization are automatically assigned to the account during creation. To change the tools provisioned for the account, modify the account preferences. |
Modify an Account
| User access level: You must be signed in either as an Admin, Super Admin or Organization Manager to modify an account. |
1. Log in to the Saner web console and access Control Panel.
The Control Panel page appears.
2. Click the drop-down menu next to the ![]() icon and select the organization you want to work with.
icon and select the organization you want to work with.
The Accounts page appears on the right side.
3. In the Accounts table, under the Action column, click ![]() to the right of the account you want to modify.
to the right of the account you want to modify.
The Modify Account Preferences page appears.
4. Make the required changes. Click Update to save the modifications you made to the account.
Saner updates the account preferences.
Delete an Account
| User access level: You must be logged in either as an Admin, Super Admin, or Organization Manager to delete an Account. |
1. Log in to the Saner web console and access Control Panel.
The Control Panel page appears.
2. Click the drop-down menu next to the ![]() icon and select the organization you want to work with.
icon and select the organization you want to work with.
The Accounts page appears on the right side.
3. In the Accounts table, under the Action column, click ![]() to the right of the account you want to delete.
to the right of the account you want to delete.
4. Click Delete on the Delete Account confirmation message.
Saner deletes the account.
Manage Users
The Users section allows administrators to effectively control user access and permissions within the platform. From this section, you can understand user roles and administrative capabilities, create new users, view detailed user information, modify existing user details, and delete users when necessary. This functionality ensures proper access control and streamlined user administration across the organization.
Understand User Roles and Administrative Capabilities
| Role | Description |
|---|---|
| Super Admin | During the initial onboarding of an enterprise, a Super Admin role is automatically created. The Super Admin has full administrative privileges, which include the ability to create and manage organizations and accounts, as well as carry out all administrative operations across Saner tools. Note: While the Super Admin can create additional admin users, the Super Admin role itself cannot be transferred to another user within Saner. |
| Admin | The admin user has complete access to create organizations and accounts and perform all types of administrative tasks using Saner tools. Note: While the Admin can create users, the Admin role itself cannot be transferred to another user within Saner. |
| Organization Manager | An organization manager has complete access to an organization and can perform all administrative tasks |
| Account Manager | An account manager has complete access to an account and can perform administrative tasks with an account. |
| Standard User (Full Access) | A standard user can perform operations such as Create, Modify, and Delete using the tools provisioned for access. However, a standard user cannot access the Control Panel to perform tasks such as User Management, Deployment, and Settings. |
| Standard User (Read-Only) | A standard user with read-only access can only perform read-only operations using Saner tools. This type of user cannot perform operations such as Create, Modify, and Delete using any Saner tools. Also, these users don’t have access to the Control Panel page to perform tasks related to User Management, Deployment, and Settings. |
| Tool/Feature | Actions Allowed | Super Admin | Admin | Organization Manager | Account Manager | Standard User (Full Access) | Standard User (Read-Only Access) |
|---|---|---|---|---|---|---|---|
| Control Panel | Create New User |  |
|
|
|
 |
|
| Edit User | |
|
|
|
|
|
|
| Enforce MFA | |
|
|
|
|
|
|
| Enforce SSO Authentication | |
|
|
|
|
|
|
| Enable API Key | |
|
|
|
|
|
|
| Delete User | |
|
|
|
|
|
|
| Device Discovery | |
|
|
|
|
|
|
| Active Directory Sync | |
|
|
|
|
|
|
| Device Import | |
|
|
|
|
|
|
| Agent Deployment | |
|
|
|
|
|
|
| Create/Edit/Delete Agent Configuration | |
|
|
|
|
|
|
| Network Scanner | |
|
|
|
|
|
|
| Posture Anomaly Scanner | |
|
|
|
|
|
|
| Risk Prioritization Scanner | |
|
|
|
|
|
|
| Create/Modify Integration Settings | |
|
|
|
|
|
|
| Create/Modify Mail Settings | |
|
|
|
|
|
|
| Create/Modify Co-Branding | |
|
|
|
|
|
|
| Saner VM | Exclude | |
|
|
|
|
|
| Remediate | |
|
|
|
|
|
|
| Patch Approval | |
|
|
|
|
|
|
| Saner CM | Import | |
|
|
|
|
|
| Create New Benchmark | |
|
|
|
|
|
|
| Apply Selected Configurations | |
|
|
|
|
|
|
| Approve/Reject Selected Patches | |
|
|
|
|
|
|
| Revert Selected Patches | |
|
|
|
|
|
|
| Create Automation Rule | |
|
|
|
|
|
|
| Rollback Patches | |
|
|
|
|
|
|
| Remove Device | |
|
|
|
|
|
|
| Reboot Device | |
|
|
|
|
|
|
| Filter applicable tasks | |
|
|
|
|
|
|
| Pause applicable tasks | |
|
|
|
|
|
|
| Resume applicable tasks | |
|
|
|
|
|
|
| Stop applicable tasks | |
|
|
|
|
|
|
| Delete tasks | |
|
|
|
|
|
|
| Saner PM | Request for Patch Approval | |
|
|
|
|
|
| Exclude | |
|
|
|
|
|
|
| Apply Selected Patches | |
|
|
|
|
|
|
| Approve/Reject Selected Patches | |
|
|
|
|
|
|
| Revert Selected Patches | |
|
|
|
|
|
|
| Create Automation Rule | |
|
|
|
|
|
|
| Rollback Patches | |
|
|
|
|
|
|
| Remove Device | |
|
|
|
|
|
|
| Reboot Device | |
|
|
|
|
|
|
| Filter applicable Tasks | |
|
|
|
|
|
|
| Pause applicable Tasks | |
|
|
|
|
|
|
| Resume applicable Tasks | |
|
|
|
|
|
|
| Stop applicable Tasks | |
|
|
|
|
|
|
| Delete Tasks | |
|
|
|
|
|
|
| Saner EM | Checks | |
|
|
|
|
|
| Actions | |
|
|
|
|
|
|
| Delete Job | |
|
|
|
|
|
|
| Saner AE | Add/Edit New Asset Licenses | |
|
|
|
|
|
| Add/Edit New Asset Listing (Blacklist/Whitelist) | |
|
|
|
|
|
|
| Upload from CSV (Blacklist/Whitelist) | |
|
|
|
|
|
|
| Saner PA | All Anomalies | |
|
|
|
|
|
| Configure | |
|
|
|
|
|
|
| Whitelist | |
|
|
|
|
|
|
| Custom Rules | |
|
|
|
|
|
|
| Saner RP | Remediate | |
|
|
|
|
|
| Configuration | |
|
|
|
|
|
|
| Device Management | Scan Now | |
|
|
|
|
|
| Create/Modify/Delete Groups | |
|
|
|
|
|
|
| Create/Modify Pin for devices | |
|
|
|
|
|
|
| Create/Modify/Delete Tags for devices | |
|
|
|
|
|
|
| Disable/Enable Device | |
|
|
|
|
|
|
| Move Device | |
|
|
|
|
|
|
| Delete Device | |
|
|
|
|
|
|
| Uninstall Agent | |
|
|
|
|
|
|
| Alerts | Create/Modify Alerts | |
|
|
|
|
|
| Reports | Create New Report | |
|
|
|
|
|
| Download Report | |
|
|
|
|
|
|
| Email Report | |
|
|
|
|
|
|
| Saved Reports | |
|
|
|
|
|
|
| Account Report APIs | |
|
|
|
|
|
|
| Organization Report APIs | |
|
|
|
|
|
Create a New User
| Required Access Level to List or Create New Users: You must log in as either as a Super Admin, Admin, Organization Manager, or Account Manager to list existing users or to create a new user. |
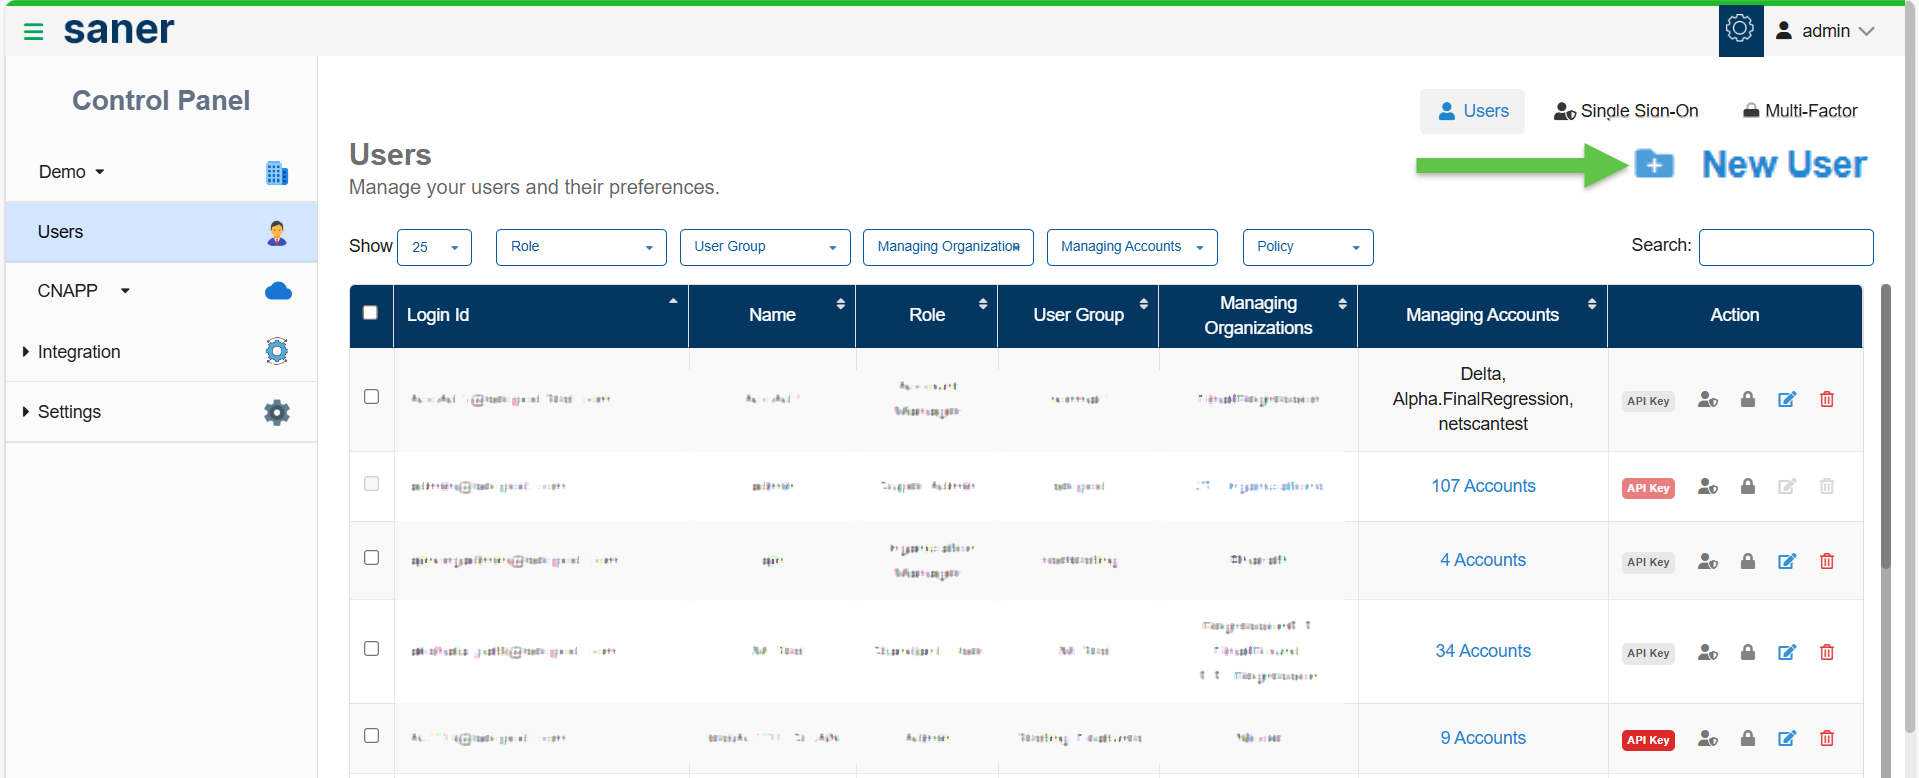
Step 1: From the Users details page, click on the New User button on the top right of the page. This opens the New User window in which you provide the user details.
Step 2: Provide the necessary details to complete the new user creation.

The following table describes the fields available on the New User page and their purpose:
| Field | Description |
|---|---|
| Login ID | Displays the email address of the user automatically. You have an option to only view the Login ID. |
| Name[Mandatory] | Enter the full name of the user. This name appears across the application in user lists, activity logs, and reports. |
| User Group[Mandatory] | Specify the group to which the user belongs. User groups help organize users and apply group-based access controls and policies. |
| SSO Policy | Choose the Single Sign-On (SSO) policy to be applied to the user. This determines if the user authenticates through an external identity provider and the SSO rules that apply. |
| Password[Mandatory] | Set a password for the user. This is required for local authentication unless an SSO-only policy is assigned. |
| Confirm Password[Mandatory] | Set a password for the user. This is required for local authentication unless an SSO-only policy is assigned. |
| MFA Policy | Select the Multi-Factor Authentication (MFA) policy for the user. This defines if MFA is required and the type of secondary authentication used. |
| API Key | Move the slider to turn on the API key. The API Key grants the user access to SanerNow web services. Once enabled, the calendar displays, allowing you to select a date on which you want the API Key for the user to expire. |
| Role | Assign a role to the user. Roles define the user’s permissions and access levels within the application. Select one of the options from the drop-down list: Admin, Organization Manager, Account Manager, or Standard User. |
| Managing Organizations[Mandatory] | Specify the organizations that the user is allowed to manage. This controls administrative scope across multiple organizations. |
| Manage Access | Configure detailed access permissions for the user, including which features, modules, and data the user can view or manage. |
Step 5: Click Create to complete the user creation successfully. The newly created user displays on the Users details page.
View the User Details
| Required Access Level to View All Users: You must login either as an Admin, Super Admin, Account Manager, or Organization Manager to view all users. |
Step 1: After logging into the application, access the Control Panel.
Step 2: Click on the Users menu(left-hand-side bar) to open the Users details page from which you manage users and their preferences.
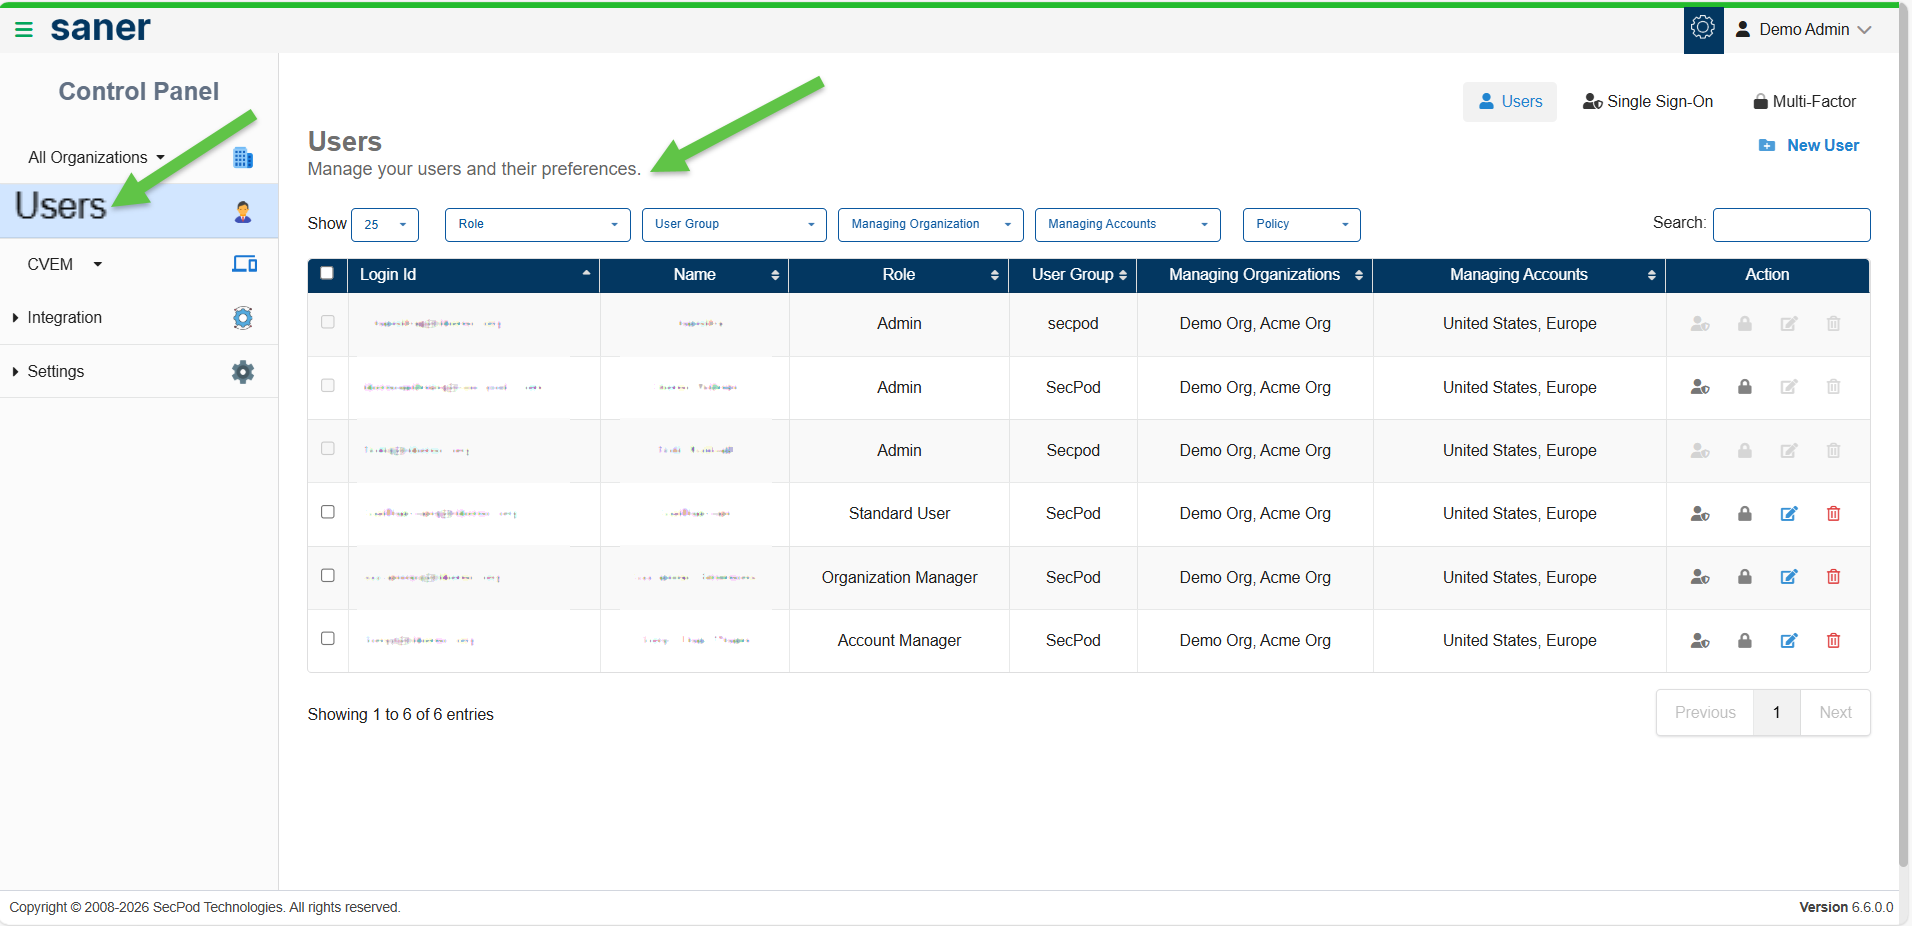
The following table describes the columns available in the Users details table and their purpose:
| Column Name | Description |
|---|---|
| Login ID | The email address of the user. |
| Name | The name of the user. |
| Role | The role assigned to the user. |
| User Group | The name of the group to which the user belongs. |
| Managing Organizations | If user(s) is an Organization Manager, they will see the organizations they are authorized to manage. In contrast, If user(s) is an Account Manager, they will see only the accounts they are authorized to manage. |
| Managing Accounts | The accounts that the user has permission to manage. |
| Action | The actions a user can perform on the Organizations/Accounts they have permission to. The following actions can be performed on the account: Modify User Preferences |
Modify the User Details
| Required Access Level to Modify User Details: You must login either as an Admin, Super Admin, Account Manager, or Organization Manager to modify all users. |
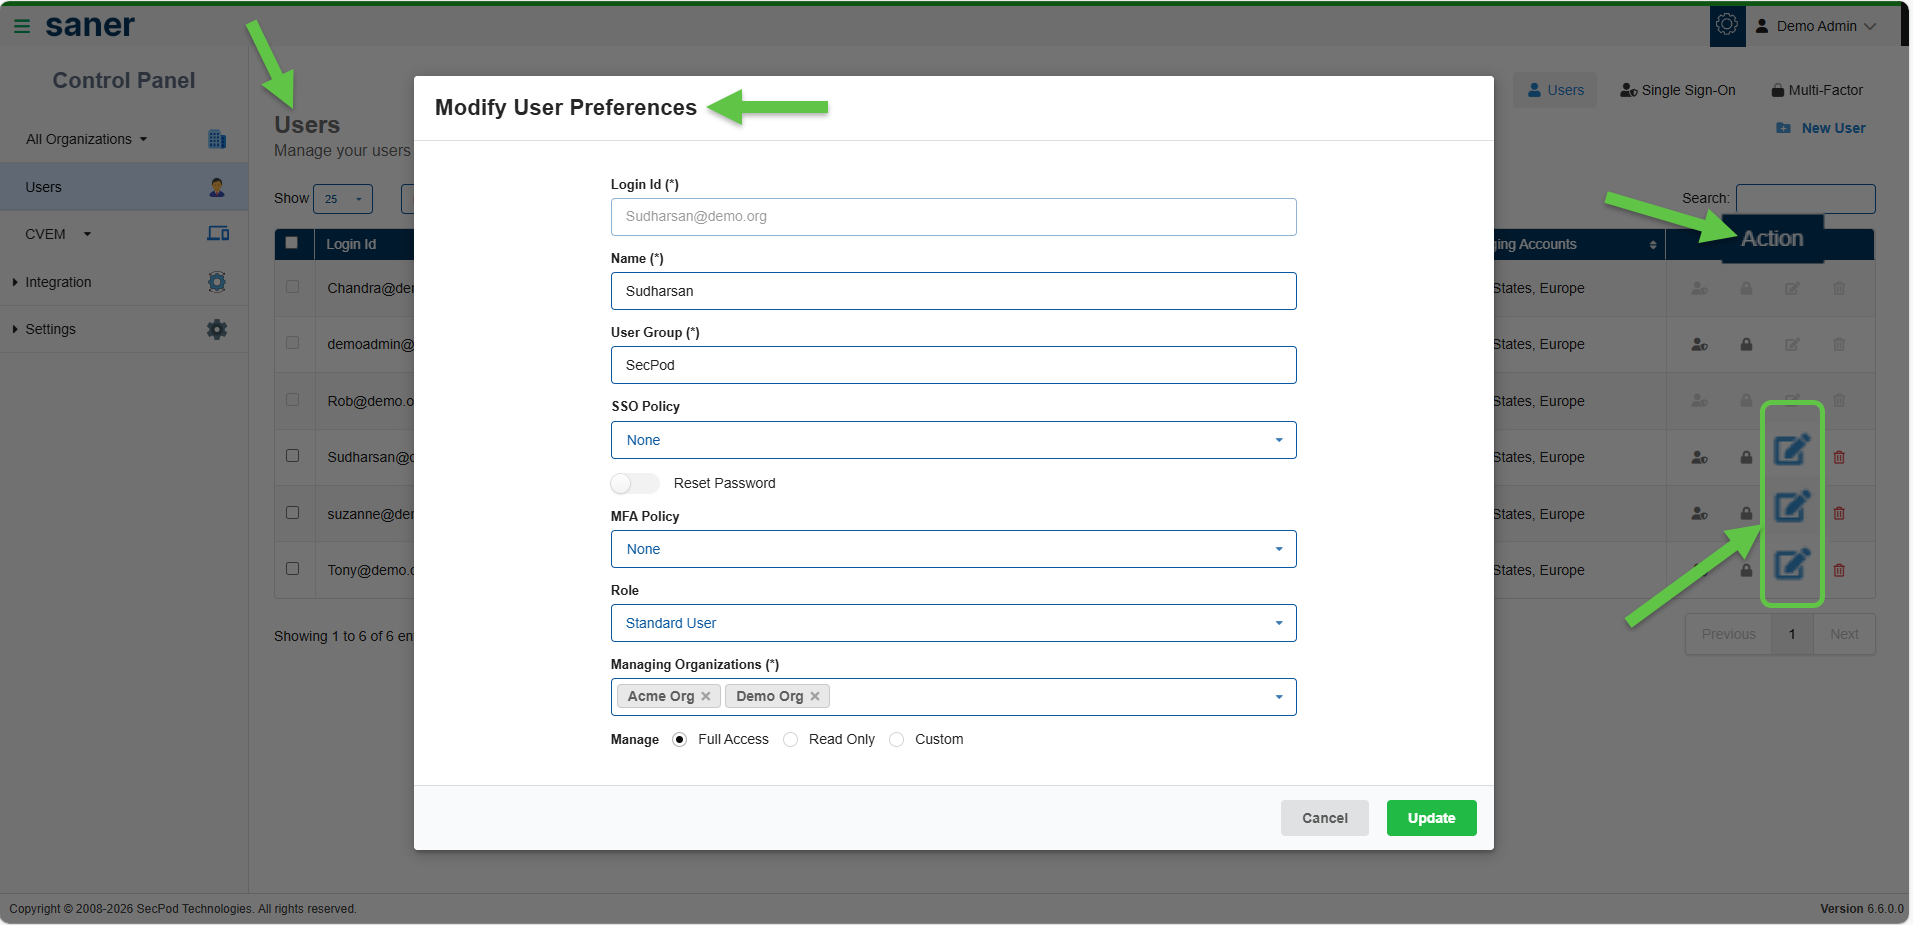
On the Users Details page, from the Action column, click the Edit icon next to the user account you want to modify. The Modify User Preferences window opens, where you can update all user information except the Login ID. After making the necessary changes, click Update to save your modifications.
Delete a User
| Required Access Level to Delete a User: You must login either as an Admin, Super Admin, Account Manager, or Organization Manager to delete users. |

Within the Users details page, from the Action column, click the Delete icon next to the user account you want to remove. Confirm the deletion in the popup dialog box to permanently delete the selected user account from the system.
Authentication
You can use two-factor authentication to secure your Saner login. Saner supports Single-Sign-On and Multi-factor authentication.
Single Sign-On
| User access level: You must login either as an Admin, Super Admin, Account Manager, or Organization Manager to configure SSO. |
You can configure SSO to log on to Saner. Any SSO vendor that supports OAuth 2.0 can be used with Saner.

Refer to the below SSO Vendor Guides.
Multi-Factor
| User access level: You must login either as an Admin, Super Admin, Account Manager, or Organization Manager to configure MFA. |
You can configure Multi-factor authentication to secure Saner logins. By default, Saner supports the Authenticator App for MFA. You can configure any MFA provider to use with Saner.

Configure MFA
You can configure Multi-factor authentication to secure Saner logins. By default, Saner supports the Authenticator App for MFA.
Refer to the MFA Guide to learn more about configuring MFA with Saner.
Deployment
Saner’s Deployment section contains features that allow you to discover devices on your network and import devices using a JSON/CSV file or from an Active Directory environment.
At the same time, the Deployment section provides Saner Agent installers for different operating systems platforms. It provides an Offline Deployer tool that can be used to deploy Saner Agents on devices.
Also, the Deployment section has Saner Network Scanner – that helps you to identify vulnerabilities and misconfigurations across all IP-enabled devices in your network.
Device Discovery
The Device Discovery Scanner helps identify devices that exist within your network. By specifying a single IP address or a range of IP addresses, the scanner searches the network to detect available devices. Once the scan is complete, all discovered devices are displayed on the Device Discovery page, providing visibility into the devices present in your network.
Additionally, you can configure the periodic discovery scan to run Daily, Weekly, or Monthly.
By gaining visibility into the discovered hosts, along with their operating systems, administrators can take further actions such as scanning, deployment, or inventory management.
Before You Begin
- Understand that Device Discovery depends on configured scanners and network accessibility.
- Make sure you have an active Saner Network Scanner in your account to utilize the device discovery feature. For instructions on how to designate a device as a network scanner, refer to the Saner Network Scanner Userguide.
- Make sure to setup the credentials and scanner configurations correctly for accurate discovery results.
- Note that the system allows only those user roles(Admin/Super Admin/Organization Manager/Account Manager) having appropriate permissions to initiate discovery or perform actions on devices
Get Started
Access Device discovery by following the listed steps:
Step1: Log in to Saner platform with administrative privileges.
Step2: Navigate to Control Panel.
Step3: From the left-hand-side navigation pane, choose the organization and account in which you want to set up the device discovery.
Step4: Specify the tool as CVEM by choosing from the drop-down menu.
Step5: Under the Discovery menu, select Device Discovery.
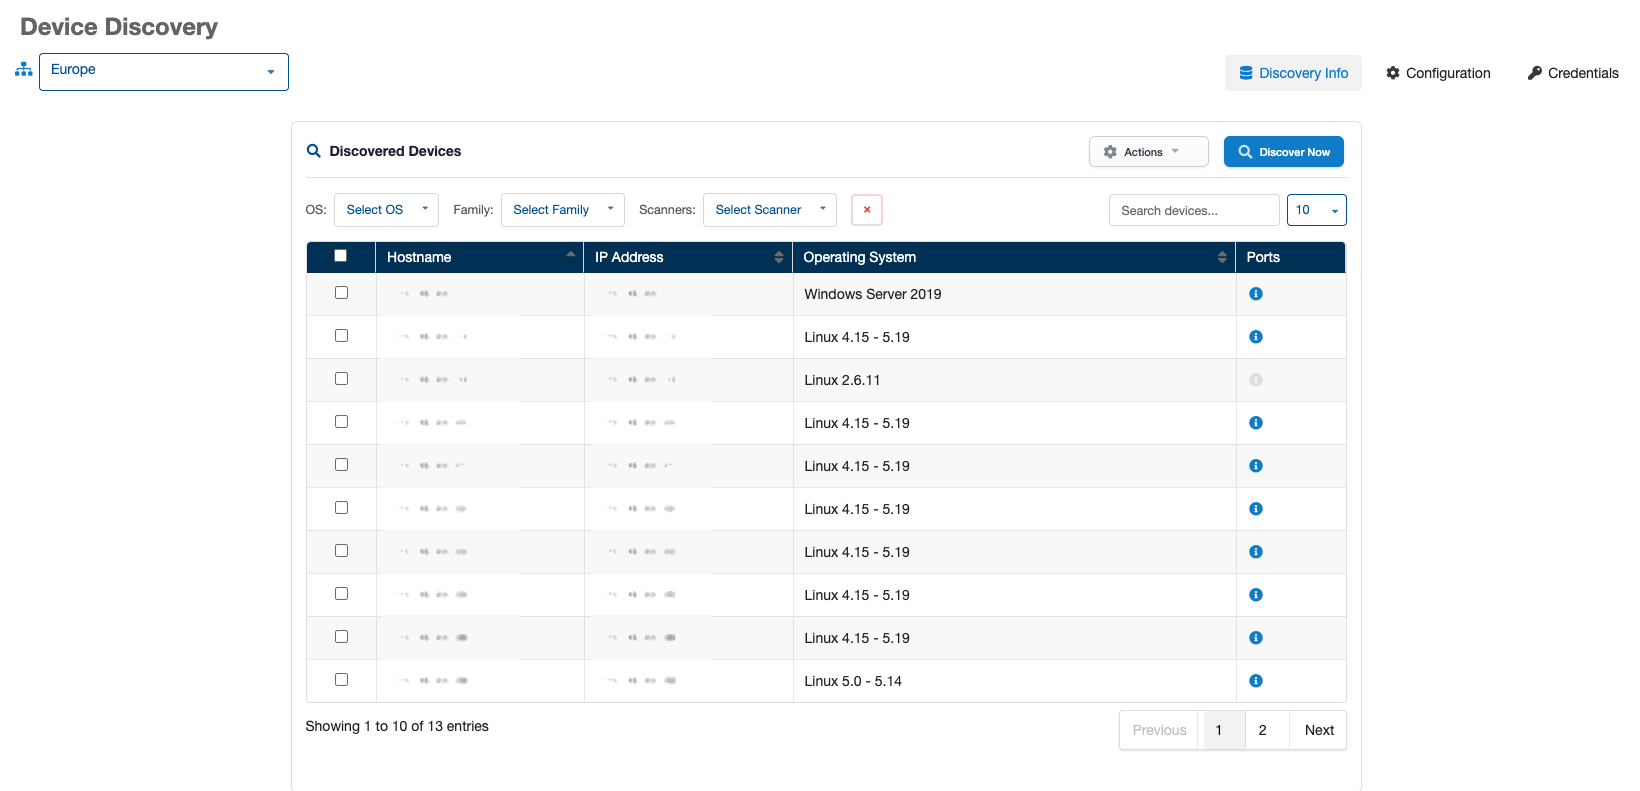
The Discovered Devices page opens displaying a tabular list of all devices identified through discovery scans.
What Do the Columns on Discovered Devices Page Mean?
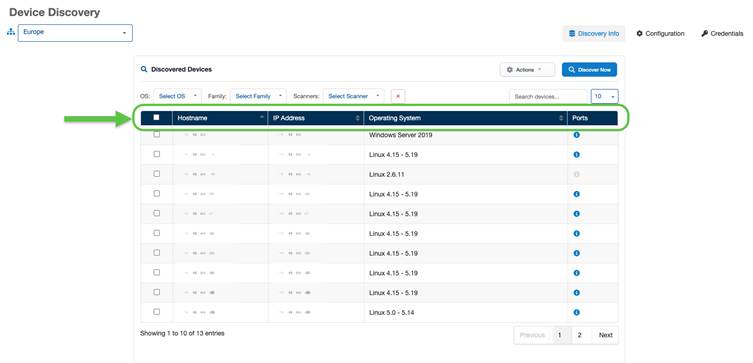
| Column | Description |
| Hostname | The hostname of the discovered device. If unavailable, the IP address may be shown. |
| IP Address | The network IP address of the discovered host. |
| Operating System | The operating system detected on the device (for example, Ubuntu, Windows, and macOS). |
| Ports | Provides port-related details for the device. Clicking the icon displays open or discovered ports. |
Initiate an On-Demand Discovery Scan Based on Configured Settings
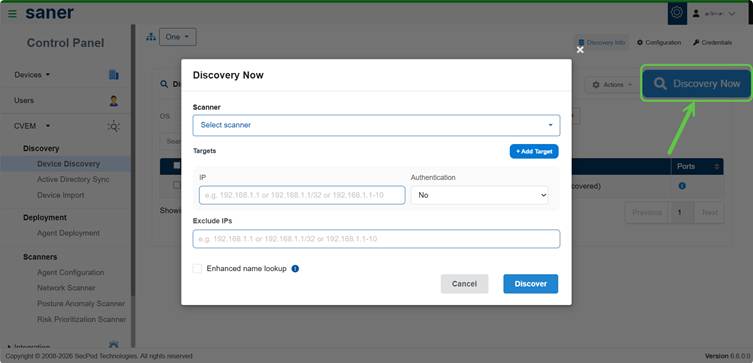
From the Discovered Devices page, click the Discovery Now button. The Discovery Now window opens and allows administrators to manually initiate an on-demand device discovery by selecting a scanner, defining target IP ranges, and optionally providing authentication credentials.
Select Scanner to Perform Discovery
The scanner name and its IP address display in the drop-down for easy identification. Choose the appropriate scanner from the drop-down menu. Note that only active and configured scanners display in the drop-down for selection.
Configure Targets
Use the Targets section to define the devices or IP ranges for discovery. To add a Target, click + Add Target button to include multiple IPs or ranges.
Provide IP
- Enter a single IP (for example, 172.16.11.72)
- A range (for example, 172.16.11.72-75) or
- CIDR notation, if supported by your configuration
Specify Authentication Options
Authenticated discovery retrieves accurate operating system details, hostname, and additional system information. Select one of the following options from the drop-down menu:
- No: This option performs unauthenticated discovery to identify host availability and basic information.
- Yes: This option helps find the accurate hostname, OS name and ports with authentication.
Authentication Details (When Enabled)
If Authentication = Yes, additional fields display:
- Credential Type: Select Custom to manually enter credentials. Select Save to retain the already created credentials.
- Auth Type: Choose the authentication protocol (for example, SMB, SSH, or others based on OS).
- Username: Enter a valid account with required privileges on the target device.
- Password: Enter the corresponding password. Use the eye icon to view or hide the password.
[Optional]Exclude IPs
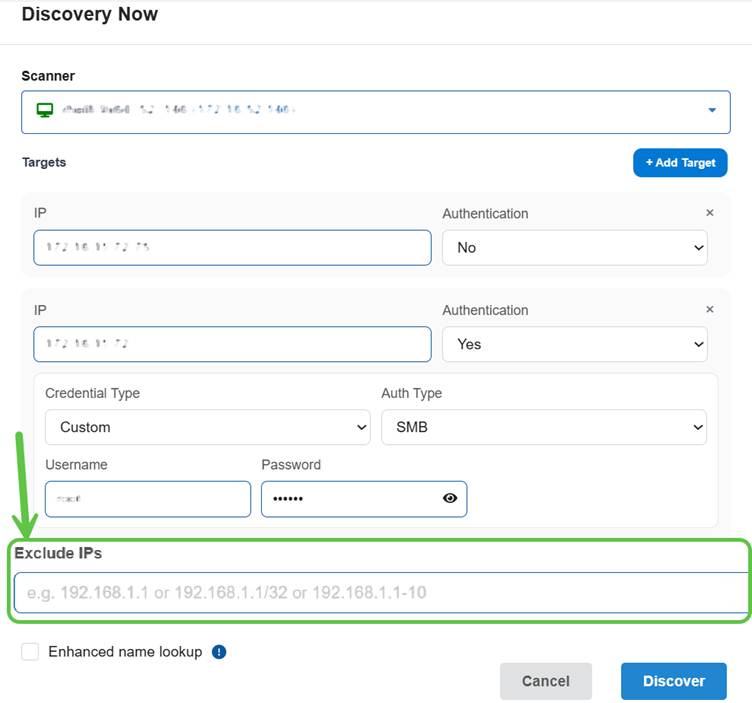
Use the Exclude IPs field to omit specific IPs or ranges from discovery. Supported formats include:
- Single IP (for example, 192.168.1.1)
- CIDR (for example, 192.168.1.1/32)
- IP range (for example, 192.168.1.1-10)
Increase Operating System Name Discovery Accuracy Using Enhanced Name Lookup

By selecting the Enhanced name lookup checkbox, you have the ability to increase the Operating System name discovery accuracy but with a slightly extended scan time.
Start the Discovery Process
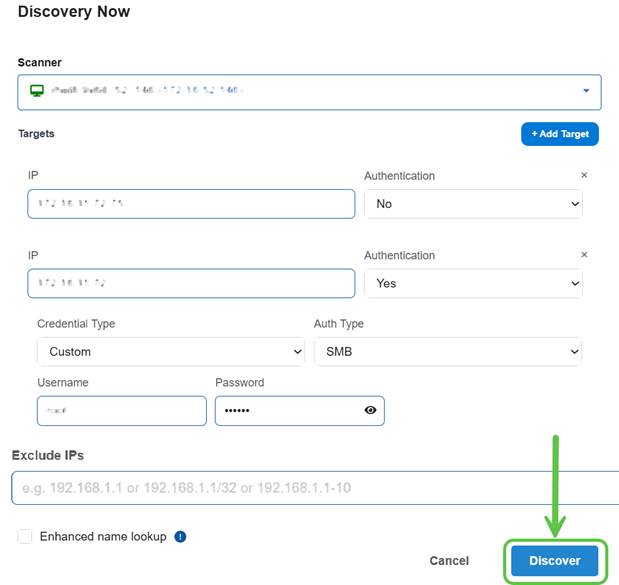
On completing the Targets configuration, go ahead and click the Discover button to initiate the discovery scan process.
[Optional]If you want to close the window without initiating discovery, click the Stop Scan button.
The scan initiation message appears as shown:
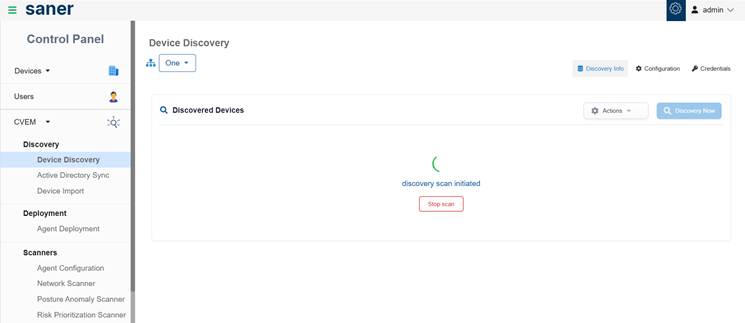
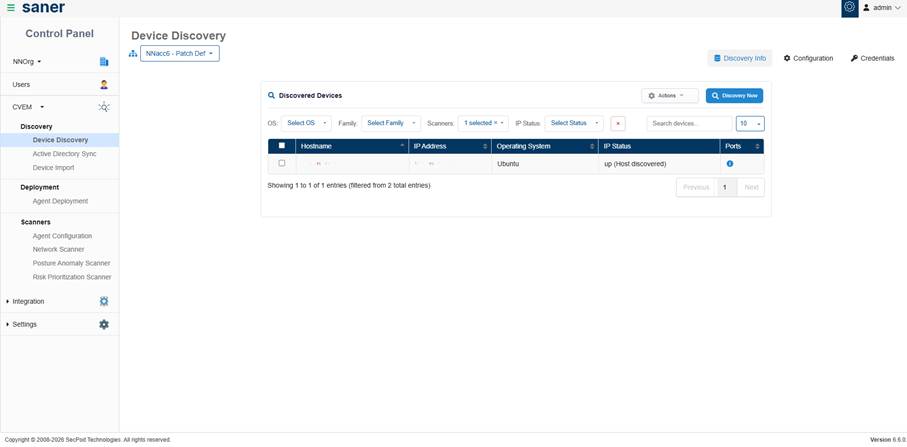
On completion of scan, the Discovered Devices page displays a tabular list of one or more devices identified through discovery scans.
Verify Operating System Detection
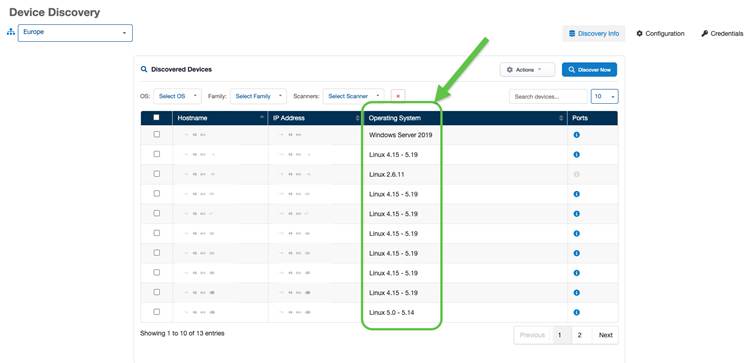
After setting up the enhanced name lookup for the target configuration and starting the discovery process, the discovery scan retrieves accurate operating system information and displays in the discovered devices list.
Locate Specific Devices Using Filters and Search Options
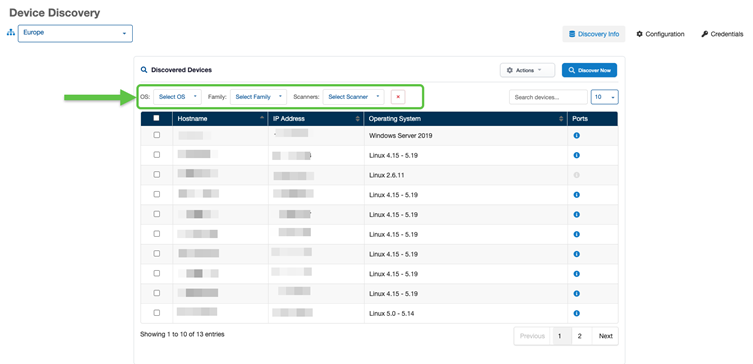
To quickly locate specific devices, use the filters in the Discovered Devices page. You can also control the number of entries displayed per page using the drop-down next to the search bar.
| Filter By | Use to… |
| OS | Retrieve devices based on operating system |
| Family | Retrieve results by OS family (for example, Linux, Windows) |
| Scanners | By selecting one or more scanners from the Scanners drop-down menu, the table updates dynamically to display only the devices discovered by the chosen scanner(s). For each listed device, the corresponding IP address(es) identified during the scan displays in the table. This filter allows you to isolate and review devices discovered by a specific scanner, making it easier to validate scan coverage, troubleshoot discovery results, and analyze findings specific to each scanner. You can select multiple scanners to view a combined list of devices discovered by all of them, or you can clear your selection to see devices discovered by all scanners. |
| IP Status | Retrieve results based on device availability or discovery status |
| Search Devices | Search using hostname or IP address |
Perform Bulk or Contextual Actions on Selected Devices
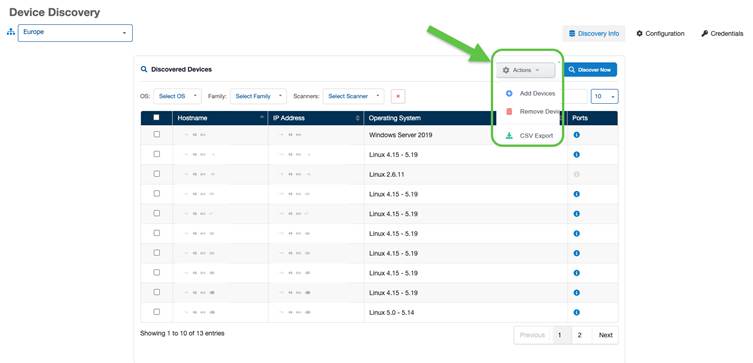
Execute bulk or contextual actions on selected devices using the “Actions” menu. Available options may vary based on configuration and permissions.
Initiate Scheduled Scan Based on Configured Settings
The configuration options for Scheduled Scans are the same as those for On-Demand Scans. For detailed guidance on selecting the appropriate scanner for discovery and configuring scan targets, refer to the On-Demand Scan configuration settings.
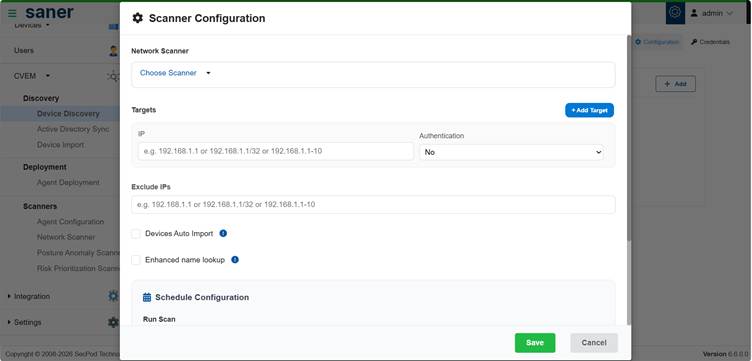
Import Devices Automatically Based on Scan Schedule Settings
From the Device Discovery page, click the Configuration button on top-right of the page. The Scanner Configuration window opens from which you start to configure the schedule for Devices Auto Import.
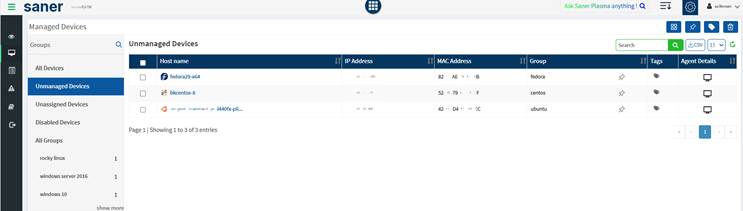
Just go ahead and select the Devices Auto Import checkbox and set the scanner schedule for automatic device discovery and import. The device(s) then moves to the Unmanaged Devices section within the Managed Devices page.
Note: If you do not select the Devices Auto Import checkbox, the devices display in the Discovered Devices table within an account.
Schedule Scan for Enhanced OS Name Lookup Discovery

From the Device Discovery page, click the Configuration button on the top-right of the page. The Scanner Configuration window opens from which you start to configure the schedule for Enhanced OS Name Lookup Discovery.
Just go ahead and select the Enhanced name lookup checkbox and set the scanner schedule for automatic device discovery and import. Also, choose the time zone from the drop-down, for the scanner to perform automatic device discovery and import.
Setup Credential
You need to add credentials in-order to securely store authentication details that can be used for asset discovery, scanning, or remote operations.
To add a new credential:
Step1: From the Device Discovery page, click the Credentials button on the top-right of the page.
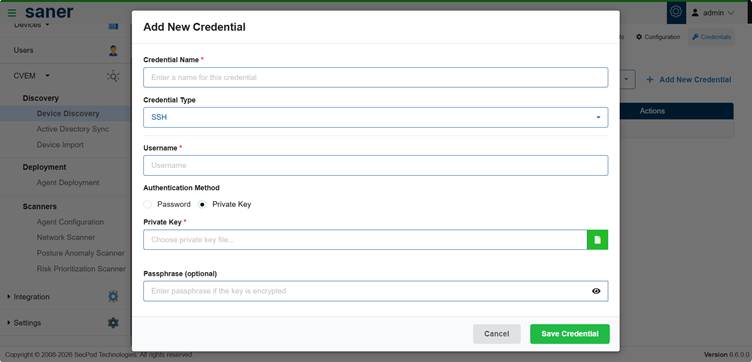
Step2: Click the link +Add New Credential.
Step3: Provide the following details:
- Credential Name: Provide a unique and easily identifiable name for the credential. For example, Example: Linux-Prod-SSH-Cred.
- Credential Type: Choose the type of credential from the dropdown menu. Available options: SSH, SMB(Windows), and HTTP.
- Username:Username that’s used to authenticate to the target system via SSH, SMB, or HTTP.
- Authentication Method: Select one of the following authentication methods:
- Password: If you select password, then provide the SSH password associated with the specified username. You can use the eye icon to show or hide the password as you type.
- Private Key: Select this option to use an SSH private key for authentication (additional fields related to the private key appears when you choose this option).
Step4: Click Save Credential to securely store the credentials.
Step5[Optional]: Click Cancel to discard the changes and exit without saving.
Agent Deployment
| User access level: You must be logged in as an Admin/Organization Manager/Account Manager to download and deploy Saner Agents. |
The Agent Deployment page provides Saner installers for the below operating systems.
- Windows
- Linux (Debian and RPM)
- MacOS
- IBM AIX
You can download the installer directly and install the Saner Agent on the device. Also, you can generate a download link that can be used to install Saner Agent on a device.
Refer here to learn about the operating systems on which Saner Agent can be installed.
Installing Saner Agent
You can install Saner Agent graphically or using a command-line interface. Refer the link below to learn more on installing Saner Agent.
https://saner.secpod.com/docs/Agent-Installation-Help-Guide.html?activeTab=Agent%20Installers
You can also use Offline Deployer tool to install Saner Agent on a device. Refer the link below to learn more on how to user Offline Deployer to deploy Saner Agents.
Agent Configuration
The Agent Configuration page allows you to create/modify configuration settings for the Saner Agent.
You can configure the Agent configuration settings mentioned below.
- Scan
- Schedule
- Remediate
- Network
- Upgrade
- Language
- Logs
| Note: Saner creates Default settings for Saner Agent that cannot be modified or deleted and is applied to all the groups. If you want to specify new settings for Saner Agent, you must create new agent settings and apply them to the device groups you want. |
Create Saner Agent Settings
| User access level: You must be logged in as an Admin/Organization Manager/Account Manager to create Saner Agent settings. |
1. Log in to the Saner web console and access Control Panel.
The Control Panel page appears.
2. Click the drop-down menu next to the ![]() icon and select the organization you want to work with.
icon and select the organization you want to work with.
3. Click Agent Configuration. ( Deployment –>Discovery–>Agents–>Agent Configuration)
The Agent Settings page appears on the right side.
4. Select the account you want to work with from the drop-down menu on the Agent Settings page.
5. Click Create Settings.
The Create Settings page appears on the screen.
6. Click the Scan tab on the left side of the Create Settings page.
7. In the Scan mode drop-down box, choose the scan mode you want.
7.1 If you chose Scan mode as Low, specify the CPU threshold. You can use the slider to allocate the percentage of CPU that should be used during the scan.
7.2 In the Scan for vulnerability box, drag the slider to the right if you want Saner Agent to perform a vulnerability scan. You can drag the slider to the left if you want Saner Agent not to perform a vulnerability scan.
7.3 In the Scan for compliance box, drag the slider to the right if you want Saner Agent to perform a compliance scan. You can drag the slider to the left if you want Saner Agent not to perform a compliance scan.
7.4 In the Behavior when scan is missed drop-down box, you can choose from the following options:
- As soon as it detects a missed scan. Saner Agent starts a scan immediately when it detects a scan is missed.
- Postpone by x hours. You can configure Saner Agent to start a scan after the ‘x’ number of hours after the device reboots.
- As per the next scheduled scan. You can configure Saner Agent to start the scan as per the following scheduled scan.
8. Click the Schedule tab.
8.1 In the Download drop-down box, choose when you want Saner Agent to download security content.
8.2 In the Scan drop-down box, choose when you want Saner Agent to start the scan.
8.3 In the Agent Messaging drop-down box, select the type of messaging you want Saner Agent to use. You can choose between Live and Poll.
9. Click the Remediate tab.
9.1 In the Vendor products patch server drop-down box, choose the server type. You can choose between the Default Server or Default with Alternate/Secondary Microsoft Patch Server.
If you choose Default with an Alternate/Secondary Microsoft Patch Server, you must specify the path for the secondary server in the Secondary Patch Server. You must also specify the condition under which the Saner Agent should contact the secondary patch server. You can choose between Default Server Connect or Patch Search fails.
9.2 In the Third-party products patch server drop-down box, you can choose between Default or Local.
If you choose Local, the Saner Agent will contact the repository configured locally. You can connect to the local repository using HTTP, HTTPS, or FTP protocol.
9.3 In the enter URL box, provide the URL for the local repository.
9.4. In the Buffer Patches box, slide the slider to the right to enable buffering of patches.
9.4.1. In the Maximum cache size limit box, specify the buffer cache size in MB.
9.4.2. In the Maximum buffering speed box, specify the buffering speed in percentage.
10. Click Network.
10.1. Click Enable proxy if you use a proxy in your environment.
10.2. In the Proxy Host Name box, provide the proxy server’s hostname.
10.3. In the Proxy Port box, provide the port number associated with the proxy server.
10.4. Click Authenticate if your proxy server uses authentication.
10.5. In the User ID box, provide the username to authenticate to the proxy server.
10.6. In the Password box, provide the password to authenticate to the proxy server.
11. Click Upgrade.
11.1. In the Agent upgrade box, you can choose between Automatic and Disabled.
11.2. If you select Automatic, Saner Agents will automatically be upgraded to the latest version.
11.3. If you select Disabled, Saner Agents won’t be upgraded to the latest version.
12. Click Logs.
12.1. In the Log Type box, you can choose between Audit and Debug log type.
Saner Agent saves minimal logs if you choose the log type as Audit.
Saner Agent saves detailed logs if you choose the log type as Debug.
13. In the Settings Name box, provide a name for the Saner Agent settings.
14. In the Settings Description box, provide a description for the Saner Agent settings.
15. In the Select groups drop-down box, select the groups to which you want the Saner Agent settings to be applied.
16. Click Create.
Saner creates the agent settings and displays them on the Agent Settings page.
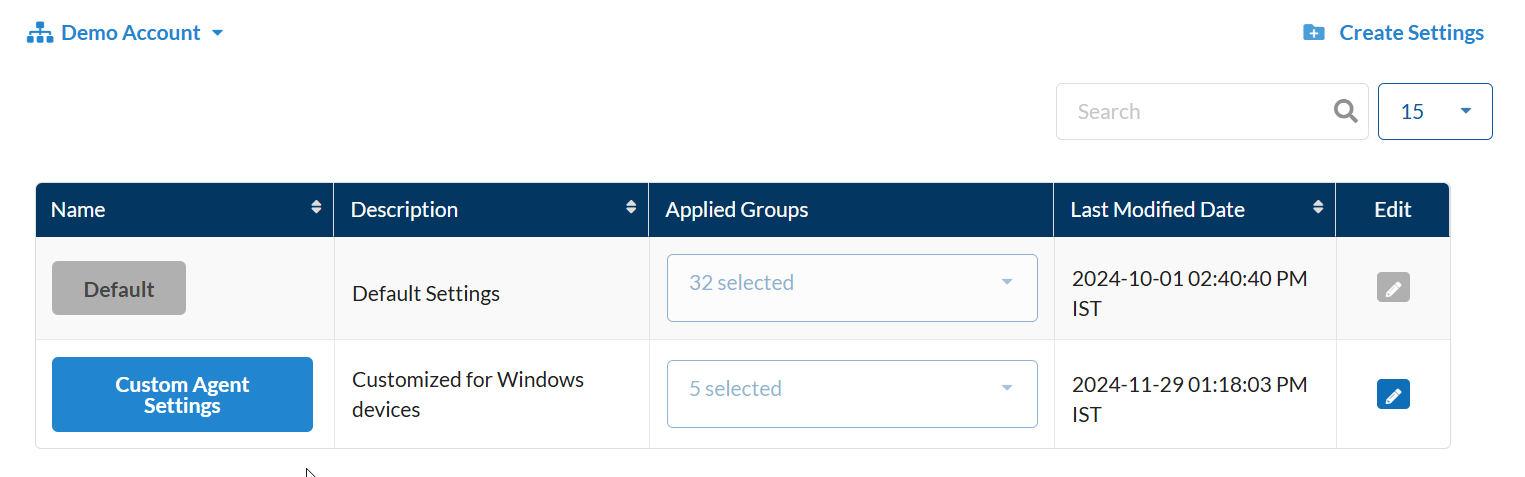
Edit Saner Agent Settings
| User access level: You must be logged in as an Admin/Organization Manager/Account Manager to edit Saner Agent settings. |
1. Log in to the Saner web console and access Control Panel.
The Control Panel page appears.
2. Click the drop-down menu next to the ![]() icon and select the organization you want to work with.
icon and select the organization you want to work with.
3. Click Agent Configuration. ( Deployment –>Discovery–>Agents–>Agent Configuration)
The Agent Settings page appears on the right side.
4. Select the account you want to work with from the drop-down menu on the Agent Settings page.
5. On the Agent Settings page, click ![]() in the Edit column next to the agent settings you want to edit.
in the Edit column next to the agent settings you want to edit.
The ![]() (save),
(save), ![]() (cancel), and
(cancel), and ![]() (delete) buttons appear.
(delete) buttons appear.
The Description and Applied Groups boxes are enabled for changes.
6. Click the settings name under the Name column to modify the agent settings.
The Update Settings page appears.
7. Modify the configuration settings as per your requirements.
8. Click Update.
Saner updates the agent configuration settings.
Delete Saner Agent Settings
| User access level: You must be logged in as an Admin/Organization Manager/Account Manager to delete Saner Agent settings. |
1. Log in to the Saner web console and access Control Panel.
The Control Panel page appears.
2. Click the drop-down menu next to the ![]() icon and select the organization you want to work with.
icon and select the organization you want to work with.
3. Click Agent Configuration. ( Deployment –>Discovery–>Agents–>Agent Configuration)
The Agent Settings page appears on the right side.
4. Select the account you want to work with from the drop-down menu on the Agent Settings page.
5. On the Agent Settings page, click ![]() in the Edit column next to the agent settings you want to delete.
in the Edit column next to the agent settings you want to delete.
The ![]() (save),
(save), ![]() (cancel), and
(cancel), and ![]() (delete) buttons appear.
(delete) buttons appear.
6. Click ![]()
7. Click OK on the confirmation message.
Saner deletes the agent configuration settings.
Network Scanner
Saner Network Scanner helps you identify vulnerabilities and misconfigurations across all IP-enabled devices in your organization. To do this, you don’t have to invest in additional hardware.
Network Scanner scans your network by leveraging the endpoints in your network. Saner’s Network Scanner is built on a hub and spoke model – which effectively reduces the scan time required to scan and discover vulnerabilities in your network – making the entire process seamless and continuous.
Refer to the Saner Network Scanner User Guide to learn more.
Authentication
You can use two-factor authentication to secure your Saner login. Saner supports Single-Sign-On and Multi-factor authentication.
Single Sign-On
| User access level: You must be logged in as an Admin/Organization Manager/Account Manager to enforce SSO authentication for user accounts in Saner CVEM. |
You can configure SSO to log on to Saner. Any SSO vendor that supports OAuth 2.0 can be used with Saner.
Refer to the below SSO Vendor Guides.
Multi-Factor
| User access level: You must be logged in as an Admin/Organization Manager/Account Manager to enforce Multi-factor authentication on user accounts in Saner CVEM. |
You can configure Multi-factor authentication to secure Saner logins. By default, Saner supports the Authenticator App for MFA. You can configure any MFA provider to use with Saner.
Configure MFA
You can configure Multi-factor authentication to secure Saner logins. By default, Saner supports the Authenticator App for MFA.
Refer to the MFA Guide to learn more about configuring MFA with Saner.
Settings
The Settings section in Saner includes features for configuring a mail server and uploading a custom logo.
Use Mail Settings to configure a mail server for sending alerts and notifications to specified recipients.
Use Co-Branding to upload your organization’s logo, which appears in the Saner web console.
Mail Settings
The Mail Settings feature supports two authentication types: Basic and OAuth.
Configure Mail Settings (Basic)
| User access level: You must be signed in as an Admin or Organization Manager/Account Manager to configure OAuth mail settings. |
1. Sign in to the Saner web console, and then go to the Control Panel.
The Control Panel page appears.
2. Select the drop-down menu next to the ![]() icon and and then choose the organization you want to work with.
icon and and then choose the organization you want to work with.
3. Select Deployment > Settings > Mail.
The Mail Settings page appears.
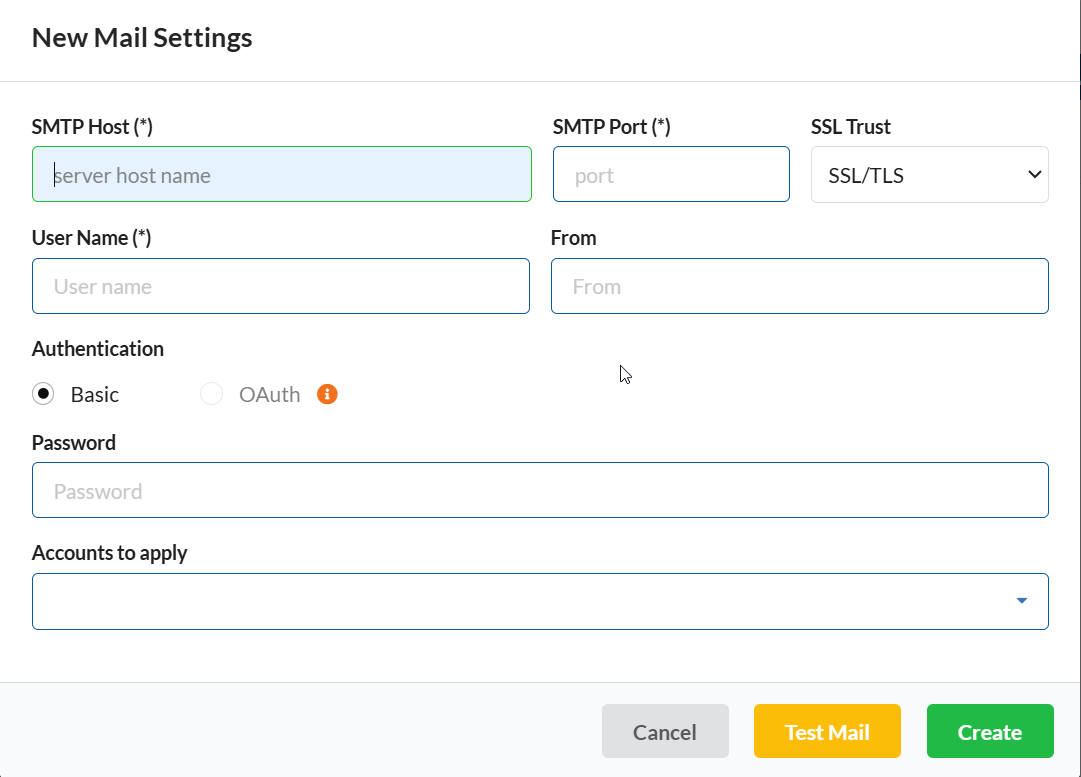
4. Select New Mail Settings in the upper-right corner of the Mail Settings page.
The New Mail Settings window appears..

5. In the SMTP Host box, enter the host name or IP address of the SMTP server (for example, smtp.example.com).
6. In the SMTP Port box, enter the port number for the SMTP server.
7. In the SSL Trust list, select the SSL option your email server supports.
8. In the User Name box, enter the email address used to authenticate with the SMTP server.
9. In the Authentication box, select Basic.
10. In the Password box, enter the password associated with the email address you provided.
11. In the From box, enter the sender name that should appear in emails sent from Saner.
12. In the Accounts to apply list, select the accounts you want to apply these mail settings to.
13. Select Test Mail to send a test email.
If you don’t receive the test email, verify the information entered in steps 5 through 10.
If you receive the test email, proceed to the next step.
14. Select Create.
Saner saves the mail settings and displays them on the Mail Settings page.
| Important: You can apply mail settings to an account and an organization in Saner. |
Configure Mail Settings (OAuth)
| User access level: You must be logged in as an Admin/Organization Manager/Account Manager to configure OAuth mail settings. |
1. Log in to the Saner web console and access Control Panel.
The Control Panel page appears.
2. Click the drop-down menu next to the ![]() icon and select the organization you want to work with.
icon and select the organization you want to work with.
3. Click Mail. ( Deployment –>Settings–>Mail)
The Mail Settings page appears on the right side.
4. Click New Mail Settings on the top right of the Mail Settings page.
The New Mail Settings window appears.
5. In the SMTP Host box, type the host or IP of the SMTP Server. (e.g., smtp.example.com).
6. In the SMTP Port box, type the port of the SMTP Server.
7. In the SSL Trust drop-down box, select the SSL Trust your email server supports.
8. In the User Name box, type the email address you want to use to authenticate to the SMTP server you mentioned in Step 3.
9. In the Authentication option box, select the authentication as OAuth.
10. Enter the Client ID and Client Secret. Toggle the Configure OAuth button towards the right.
A pop-up message appears on the screen.
11.Click OK.
Your mail provider’s website appears.
If you are using Gmail, refer the article – How to create OAuth Client ID and Client Secret for Gmail Accounts.
If you are using Microsoft 365, refer the article – How to create OAuth Client ID and Client Secret for Microsoft 365.
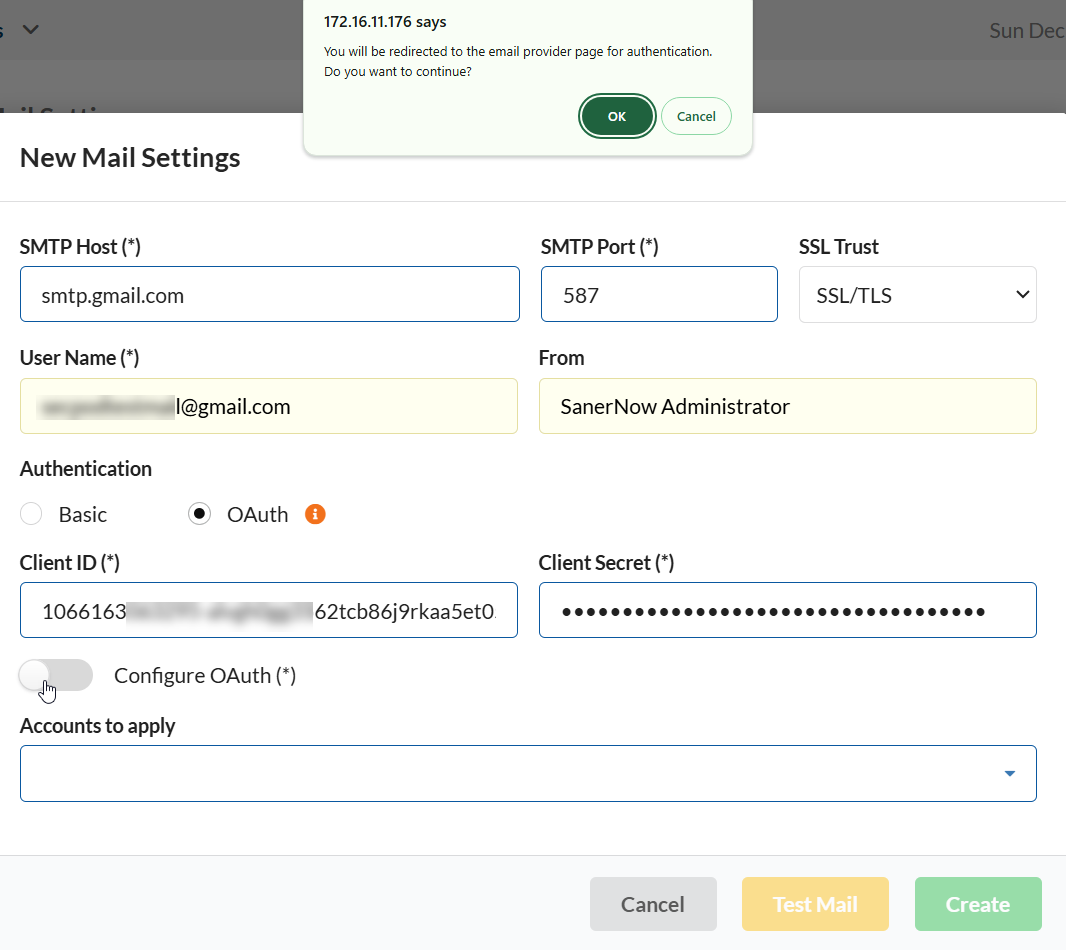
| Note Saner supports Gmail and Office365 email addresses for OAuth authentication. Saner will enable the OAuth option if you enter a valid SMTP server address associated with Gmail or Office365. |
| Note If you’re using an Office 365 email address for OAuth authentication, use the following settings. Make sure to whitelist the email address in the Office 365 admin portal to ensure seamless integration with OAuth: SMTP host: smtp.office365.comSMTP port: 587SSL trust: STARTTLSIf you’re using a Gmail email address for OAuth authentication, use the following settings: SMTP host: smtp.gmail.comSMTP port: 587SSL trust: STARTTLS |
12. Follow the on-screen instructions to validate the email address, OAuth Client ID, and Client Secret. You will see a Success notification on the right side of the page.
13. In the Accounts to apply drop-down box, select the accounts you want to use the mail settings.
14. Click Test Mail to trigger a test mail.
If the OAuth settings are correct, you will see a notification message on the right side of the screen stating that a test mail has been sent successfully. If the settings are incorrect, you will see an error message on the right side of the screen.
15. Click Create to save the OAuth mail settings.
Saner creates the mail settings and displays it on the Mail Settings page.
Co-Branding
The co-branding feature in Saner lets you upload a custom logo to the web console. The logo appears on the console and in both canned and custom reports.
Upload a custom logo
| User access level: You must be signed in as an Admin or Organization Manager to upload a custom logo in Saner. |
1. Sign in to the Saner web console, and then go to the Control Panel.
The Control Panel page appears.
2. Select the drop-down menu next to the organization![]() icon and then choose the organization you want to work with.
icon and then choose the organization you want to work with.
3. Select Deployment > Settings > Co-Branding.
The Co-Branding page appears on the right side.
4. Select Choose image.
The file browser opens.
5. Locate and select the PNG or JPEG file, and then select Crop & Upload image.
The logo is uploaded and appears in the web console and reports.
| Important: The image must be in PNG or JPEG format and no larger than 200 KB. |
To learn more on how to manage devices in Saner, refer the Saner Device Management User Guide.

