Overview
SanerNow Continuous Posture Anomaly Management (CPAM) is a cloud-based solution that provides deep visibility into your IT infrastructure.
It helps IT security teams identify devices that are misconfigured, uniquely configured, or significantly different from others in the environment.
SanerNow CPAM continuously monitors thousands of device parameters to detect posture anomalies, including outliers, aberrations, and deviations across your IT landscape.
Getting Started with SanerNow CPAM
If you’re an existing customer who have subscribed to the Endpoint Query and Response tool (EQR), CPAM tool will be available to you under the SanerNow tools icon. You can click on the PA icon, and it will take you to the PA dashboard.
Note: CPAM tool has replaced EQR. You will find it listed as PA throughout SanerNow’s interface.
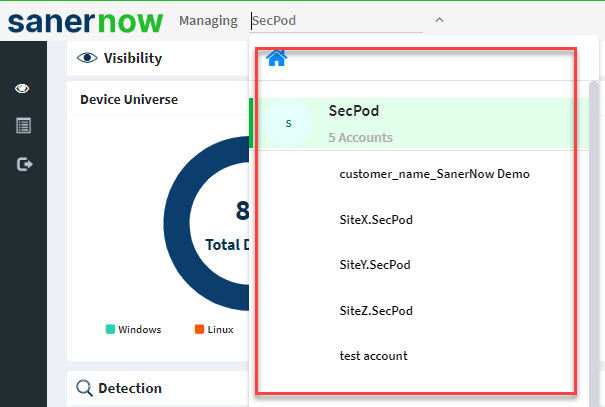
Select the Account you want to work with.
Click the SanerNow tools icon and select PA (Posture Anomaly) from the list of SanerNow tools.
Performing Posture Anomaly Scan on an account for the first time
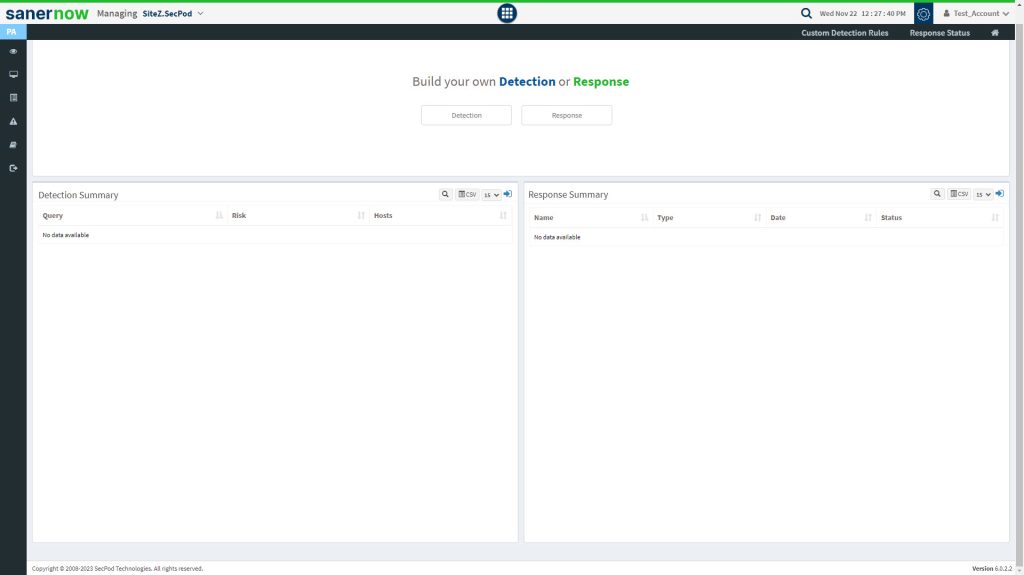
You will likely encounter a blank dashboard if PA Scan has not been performed on the account. Your screen will look exactly like the image mentioned below.

The PA tool needs data to do the computation and reveal the anomalies that exist in your account. And for this data to be collected, PA tool needs to execute a scan on the account.
How to launch a Posture Anomaly Scan on an account?
Follow the steps below to launch a PA Scan on an account.
Step 1: Select the account on which you want the PA Scan to be performed. You can find the account on the top-left corner of the page.

Step 2: If you want PA Scan to be performed immediately on the account, click on ‘Scan Now’. This will initiate a PA Scan. The scan time will vary depending on the number of devices available within the account.

However, if you don’t want to perform an immediate PA Scan on the account, you can schedule one for later. The following options are available for scheduling a PA Scan.
- Daily
- Weekly
- Monthly
How to schedule a Posture Anomaly Scan to run daily?
Follow the steps below to run a daily PA Scan on the account.
Step 1: Select the schedule as Daily.

Step 2: You need to specify the Start time – this is the time when the PA Scan will be run on the account.

Step 3: Click on Update to save the PA Scan preferences.

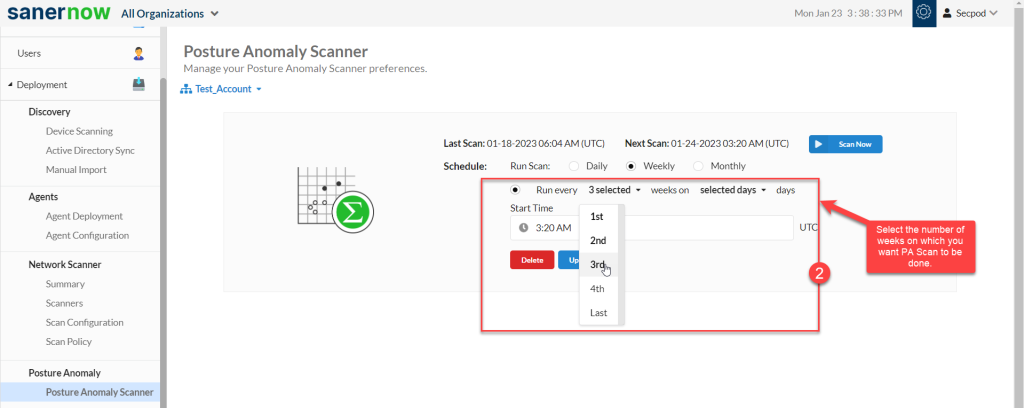
How to schedule a Posture Anomaly Scan to run on a weekly basis?
Follow the steps below to run a PA Scan on a weekly basis.
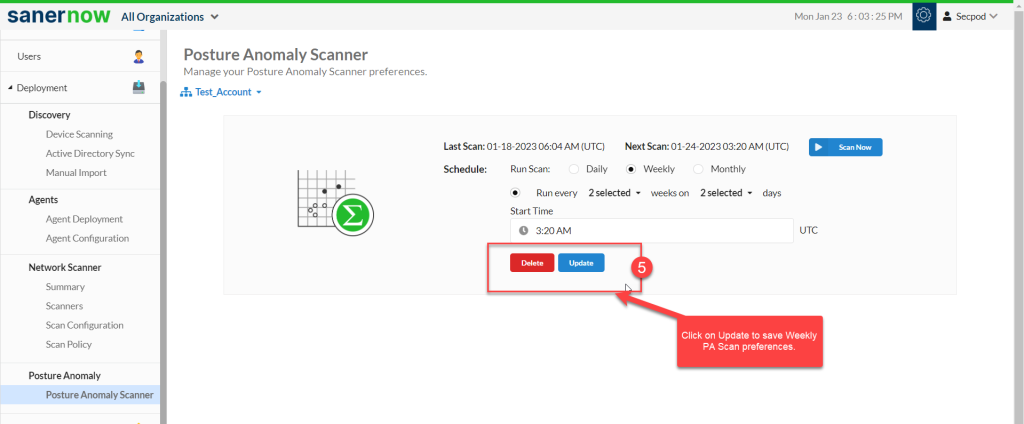
Step 1: Select the Schedule as Weekly.

Step 2: Specify how many weeks you want the PA Scan to be performed on the account.
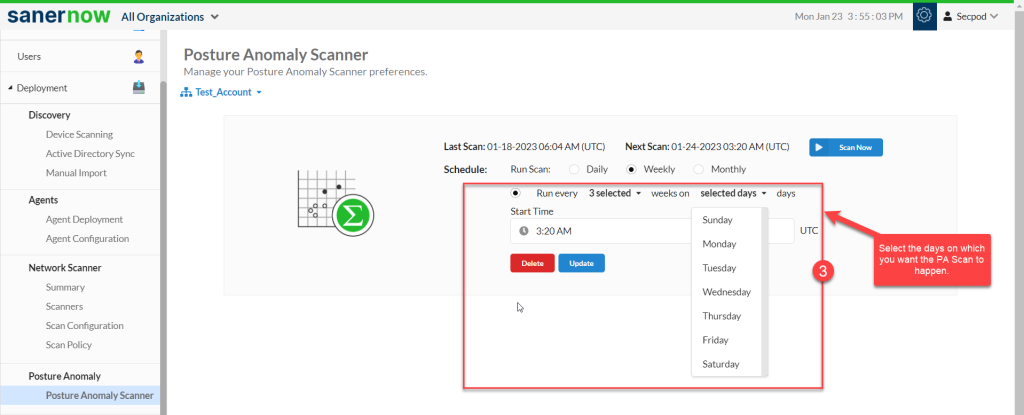
Step 3: Once you have selected the weeks, select all the days for which you want the PA Scan to be done on the account.
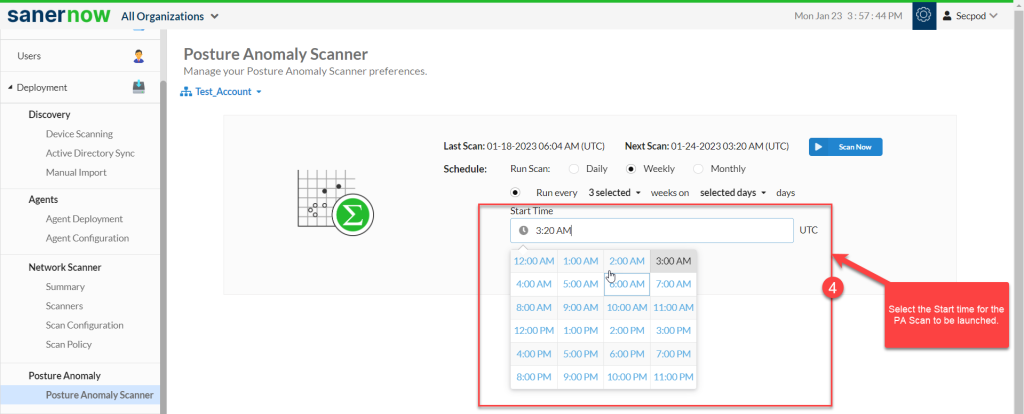
Step 4: Select the Start time – the PA Scan will be launched at this time every week as per the schedule you set.
Step 5: Click on Update to save weekly PA Scan preferences.
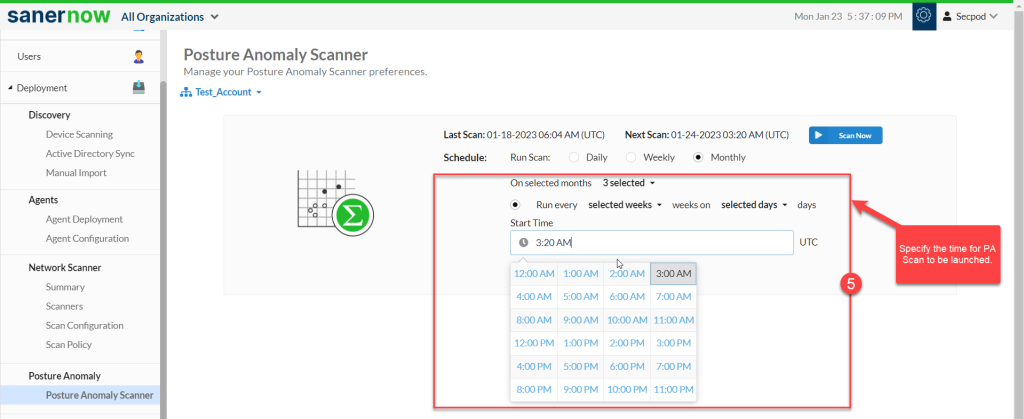
How to schedule a Posture Anomaly Scan to run on a monthly basis?
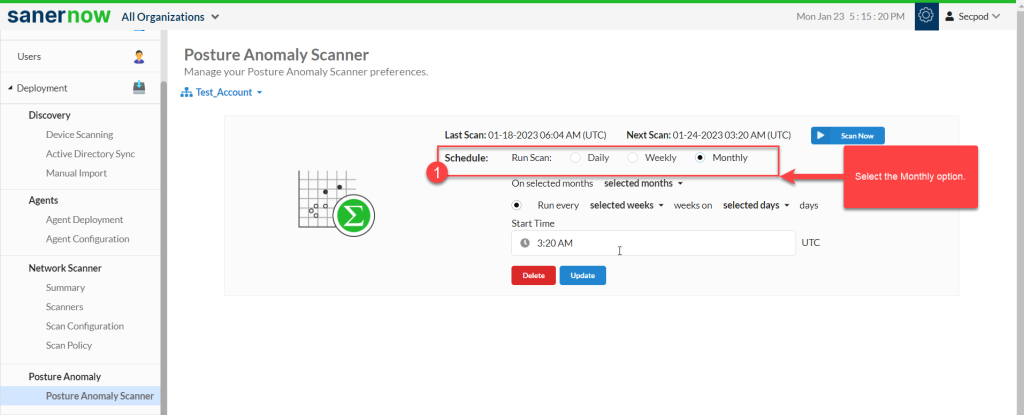
Follow the steps below to run a PA Scan on a monthly basis.
Step 1: Select the Schedule as Monthly.
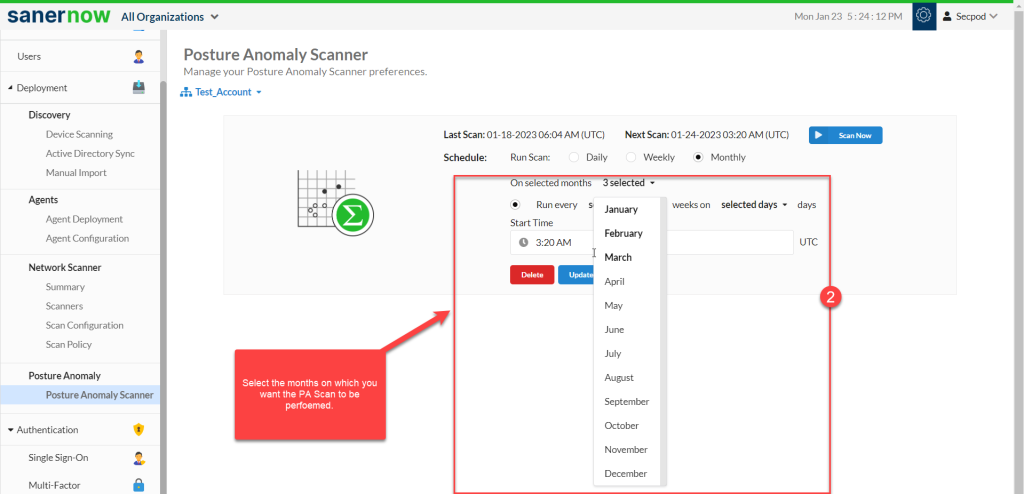
Step 2: Select the months on which you want the PA Scan to be performed.
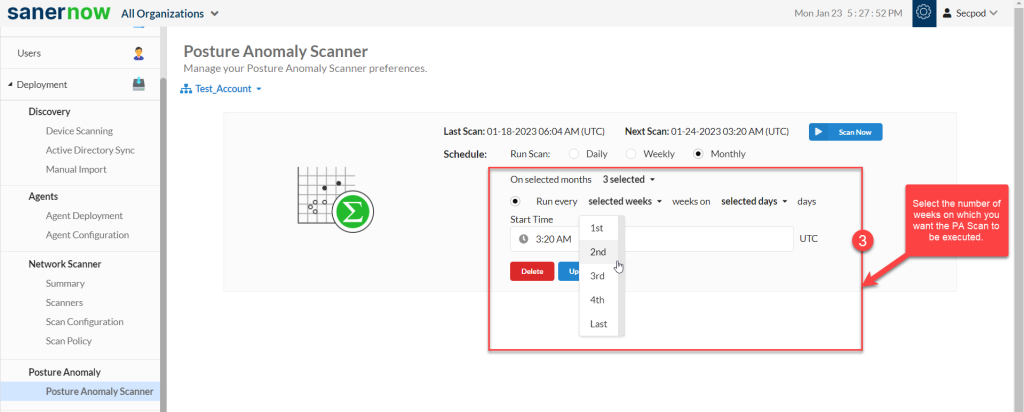
Step 3: Specify the weeks on which PA Scan needs to be done.
Step 4: Select the days when the PA Scan is required on the account.

Step 5: Select the Start time – the PA Scan will be launched at this time every month as per the schedule you set.
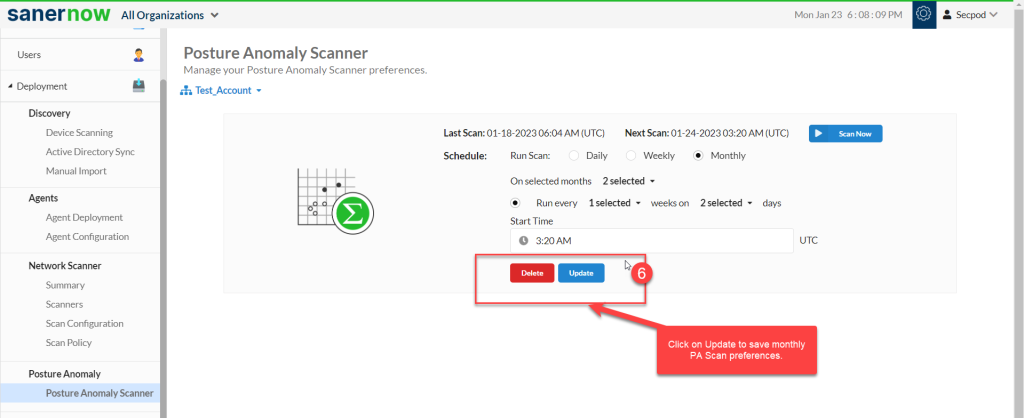
Step 6: Click on Update to save monthly PA Scan preferences.
How to delete Posture Anomaly Scanner scan preferences?
Click on the Delete button on the PA Scanner page. This will delete all saved scan preferences. However, the data from previous PA Scans will be retained.
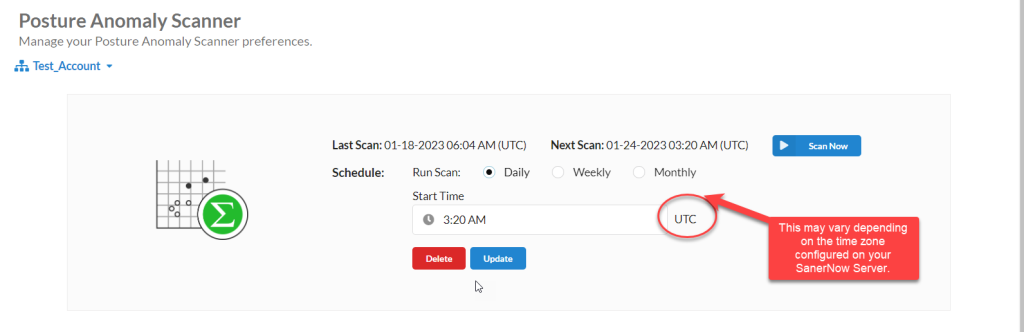
What time zone is used by Posture Anomaly Scanner to run scheduled scans?
All scheduled PA Scans will be launched in accordance with time zone configuration on the SanerNow Server.
Getting familiarized with PA Dashboard
Once the PA Scan is done on the account, the PA tool will do the computation on the collected data and populate the relevant sections of the dashboard.
Let’s look at each of the components available on the PA Dashboard and their functionalities.
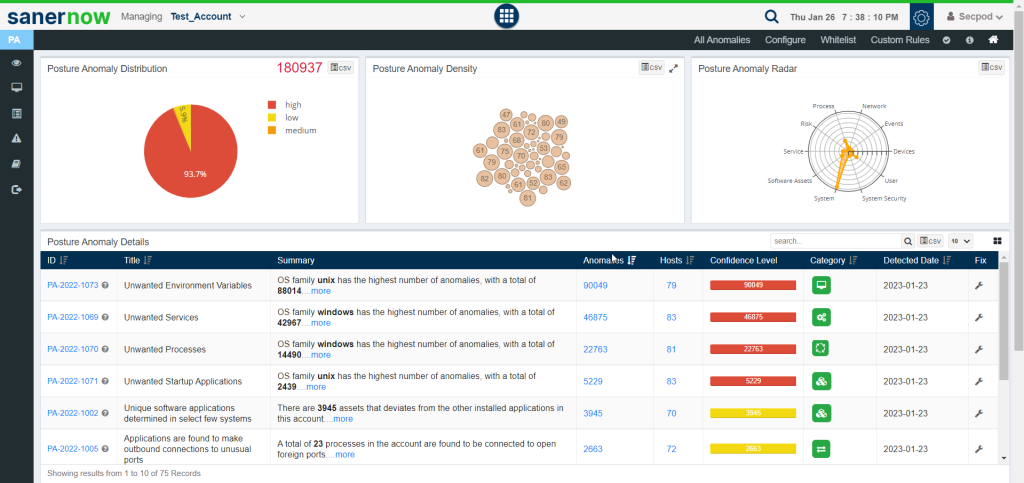
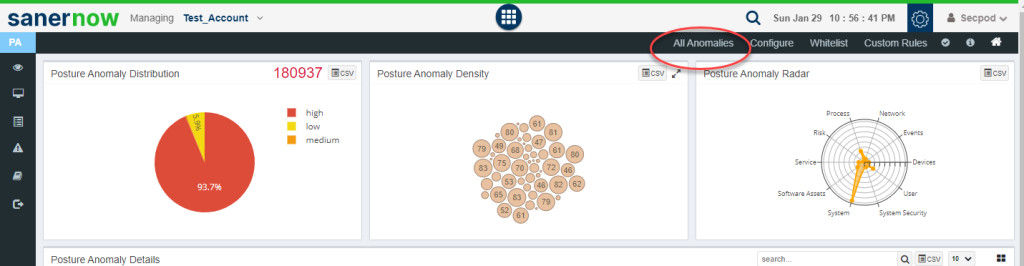
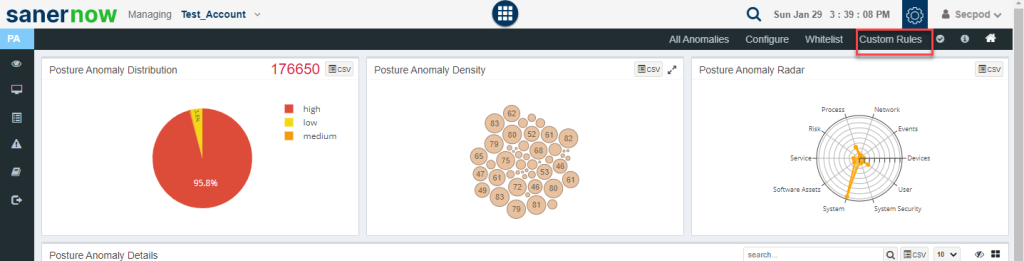
Posture Anomaly Distribution Graph
The total number of anomalies discovered in the account is displayed at the top right corner of the Posture Anomaly Distribution Graph.
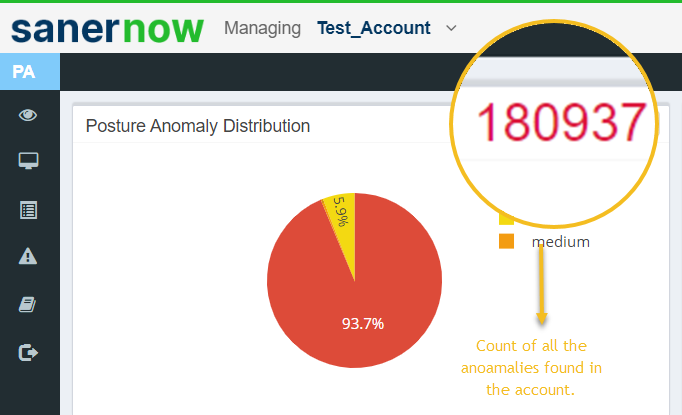
Additionally, the anomalies discovered are categorized as high, low, and medium and presented in a pie chart form. The categorization is done on how far the discovered anomalies deviate from the baseline.
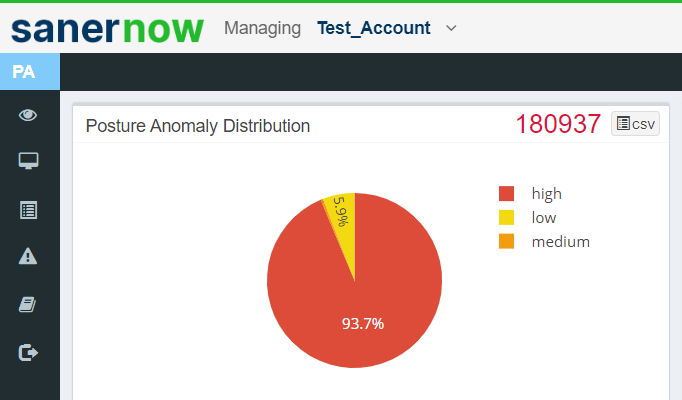
You can download the information displayed on this pane in the form of a .csv file by clicking on the![]() icon located at the top right corner of the pane.
icon located at the top right corner of the pane.
Posture Anomaly Density Graph
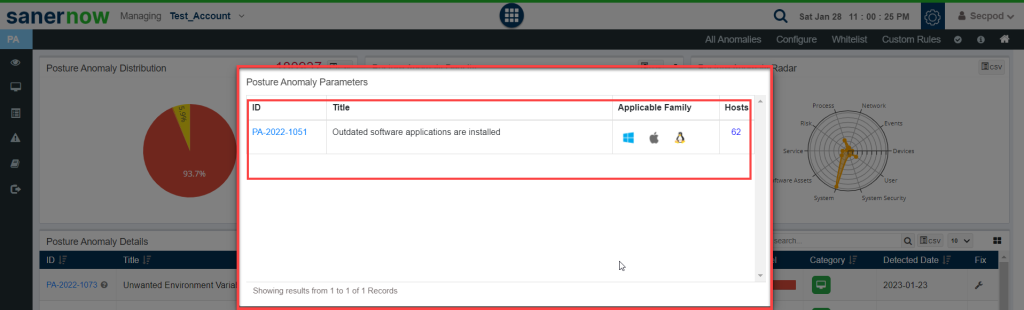
The Posture Anomaly Density Graph shows the count of devices detected for individual PA ID’s.

You can click on any of these individual bubbles to get more information. Details such as PA ID, the description of the PA ID, applicable family and the total number of hosts will be displayed on this page.
You can download the information displayed on this pane in the form of a .csv file by clicking on the![]() icon located at the top right corner of the pane.
icon located at the top right corner of the pane.
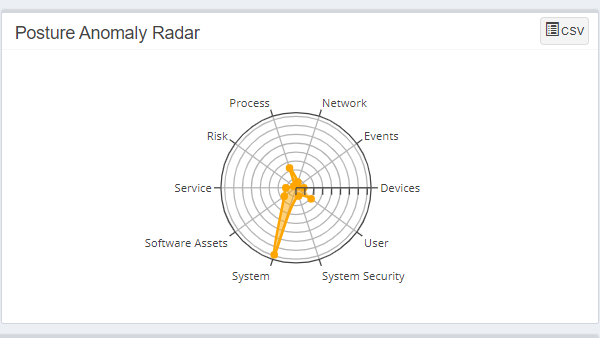
Posture Anomaly Radar
The Posture Anomaly Radar shows the distribution of anomalies depending on the category they fall under.
You can download the information displayed on this pane in the form of a .csv file by clicking on the![]() icon located at the top right corner of the pane.
icon located at the top right corner of the pane.
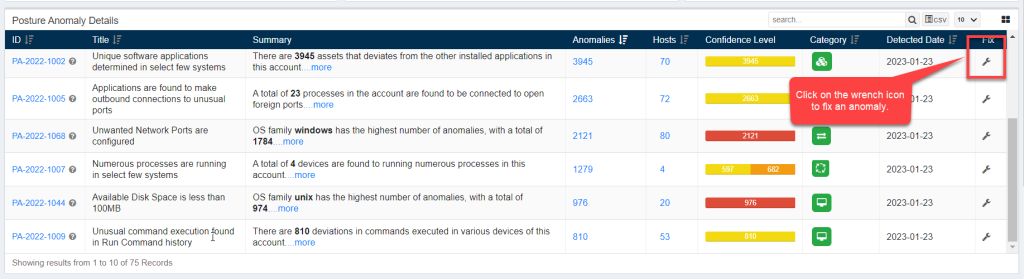
Posture Anomaly Details
The Posture Anomaly Details pane gives you a detailed view of all the anomalies detected in the account.
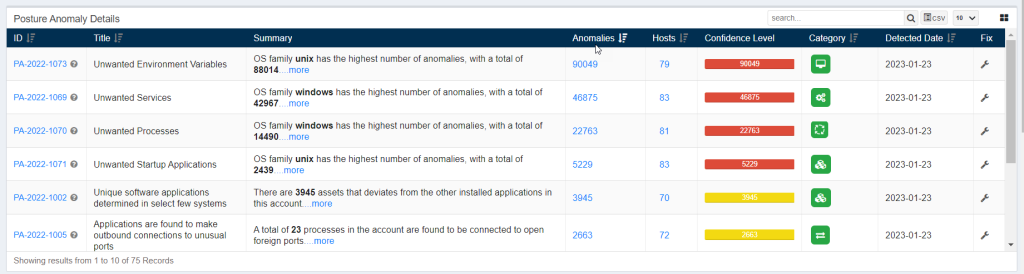
The following information is presented in a tabular format on the Posture Anomaly Details pane.
- ID: This column displays all the PA ID relevant to the anomalies detected in the environment.
- Title: This column displays the title of the PA ID.
- Summary: This column gives a summary of the Posture Anomaly found in the account. Information such as – the OS family with the highest number of anomalies found is displayed here.
- Anomalies: This column lists the total count of anomalies relevant to a particular PA ID.
- Hosts: This column provides the total number of hosts affected by the anomalies that fall under the purview of a particular PA ID.
- Confidence Level: The confidence level is calculated on the basis of how far the detected anomaly deviates from the baseline. The confidence level is further classified into high, low, and medium.
- Category: This column shows the category the detected PA ID belongs to. Refer to the Types of Category section to know more.
- Detected Date: This column shows the date on which the PA tool detected the anomaly.
- Fix: This column provides the fix for the applicable PA ID.
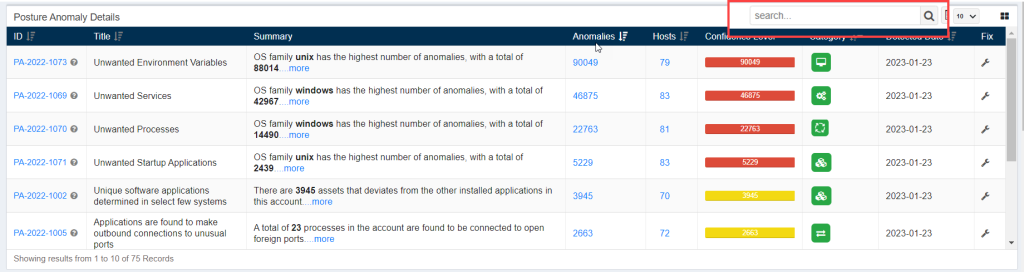
You can search for specific PA ID’s by using the search option located on the top right side of the Posture Anomaly Details pane.
You can download the information displayed on this pane in the form of a .csv file by clicking on the![]() icon located at the top right corner of the pane.
icon located at the top right corner of the pane.
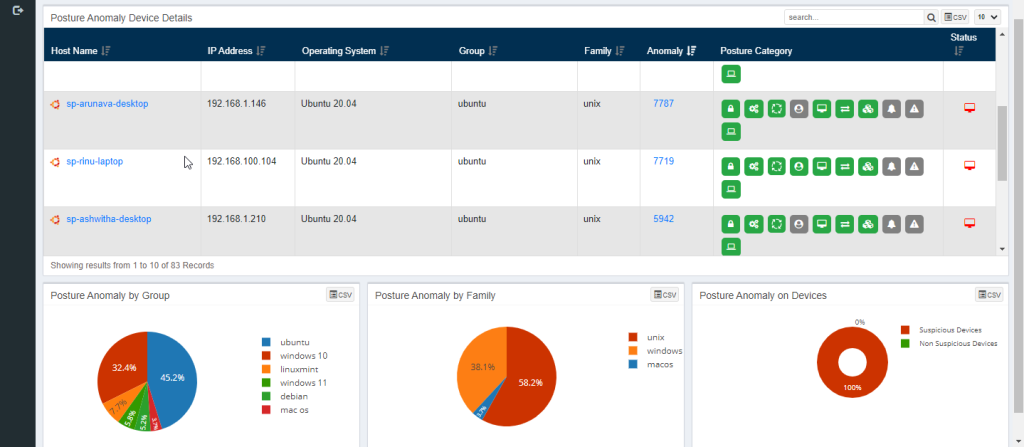
Posture Anomaly Device Details
The Posture Anomaly Details pane gives you a detailed view of all the anomalies that were discovered on individuals hosts in the account.
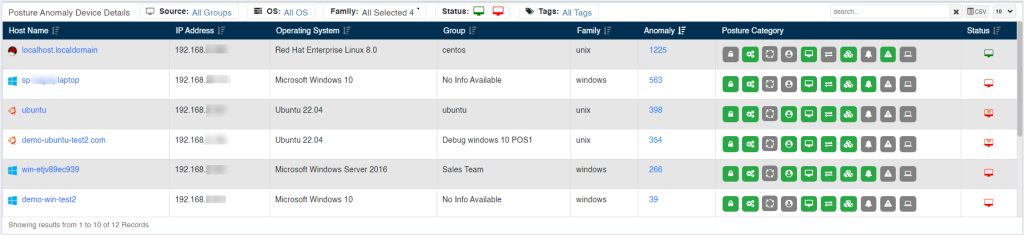
The Posture Anomaly Device Details pane gives below mentioned information:
- Host Name: This column shows the hostname associated with the device on which anomalies exist.
- IP Address: This column shows the IP address associated with the device on which the anomalies exist.
- Operating System: This column shows the Operating System running on the device on which the anomalies exist.
- Group: This column shows the group of Operating System the device belongs to on which the anomalies exist.
- Family: This column shows the family of Operating System the device belongs to on which the anomalies exist.
- Anomaly: This column shows the total count of anomalies that exist on the device.
- Posture Category: This column shows the categories of anomalies that exist on the device.
Status: This column shows the Device Status. The Status can be – Offline and Online. If the Status icon is red – this means that the device is offline. And if the Status icon is green – this means that the device is Online.
You can download the information displayed on this pane in the form of a .csv file by clicking on the![]() icon located at the top right corner of the pane.
icon located at the top right corner of the pane.
Types of Posture Category
The Posture Anomaly is divided into below categories:
- Network
- System
- Service
- Process
- System Security
- Software Assets
- User
- Events
- Risk
- Devices
Posture Anomaly by Group
The Posture Anomaly by Group pane gives you a pie chart representation of the devices categorized by the Operating Systems running on them.
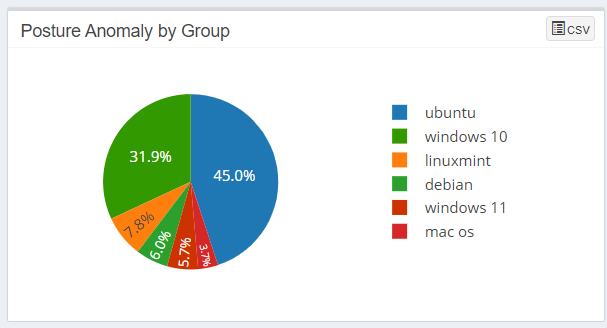
You can download the information displayed on this pane in the form of a .csv file by clicking on the![]() icon located at the top right corner of the pane.
icon located at the top right corner of the pane.
Posture Anomaly by Family
The Posture Anomaly by Family pane gives you a pie chart representation of the devices categorized by the OS families they belong to.
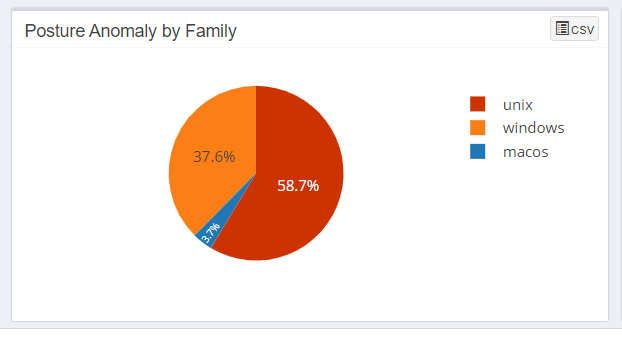
You can download the information displayed on this pane in the form of a .csv file by clicking on the![]() icon located at the top right corner of the pane.
icon located at the top right corner of the pane.
Posture Anomaly on Devices
The Posture Anomaly on Devices pane gives you a pie chart representation of the devices categorized by Suspicious Devices and Non-Suspicious Devices.
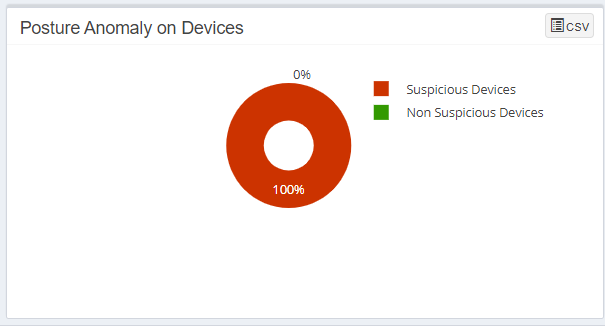
You can download the information displayed on this pane in the form of a .csv file by clicking on the![]() icon located at the top right corner of the pane.
icon located at the top right corner of the pane.
How to Fix Anomalies detected in your account?
There are various ways you can fix anomalies detected in your account using PA tool.
Fixing Anomalies from PA Dashboard
Click on the wrench icon displayed under the ‘Fix’ column to start fixing anomalies that fall under a particular PA ID.
You will be presented with a screen that will show possible actions that can be taken to fix the anomaly. These actions will vary depending on the kind of anomaly detected and the operating system running on the devices.
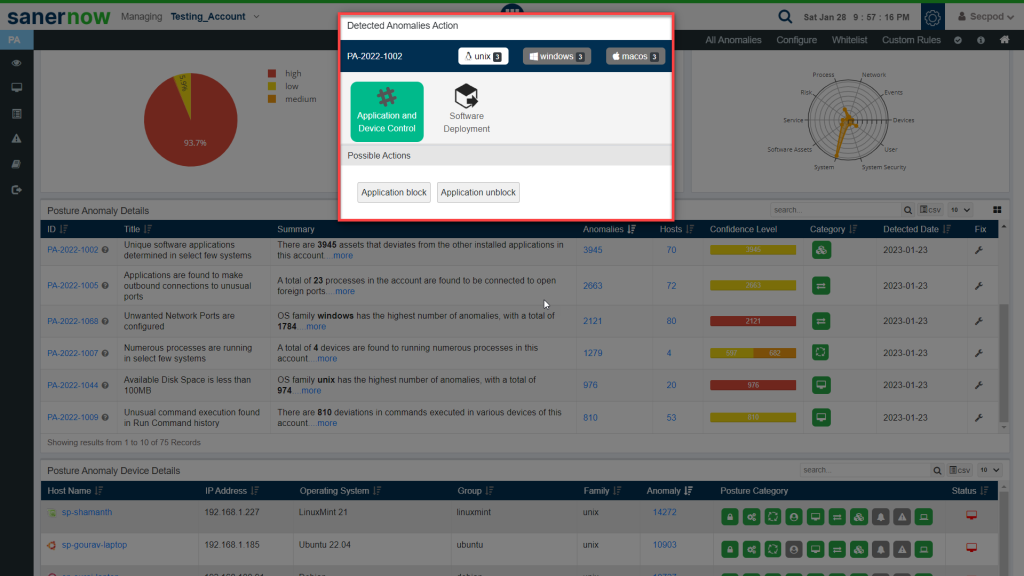
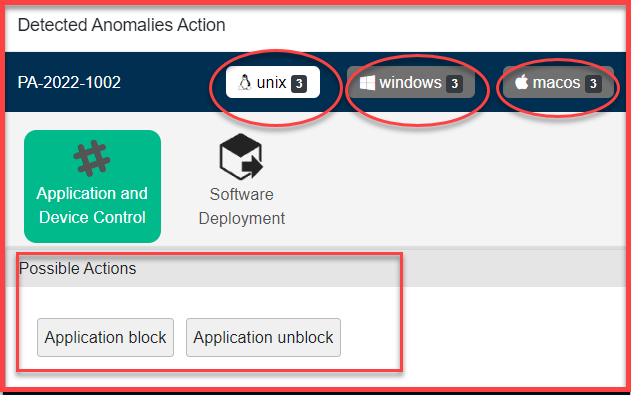
The Detected Anomalies Action screen will show you all available possible actions for operating systems on which anomalies were detected. The number of possible actions available to fix the anomaly on individual operating systems is displayed right next to the operating system label.
Once you click on any of the Possible Actions buttons, you will be directed to the Response and Deploy page.
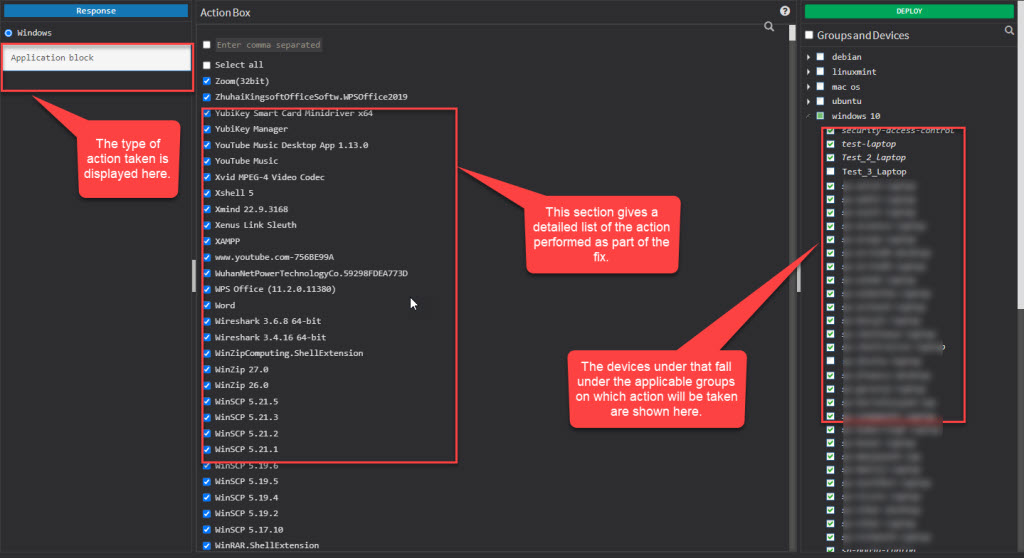
Here, you can see the kind of action being performed on the top left page. Under the Action Box, you can see the details of the actions. This information displayed in the Action Box will change depending on the type of action being performed as part of the remediation of the anomaly. And under the Deploy page, you can see all the devices on which the Action will be performed.
Fixing Anomalies from Posture Anomaly Summary Page
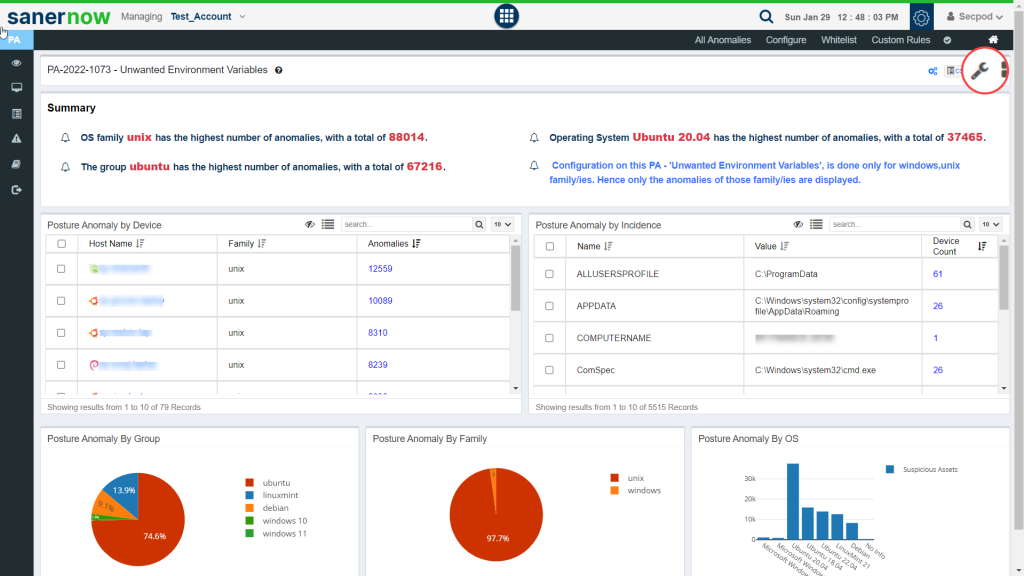
Another way of fixing an anomaly is by clicking on the PA ID displayed under the ID column of the Posture Anomaly Details on the PA Dashboard. This will take you to the PA Summary page. Here, you will get detailed information related to the PA ID.
You can click on the wrench button on the top right corner of the page to start the remediation for all the anomalies that fall under the PA ID.
Once you click on the wrench button, you will be directed to the Detected Anomalies Action.

Once you click on any of the Possible Actions buttons, you will be directed to the Response and Deploy page.

Here, you can see the kind of action being performed on the top left page. Under the Action Box, you can see the details of the actions. This information displayed in the Action Box will change depending on the type of action being performed as part of the remediation of the anomaly. And under the Deploy page, you can see all the devices on which the Action will be performed.
Fixing Anomalies from All Anomalies Page
Click on All Anomalies label on the PA Dashboard page.
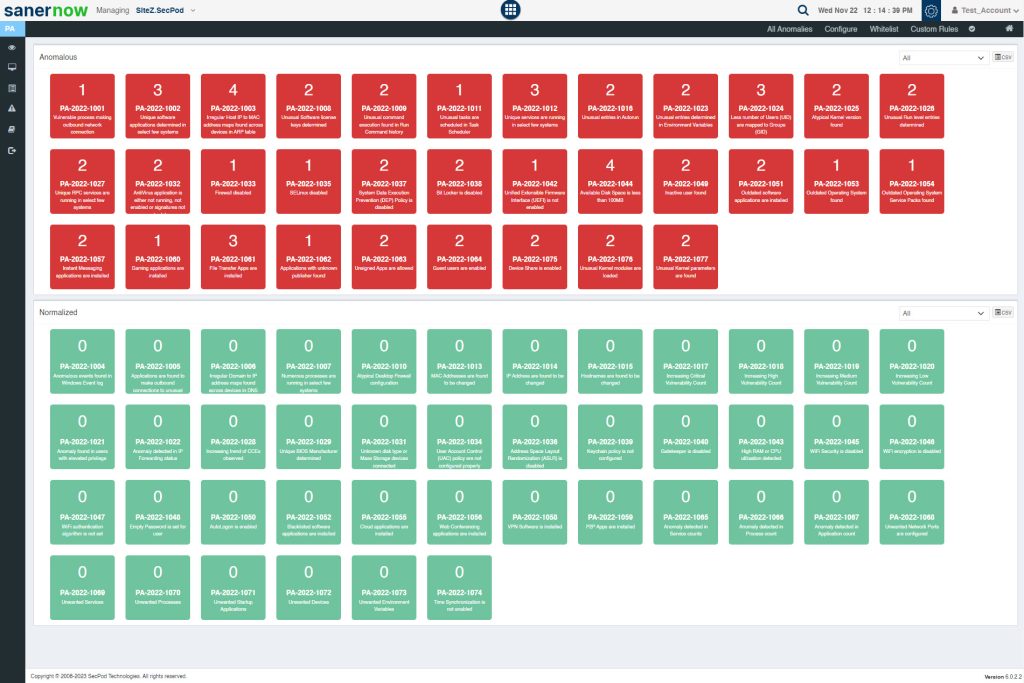
You will be re-directed to All Anomalies page. This page has two sections.
- Anomalous
- Normalized
Anomalous section – This section shows all the anomalies detected in the account. Each red tile displays the total number of devices that were discovered under a particular anomaly. PA-ID details and a summary is shown on the tile. You can hover over the tile to get more information about the PA ID.
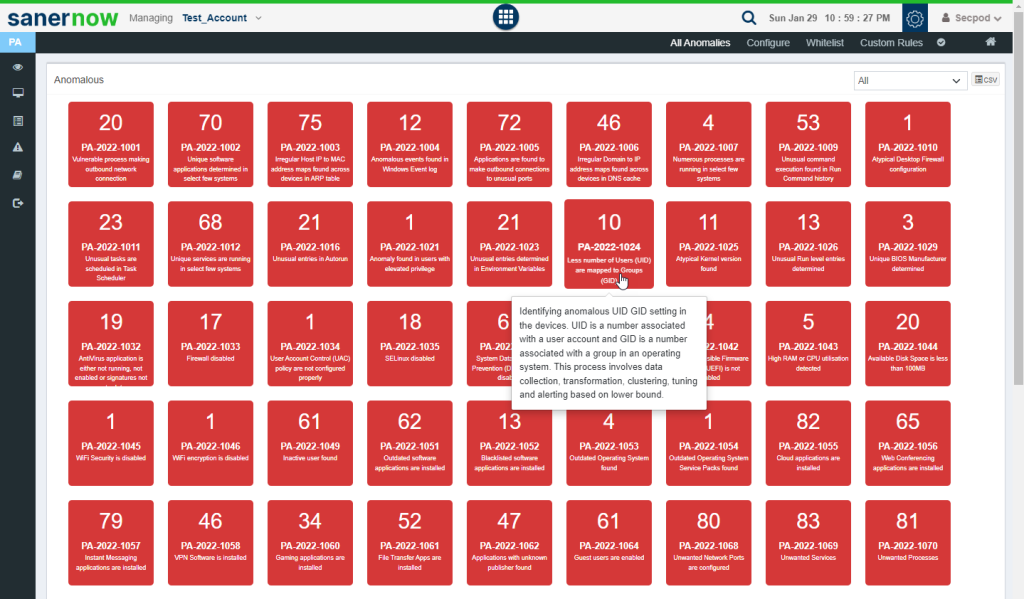
Normalized Section: This section shows all the anomalies that were normalized. Each green tile displayed the total number of devices that were remediated that belong to a particular PA ID. PA-ID details and a brief summary are shown on the tile. You can hover over the tile to get more information about the PA ID.
You can click on the red tile. This will take you to the PA Summary page. You can click on the wrench button on the top right corner of the page to start the remediation for all the anomalies that fall under the PA ID.

Once you click on the wrench button, you will be directed to the Detected Anomalies Action.

Once you click on any of the Possible Actions buttons, you will be directed to the Response and Deploy page

Here, you can see the kind of action being performed on the top left page. Under the Action Box, you can see the details of the actions. This information displayed in the Action Box will change depending on the type of action being performed as part of the remediation of the anomaly. And under the Deploy page, you can see all the devices on which the Action will be performed.
How to configure Posture Anomaly tool for custom detection?
Click on Configure label on the PA Dashboard. This will take you to the Configure page.
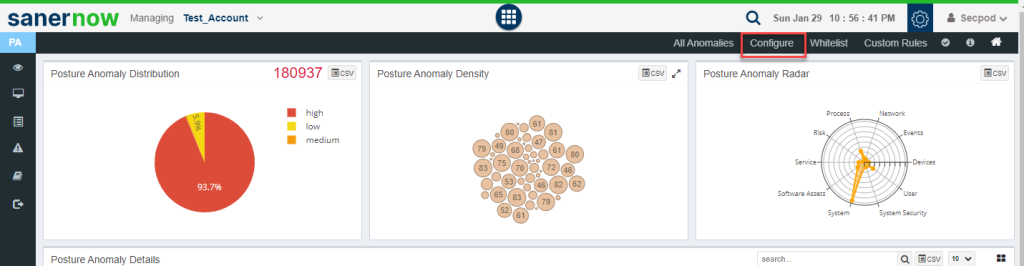
On this page, you can perform checks to detect unwanted services, ports, processes, start-up applications, devices, and environment variables.
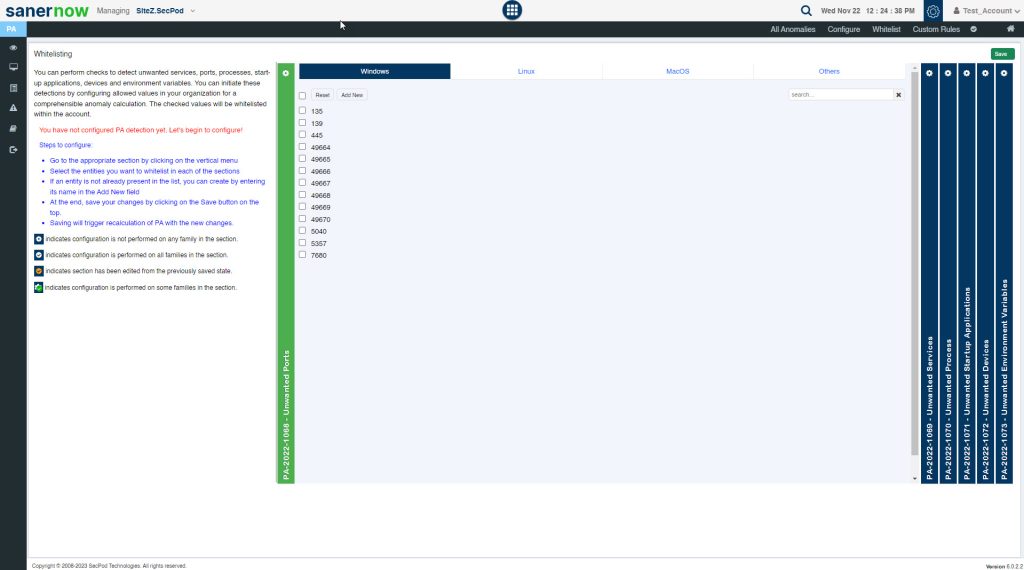
PA Tool provides a total of 6 configurable PA ID’s that can be used for custom detection.
- PA 2022-1068 – Unwanted Ports
- PA 2022 -1069 – Unwanted Services
- PA 2022- 1070 – Unwanted Processes
- PA 2022 1071 – Unwanted Startup Applications
- PA 2022-1072 – Unwanted Devices
- PA 2022-1073 – Unwanted Environment variables
Each of these PA IDs allow you to provide inputs that are OS specific – Windows, Linux, MacOS. Also, you can provide inputs for Network Devices under ‘Others’ tab. Once you provide values for any of these configurable PA ID’s, the PA tool will initiate a scan and the values provided by you will be whitelisted within the account.
Note: Users need to mandatorily configure each of these six configurable PA ID’s. This means that the user needs to explicitly tell which ports, services, processes, startup applications, devices, and environment variables are allowed within the account.
How to whitelist an entire PA ID?
Click on the Whitelist option on the PA Dashboard.
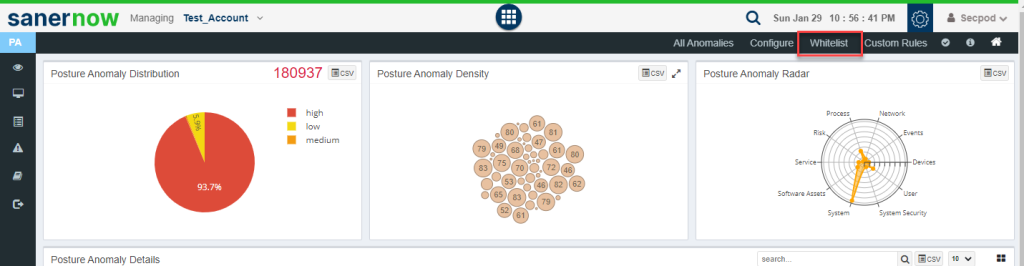
You will be redirected to the Whitelist page.

On this page, you can select the PA ID’s that you want to be whitelisted within the account. You can select single, multiple or even select all listed PA ID’s here by clicking on the checkbox located on the left side right next to the ID column. And then click on the Save button located at the right-hand corner of the page. Once you do this, the PA tool will whitelist the selected the PA ID’s and then perform a Posture Anomaly Scan on the account to recalculate the Anomaly status.
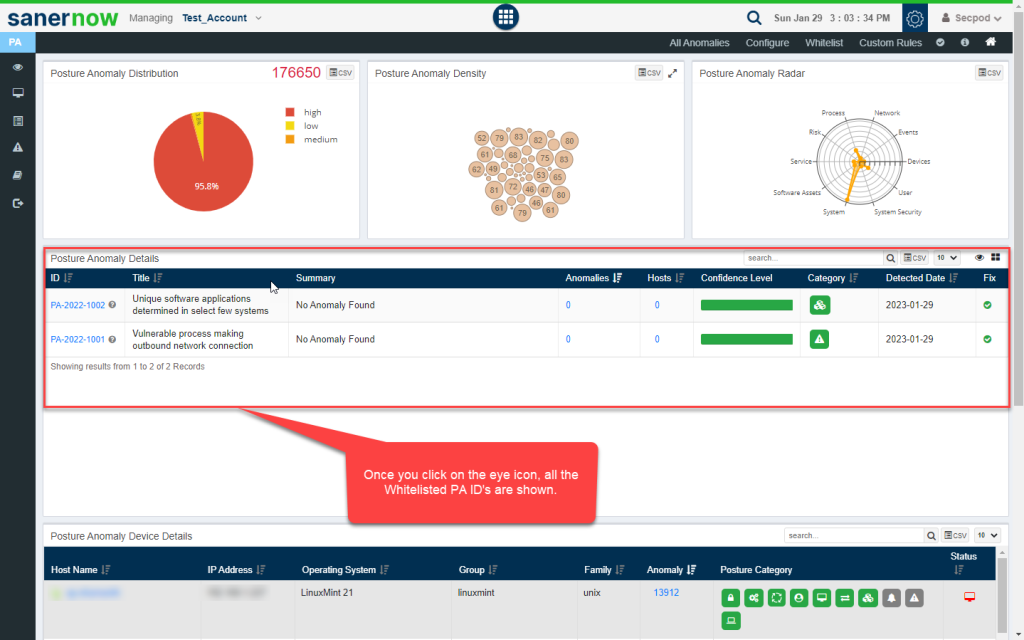
Now go to the PA Dashboard, you will see all the non-whitelisted PA IDs displayed under Posture Anomaly Details pane. You can see a ‘Eye’ icon on the Posture Anomaly Details pane. This indicates that whitelisted PA IDs exist and are not displayed currently.
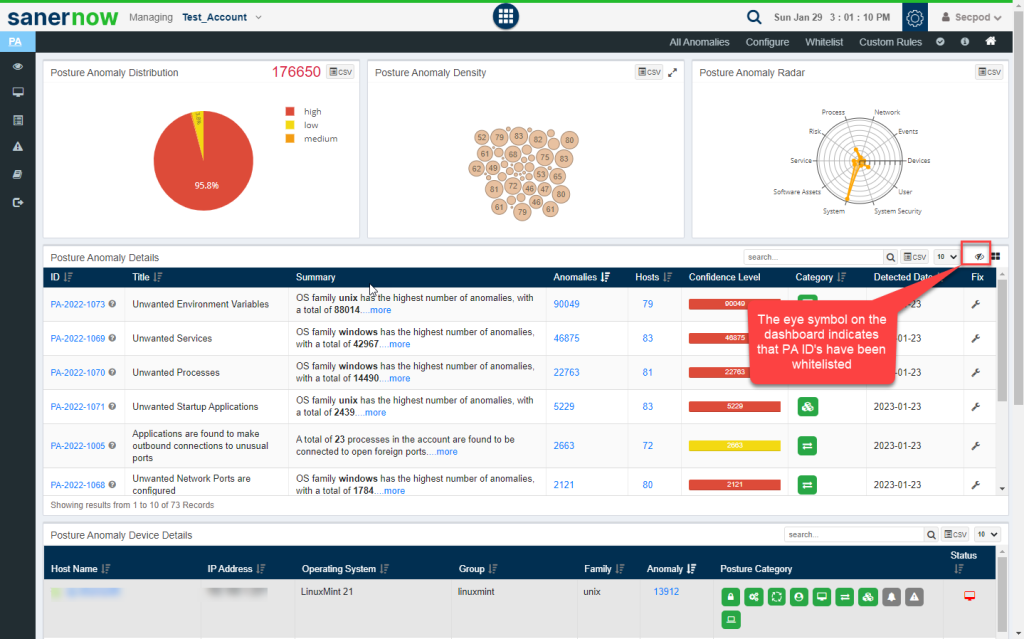
You can click on the Eye icon to see whitelisted PA ID’s.
How to build your own Detection and Response?
Click on Custom Rules on the PA Dashboard to build your custom detection and response.
This will take you to the page where you can build your own Detection and Response.
PA tool helps you write custom detection scripts and response scripts to respond to threats through its query module.
A query is a request for information from a database or live data from endpoints where the SanerNow agent is installed. SanerNow supports natural language-based queries related to the endpoint’s processes, services, users, registry, network, and device configurations. The SanerNow platform’s metadata model makes it easy to search using unstructured natural language-based queries. SanerNow is fully compliant with well-established standards, such as SCAP and STIX/TAXII.
Query results are fetched in microseconds to help make quick decisions around endpoint activities. Complex queries can be created, or multiple queries can be cascaded with ‘AND’ and ‘OR’ combinations.
Queries are categorized into two types:
1. Default Queries – The SanerNow solution provides default queries that can fetch information such as anti-virus information, hosts that have disabled the firewall, hosts that have disabled Bit locker protection, etc.
2. Custom Queries – Users can create custom queries.
To create a custom query, click the Detection or Response button. A query contains two options:
Add Rule – to select supported probes. Multiple rules can be selected with AND or OR operations.
Add Group – to join rules based on conditions. Multiple rules can be joined into one group.
The Run option displays the query results fetched from the database. The Edit and Delete buttons allow you to edit or delete the queries.
To create a custom query for threat detection.
- Click Detection in the Build your own Detection and Response pane. The query building page is displayed with a drag and drop library of probes.
- Filter the probes according to the operating system for which you want to write a query.
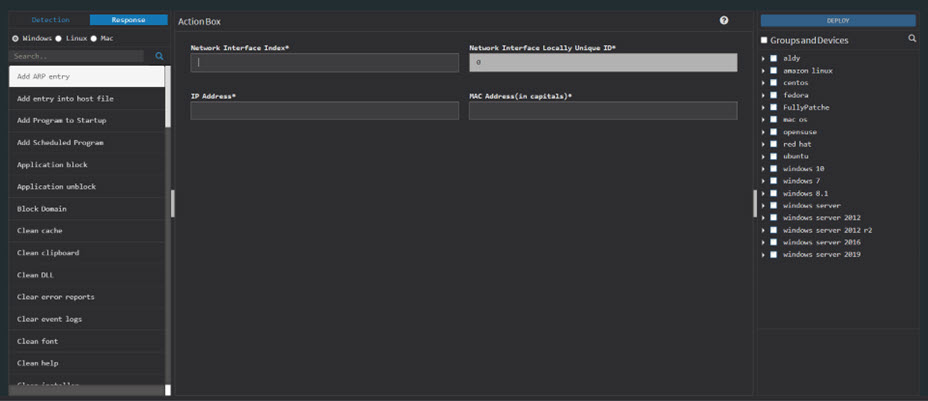
For example, to check for Locky using multiple rules, drag and drop Registry Key Effective Rights probes into the Action Box pane, as shown below. Drag and drop Hive and Key as the parameters. Add a file and the file path.

Select the devices and groups you want to query. Click the Deploy option at the top right corner. Select the devices and groups you want to query. Click the Deploy button at the top right corner. Once you do that, ‘DeployPackage’ window appears. Here, you can specify the package name, the number of times you want the query to run, and the intervals at which the query should be executed.
You need to specify when the query should be run – immediately, daily, weekly, monthly, or on a specific date. Specify the time and the corresponding days of the week, month, or date. And then assign the query a severity – low, medium, high, or critical. And then click on the Create button.

Once the query is created or updated, the results are displayed in real-time. After the task is created, SanerNow searches the system reports’ local database. Click on Submit to retrieve the report. Clicking Submit sends the queries to the Saner Agent to fetch the current data.
Detection Summary
This page shows a list of queries, affected hosts, and the associated risk severity.
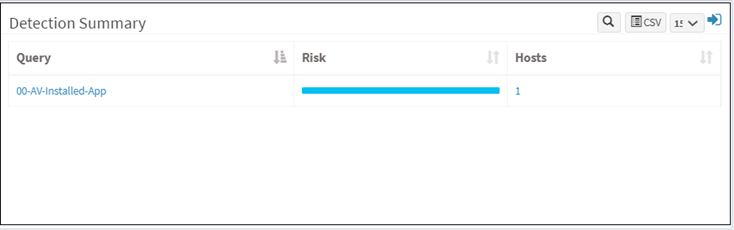
The number displayed under Hosts column shows the total count of devices affected. Click on the number to view the hostname of the affected device and other details such as the device’s hardware and software details and the vulnerability, compliance, patch, and endpoint details on a new page.
Go to the Endpoint Threat Detection tab to view all the EQR details related to the host.
Click the Query name to delve into further details such as the system details and the probe details such as the file path, file name, hive, program name, etc. Click the back arrow to return to the details page.
Click the Submit to submit the query to the Saner agents.
Click the Edit to modify the query you want to submit to the agents. Click the Expand icon to modify the query, run it, or delete the scheduled detection job.
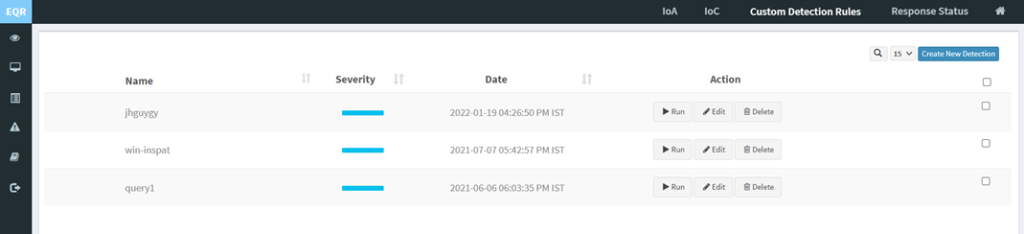
Click on the Create New Detection option to create a custom query for threat detection. Refer to the Build your own Detection and Response section for more details.
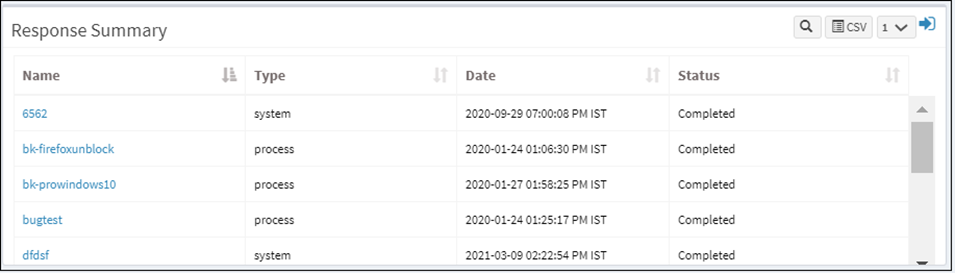
Response Summary
This page shows a list of all the response scripts written to prevent, stop, or clean up malware. It will display the response name, type, date and time on which the scripts ran, and the status.
How to create a new response
Click on the Create New Response option. The response building page is displayed with a network interface index, unique ID, IP address, and MAC address fields.
Select the devices and groups. Click on the Deploy option at the top right corner. And then you will see the Deploy Package dialog box on the screen.
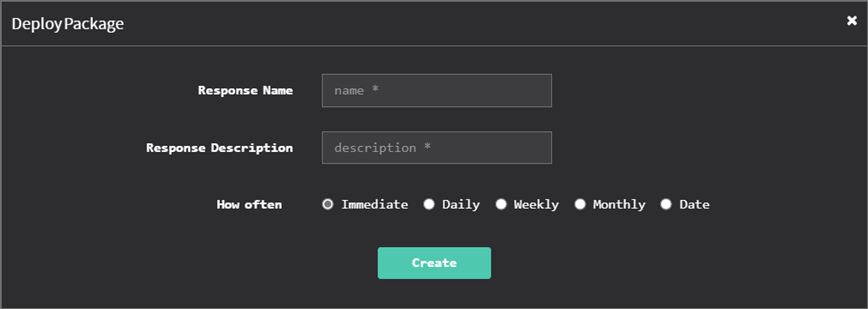
Specify a response name and the response description. Specify when you want to run the response – immediately, daily, weekly, monthly, or on a specific date. Specify the time, the corresponding days of the week, and the days of the month. Or date. And then click on the Create button.

