Overview
We’ve introduced the Saner Risk Prioritization tool to help you identify and prioritize the most severe vulnerabilities that need immediate remediation amongst the myriad of vulnerabilities present in your organization.
Patching all the vulnerabilities is quite often a daunting task for IT teams. However, with the Saner Risk Prioritization tool, you can prioritize patching the critical vulnerabilities first and then focus on the less severe ones. Saner Risk Prioritization uses the Stakeholder-Specific Vulnerability Categorization(SSVC) framework to categorize risks into four categories: Act, Attend, Track*, and Track. At the same time, Saner Risk Prioritization allows you to perform a deeper exploitation analysis of the risks by leveraging SecPod’s proprietary machine-learning algorithm.
Saner Risk Prioritization leverages findings from Saner VM and CM to continuously discover, assess, and prioritize vulnerabilities and misconfigurations across your environment. Vulnerabilities can be remediated through Saner PM, while misconfigurations can be remediated using Saner CM.
Pre-requisites for Saner Risk Prioritization
You must have an active subscription to either of the following Saner tools:
- Vulnerability Management (VM)
- Compliance Management (CM)
Access Saner Risk Prioritization
You can access the Saner Risk Prioritization tool in two ways.
Launch the Saner Risk Prioritization tool from the Prioritization pane
Follow the below steps to access the Saner Risk Prioritization tool.
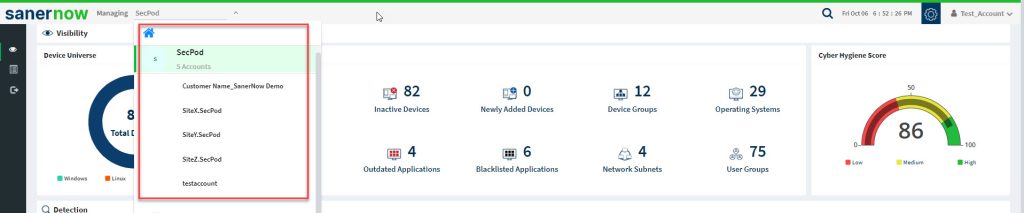
1: Log in to the Saner web console.. On the Organization Unified Dashboard, select the Account you want to work with.
2: In the Account level dashboard, scroll to the Prioritization section and click the RP icon on the right.
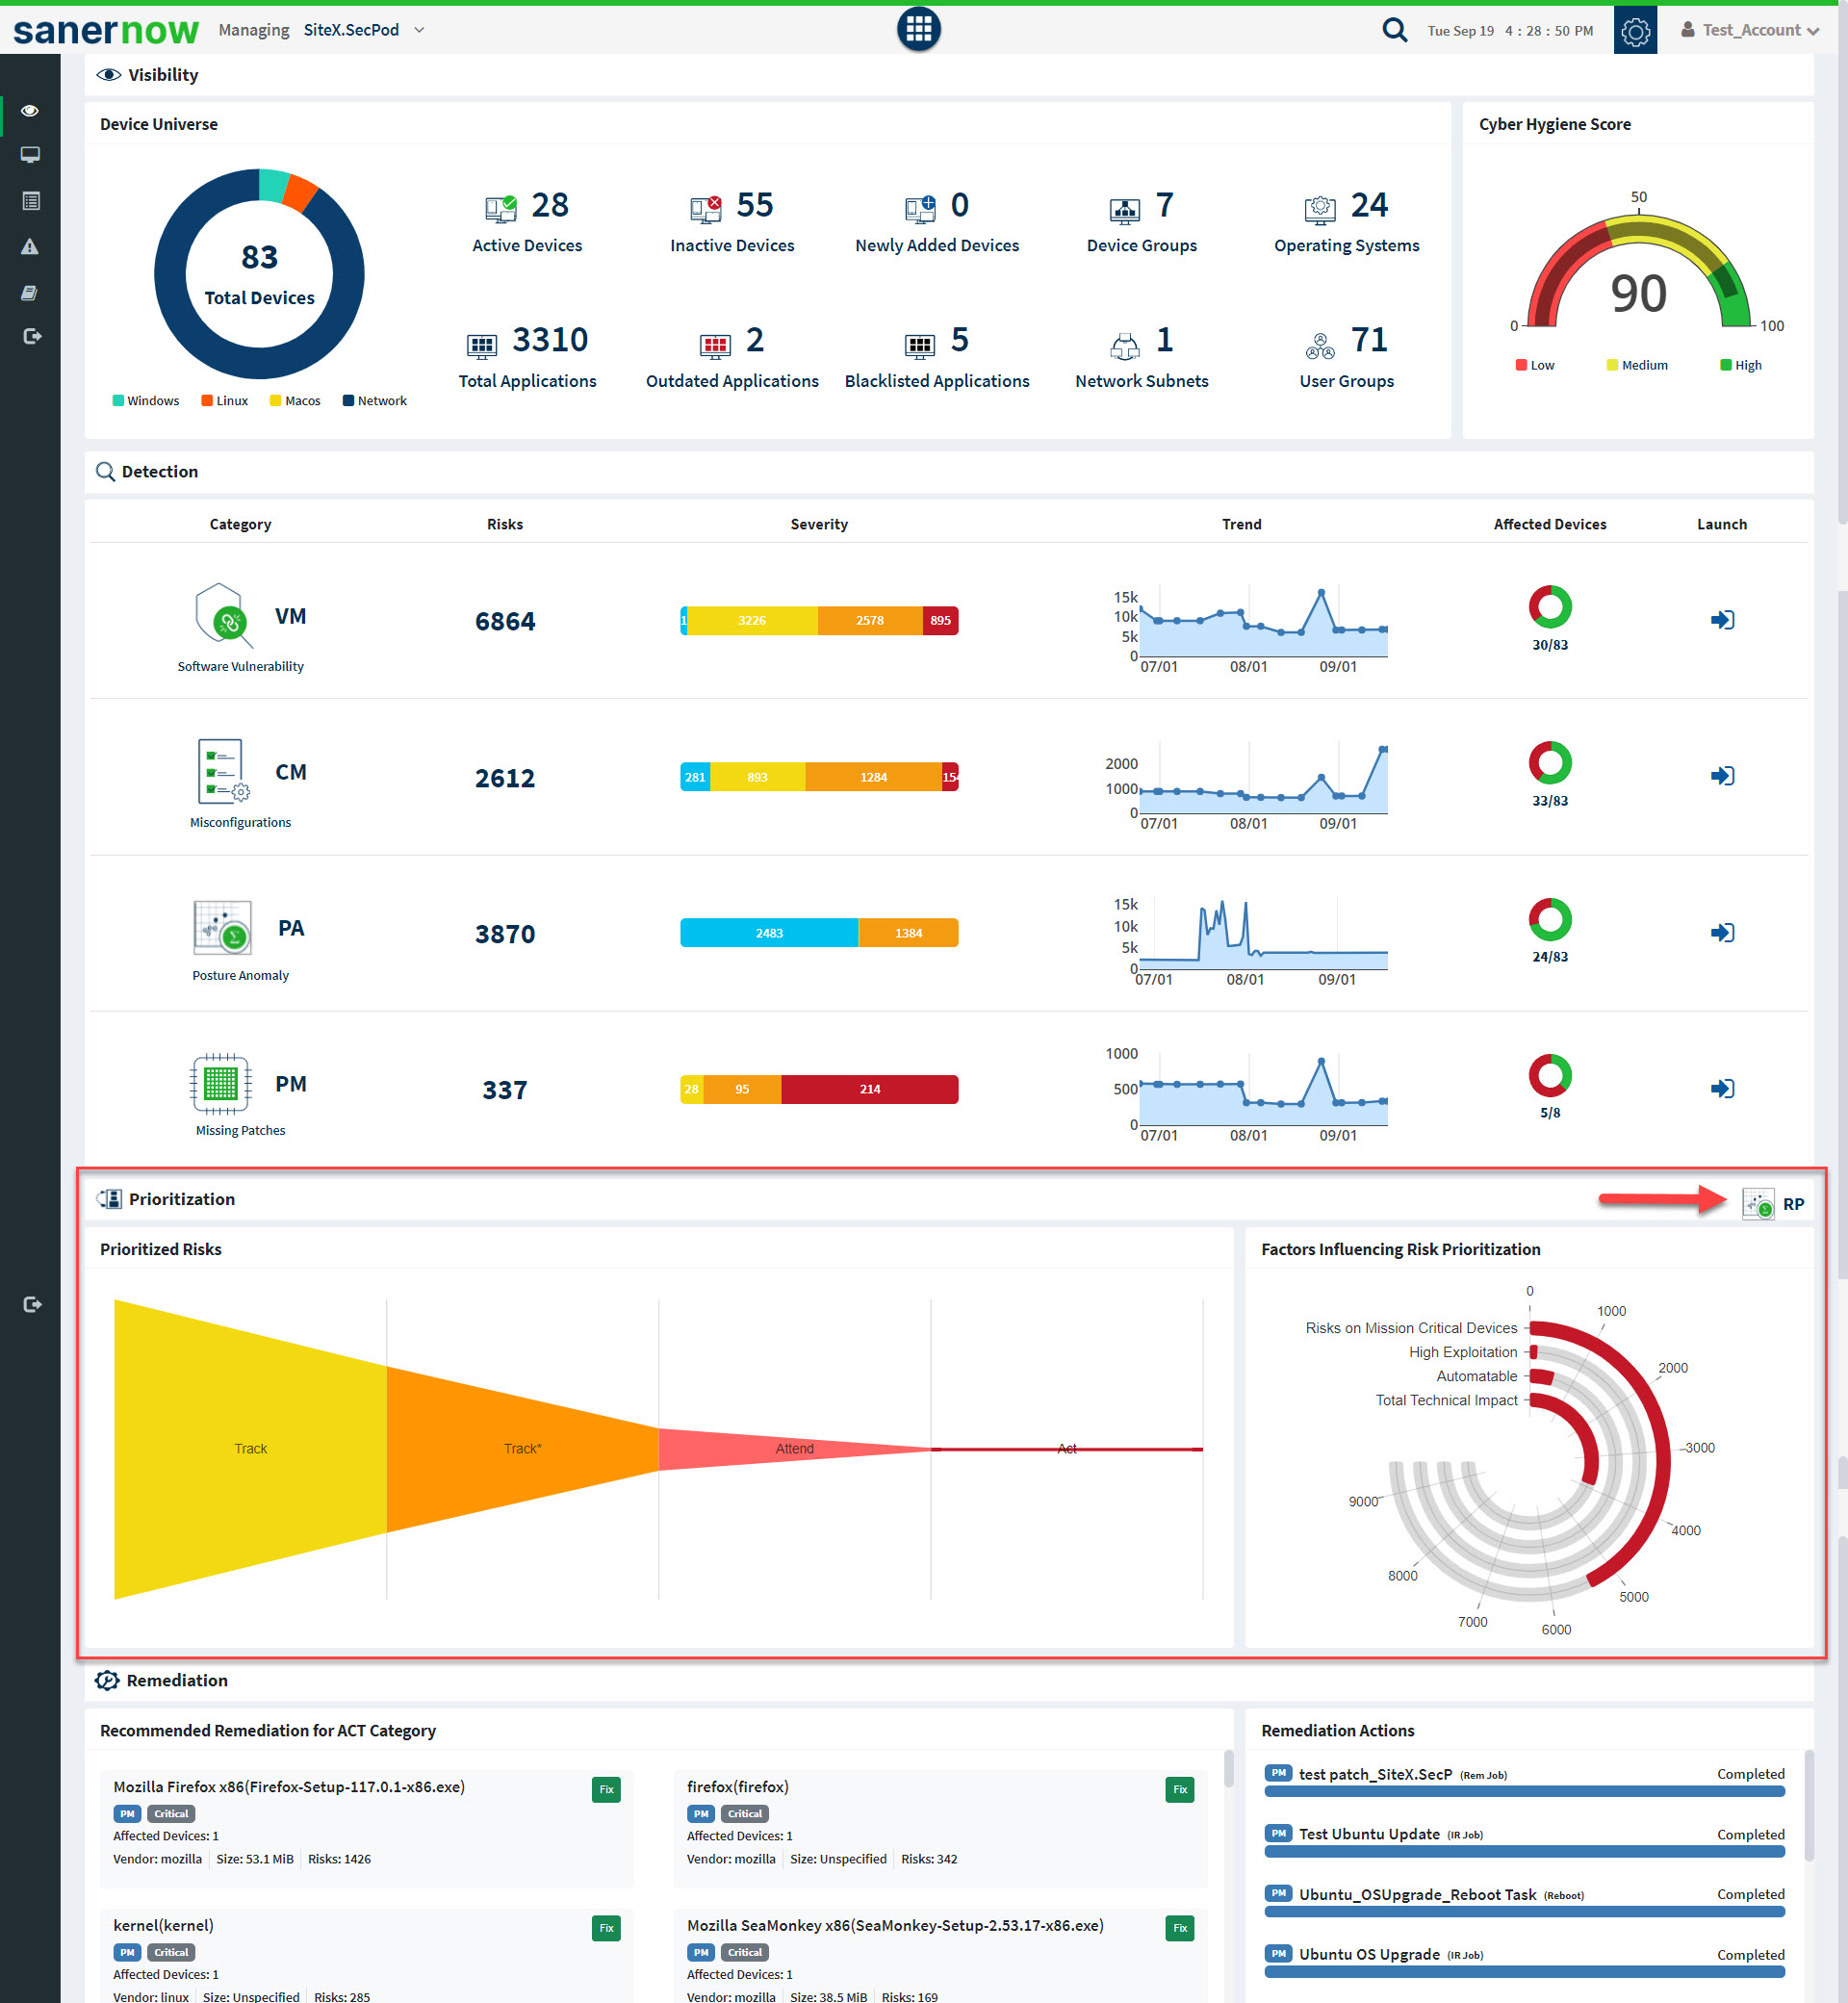
3: You will be re-directed to the Saner Risk Prioritization dashboard.
Launch the Saner Risk Prioritization tool from the Saner tools menu button
Follow the below steps to access the Saner Risk Prioritization tool.
1: Log in to the Saner portal. On the Organization Unified Dashboard, select the Account you want to work with.

2: Click the Saner tools menu button located at the top. Then click the Risk Prioritization icon.
3: You will be re-directed to the Saner Risk Prioritization dashboard.
Get Started with Saner Risk Prioritization
We recommend answering the Configuration questions before using the Saner Risk Prioritization tool. Answering the questionnaire helps the Saner Risk Prioritization tool categorize risks effectively and produce accurate results.
Follow the below steps to configure the questions for the Saner Risk Prioritization tool.
1: Click the gear icon  on the top right of the Saner Risk Prioritization dashboard.
2: A screen with the list of questionnaires appears. On this screen, the questions marked with red are mandatory. And it is recommended that you answer these questions. If you don’t provide an answer to the required questions, Saner Risk Prioritization will assume the default values in this case. However, this may lead to inaccurate prioritization of risks.
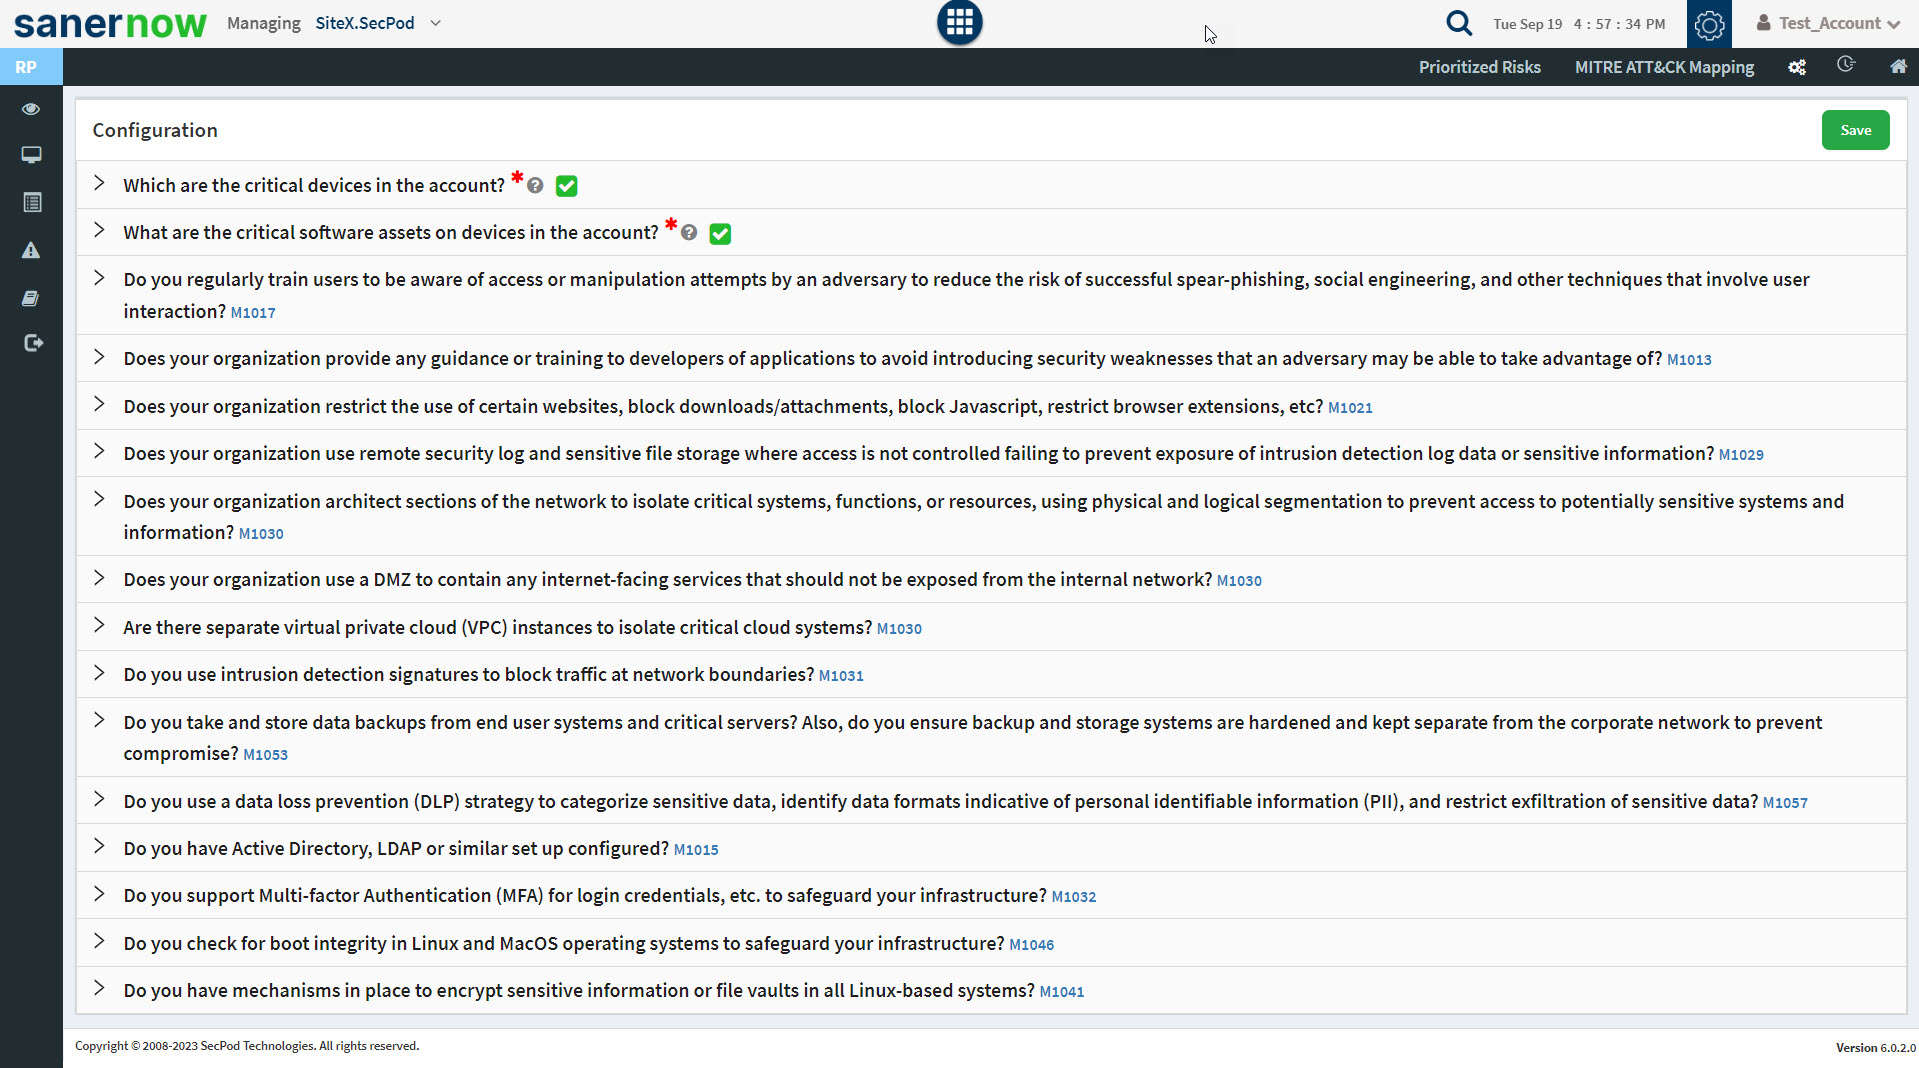
A green check mark appears next to the question you provided answers to.
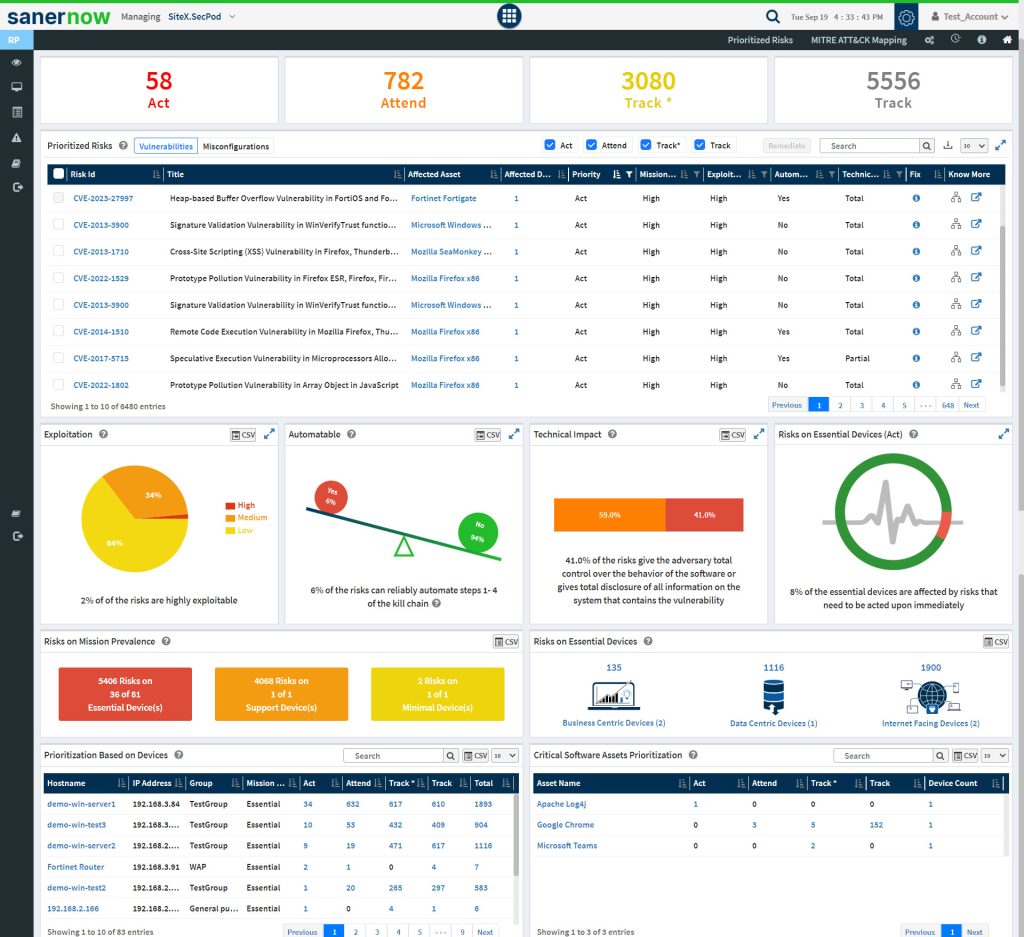
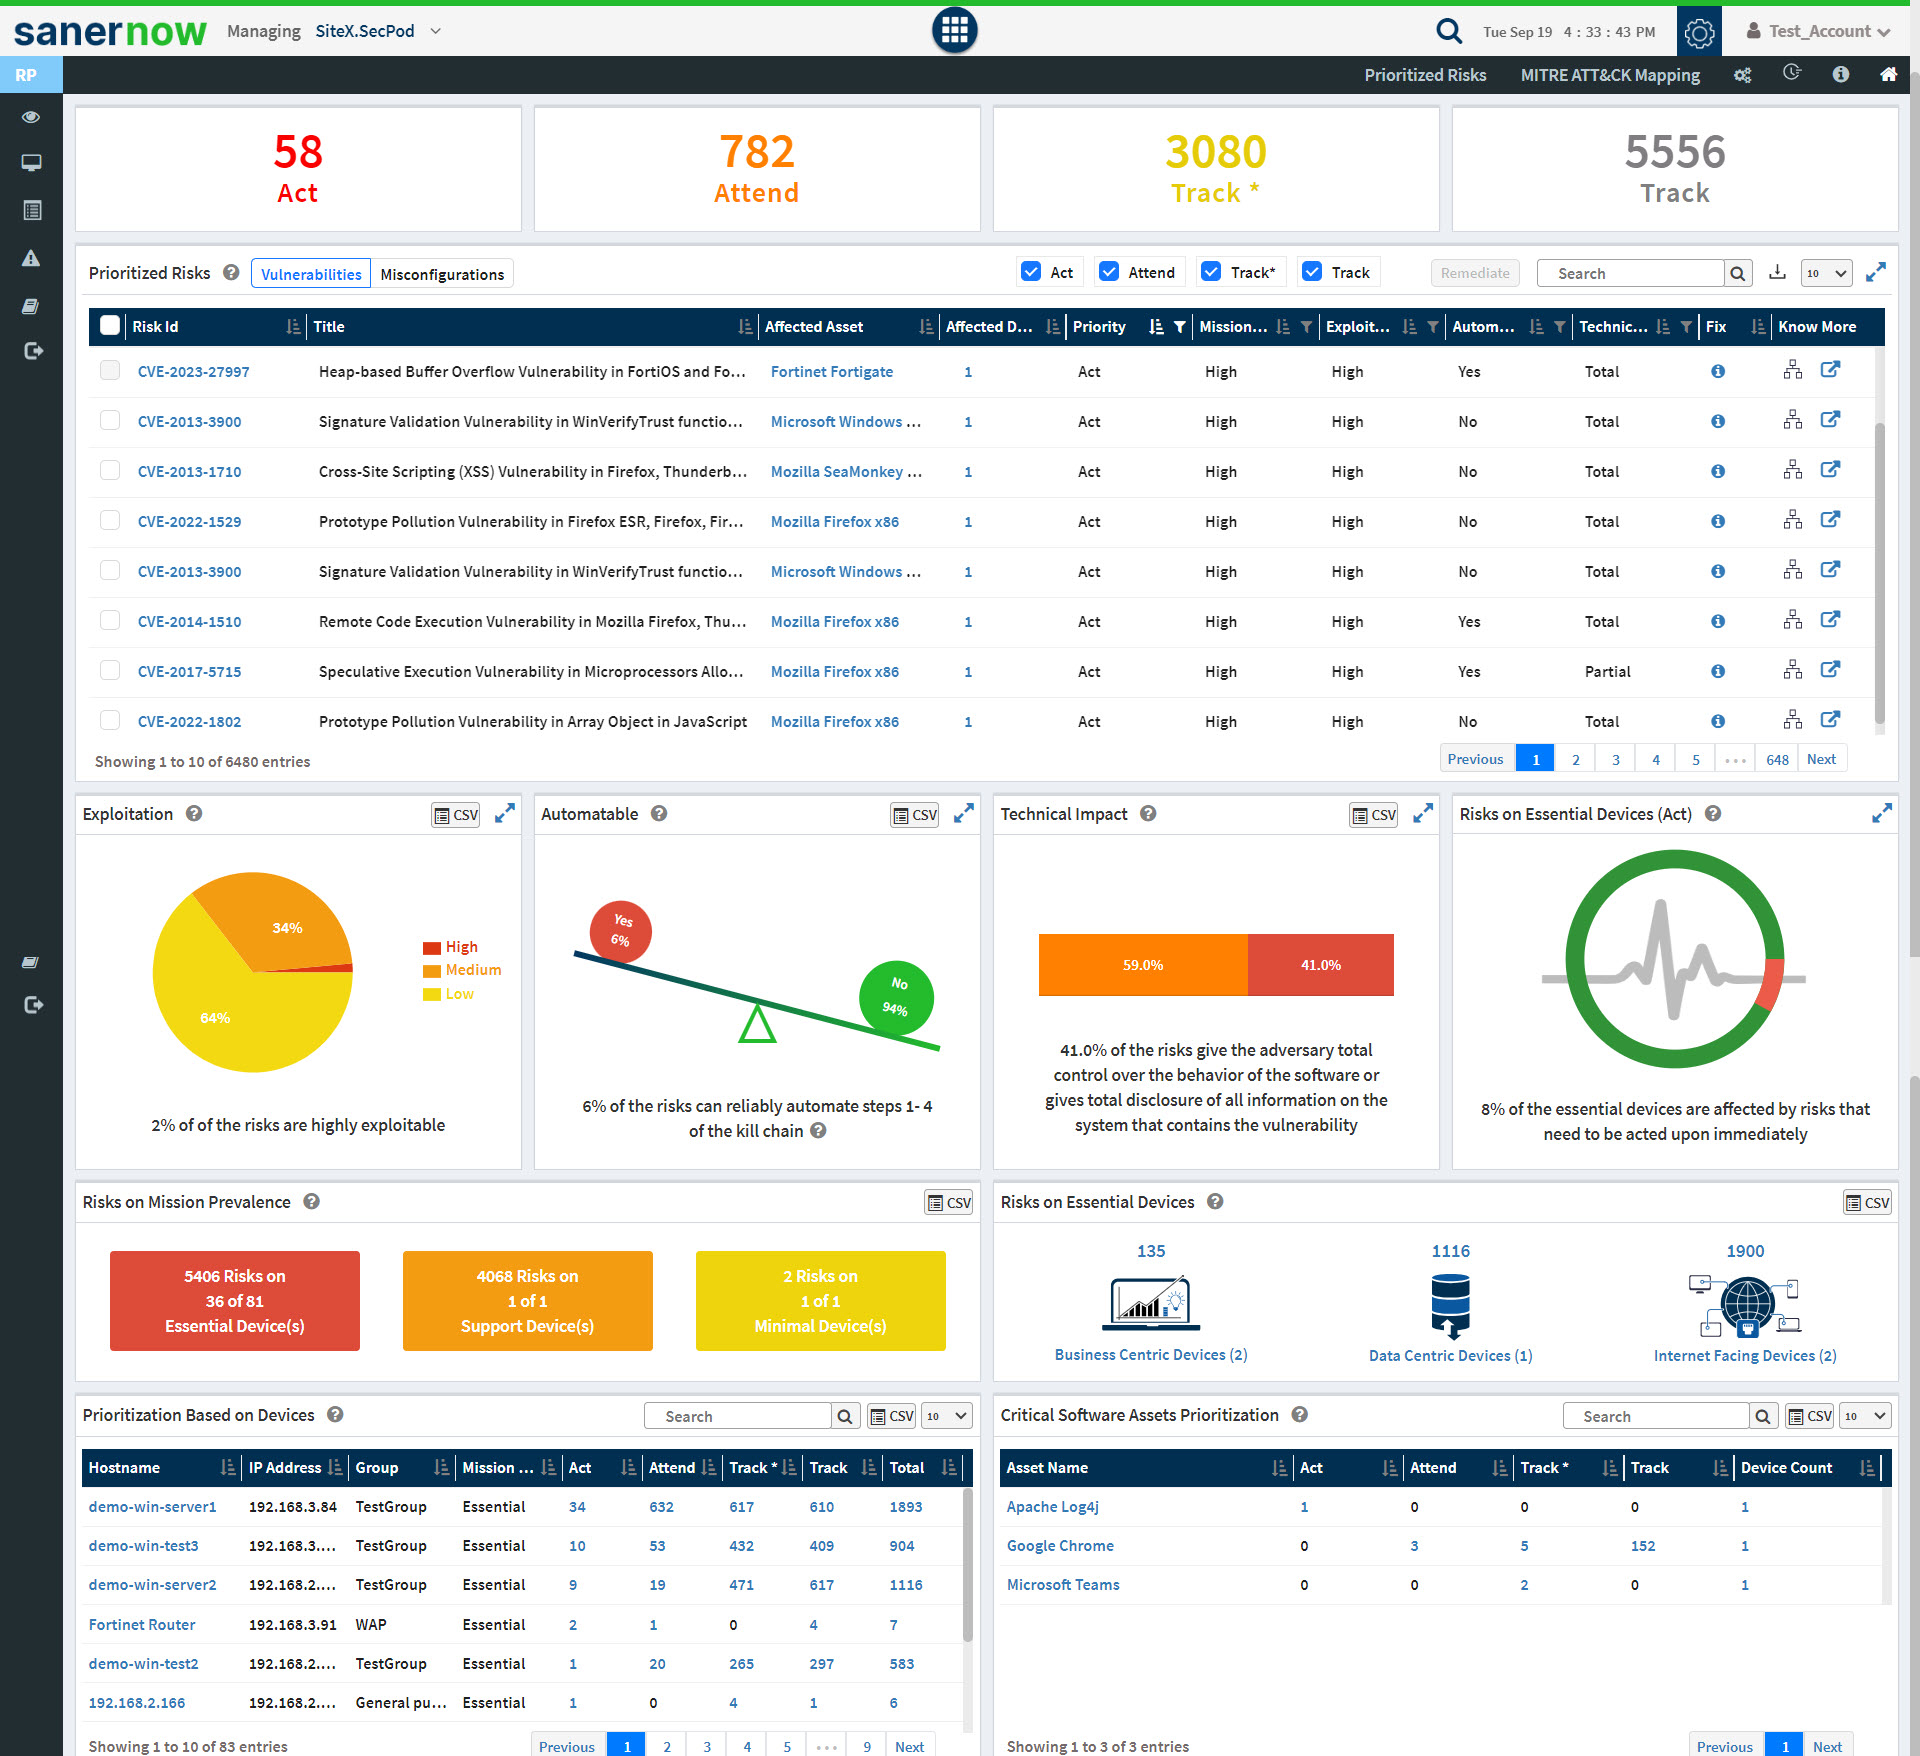
Saner Risk Prioritization Dashboard
View Prioritized Risks in the Account

The top pane in the Saner Risk Prioritization dashboard displays the most severe risks found in the Account. Saner Risk Prioritization performs an automatic scan on the Account regularly and categorizes the identified risks into four categories using the Stakeholder-Specific Vulnerability Categorization(SSVC) framework. The categories are as follows:
- Track: The vulnerability does not require action currently. The organization would continue tracking and reassessing the vulnerability if new information becomes available. Cybersecurity & Infrastructure Security Agency recommends remediating Track vulnerabilities within standard update timelines.
- Track*: The vulnerability contains specific characteristics that may require closer monitoring for changes. Cybersecurity & Infrastructure Security Agency recommends remediating Track* vulnerabilities within standard update timelines.
- Attend: The vulnerability requires attention from the organization’s internal, supervisory-level individuals. Necessary actions include requesting assistance or information about the vulnerability and may involve publishing a notification either internally and/or externally. Cybersecurity & Infrastructure Security Agency recommends remediating Attend vulnerabilities sooner than standard update timelines.
- Act: The vulnerability requires attention from the organization’s internal, supervisory-level, and leadership-level individuals. Necessary actions include requesting assistance or information about the vulnerability and publishing a notification either internally and/or externally. Typically, internal groups would meet to determine the overall response and execute agreed-upon actions. Cybersecurity & Infrastructure Security Agency recommends remediating Act vulnerabilities as soon as possible.
Clicking on each category – Act, Attend, Track*, and Track will take you to the Prioritized Risks screen, where you get a detailed view of the risks.
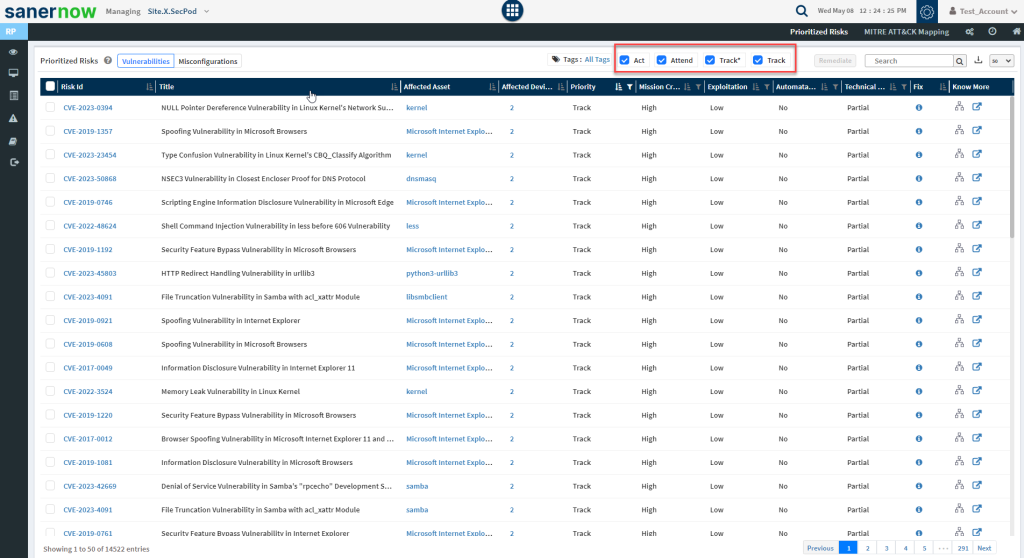
Get a detailed view of the prioritized risks in the Account
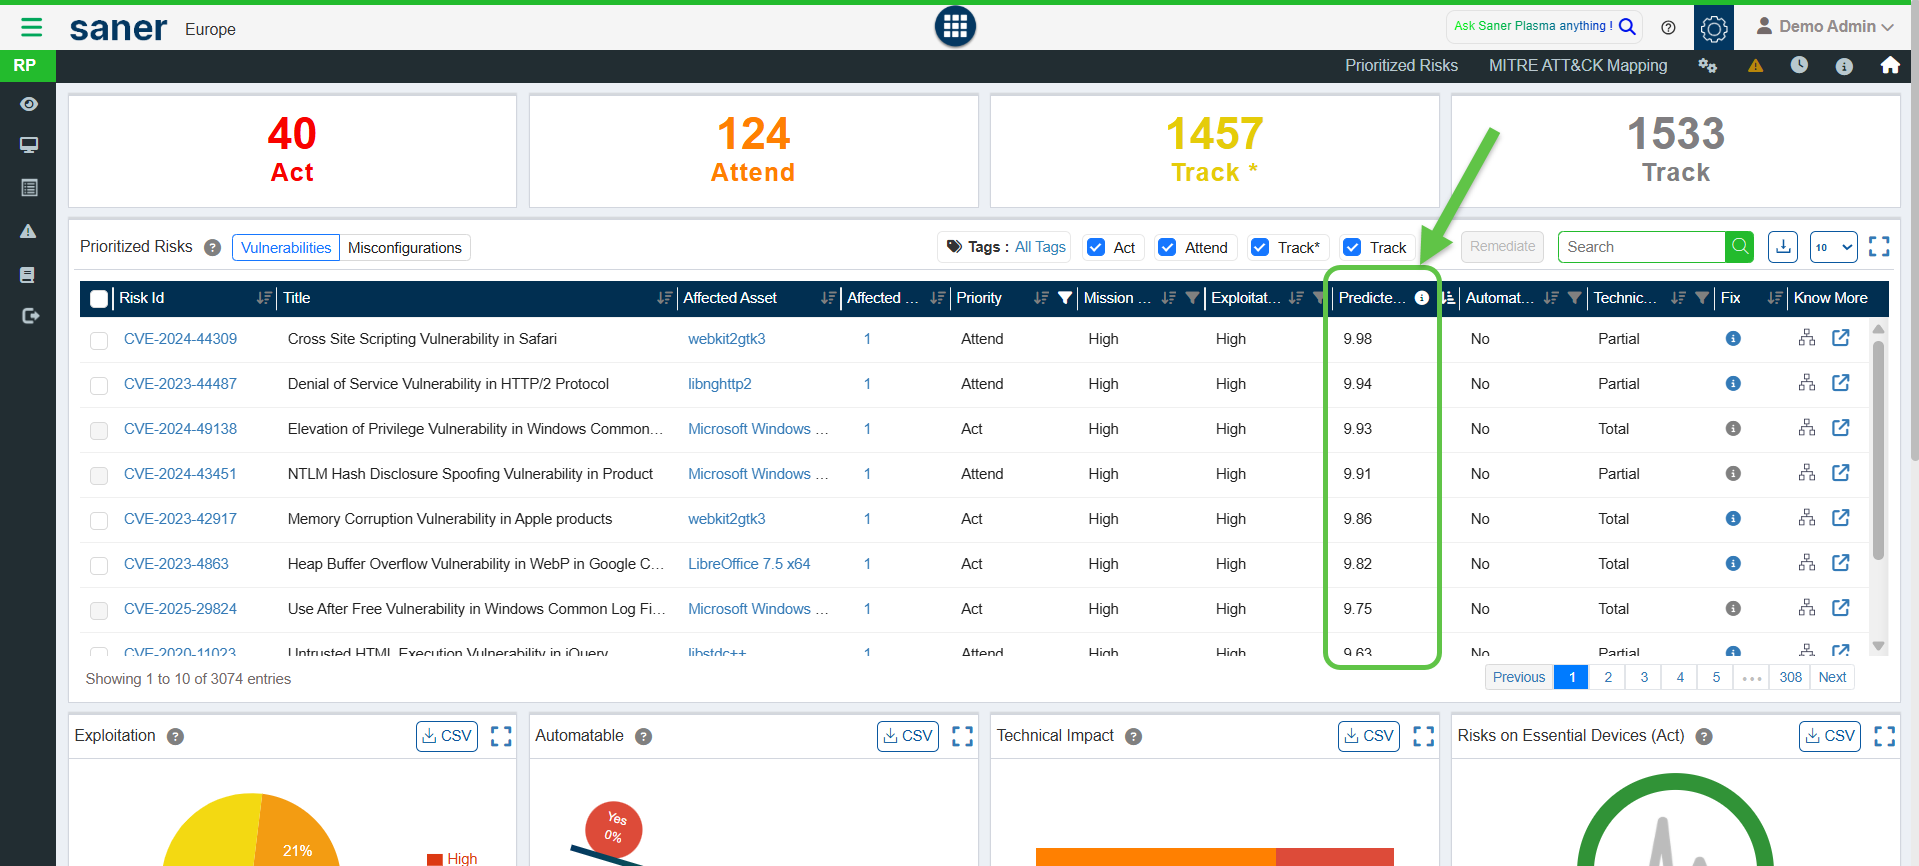
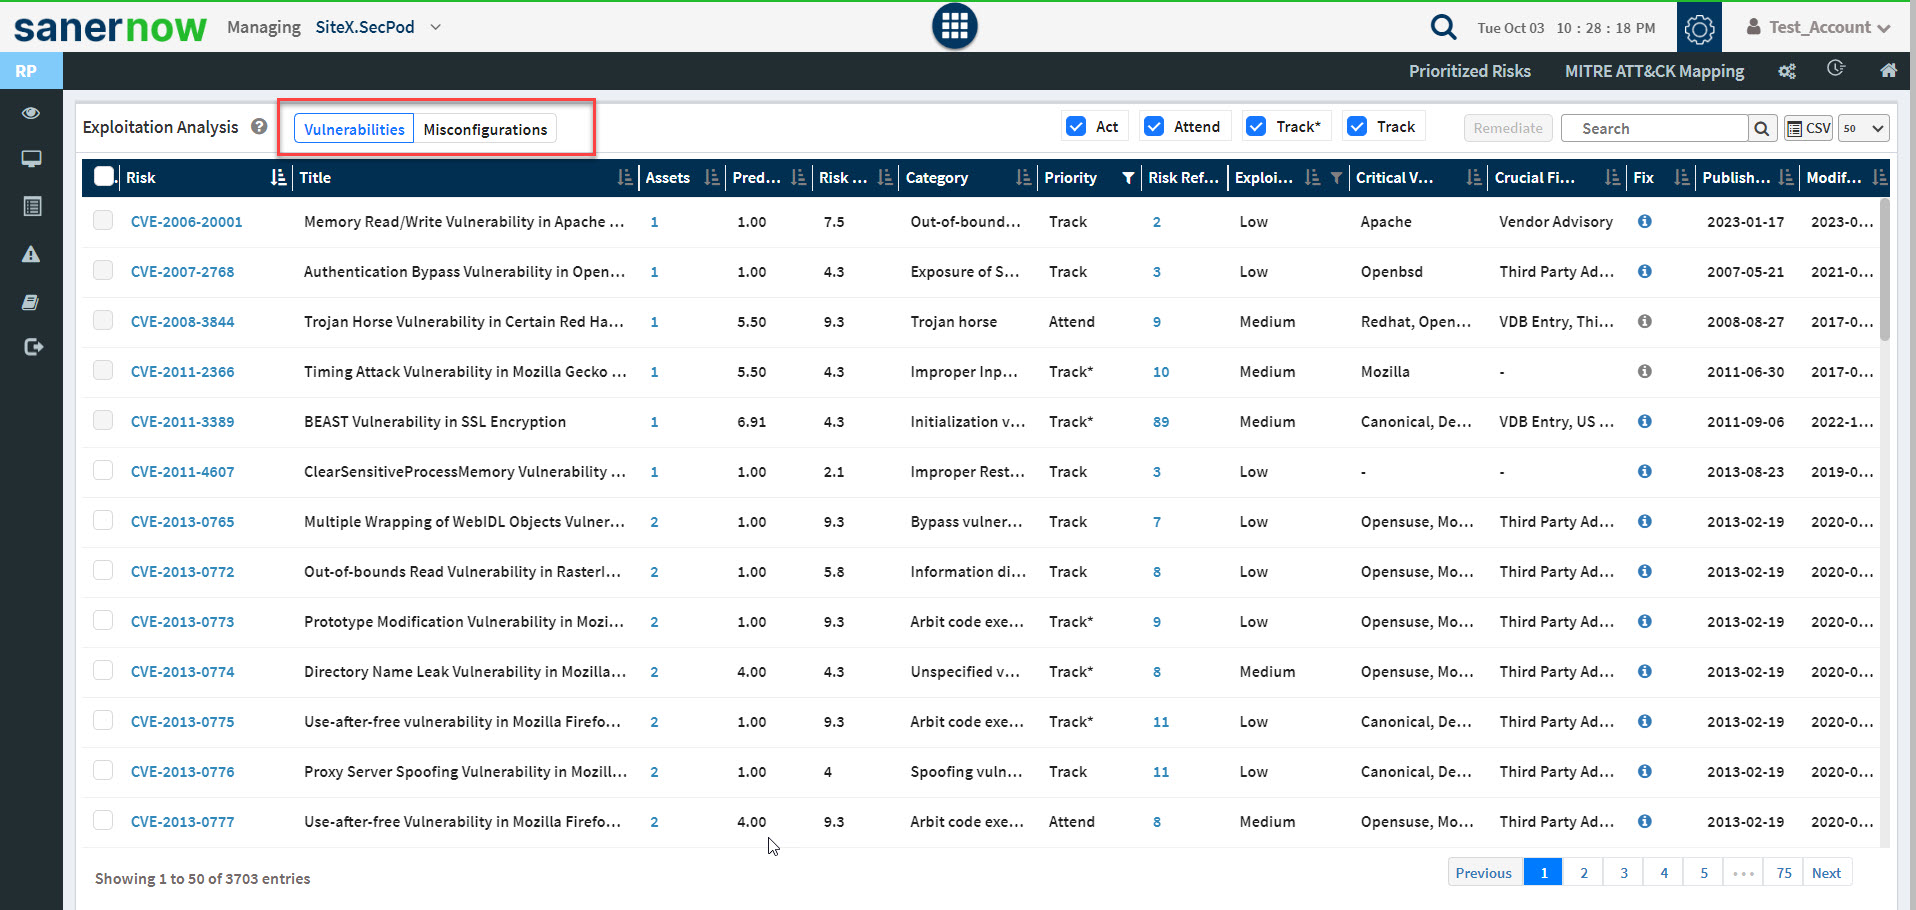
The Prioritized Risks pane displays all the risks – vulnerabilities and misconfigurations in the Account. You can toggle between vulnerabilities and misconfigurations using the button on the left of the Prioritized Risks pane.
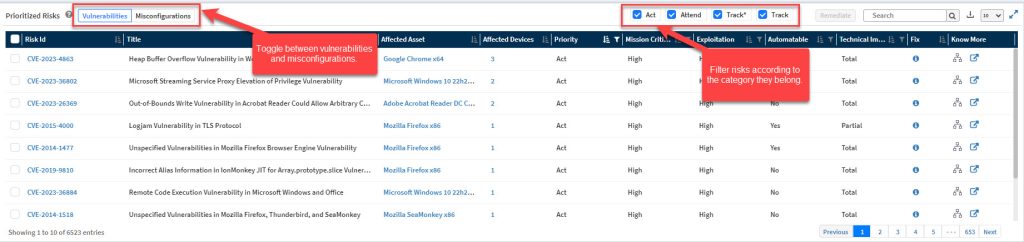
Similarly, you can filter the risks according to their category. The category checkboxes placed on the top right of the Prioritized Risks pane help you display risks belonging to each category: Act, Attend, Track*, and Track.
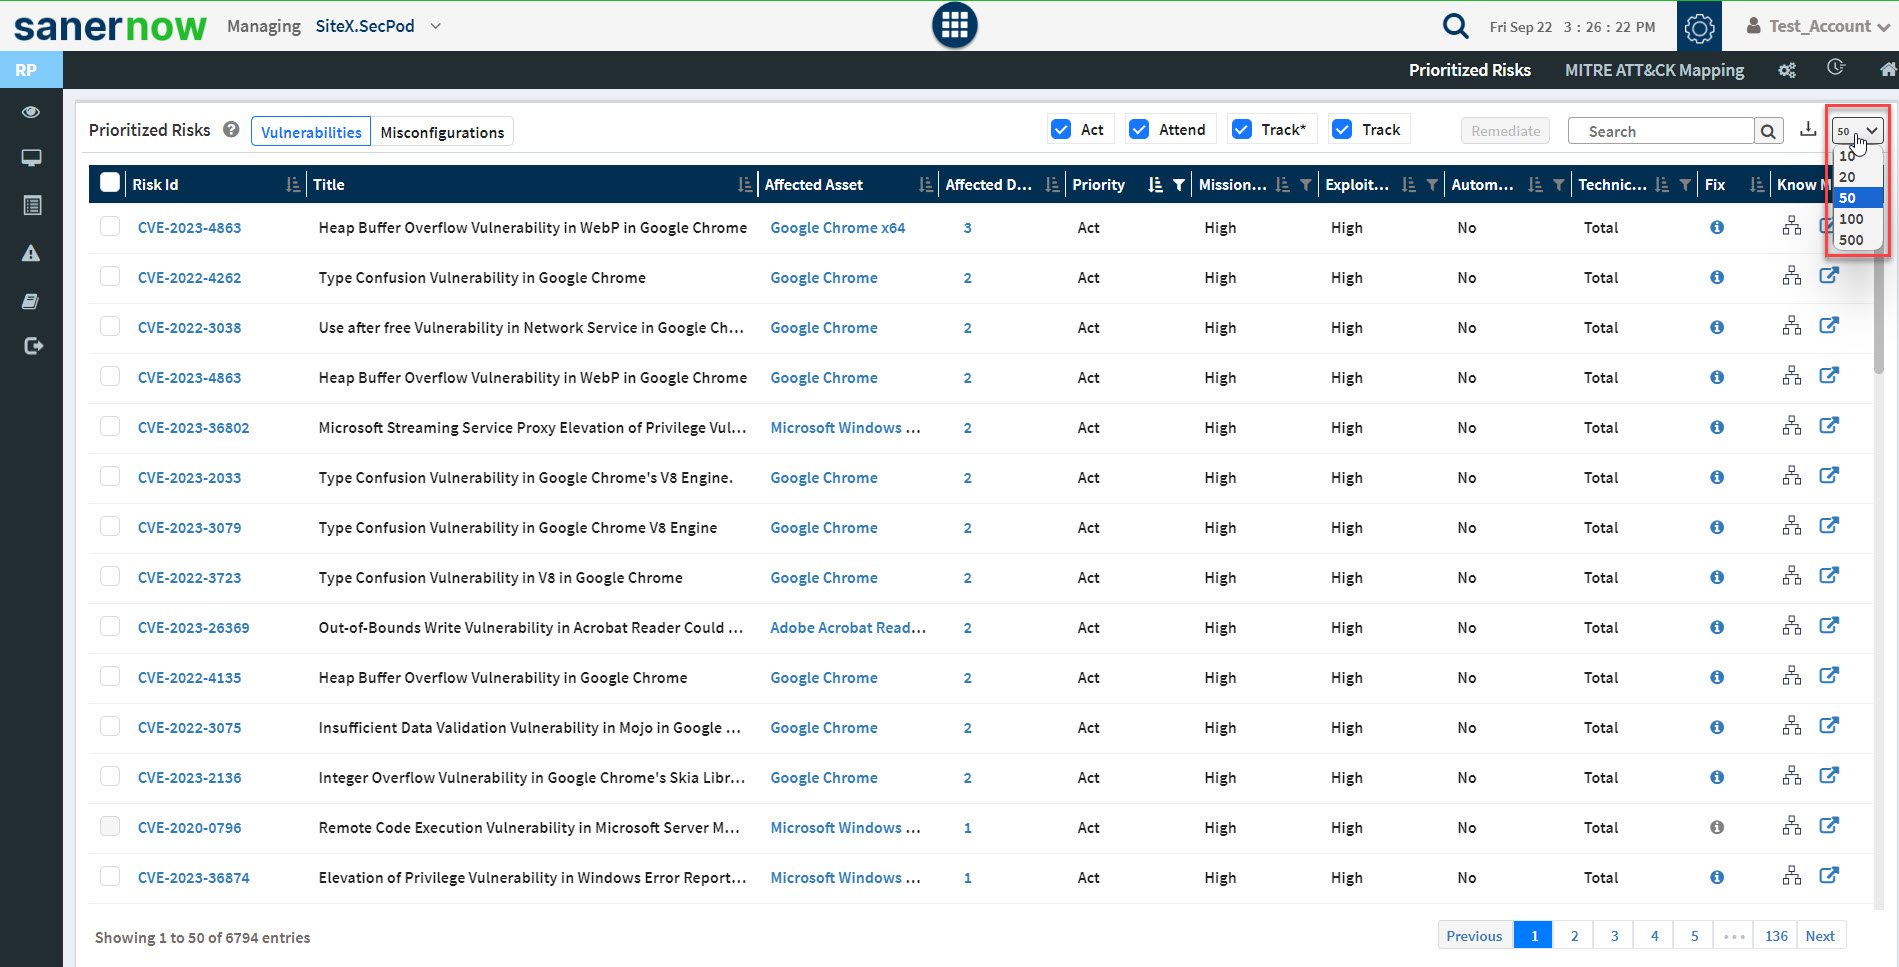
The Prioritized Risks pane on the Saner Risk Prioritized dashboard shows only ten risks at a time. However, you can expand the Prioritized Risks pane and see fifty risks at a time on the screen.
Click the ![]() button to expand the Prioritized Risks pane. In the expanded view, the Prioritized Risks pane can display a maximum of 500 risks. You can use the drop-down box on the top right to specify the number of records to be displayed.
button to expand the Prioritized Risks pane. In the expanded view, the Prioritized Risks pane can display a maximum of 500 risks. You can use the drop-down box on the top right to specify the number of records to be displayed.
You can search for risks by specifying the CVE id or with the asset name. Enter the CVE ID or the asset name in the text box right next to the ![]() icon. Similarly, you can download the risks presented on the Prioritized Risks pane in a Comma Separated Value (CSV) or CycloneDX format. Click the download button
icon. Similarly, you can download the risks presented on the Prioritized Risks pane in a Comma Separated Value (CSV) or CycloneDX format. Click the download button ![]() . You get a prompt to choose between CSV or CycloneDX file format. Once you confirm the file format, the file gets downloaded onto your computer.
. You get a prompt to choose between CSV or CycloneDX file format. Once you confirm the file format, the file gets downloaded onto your computer.

The Prioritized Risks pane provides the following details about each risk listed in the pane.
- Risk ID — A unique ID assigned to the risk.
- Title – A short description of the risk.
- Affected Asset – The name of software asset, operating system, configuration setting, etc. affected by the vulnerability.
- Affected Devices – Hosts that are vulnerable to the risk.
- Priority – Any of the risk prioritisation categories – Act, Attend, Track*, Track
- Mission Critical – Mission prevalence factor – Essential, Support, Minimal impact
- Exploitation – Categorisation of Exploitation based on SecPod’s ML algorithm – High, Medium, Low
- Automatable – Automatable? Yes or No
- Technical Impact – Categories how the risk impacts the system due to authentication disclosure or obtaining control of the component – Partial or Total
- Fix – Remediation through Patch Management feature
- Know More – Dig deep to understand the Risk Prioritization analysis.
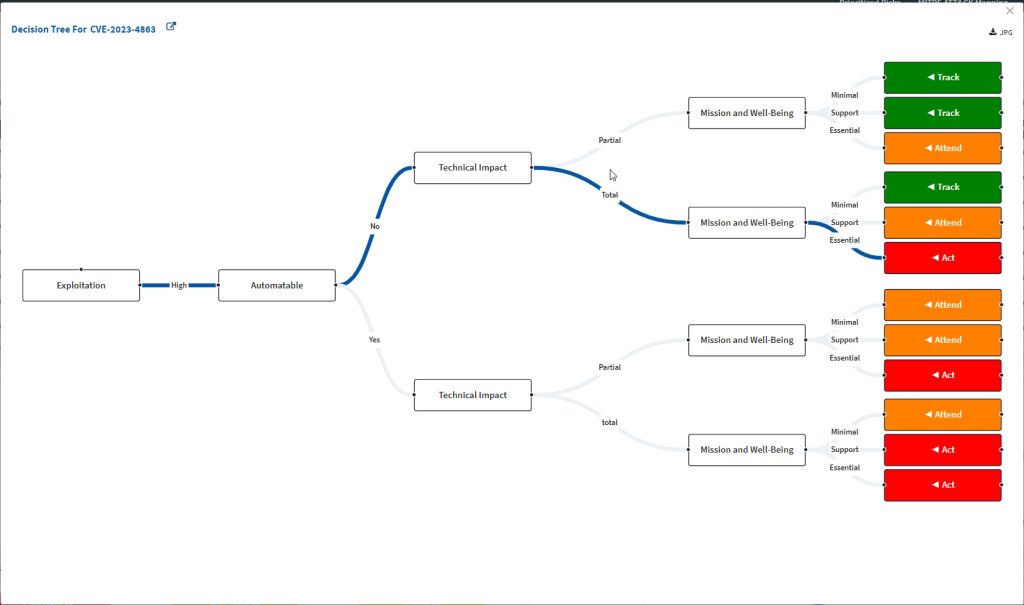
The Know More field displays two crucial pieces of information :
- Decision Tree
- More Details about the risk
Decision Tree
Clicking the Decision Tree will display the factors affecting the decision for Saner Risk Prioritization tool to classify the vulnerability (CVE/CCE) into one of the categories, namely: Act, Attend, Track*, and Track.
Know More
The Know More pane gives you information about the affected asset, the number of affected devices, the type of risk, and the category of risk it falls into. Similarly, you get information about the number of Mission Critical affected devices by the risk, information about the technical impact, automatable, and the exploitation details of the risk.
Remediate risks displayed in the Prioritized Risks pane
You can remediate both vulnerabilities and misconfigurations listed in the Prioritized Risks pane.
Follow the below steps to remediate a vulnerability from the Prioritized Risks pane.
1: Select the CVE ID from the list you want to remediate. The Remediate button on the top right gets enabled.
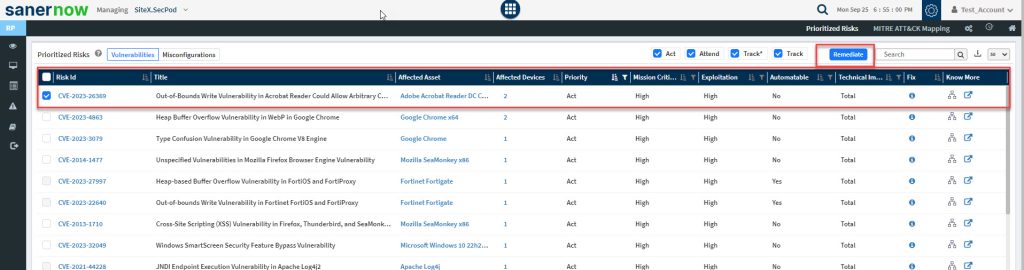
2: Click the Remediate button, which takes you to the Saner PM tool to create a Patching Task for the vulnerability.
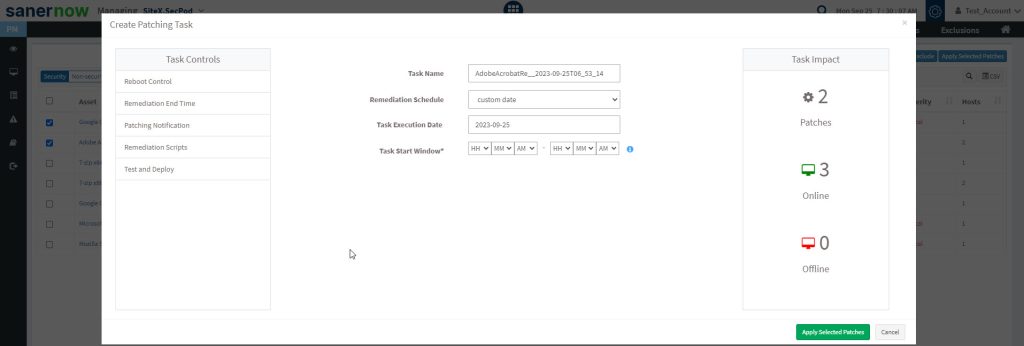
3: You can specify the type of remediation schedule you prefer. The following options are available.
- Immediate
- After scheduled scan
- Custom Date
Immediate – If you specify the remediation schedule as Immediate, the Saner CM tool will create the patching task and apply the patches immediately.
After Scheduled Scan – If you specify the remediation schedule as After Scheduled Scan, the Saner CM tool will create the patching task and apply the patches after the Saner Agent has completed the scheduled scan.
View and Remediate Risks in the Exploitation Category
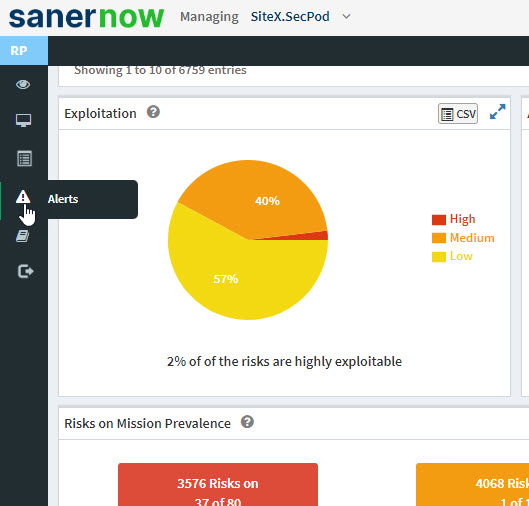
The Exploitation pane shows the risk distribution based on the exploitation evidence in a pie chart and categorizes them into High, Medium, and Low.
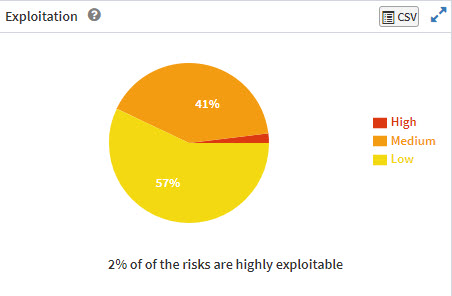
Click the ![]() button to expand the Exploitation pane – this will take you to the Exploitation Analysis pane. You can also access the Exploitation Analysis pane by clicking the pie chart.
button to expand the Exploitation pane – this will take you to the Exploitation Analysis pane. You can also access the Exploitation Analysis pane by clicking the pie chart.
The Exploitation Analysis pane gives a detailed view of the risks under the Exploitation category. A maximum of 500 risks can be displayed on the Exploitation Analysis pane.
You can use the drop-down box on the top right to specify the number of records to be displayed. Also, you can toggle between Vulnerabilities and Misconfigurations to be displayed on the Exploitation Analysis pane.
Similarly, you can filter the risks according to their category. The category checkboxes placed on the top right of the Exploitation Analysis pane help you show risks belonging to each category: Act, Attend, Track*, and Track.
You can search for risks by specifying the CVE id or with the asset name. Enter the CVE ID or the asset name in the text box next to the ![]() icon. You can download the CVEs under the Exploitation category by clicking the
icon. You can download the CVEs under the Exploitation category by clicking the ![]() icon.
icon.
Follow the steps mentioned in the Prioritized Risks pane to remediate risks under the Exploitation pane.
View and Remediate Risks in the Automatable Category
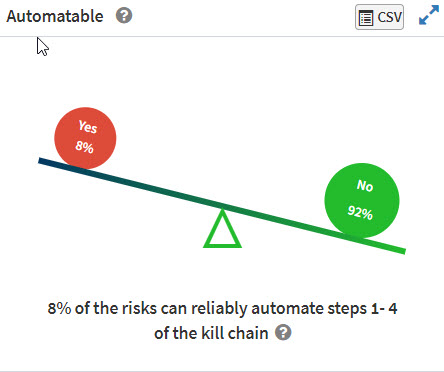
The Automatable pane shows the distribution of vulnerabilities based on their reliability on automation.
No: Cannot be reliably automated.
Yes: Can be reliably automated.
Click the ![]() button to expand the Automatable pane – this will take you to the Automatable Analysis pane. You can also access the Automatable Analysis pane by clicking the figure displayed on the Automatable pane.
button to expand the Automatable pane – this will take you to the Automatable Analysis pane. You can also access the Automatable Analysis pane by clicking the figure displayed on the Automatable pane.
The Automatable Analysis pane gives a detailed view of the risks under the Automatable category. A maximum of 500 risks can be displayed on the Automatable Analysis pane.
You can use the drop-down box on the top right to specify the number of records to be displayed. Also, you can toggle between Vulnerabilities and Misconfigurations to be displayed on the Automatable Analysis pane.

Similarly, you can filter the risks according to their category. The category checkboxes placed on the top right of the Automatable Analysis pane help you show risks belonging to each category: Act, Attend, Track*, and Track.

You can search for risks by specifying the CVE id or with the asset name. Enter the CVE ID or the asset name in the text box next to the ![]() icon. You can download the CVEs under the Automatable category by clicking the
icon. You can download the CVEs under the Automatable category by clicking the ![]() icon.
icon.
Follow the steps mentioned in the Prioritized Risks pane to remediate risks under the Automatable Analysis pane.
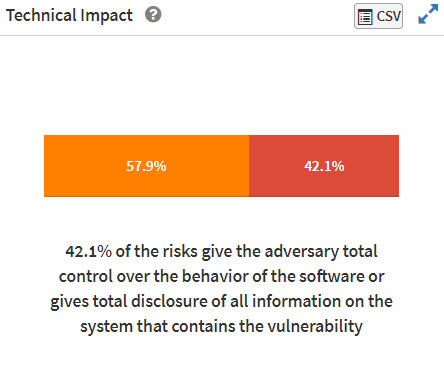
View and Remediate Risks in the Technical Impact Category
The Technical Impact pane shows the distribution of vulnerabilities based on the extent of control the adversary gets over the component.
Partial: Limited Control
Total: Full Control
Click the ![]() button to expand the Technical Impact pane – this will take you to the Technical Impact Analysis pane. You can also access the Technical Impact Analysis pane by clicking the figure displayed on the Technical Impact pane.
button to expand the Technical Impact pane – this will take you to the Technical Impact Analysis pane. You can also access the Technical Impact Analysis pane by clicking the figure displayed on the Technical Impact pane.
The Technical Impact Analysis pane gives a detailed view of the risks under the Technical Impact category. A maximum of 500 risks can be displayed on the Technical Impact Analysis pane.
You can use the drop-down box on the top right to specify the number of records to be displayed. Also, you can toggle between Vulnerabilities and Misconfigurations to be displayed on the Technical Impact Analysis pane.

Similarly, you can filter the risks according to their category. The category checkboxes placed on the top right of the Technical Impact Analysis pane help you show risks belonging to each category: Act, Attend, Track*, and Track.
You can search for risks by specifying the CVE id or with the asset name. Enter the CVE ID or the asset name in the text box next to the ![]() icon. You can download the CVEs under the Technical Impact category by clicking the
icon. You can download the CVEs under the Technical Impact category by clicking the ![]() icon.
icon.
Follow the steps mentioned in the Prioritized Risks pane to remediate risks under the Technical Impact Analysis pane.
View and Remediate Risks on Essential Devices
The Risks on Essential Devices pane displays the risks based on Mission prevalence present on Essential Devices that need to be acted on immediately. The dynamic pulse chart indicates the status of the Account. The greener the icon, the healthier the Account.
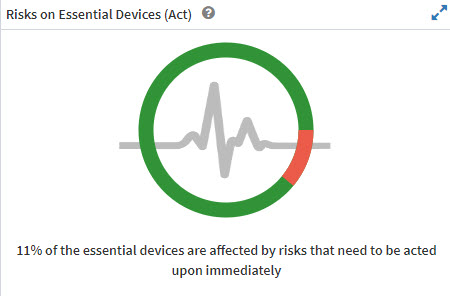
All the risks shown on the Risk on Essential Devices pane fall under the Act category. Clicking the pulse chart will take you to the Prioritized Risks pane. Follow the steps mentioned in the Remediating risks displayed in the Prioritized Risks pane section to remediate risks.
View and Remediate Risks on Mission Prevalence
The Risks on Mission Prevalence pane visually represents the risk count on devices based on Mission Prevalence. You can view the risks on Essential Devices(s), Supported Devices(s), and Minimal Devices(s) and remediate them on click.

The boxes presented in the Risk on Mission Prevalence pane represent the risks based on the following category of devices:
- Essential Devices(s)
- Support Devices(s)
- Minimal Device(s)
Clicking on these boxes will take you to the Prioritized Risks pane, where you can filter the risks according to Act, Attend, Track*, and Track categories and remediate the risks as well.
Follow the steps mentioned in the Remediating risks displayed in the Prioritized Risks pane section to remediate risks.
View Risks on Essential Devices
This pane visually represents the risks on essential devices – Business-centric, Data-Centric devices, and Internet Facing Devices. The number of risks on each category of devices is presented on the top of the icon, while the number of devices belonging to each category is displayed below the icon

To remediate the risks, you can click the icons, namely Business Centric Devices, Data-Centric Devices, and Internet-Facing Devices. You will be redirected to the Prioritized Risks pane. Follow the steps mentioned in the Remediating risks displayed in the Prioritized Risks pane section to remediate risks.
Configure Alerts and Generate Reports in the Saner Risk Prioritization
Configure Alerts in the Saner Risk Prioritization tool
You can configure the Saner Risk Prioritization tool to send you alerts. You can receive alerts about All Software Assets or Critical Software Assets in the Account.
Follow the below steps to configure alerts in the Saner Risk Prioritization tool.
1: Click the Alerts icon on the left side of the Saner Risk Prioritization dashboard.
2: You will be taken to the Alerts Screen. Here, you need to provide the email address to which you want the alerts to be sent.
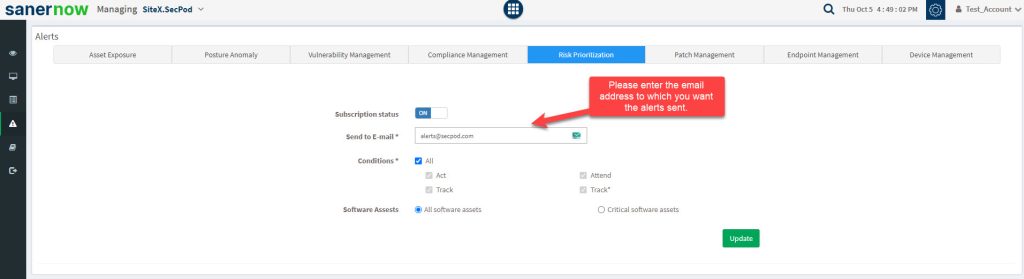
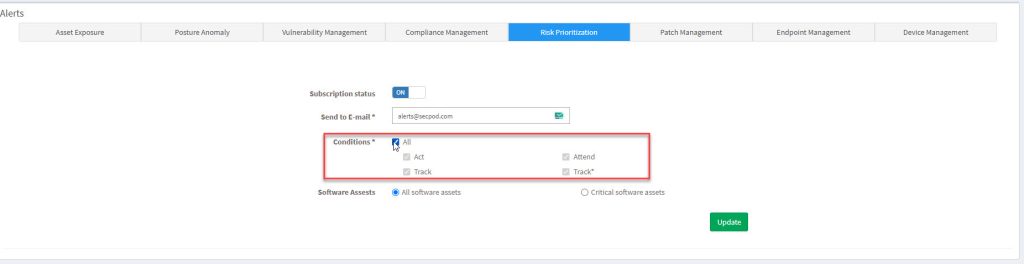
3: Once you have entered the email address, select the conditions that must be met for the Alert to be sent to you. You can choose all the conditions by clicking the All checkbox. Or you can select individual conditions by unchecking the All checkbox.
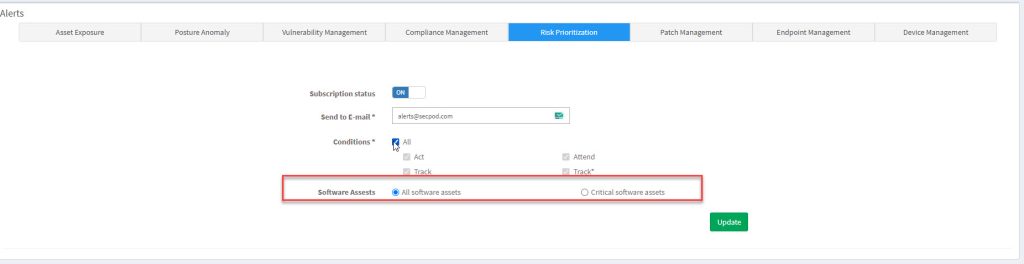
4: You can specify the Alerts for All software assets or Critical software assets in your Account.
5: Click the Update button to save the configuration for alerts.
Generate Reports in the Saner Risk Prioritization tool
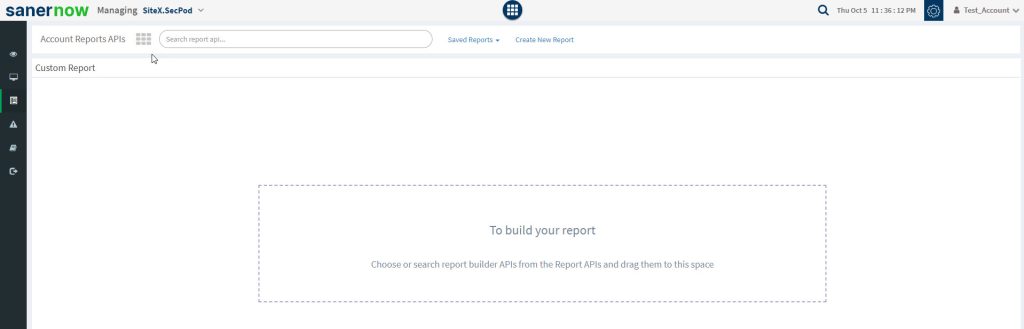
1: Click the Reports icon on the left side of the Saner Risk Prioritization dashboard.
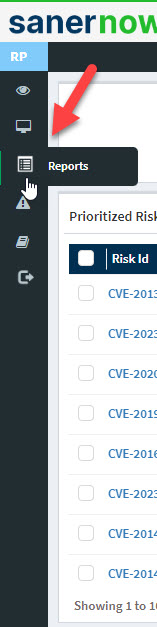
2: You will be taken to the Reports Screen.
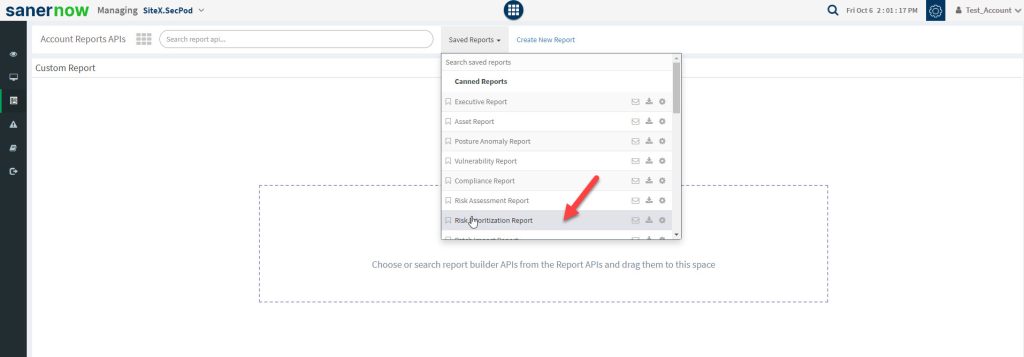
3: Click the Saved Reports button. Select the Risk Prioritization report. The saved report will load on your screen.