Saner VM provides a vulnerability management tool with impeccable vulnerability scans and instant remediation. Vulnerability management doesn’t stop with scanning and detection; it comes with integrated patch management to remediate vulnerabilities instantly. Saner vulnerability management works as follows:
- Scan and Identify: It runs continuous scans and identifies vulnerabilities.
- Assess and Prioritize: Assess vulnerabilities and prioritize based on severity range.
- Remediate and Report: Remediate through patch management and report required actions.
Monitor + Assess + Prioritize + Remediate = Vulnerability Management
Saner VM simplifies the vulnerability management cycle to a daily routine, simplifies remediation and reporting, and reduces the total cost of operation (TCO). The Saner VM solution helps identify, classify, remediate, and mitigate vulnerabilities in an organization. In the following sections, we will see how to accomplish Vulnerability Management with the Saner VM.
- Log in to the Saner account with credentials.
- Suppose an account already exists and the Saner Agent has been deployed on the endpoints; the organization level dashboard is displayed.
3. To select an account, click All Organizations on the top left corner of the dashboard. All Organization section lists all the organizations. You can see the list of organizations as Org1, Org2, and Org3, as shown below; select the account, and a dashboard with the summary view of the account is displayed.
4. Click the Saner tools icon on the header. It will display all the provision tools, as shown below.

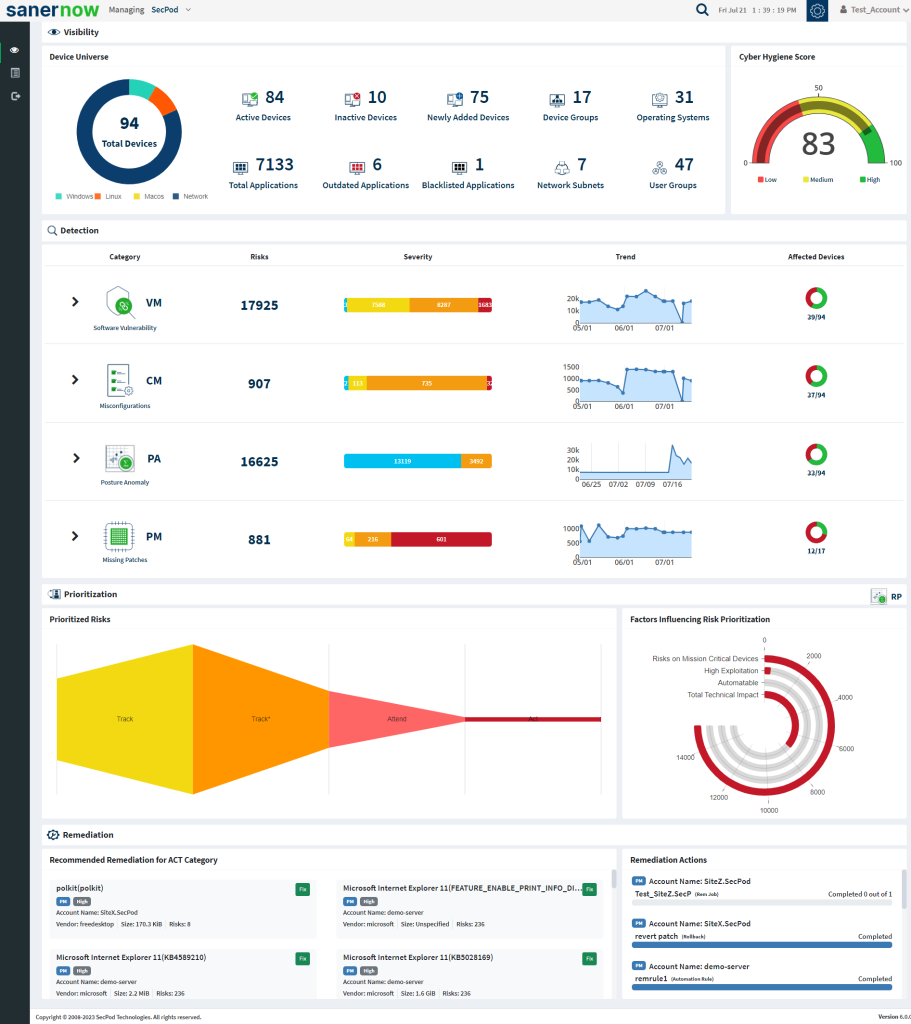
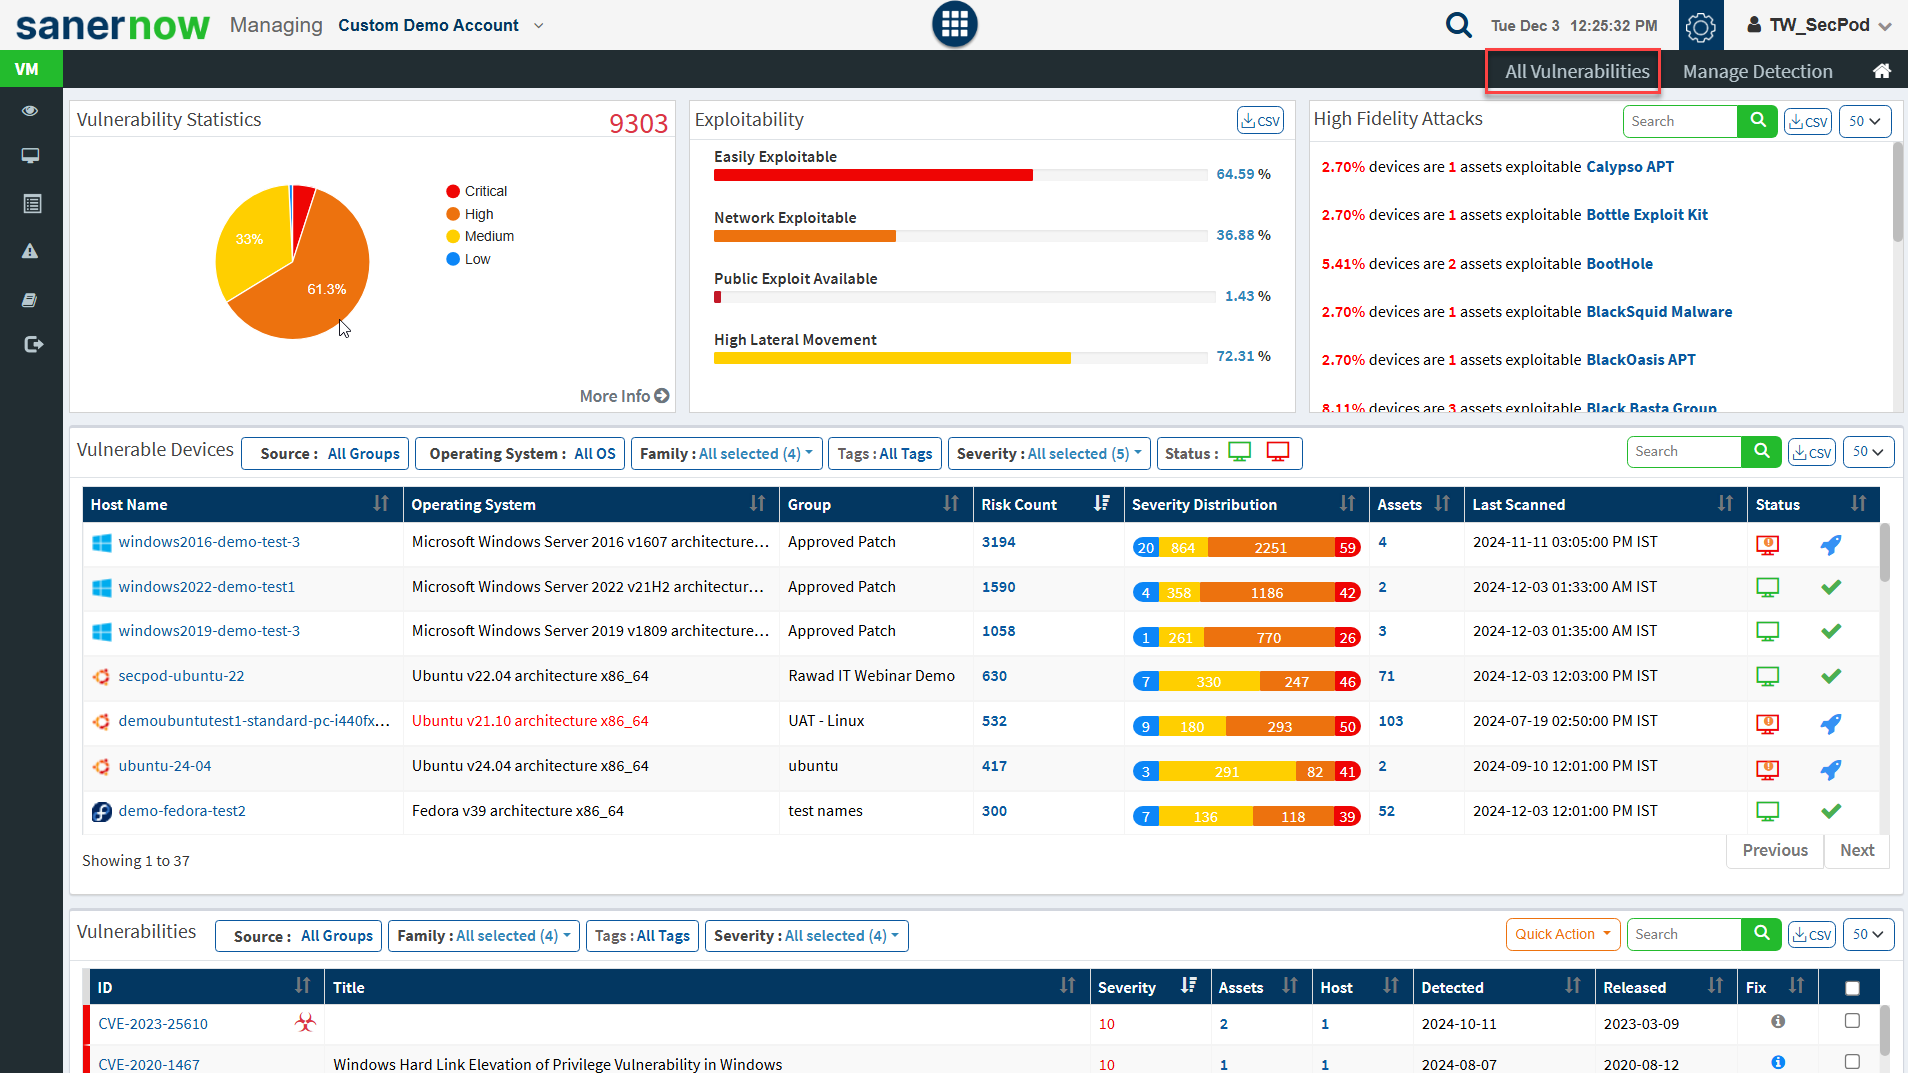
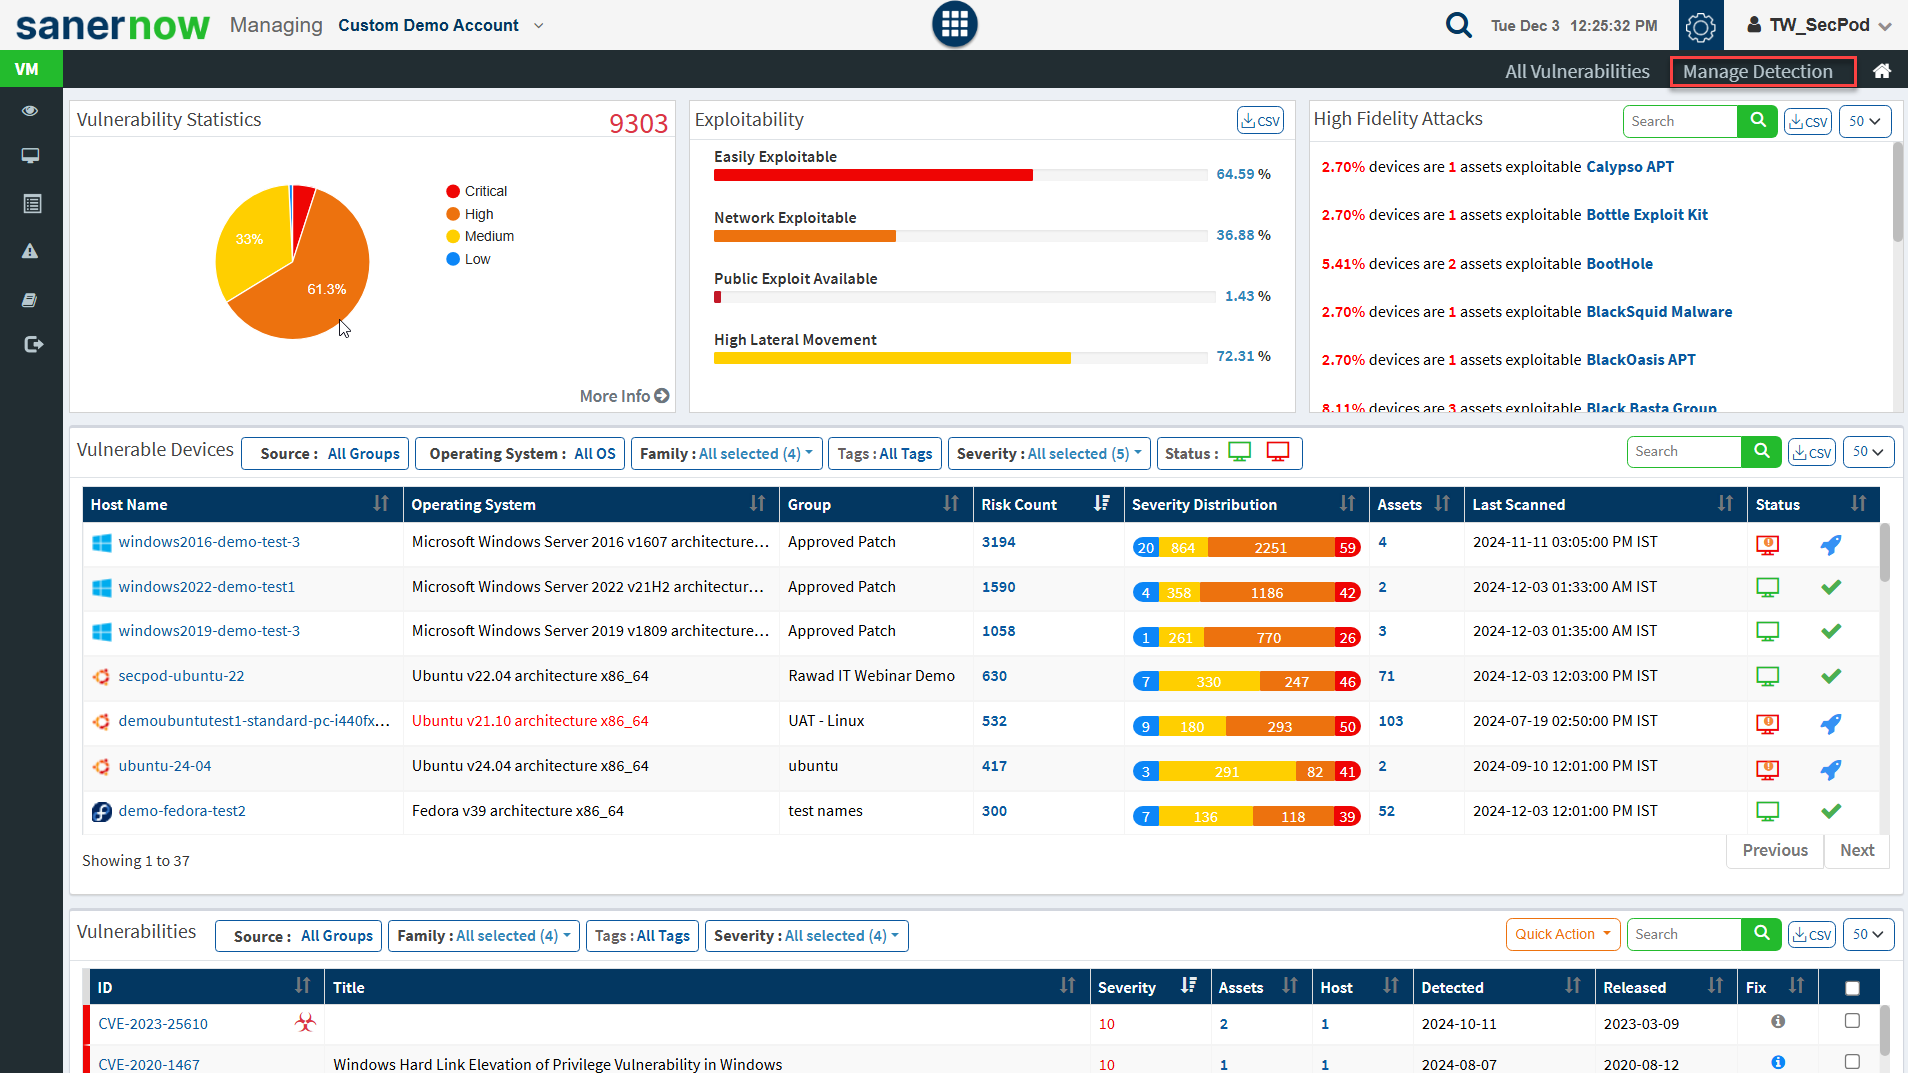
5. Click on the Vulnerability Management icon. The Vulnerability Dashboard is displayed, which provides vulnerability details categorized by severity or type, age, affected hosts, vulnerable devices, and vulnerabilities.
Saner platform hosts the world’s largest vulnerability database with around 100,000+ security checks. The latest vulnerability checks are constantly fed to the SCAP repository. Saner VM thoroughly analyses these vulnerabilities and prioritizes them based on their severity. Easily manage and control all vulnerability management tasks from an all-in-one centralized console. Gain insights on various vulnerability management attribute from the centralized dashboard. View the exploit potential of the detected vulnerabilities evaluated based on the CVSS score.
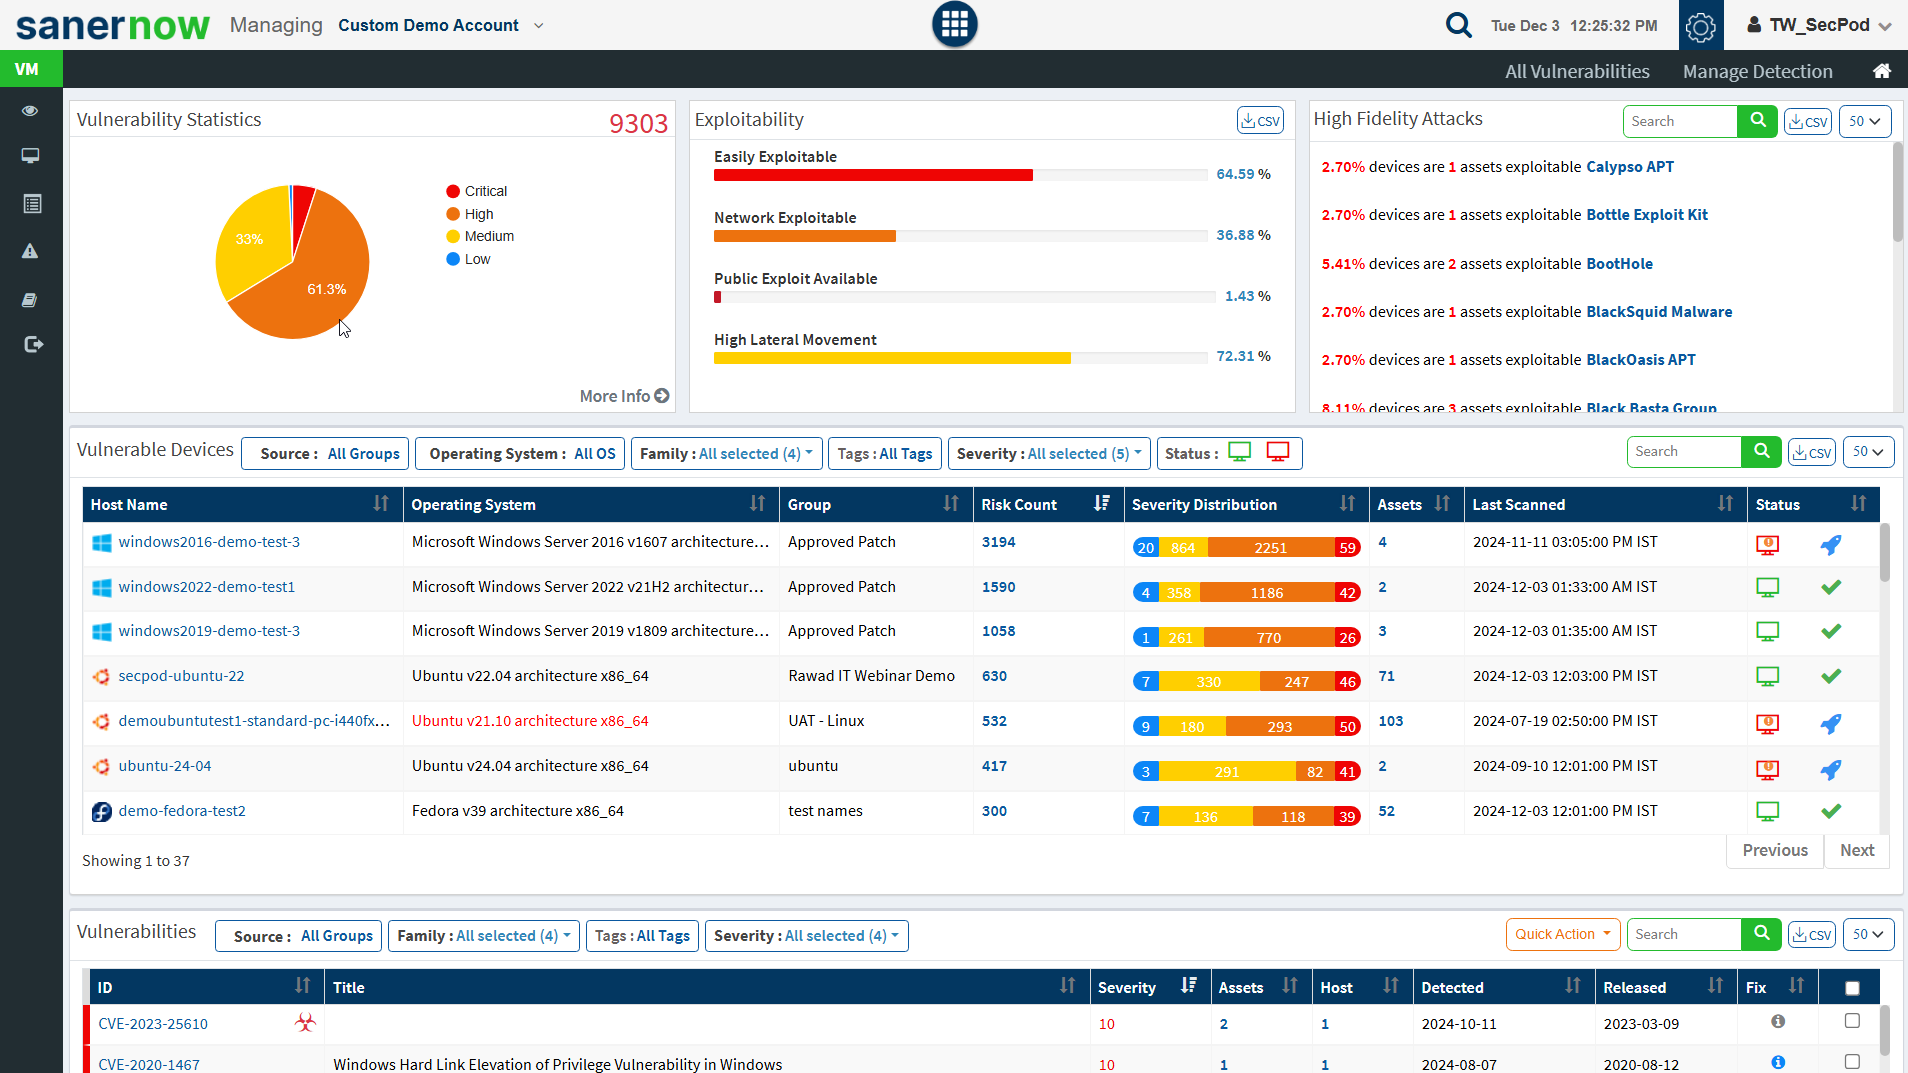
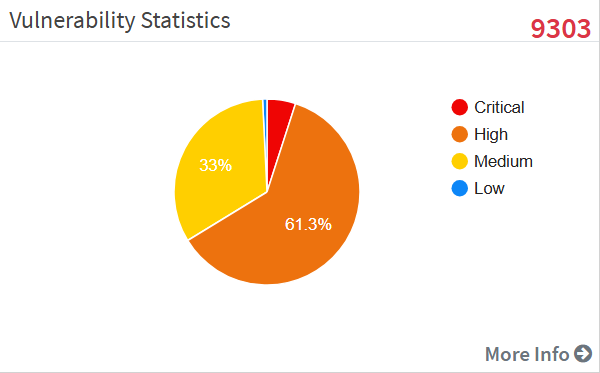
Vulnerability Statistics
It is important to prioritize the vulnerabilities based on the severity levels and plan the remediation. SecPod uses the Common Vulnerability Scoring System (CVSS), which determines the severity of the vulnerability based on principal characteristics. The Vulnerability Statistics pane shows the total number of vulnerabilities in the network and classifies the severity of the vulnerabilities as low, medium, high, and critical.
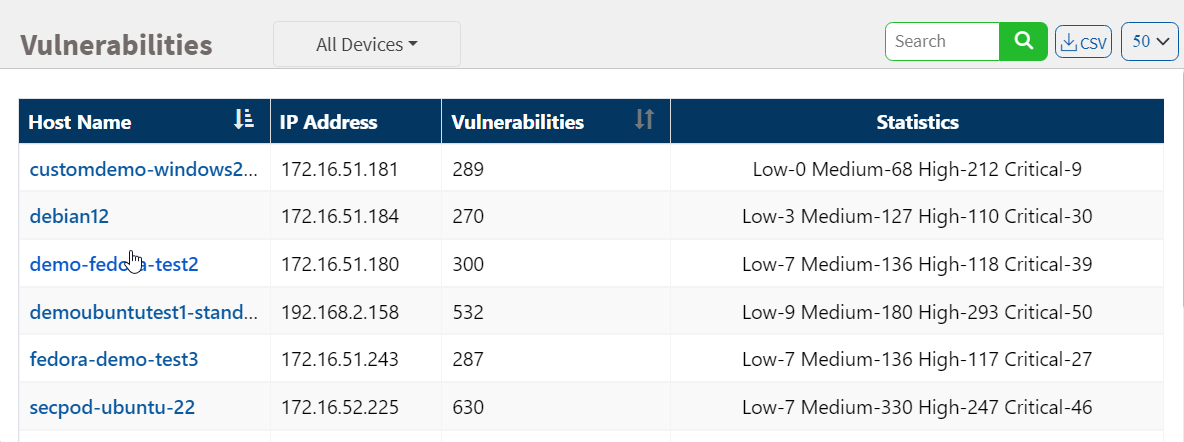
Click on the More Info link, which shows a dialog box to filter the vulnerability statistics by all devices, unassigned devices, groups, or a specific group of devices. The affected device or hostname, the IP address, the total number of vulnerabilities for that host, and the severity grouping is displayed in the dialog.
Exploitability
Remediation can be prioritized if there is visibility into the vulnerability category. You can download the excel sheet by clicking on the CSV icon. The file contains information about the vulnerabilities based on the exploitability.
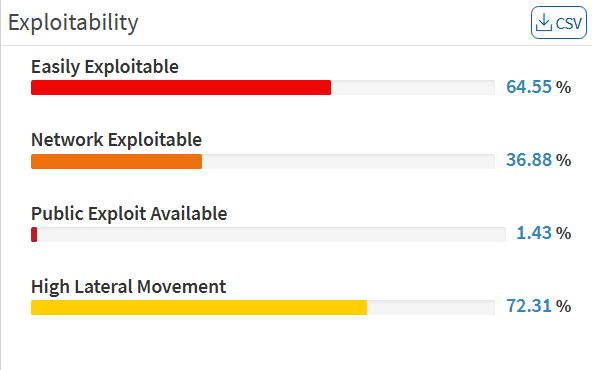
This page categorizes the vulnerabilities on the network by:
- Easily Exploitable: Vulnerabilities are known in the public domain, making an exploit easily possible.
- Network Exploitable: Vulnerabilities can be exploited with remote network access. The attacker’s path is through the network layer.
- Public Exploit Available: Vulnerabilities for which publicly available exploits have occurred in the past.
- High Lateral Movement: Vulnerabilities extend to the network as the threat moves from device to device and asset to asset, and attackers collect valuable data.
High Fidelity Attacks
High fidelity attacks pane groups, the vulnerabilities by the exploit kits that can be used to exploit the weakness. This pane shows the high-fidelity attacks which defect the array of attacks vulnerability leads to. In this way, Saner VM predicts having the vulnerability in an organization. On clicking on the highlighted attack name, you will get a description model of the attack. You can download the excel sheet with detailed information by clicking on the CSV icon.
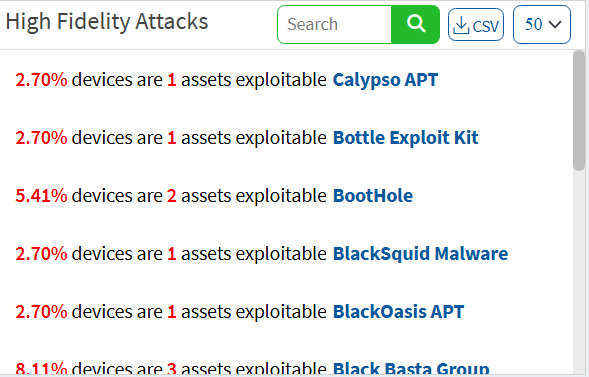
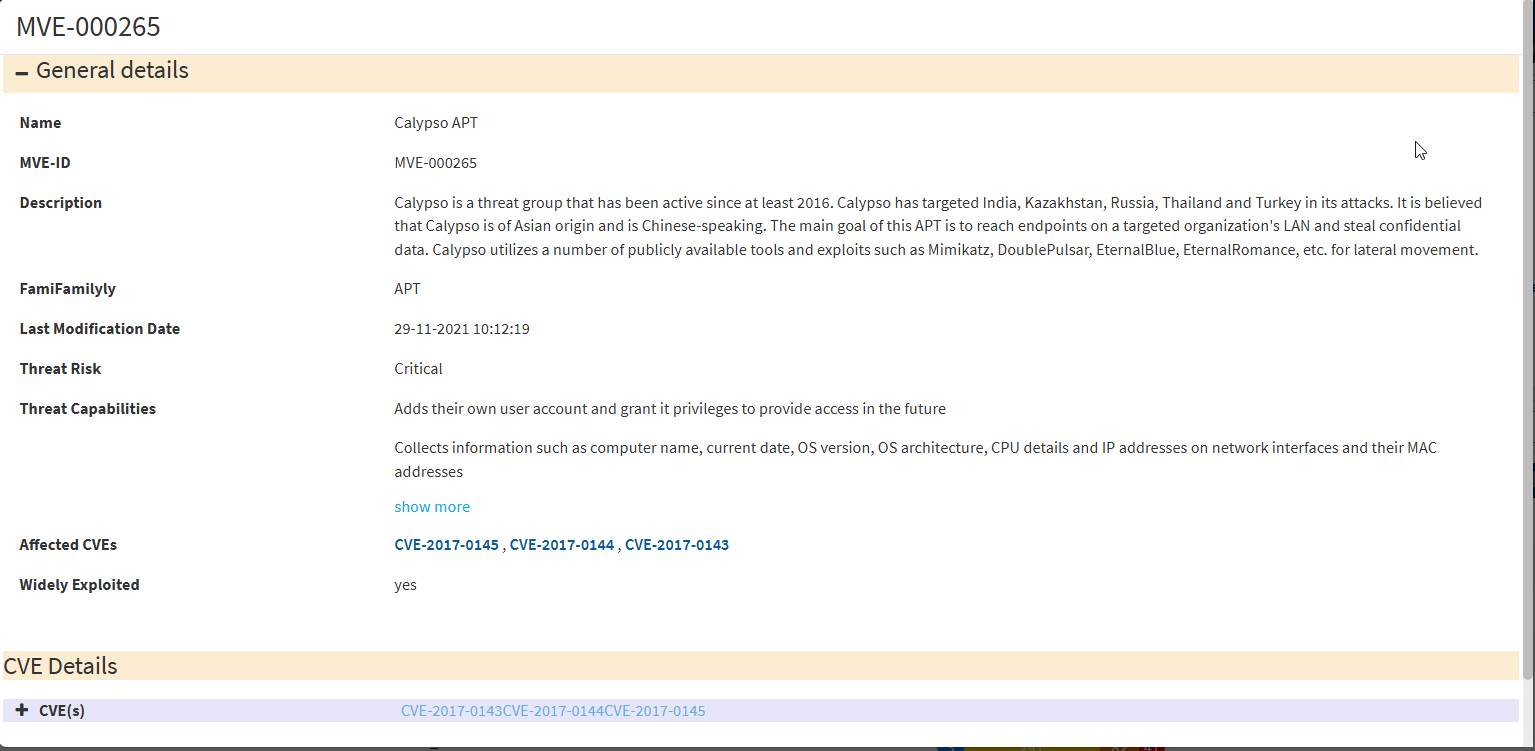
A new section has been introduced for high-fidelity attacks. You can view the individual vulnerabilities associated with high-profile attacks in the All Vulnerabilities dashboard. You can act on these critical vulnerabilities by remediating or excluding them through the Quick Action section. Similarly, we’ve enhanced SecPod’s proprietary vulnerability intelligence library is enhanced to include additional malware and threat intelligence information and MITRE ATTA&CK information.
Click the exploit name in the pane to fetch the details from SecPod’s vulnerability intelligence library.
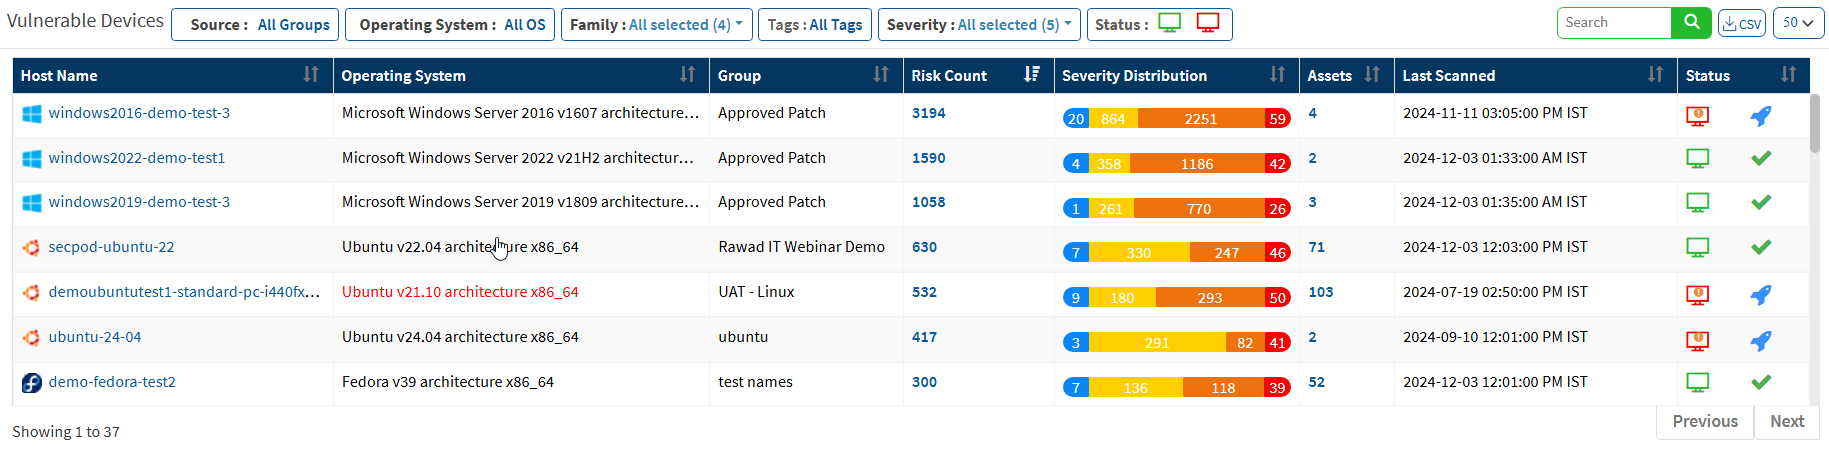
Vulnerable Devices
This pane lists vulnerable devices with detailed information on risk count based on severity distribution. This pane displays all the devices in the network along with the hostname, operating system, group, count, severity distribution, assets count, last scanned information, and device status. Filter options are provided to narrow the search based on the groups, operating system, family, and status. The Others option in the Family filter will list the network devices. You can download the excel sheet with vulnerable device information by clicking on the CSV icon.

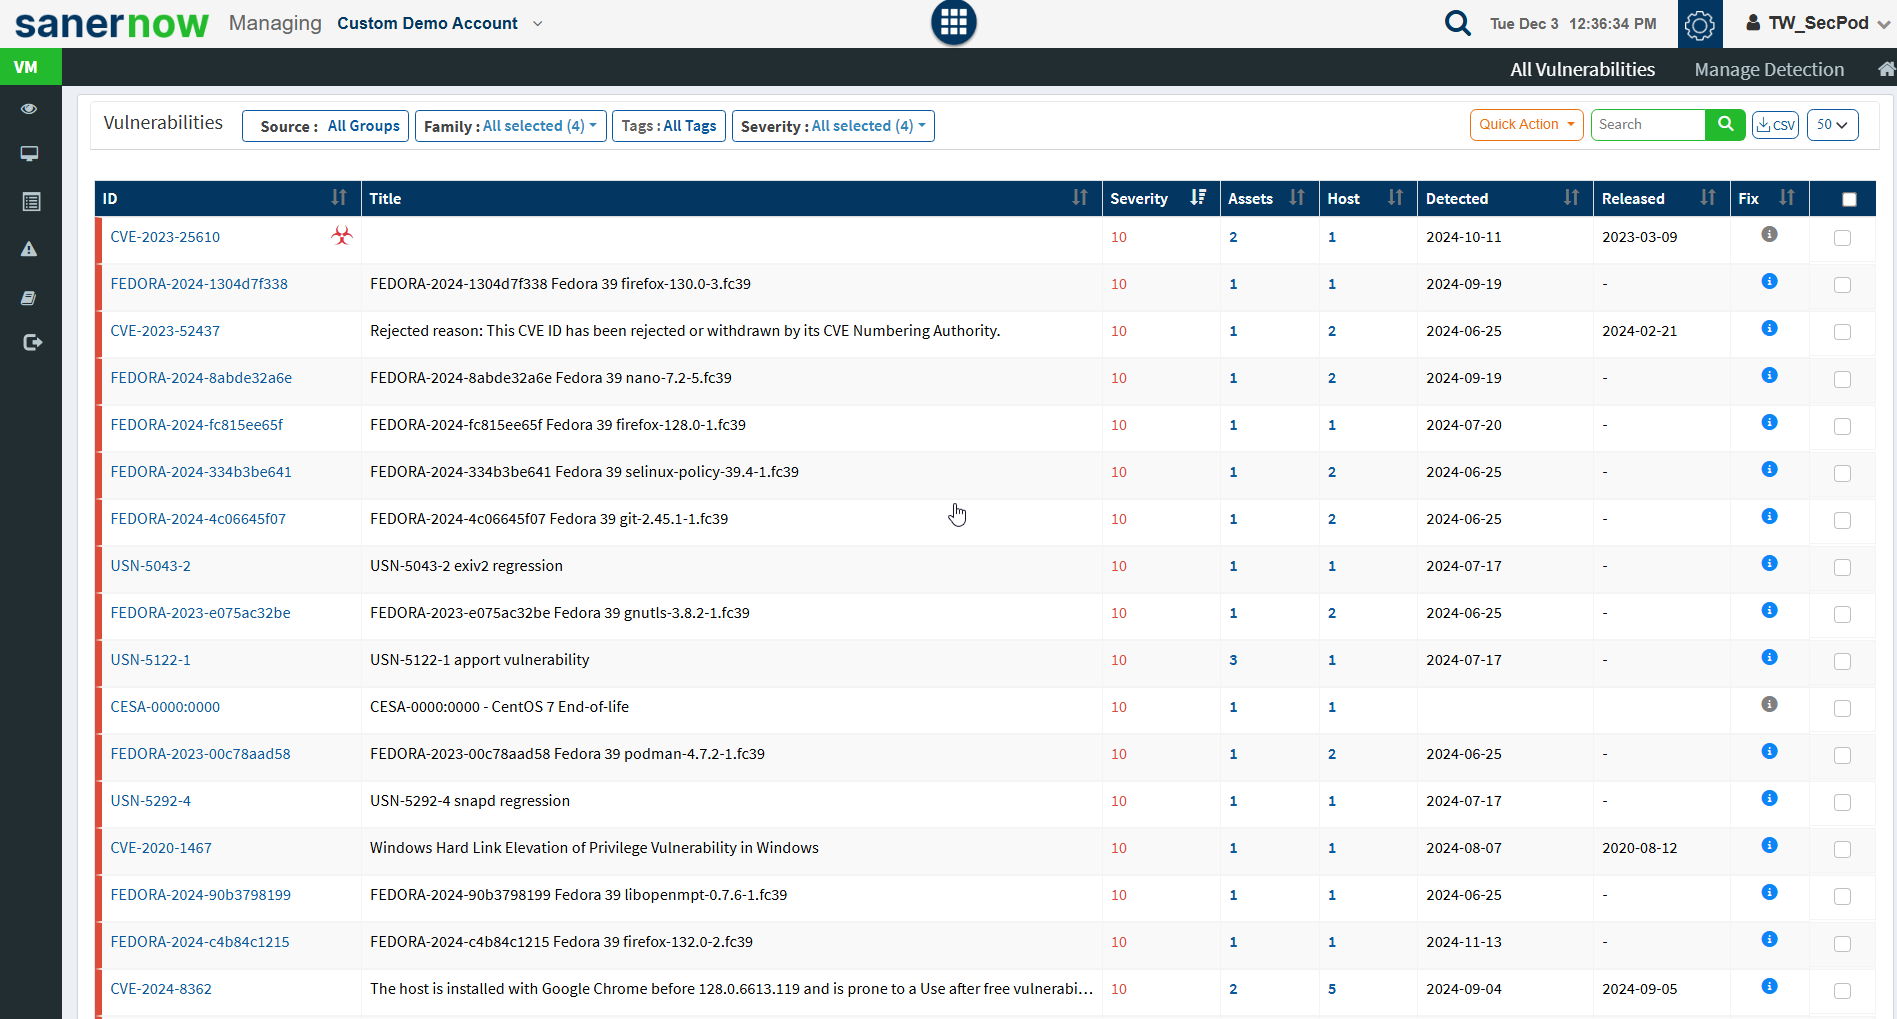
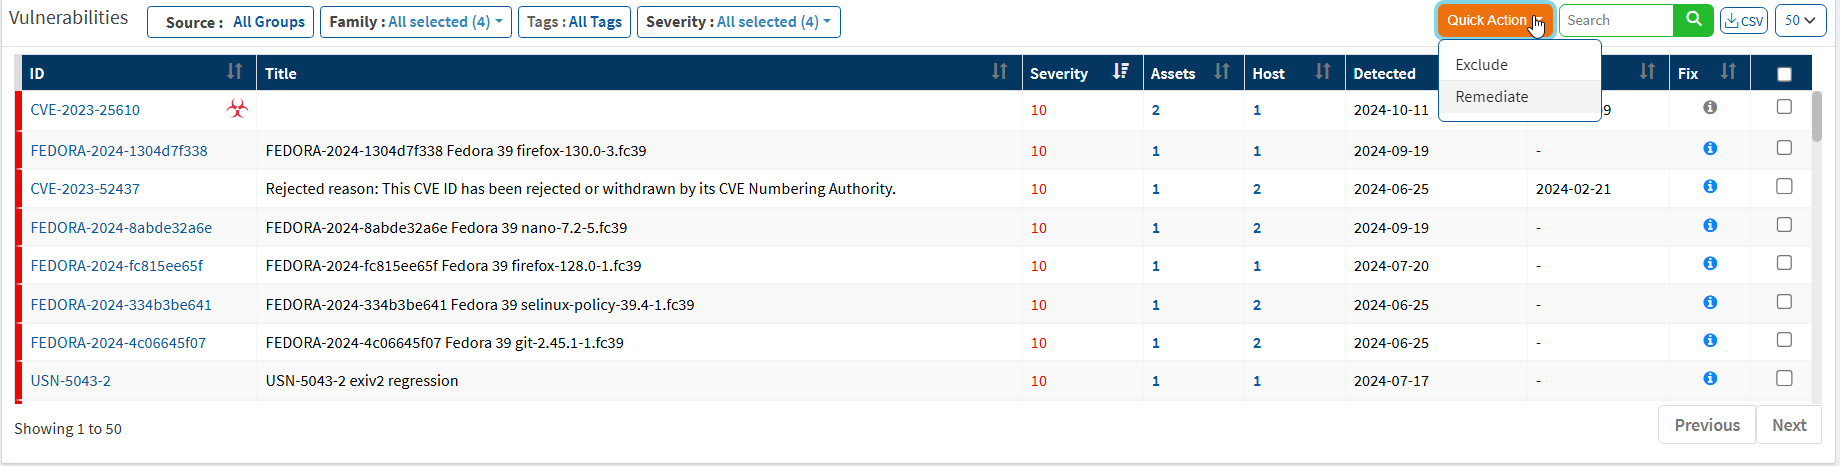
Vulnerabilities
This page lists the vulnerabilities with detailed information. You can see the CVE ID of the vulnerabilities, vulnerable title, detected time, and how many hosts it affected. Filters are provided to filter the vulnerabilities based on group, family, and severity. You can download the excel sheet with vulnerabilities information by clicking on the CSV icon.
You will get fixed information by moving a cursor on the (i) icon. To get more details about the vulnerabilities, click on the CVE id, which redirects to the SCAP repository page. This page will display complete information about the vulnerability and CVSS score. The severity level is calculated based on the CVSS score. In addition, the Quick action allows to exclude and remediate the selected vulnerabilities. You can search for multiple CVE by specifying the CVE ids in the search box.
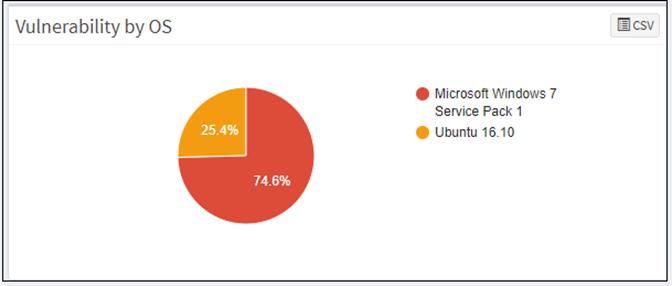
Vulnerability by OS
This page shows the list of vulnerabilities categorized by the operating system with the help of a pie chart. You can download the excel sheet with the list of vulnerabilities based on the operating system by clicking on the CSV icon.
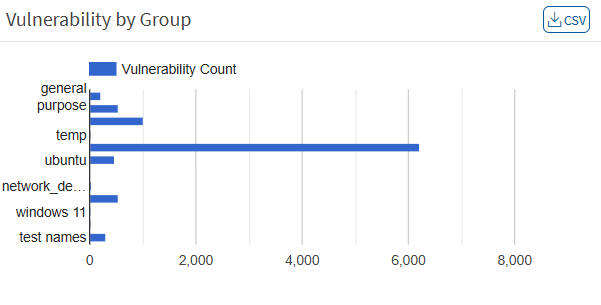
Vulnerability by Group
This page shows the list of vulnerabilities, categorized by the groups with the help of a graph. You can download the excel sheet with a list of vulnerabilities based on the group by clicking on the CSV icon.
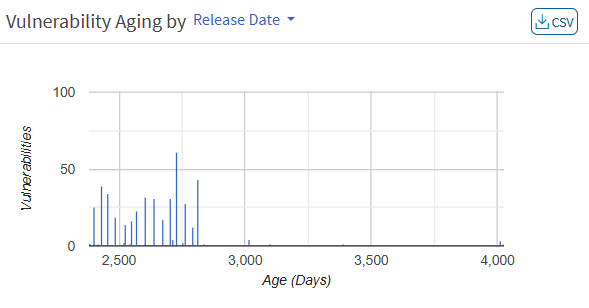
Vulnerability Aging
This pane shows vulnerabilities grouped by aging. The number of days since they were detected has not been fixed. The pane shows the age of each vulnerability in an account after its detection. You can download the excel sheet with a list of vulnerabilities based on age by clicking on the CSV icon.
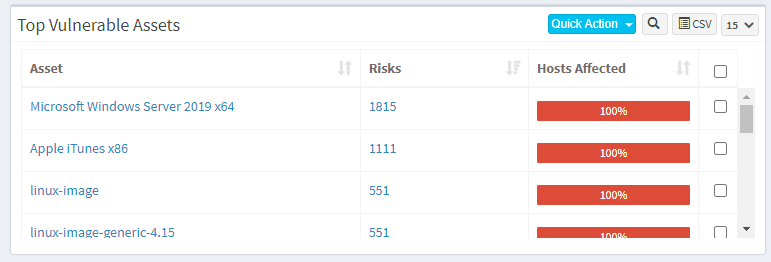
Top Vulnerable Assets
This pane shows the top vulnerable assets by their CVE ID and the number of devices at risk. You can download the excel sheet with the asset information by clicking on the CSV icon. The search option is provided to search the asset with the asset name. In addition, Quick Action section allows to exclude and remediate the vulnerabilities of the corresponding assets.

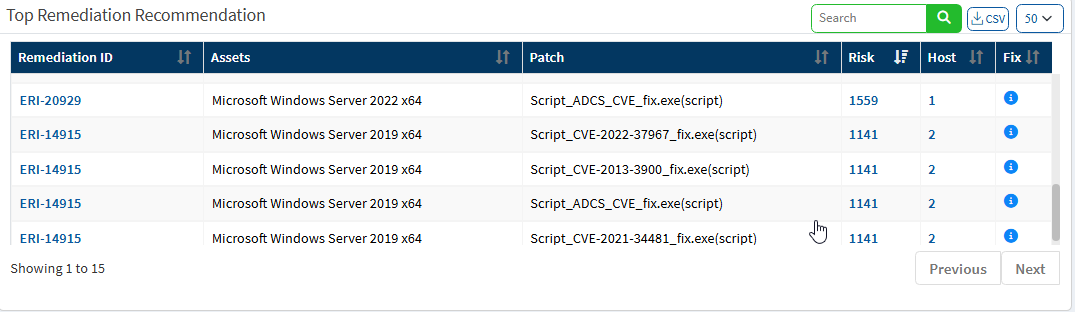
Top Remediation Recommendation
This page lists the top remediation recommended based on the CRE. It will list remediations that can address a maximum number of deviations. You can download the CSV file by clicking on the CSV icon.
All Vulnerabilities Dashboard
Saner VM introduces a new dashboard where you can view all the vulnerabilities with CVE IDs, severity, the number of assets affected, detected dates, and fix information. You are also provided with a search bar where you can search for exploit-specific keywords. You can act on these vulnerabilities by excluding them or by remediating them through the Quick Action section.
Exclude Vulnerabilities
Saner VM tool will detect and identify all the vulnerabilities that exist in an account. You can see all the detected vulnerabilities displayed on the All Vulnerabilities page. However, there might be scenarios in which you want VM tool to exclude vulnerabilities from certain devices or groups.
VM tool allows you to exclude vulnerabilities. And you can do this namely at – Account, Group(s), and Device(s) level.
Follow the below mentioned steps on how to exclude vulnerabilities at Account, Group(s), and Device(s) levels.
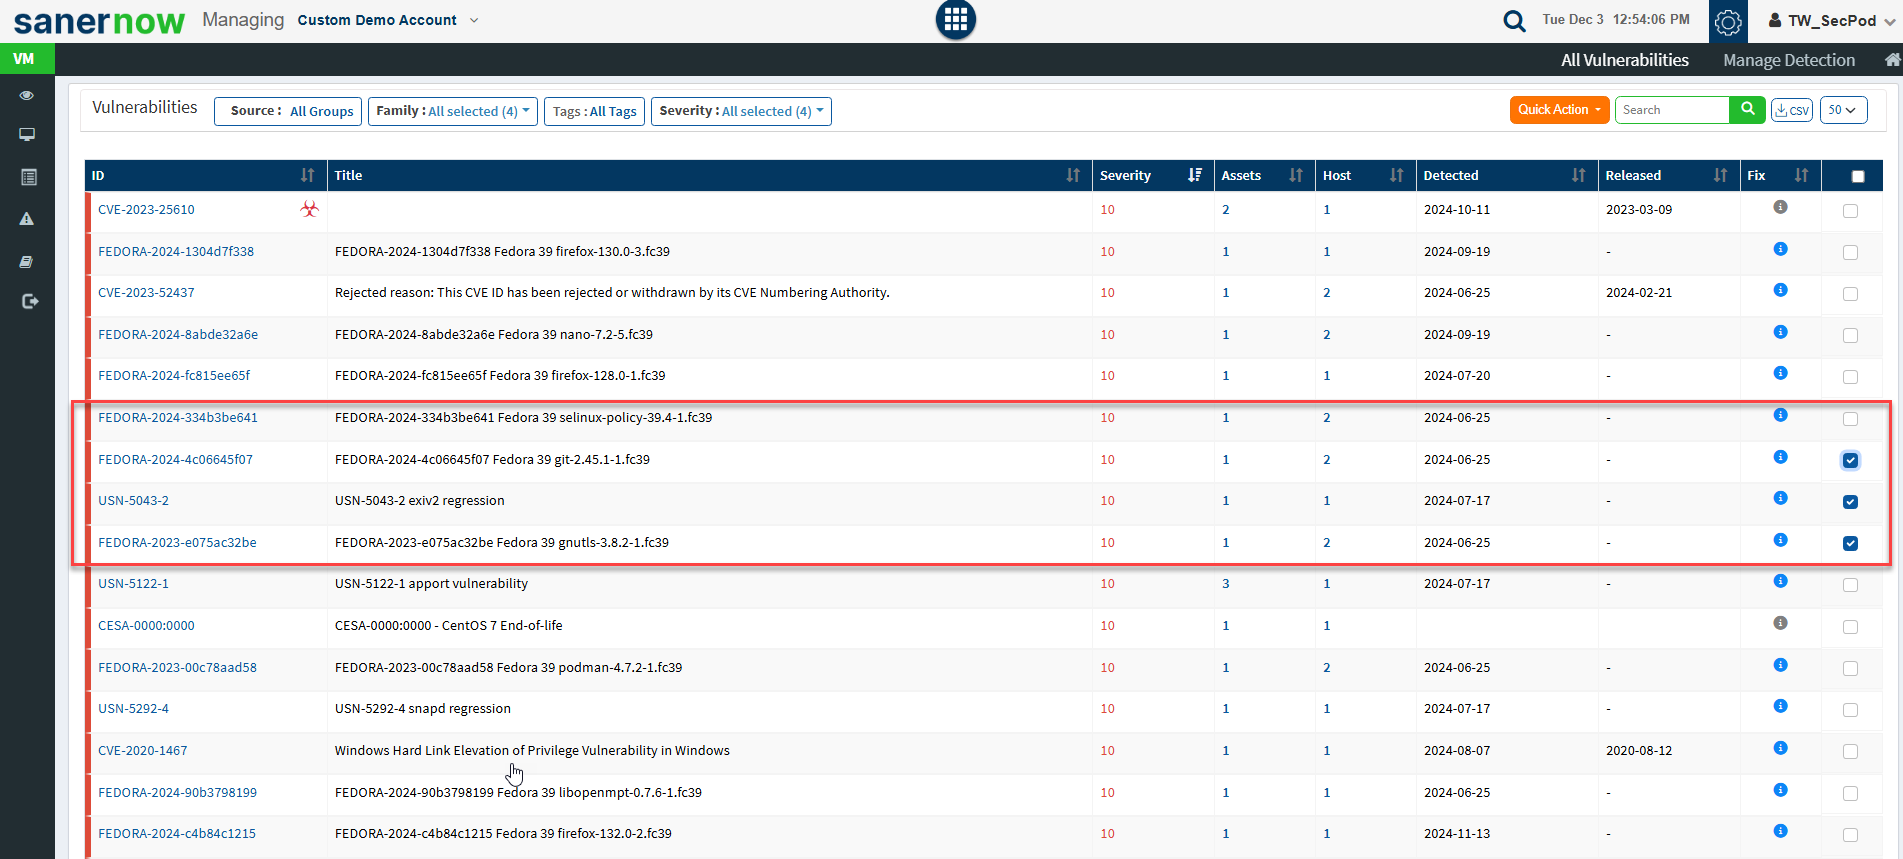
Step 1: On the VM Dashboard, click on All Vulnerabilities which is located at the top right hand side of the page.
Step 2: You will be directed to the All Vulnerabilities page. Here, you can view all the vulnerabilities found by VM tool.

Step 3: Click on the checkboxes displayed towards the right side of the vulnerabilities that you want to exclude. And then click on the Quick Action button.
Step 4: You will see two options when you click on the Quick Action button – 1. Exclude and 2. Remediate.
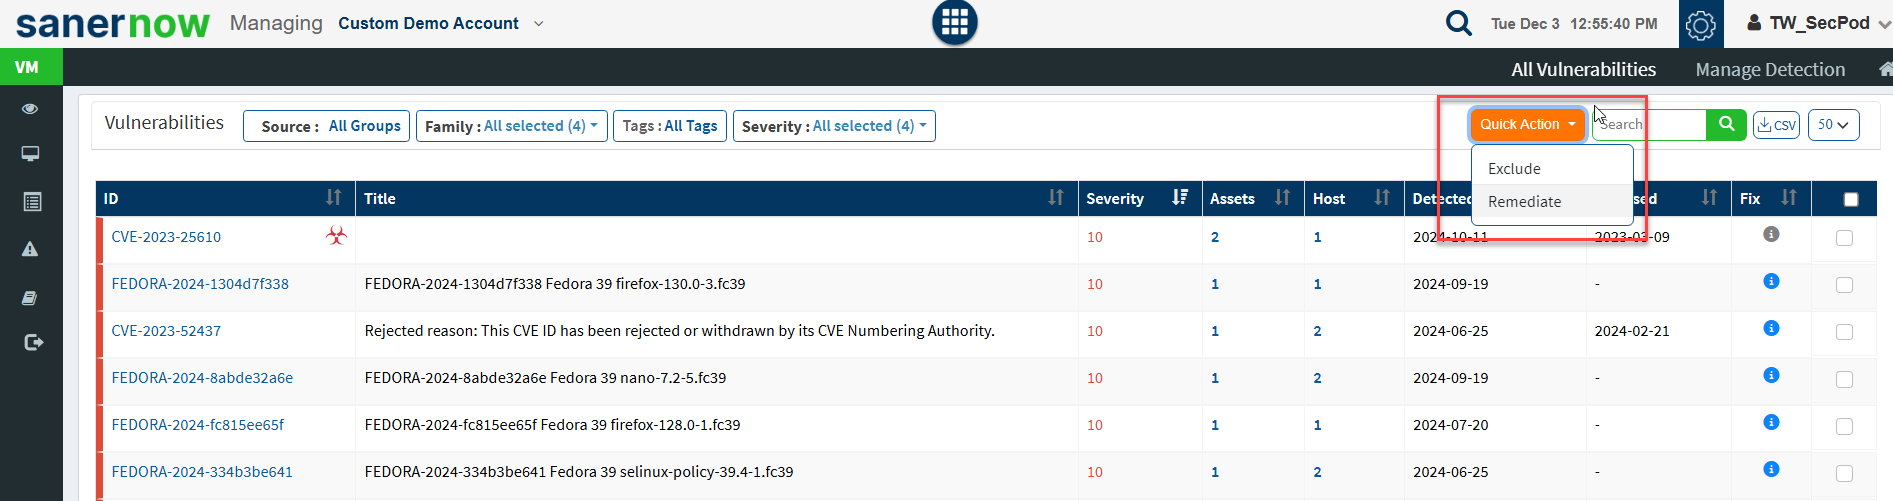
Step 5: Click on Exclude option. You will now be presented with a new pop-up screen.
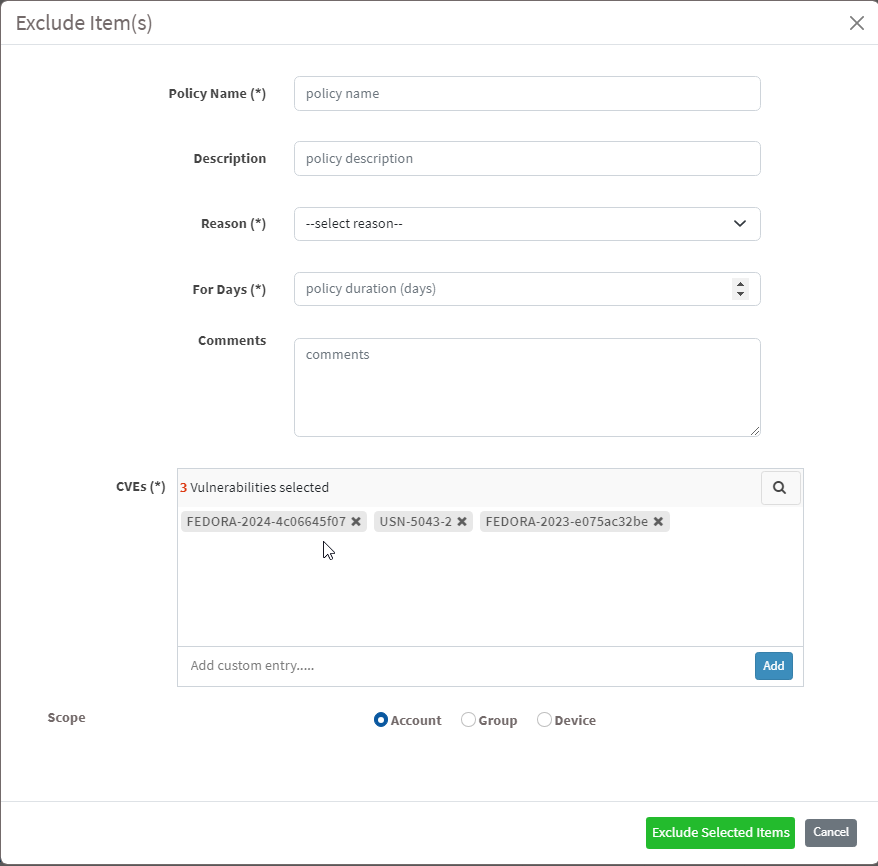
Step 6: You need to fill in information in all the textboxes marked with an asterisk (*). Fill in the required info in the below text boxes.
- Policy Name – Provide a name for the policy you are creating.
- Reason – You need to select the reason you want to exclude the vulnerabilities. Select one of the reasons presented by the drop-down box. The following reasons are available for you to choose.
- False Positive
- Not Applicable
- Risk Accepted
- For Days – Enter the number of days you want VM tool to exclude the vulnerabilities.
- (You can exclude the vulnerability for minimum 1 day and a maximum for 999 days.)
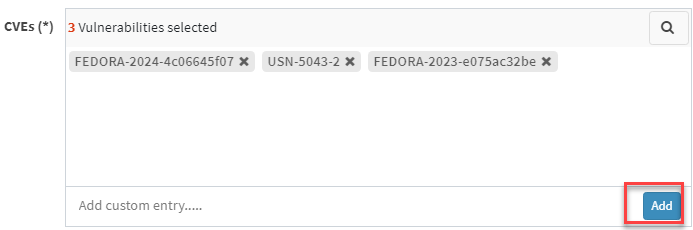
- CVEs – Here, you will see all the vulnerabilities you selected to be excluded. At the same time, you can manually add vulnerabilities to be excluded using the Add button.
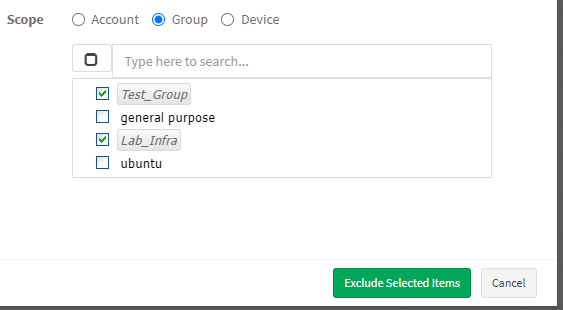
- Scope – You need to select the scope. You can choose between Account, Group, and Device.

- Account – When you select Account, the selected vulnerabilities will be excluded from all the devices that are part of the account till the date specified by you.
- Group – When you select Group, the selected vulnerabilities will be excluded for all the devices that belong to the selected Group(s) till the date specified by you. (You can select multiple groups)
- Device – You can select one or more devices belonging to various groups to exclude the selected vulnerabilities till the time specified by you. You can select multiple devices belonging to various groups to exclude selected vulnerabilities from them.
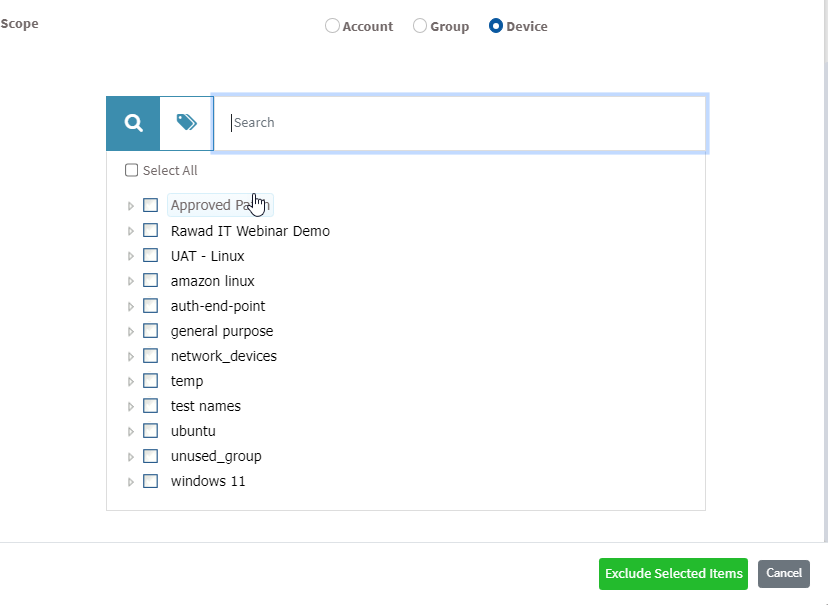
Step 7: Once you have selected the Scope, click on Exclude Selected Items button. VM tool will exclude the selected vulnerabilities from applicable devices.
Manage Zero-Day Vulnerabilities in Saner Vulnerability Management(VM)
Saner Vulnerability Management(VM) offers improved visibility and response capabilities for zero-day vulnerabilities across its dashboards, vulnerability listings, reports, and alerts. Users can easily identify zero-day CVEs directly from the High Fidelity Attacks dashboard view and the Vulnerability Details view by using a dedicated “Zero Day Only” filter. This provides quick access to affected assets.
In addition to the views, key reports also clearly indicate if a CVE is classified as a zero-day vulnerability. Configurable alerts ensure that users receive timely email notifications whenever a zero-day vulnerability is detected on newly scanned devices, allowing a faster response.
Detect Zero-Day Vulnerabilities from Dashboards
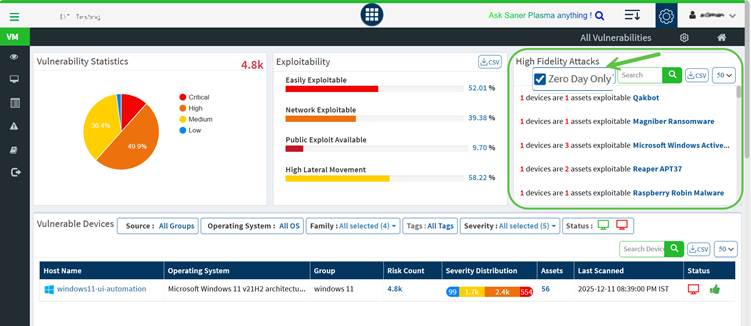
Step 1: Navigate to the High Fidelity Attacks dashboard block in Vulnerability Management(VM) tool.
Step 2: Select the Zero Day Only checkbox to filter and display only zero-day vulnerabilities.
Step 3: Click any listed vulnerability(link) to view a detailed window showing all affected assets associated with the zero-day CVE.
View Zero-Day Vulnerabilities from Vulnerability Management
Step 1: Go to the Vulnerability Management dashboard.
Step 2: Click All Vulnerabilities from the top menu bar.
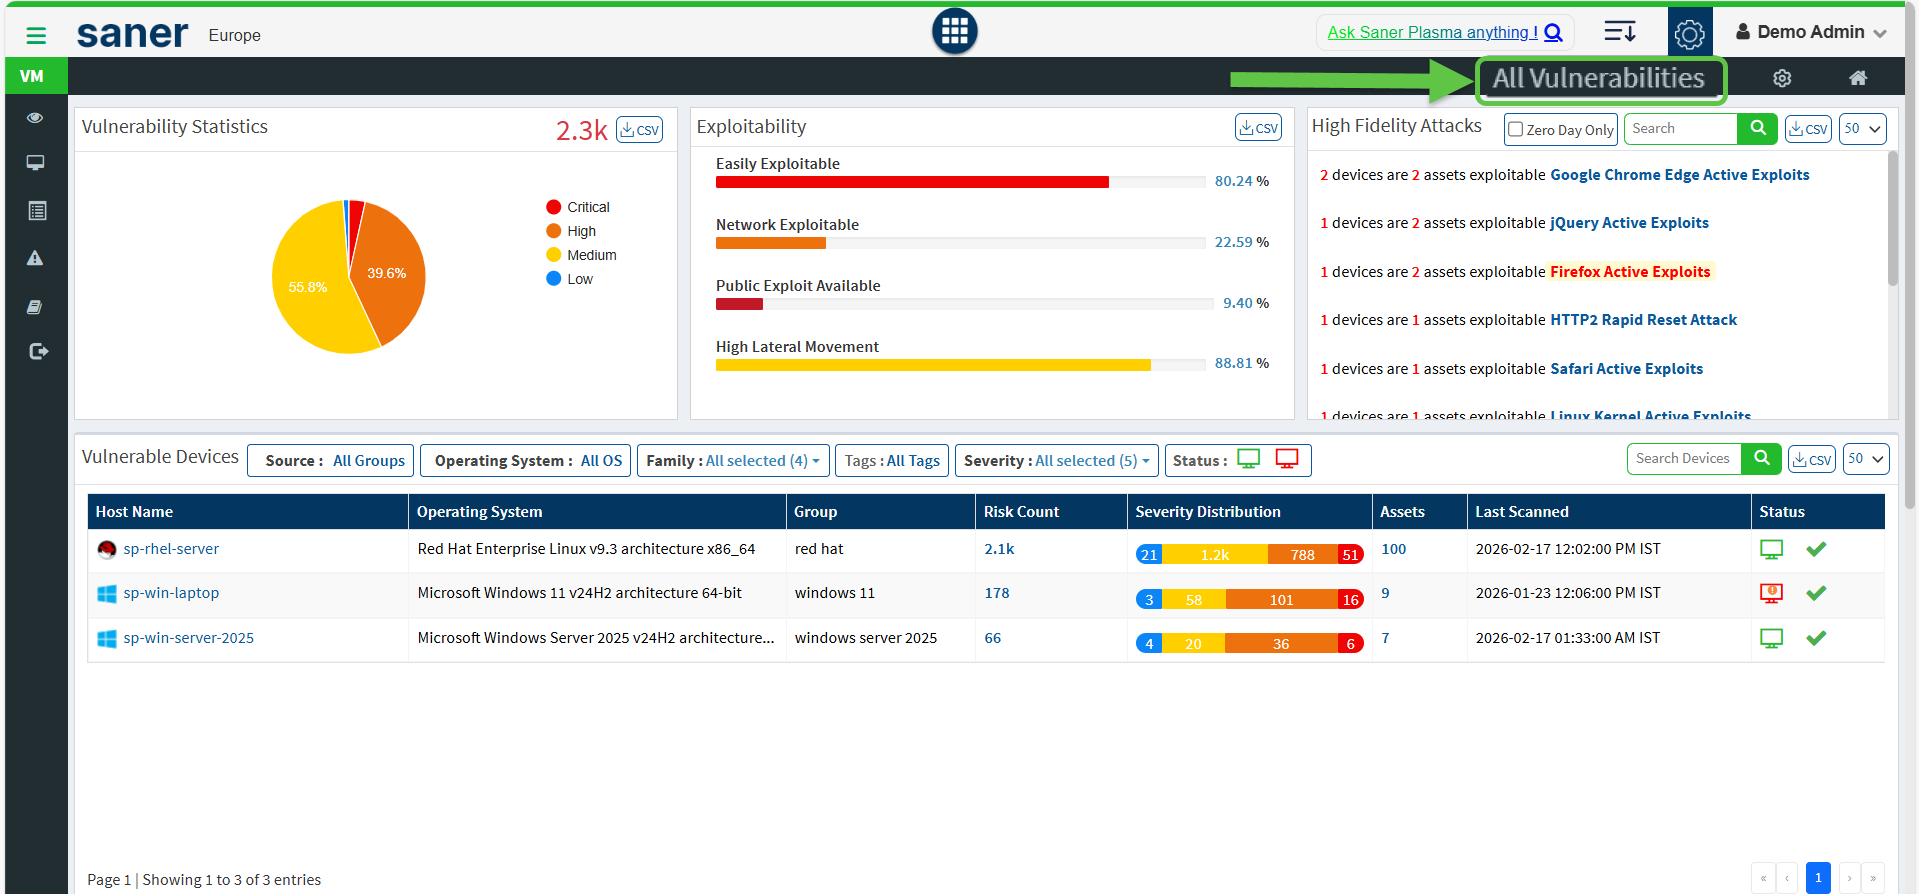
Step 3: From the Vulnerabilities list view, select the Zero Day Only checkbox to list all vulnerabilities and assets identified as zero-day.

Identify Zero-Day Vulnerabilities in Reports
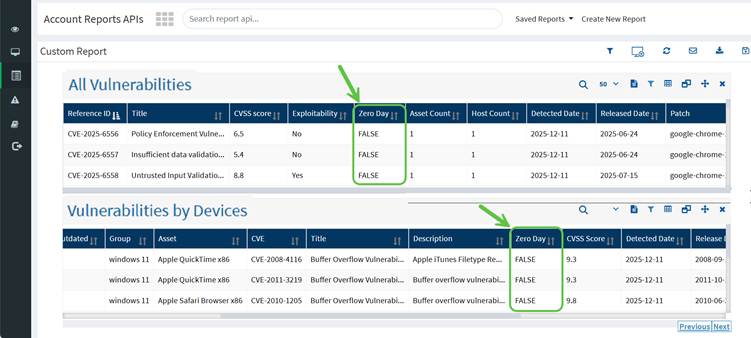
Step 1: Open the Reports module.
Step 2: Run reports such as All Vulnerabilities or Vulnerabilities by Devices.
Step 3: Review the Zero Day column:
- TRUE indicates the CVE is marked as a zero-day vulnerability
- FALSE indicates the CVE is not a zero-day vulnerability
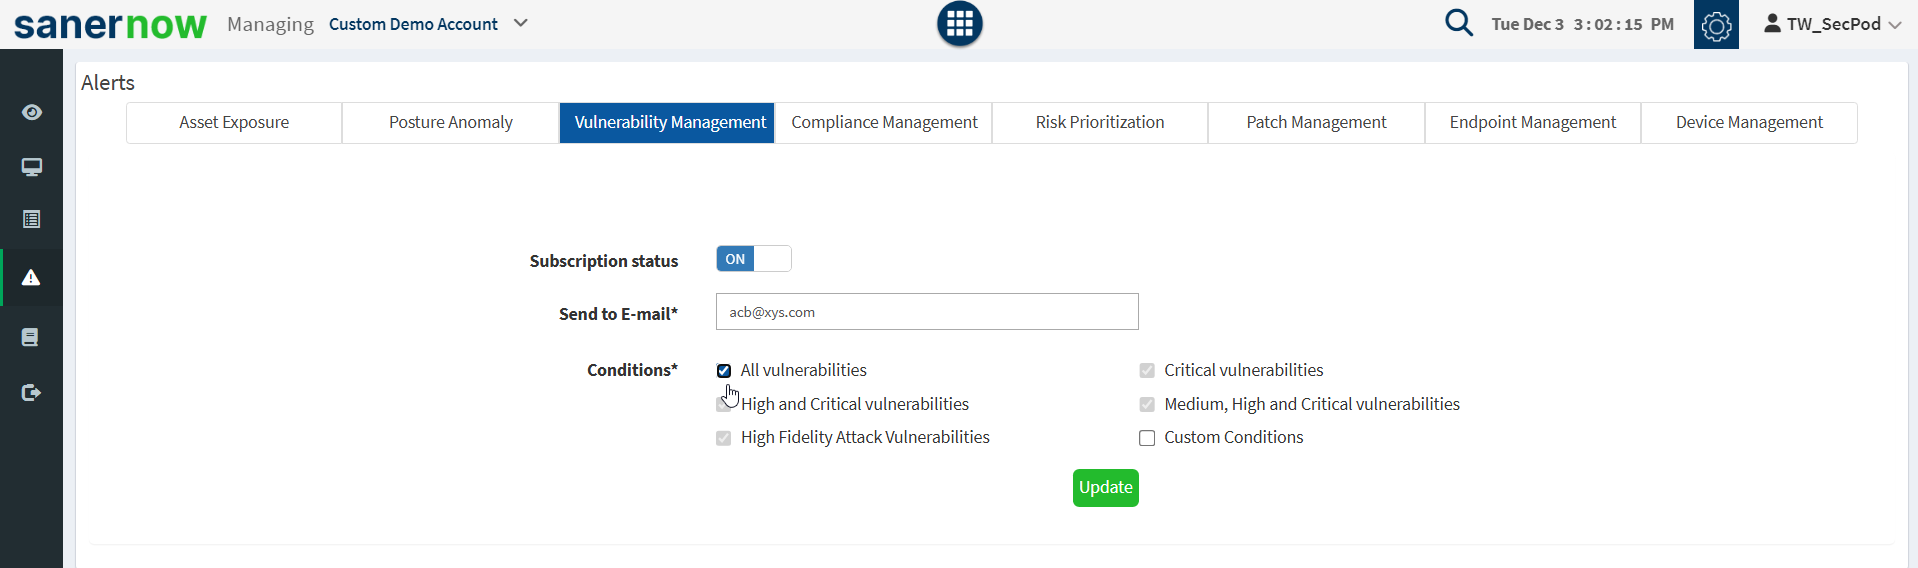
Enable Alerts for Zero-Day Vulnerabilities
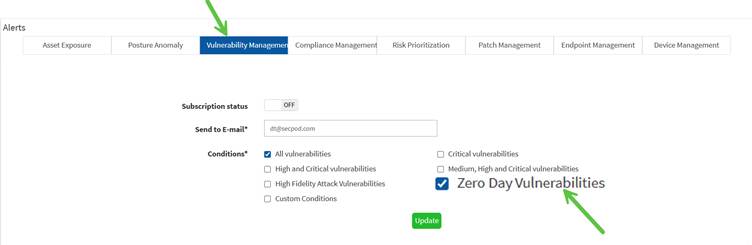
Configure alerts for zero-day vulnerabilities from the alert settings. Just click the Zero Day Vulnerabilities checkbox under the Conditions section to trigger alerts. As a result, users receive timely email notifications whenever a zero-day vulnerability is detected on newly scanned devices, allowing a faster response.
How to Exclude Assets in VM tool
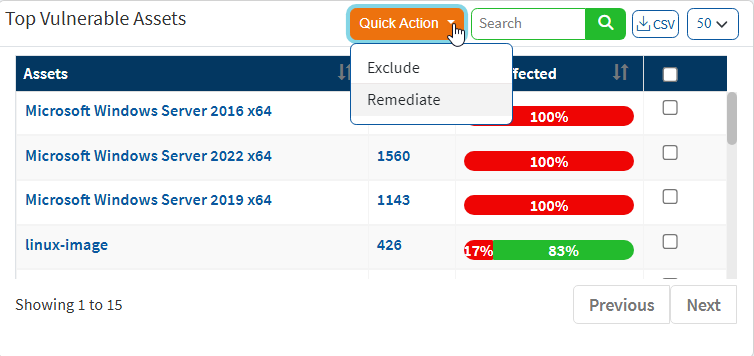
Step 1: On the VM Dashboard, you can find the Top Vulnerable Assets section located at the bottom left corner of the page. All the top vulnerable assets found in the account are listed here.
Step 2: You will find the Exclude option when you click on the Quick Action button.

Step 3: You will see two options when you click on the Quick Action button – 1. Exclude and 2. Remediate. Click on Exclude. You will be presented with a new pop-up window.
Step 4: You need to fill in information in all the textboxes marked with an asterisk (*). Fill in the required info in the below text boxes.
- Policy Name – Provide a name for the policy you are creating.
- Reason – You need to select the reason you want to exclude the vulnerabilities. Select one of the reasons presented by the drop-down box. The following reasons are available for you to choose.
- False Positive
- Not Applicable
- Risk Accepted
- For Days – Enter the number of days you want VM tool to exclude the vulnerabilities.(You can exclude the vulnerability for minimum 1 day and a maximum for 999 days.)
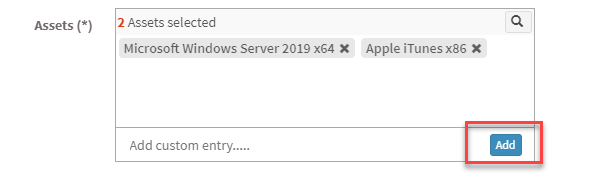
- Assets – Here, you will see all the assets you selected to be excluded. At the same time, you can manually add Assets to be excluded using the Add button.
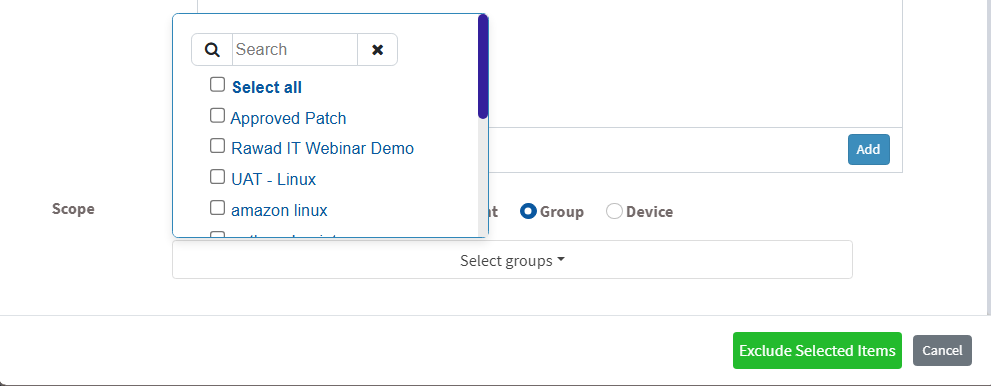
- You need to select the scope. You can choose between Account, Group, and Device.

- Account – When you select Account, the selected vulnerabilities will be excluded from all the devices that are part of the account till the date specified by you.
- Group – When you select Group, the selected vulnerabilities will be excluded for all the devices that belong to the selected Group(s) till the date specified by you. (You can select multiple groups).
- Device – You can select one or more devices belonging to various groups to exclude the selected vulnerabilities till the time specified by you. You can select multiple devices belonging to various groups to exclude selected vulnerabilities from them.

Step 7: Once you have selected the Scope, click on Exclude Selected Items button. VM tool will create the Exclude policy and exclude the selected assets and all the vulnerabilities belonging to the asset from applicable devices.
Note: In VM tool, you can exclude vulnerabilities in various ways. For instance, you can exclude a vulnerability directly from the vulnerabilities table on the VM Dashboard. However, you must follow the steps mentioned above, irrespective of what page or section you use to exclude a vulnerability.
How to Enable/Disable, Edit and Delete an existing Exclude Policy in VM tool
Step 1: On the VM Dashboard, click on Manage Detection located at the top right corner of the page.
Step 2: You will be presented with a new screen. You can see all the Exclude Policy that exist in the account.

The last column on this page – Action presents you with three buttons namely – a toggle button -Enable /Disable, Edit, and Delete buttons that can be used to control Exclude policies.
| Button | Usage |
 Enabled Enabled | Using this button, you can enable the Exclude policy |
 Disabled Disabled | Using this button, you can disable the Exclude policy. |
 Edit Edit | Using this button, you can edit the Exclude policy. |
| Using this button, you can delete the Exclude policy. |
Remediating Vulnerabilities from Vulnerability Management Dashboard
You can remediate vulnerabilities in three possible ways:
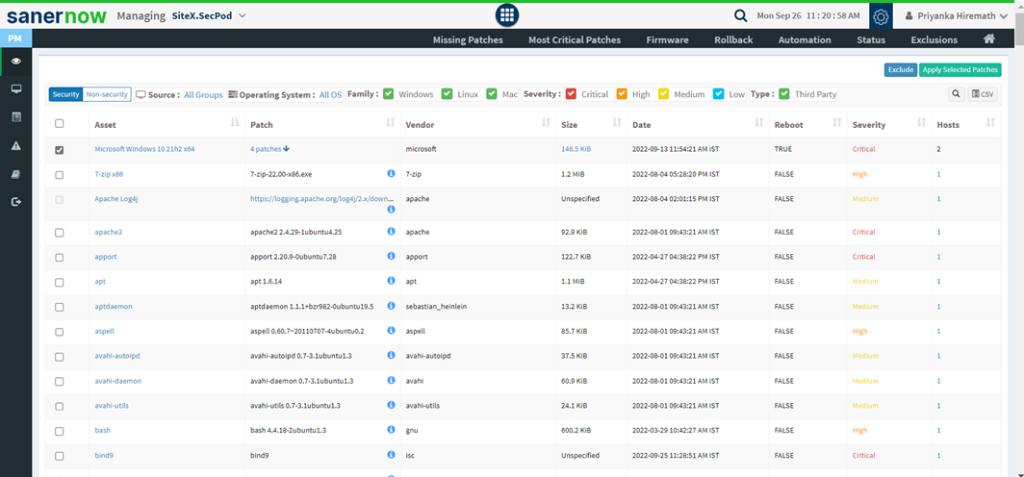
- Remediate from All Vulnerability dashboard
- In All Vulnerabilities, select the vulnerabilities from the check box to remediate.
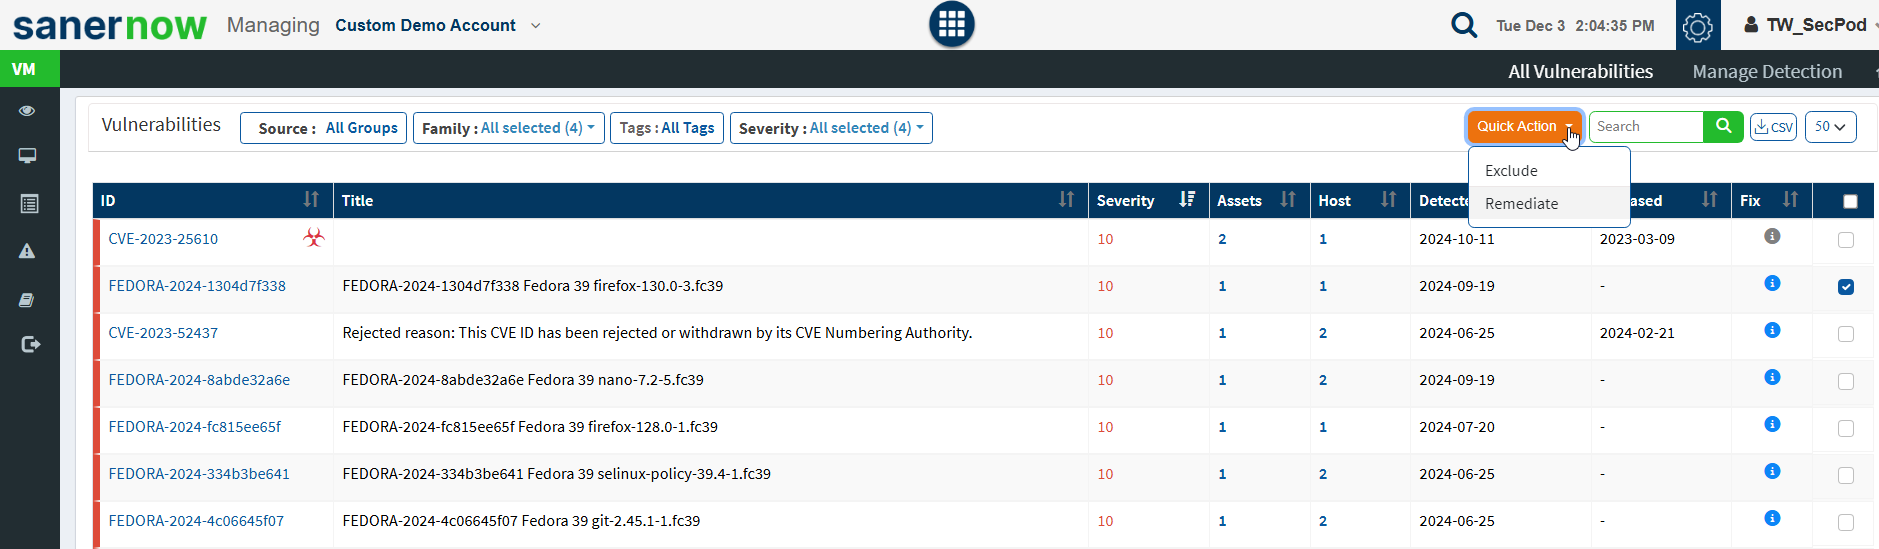
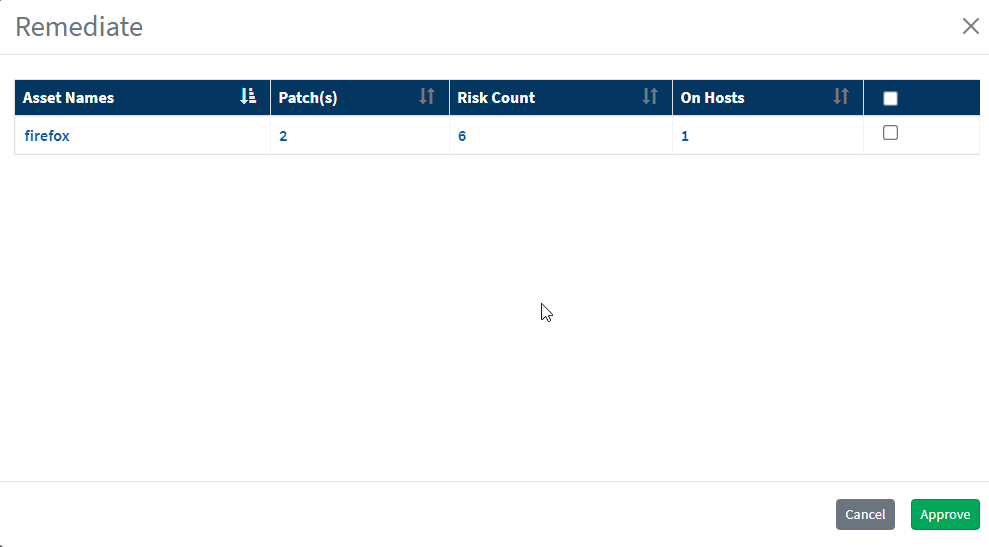
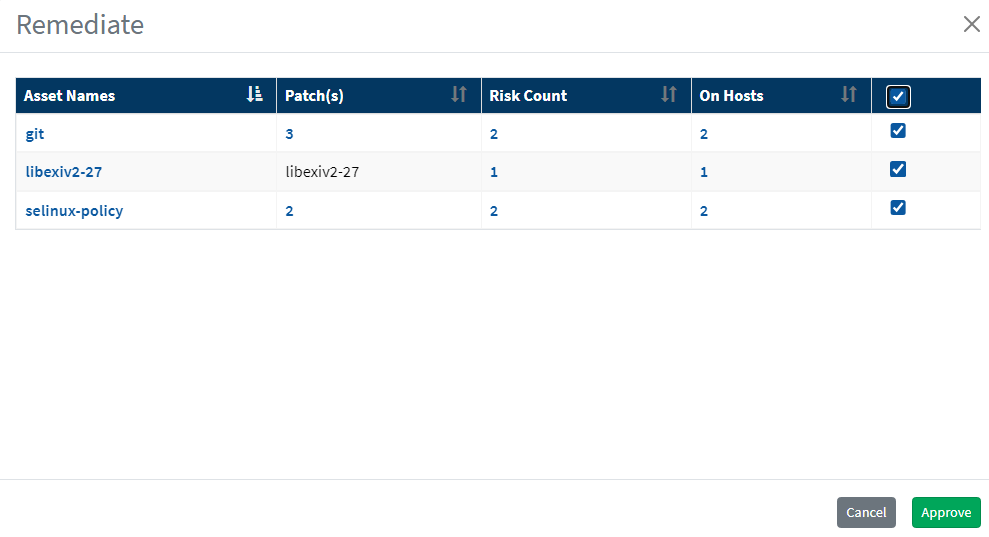
- Click on Quick Action and select Remediate.
- Approve the patches for remediation.
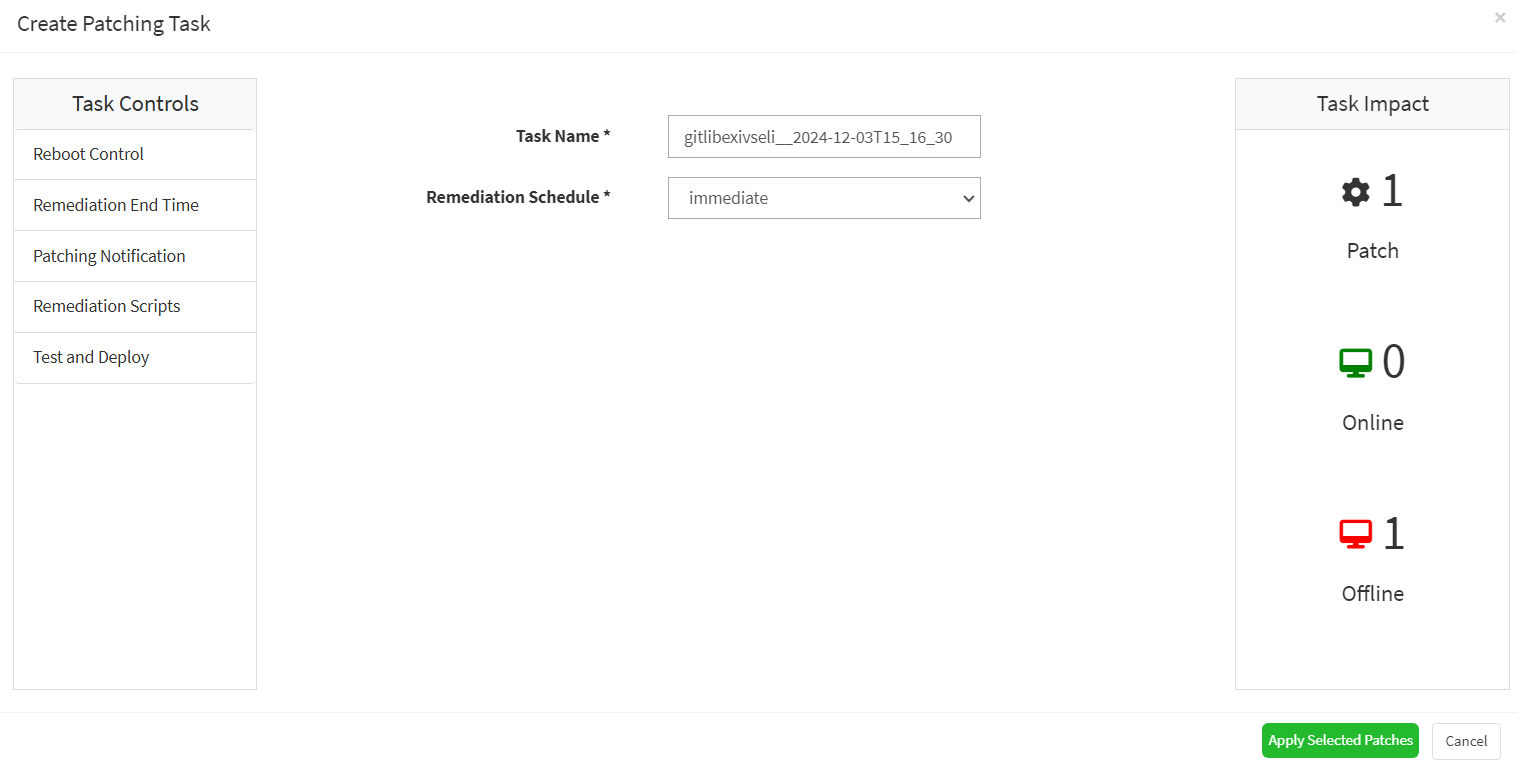
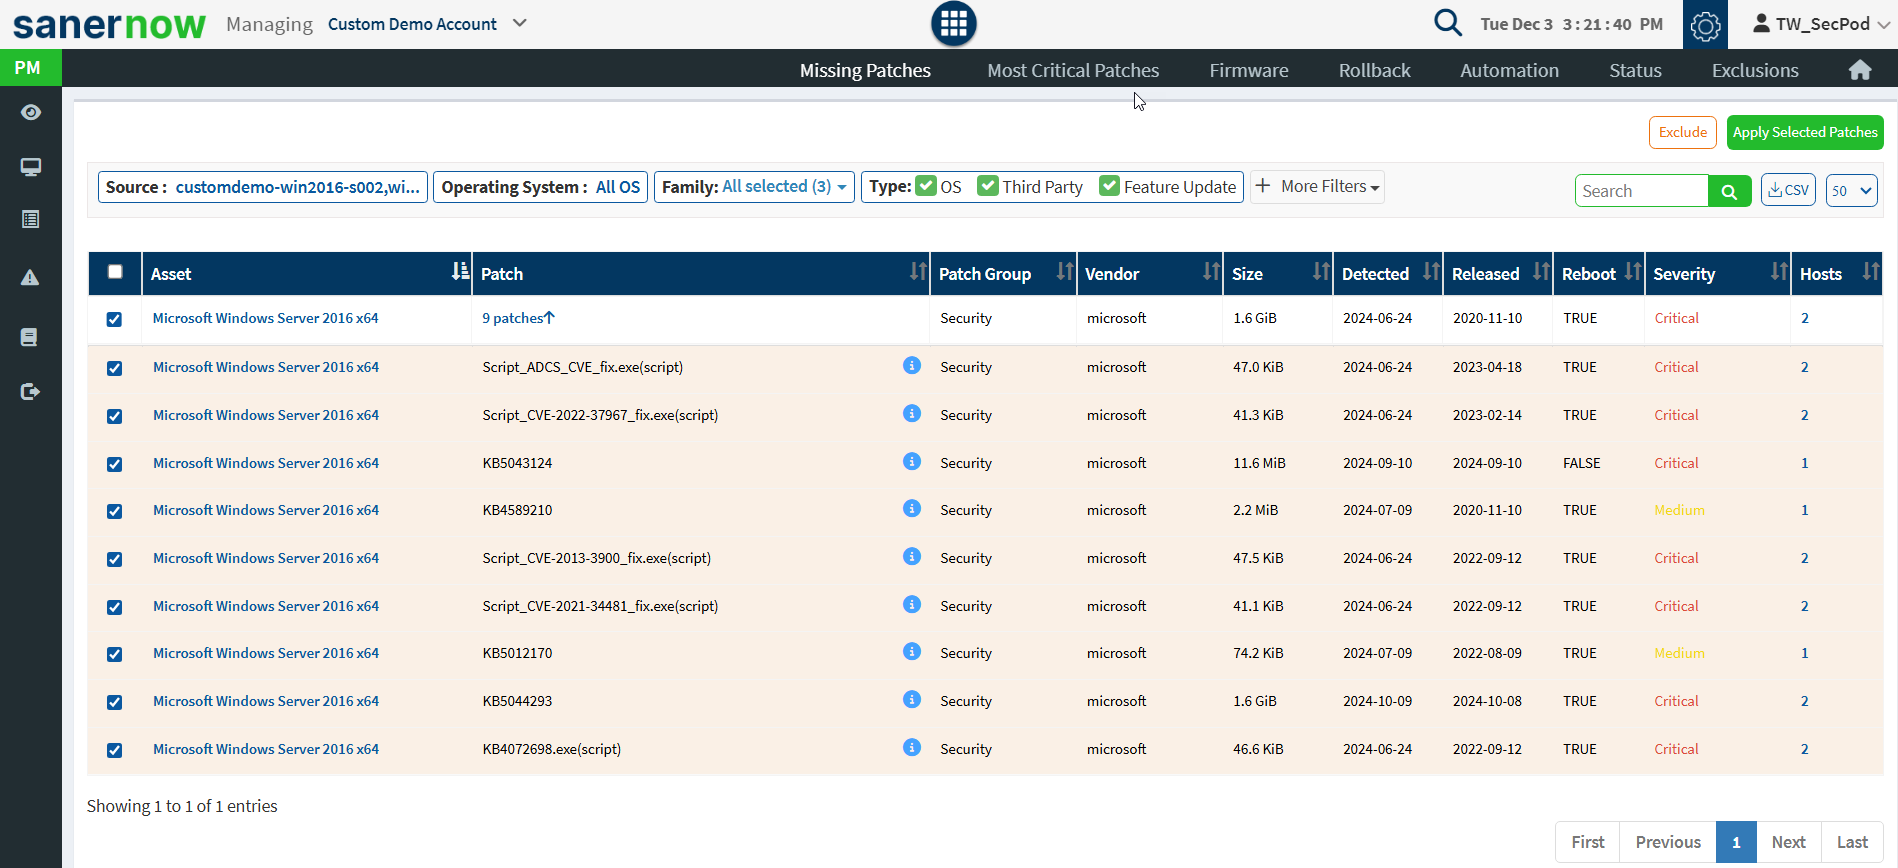
- You will be redirected to the Patch Management module.
- Click on Apply Selected Patches and Create a patching task for remediation.
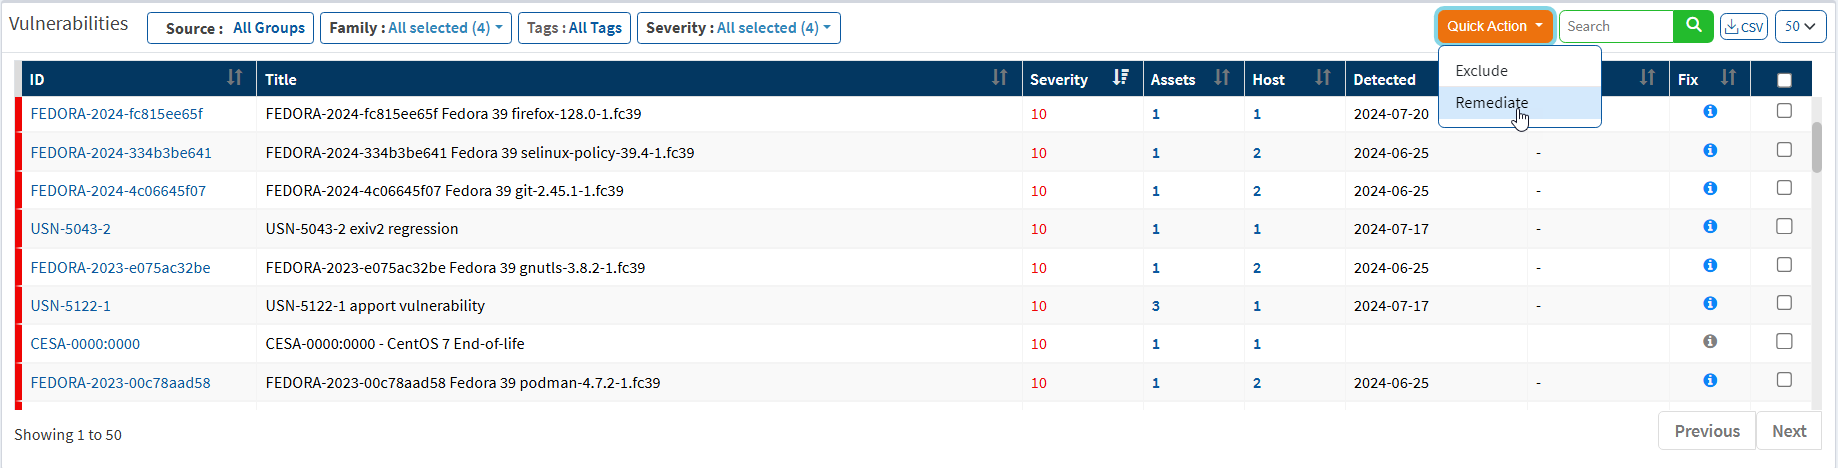
- Remediate from the Vulnerabilities panel in the vulnerability management dashboard
- Select the vulnerabilities you want to remediate. Go to quick action and select Remediate and click on approve. You will be redirected to the patch management dashboard.
- Click on Apply Selected Patches and create a patching task.
- Remediate from Top Vulnerable Assets
- Select the assets and click on quick action. The vulnerabilities associated with assets can be remediated.
- Repeat the same procedure as explained above to remediate the vulnerabilities the corresponding assets.
Remediation SLA
Security teams deal with a plentitude of vulnerabilities; however, they often assign the same Service Level Agreement(SLA) to all the vulnerabilities regardless of severity. However, the one-size-fits-all approach is not ideal when it comes to vulnerabilities. Vulnerabilities fall into different categories; some are critical, while others may be less severe. It is pivotal to patch the critical vulnerabilities on the highest priority to stop any impending threats it may cause to the organization if left unpatched
Each patch should be assigned a unique SLA depending on its severity. Saner VM allows you to specify Service Level Agreements (SLA) for different patches detected in your environment. The Remediation SLA in Saner VM allows you to specify different SLAs for different patches. You can specify SLAs for the following patch categories.
- Most critical patches
- Critical severity patches
- High severity patches
- Low severity patches
- Feature patches
- Third-party patches
- Microsoft vendor security patches
- Unix vendor security patches
- MAC vendor security patches
- All patches
You can use Groups or Tags to define the scope of devices to which the SLA Configuration should be applied. The SLA Configuration gets applied to the devices that are part of the selected Group or Tag.
Create a New SLA Configuration
| User access level: Only Organization Admin, Account Admin, and Normal Users with full access can create, edit, and delete SLA Configurations. Normal Users with read-only access can only view SLA Configurations. |
You can create a new SLA Configuration that meets your organization’s requirements. Follow the steps below to create a new SLA configuration.
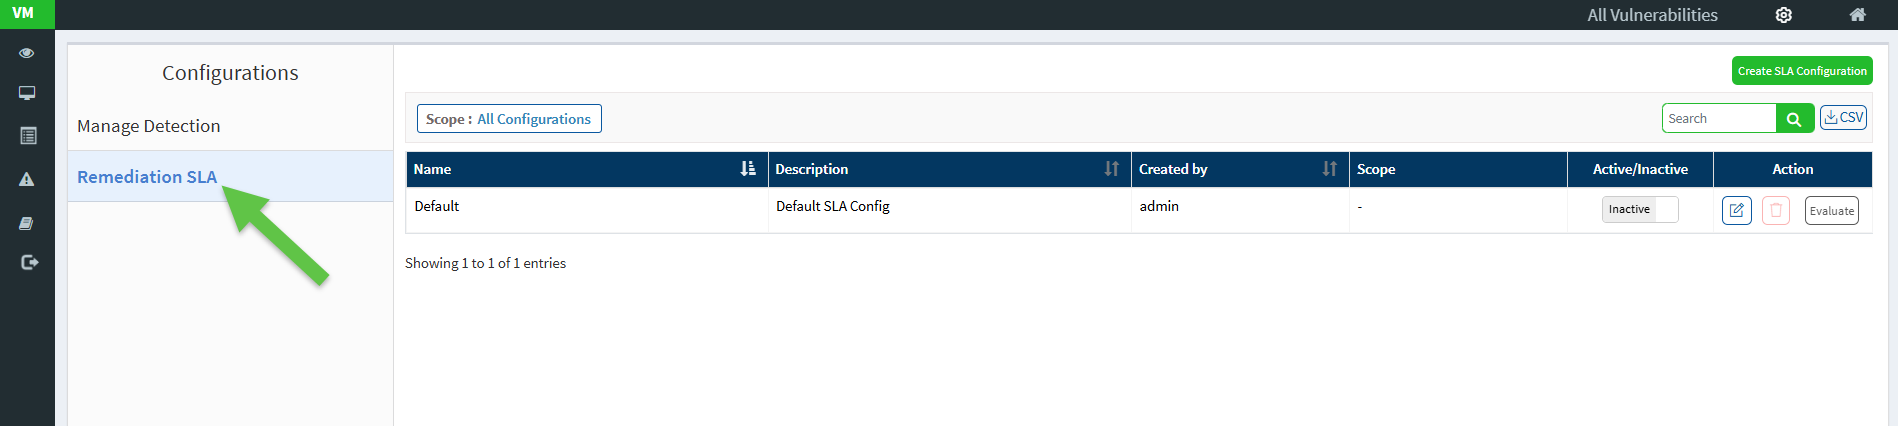
- From the VM Dashboard page, click the gear icon on the top right of the page. This opens the Configurations page.
- Click the Remediation SLA menu on the left-hand sidebar. The All Configurations page appears.
- From the All Configurations page, select the Remediation SLA menu from the left-hand-side bar.
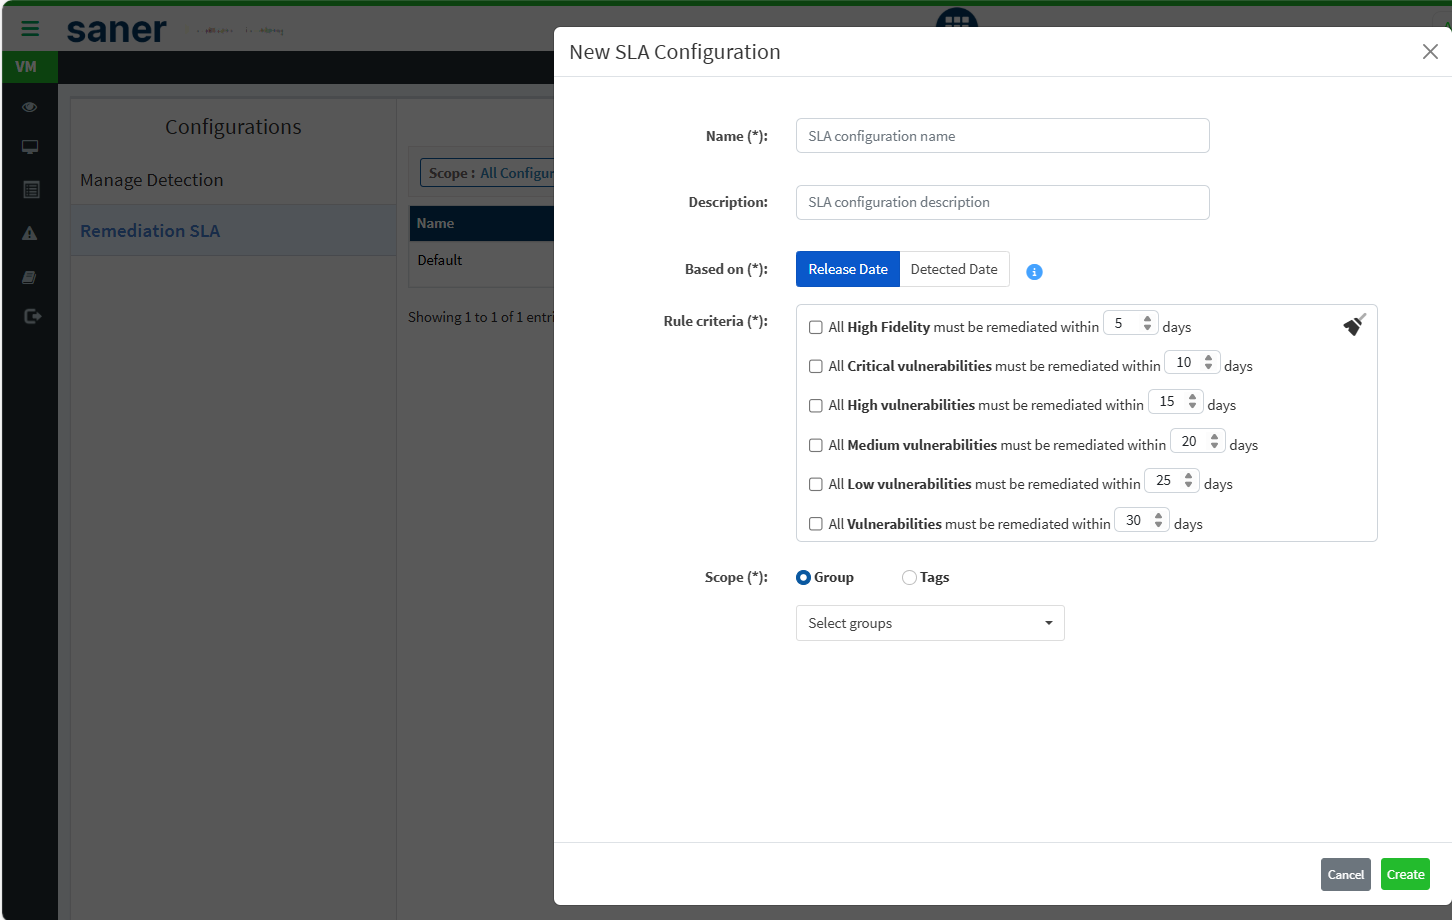
4. Click the Create SLA Configuration button to open the New SLA Configuration window.
[Mandatory] In the Name box, enter a unique name for the SLA configuration. The name should be more than four characters and not exceed 35 characters.
5. In the Description box, describe the SLA configuration. The description should be more than four characters and not exceed 35 characters.
6. [Mandatory] In the Based on section, choose between Release Date and Detected Date. If you choose Release Date – Saner VM considers the date the software vendor released the patch during SLA compliance computation. If you choose Detected Date – Saner VM considers the date on which the Saner VM detected the missing patch during SLA compliance computation.
7. [Mandatory] In the Rule criteria box, check the box next to the rule to select the rule you want to be part of the newly created SLA configuration. You can modify these values to align with your organization’s SLA.
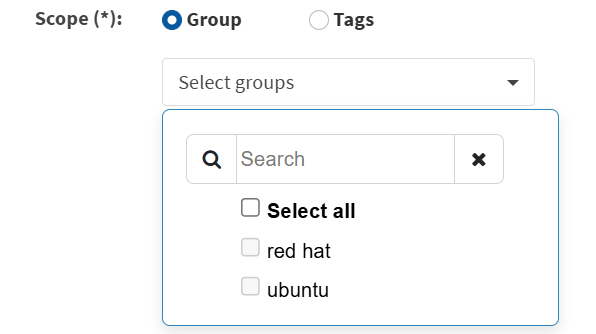
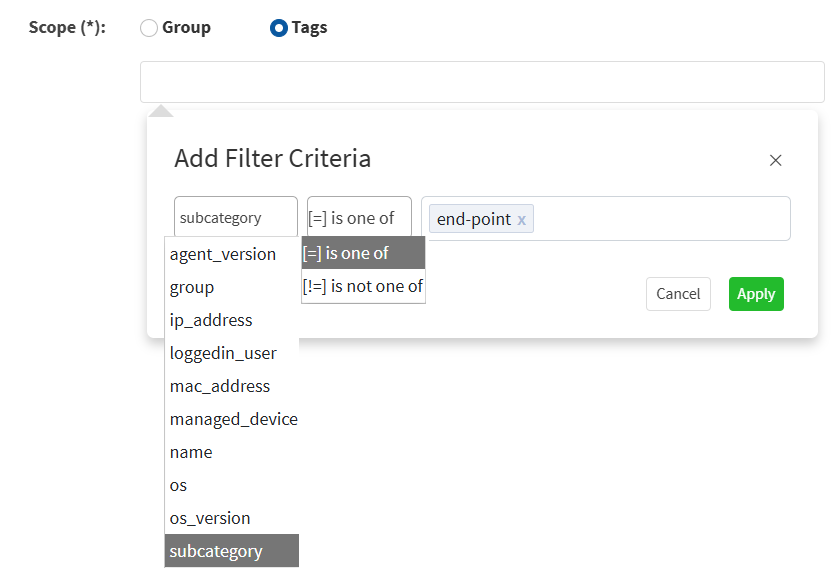
8. [Mandatory] In the Scope section, choose between Group or Tags. If you select the Group option, you can select the groups from the Groups drop-down box. Similarly, if you choose the Tags option, you must specify the tag criteria using the Add Criteria button. Once you have specified the tag criteria, click Apply.
9. Click Create to create the new SLA Configuration. Saner VM creates the SLA Configuration based on the name, description, and rule criteria you selected.
| Note You can also use the Default SLA Configuration. However, by default, it is inactive. You must assign a Group or a Tag to the Default SLA Configuration to activate and use it. |
View existing SLA Configurations
The Remediation SLA page displays all the SLA Configurations in the account. Every SLA Configuration present in the account is listed with the below details.

You can find the below details about SLA Configurations on the Remediation SLA page.
Name
The name of the SLA configuration.
Description
A brief description about the SLA configuration.
Scope
The scope assigned to the SLA Configuration and the number of devices part of the selected scope. A SLA Configuration can be assigned to a Group ![]() or a Tag
or a Tag ![]() .
.
Active/Inactive
The SLA Configuration can be active or inactive.
Action
You can ![]() Edit,
Edit, ![]() Delete, or Evaluate an SLA Configuration.
Delete, or Evaluate an SLA Configuration.
Search and Filter SLA Configurations
You can search for existing SLA Configurations. Enter the name of the SLA Configuration you want to search for in the search box located on the right of the page and hit Enter. Saner VM displays all the SLA configurations that match the search criteria.

By default, the Remediation SLA page shows all the SLA Configurations. However, you can filter the SLA Configurations using the Scope filter. You can use the Scope filter to filter SLA Configurations assigned to a Group or a Tag.
Follow the steps below to filter SLA Configurations assigned to a group.
1. Click the Scope filter. The Filter Configurations section appears.
2. In the Scope section, choose Group. From the groups drop-down box, choose the groups from the list. You can select one or more groups.
3. Click Apply. Saner PM displays the SLA Configurations assigned to the selected groups.
Follow the steps below to filter SLA Configurations by tags.
1. Click the Scope filter. The Filter Configurations section appears.
2. In the Scope section, choose Tags. From the Device list, click the checkboxes following the device name you want to select. You can select one or more devices.
3. From the Device list, click the checkboxes following the device name you want to select. You can select one or more devices.
4. Click Apply.
Saner VM displays the SLA Configurations assigned to selected devices.
View SLA Evaluations for a Selected Date Range
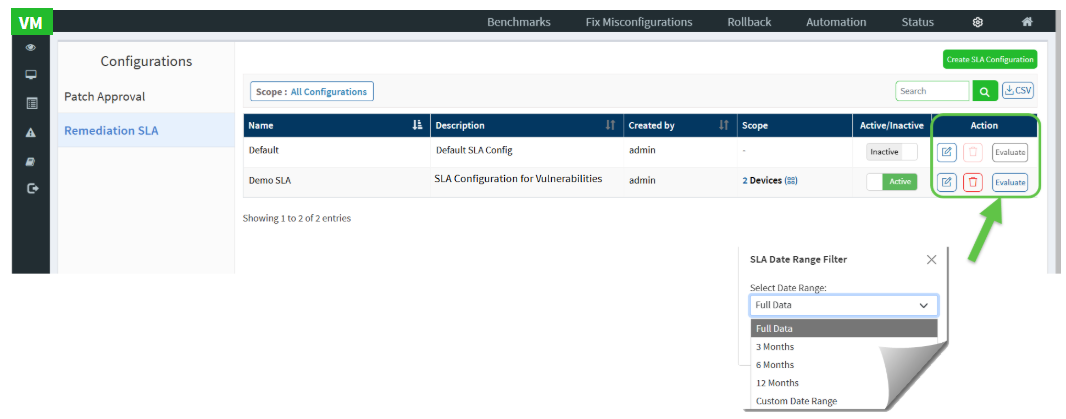
By utilizing the SLA Date Range filter, you can generate a CSV report that contains SLA data for the specified timeframe. This report provides clear insights into SLA adherence and violations. It allows you to assess SLA performance during a defined period, facilitating a more focused and meaningful analysis. Additionally, this report helps you monitor trends, identify gaps, and take timely corrective actions to enhance overall SLA compliance.
To use the filter, from the Remediation SLA page, click the Evaluate button under “Action” column. In the Select Date Range field, you can select predefined date range options (Full data, 3months, 6months, or 12 months) or choose Custom Date Range from the dropdown menu.
For Custom Date Range, specify your desired start and end dates either by using the date picker or by manually entering the values in dd-mm-yyyy format.
After selecting the dates, click Apply to filter and evaluate the SLA data for the chosen period. If you decide not to apply any changes, just click Cancel.
Download and Save the SLA Task in CSV Format

Once you have specified the SLA date range, the Tasks window appears displaying the SLA that you created. Proceed to click the download button from the Tasks window and save the file into your preferred location.
View and Analyze the Vulnerability SLA Report
The Vulnerability SLA Report provides a comprehensive view of how effectively your organization is meeting remediation Service Level Agreements (SLAs). It helps you monitor SLA governance, identify violations, track vulnerabilities approaching deadlines, and measure overall compliance across devices and device groups.
The report is structured into four key sections for streamlined analysis. The Overall Summary offers a high-level snapshot of SLA governance status, recent violations, and required remediation actions. The Vulnerability SLA Violations section highlights devices and vulnerabilities currently breaching SLA guidelines, enabling quick identification of critical risks. The Vulnerability SLA Goals section focuses on vulnerabilities still within the SLA window but requiring timely action to avoid violations. Finally, the Vulnerability SLA Compliance section showcases devices and vulnerabilities that successfully meet SLA requirements, helping you measure performance and improvement over time.
Together, these sections enable security and operations teams to proactively manage remediation timelines, prioritize actions based on severity and device group impact, and continuously improve SLA adherence across the environment.
Access Vulnerability SLA Report from Canned Reports
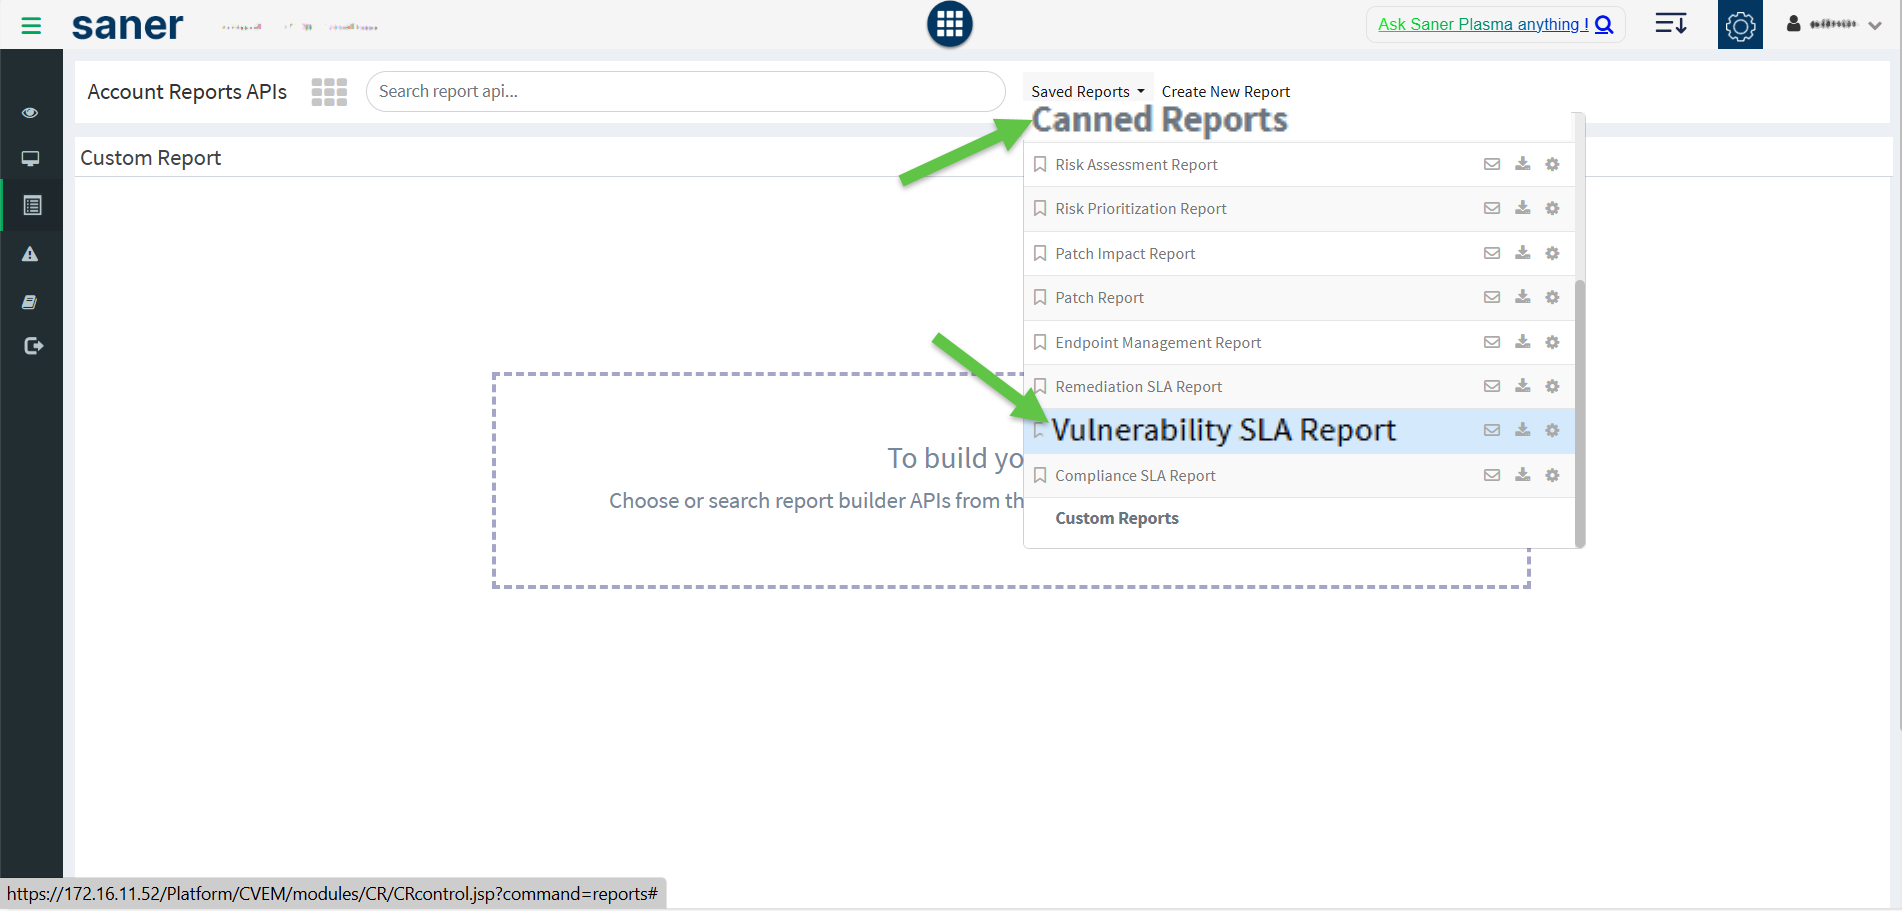
Step1: From the App Launcher, access the VM Vulnerability Management tool.
Step2: From the left-hand-side menu, select Reports.
Step2: Expand the Saved Reports drop-down.
Step3: From the Canned Reports section, click on the Vulnerability SLA Report option. The Vulnerability SLA Report page opens and displays detailed insights organized into the following sections:
I. Overall Summary
This section provides a high-level overview of SLA governance and compliance status.
- Devices under SLA Governance
Displays the total number of devices categorized as:- Under Remediation SLA Governance
- Outside Remediation SLA Governance
- Devices SLA Governance Insights
Shows the distribution of devices based on their SLA governance status. - Vulnerability SLA Violations in the Last 30 Days
Shows the total number of vulnerabilities that violated SLA guidelines in the past 30 days. - Vulnerability Guideline for SLA Adherence
Displays the number of vulnerabilities that must be applied to maintain SLA compliance.
II. Vulnerability SLA Violations
This section highlights devices and vulnerabiilties currently breaching SLA policies.
Devices and Vulnerability Violating SLA Guidelines
Displays the total count of devices with vulnerabilities that are currently violating remediation SLA guidelines.
Severity Distribution of Vulnerabilities Violating SLA Guidelines
Categorizes SLA-violating vulnerabilities by severity levels.
Violation Distribution by Device Group
Breaks down SLA violations by device group classification.
Devices with Violations
Lists the top 10 devices with the highest number of SLA-violating patches.
SLA Violating Vulnerabilities
Displays Vulnerabilities with the SLA violations across device
III. Vulnerability SLA Goals
This section focuses on vulnerabiilties and devices that are still within the SLA window but require action.
- Devices and Vulnerabilities Within SLA Goals
Displays the total number of vulnerabilities that must be installed to meet SLA compliance goals. - Severity Distribution Within SLA Goals
Categorizes vulnerabilities within the SLA window by severity levels. - Device Group Status Within SLA Goals
Breaks down devices within the SLA window by device groups. - Devices Approaching SLA Deadline
Lists the top 10 devices with vulnerabilities nearing their SLA compliance deadline. - Vulnerabilties Requiring Attention
Lists the top 10 vulnerabilties within the SLA window that require immediate remediation.
IV. Vulnerability SLA Compliance
This section highlights devices and vulnerabiilties that meet SLA requirements.
- SLA Compliance Overview
Displays the total number of devices with installed vulnerabilties that comply with SLA guidelines. - Compliance by Vulnerability Severity
Categorizes SLA-compliant vulnerabilties by severity levels. - Compliance by Device Group
Breaks down SLA-compliant devices by device groups. - SLA Compliant Devices
Lists the top 10 devices with the highest SLA compliance rate. - SLA Compliant Vulnerabilties
Lists the top 10 vulnerabilties with the highest compliance across devices.
Build SLA Reports Using Drag-and-Drop Report APIs
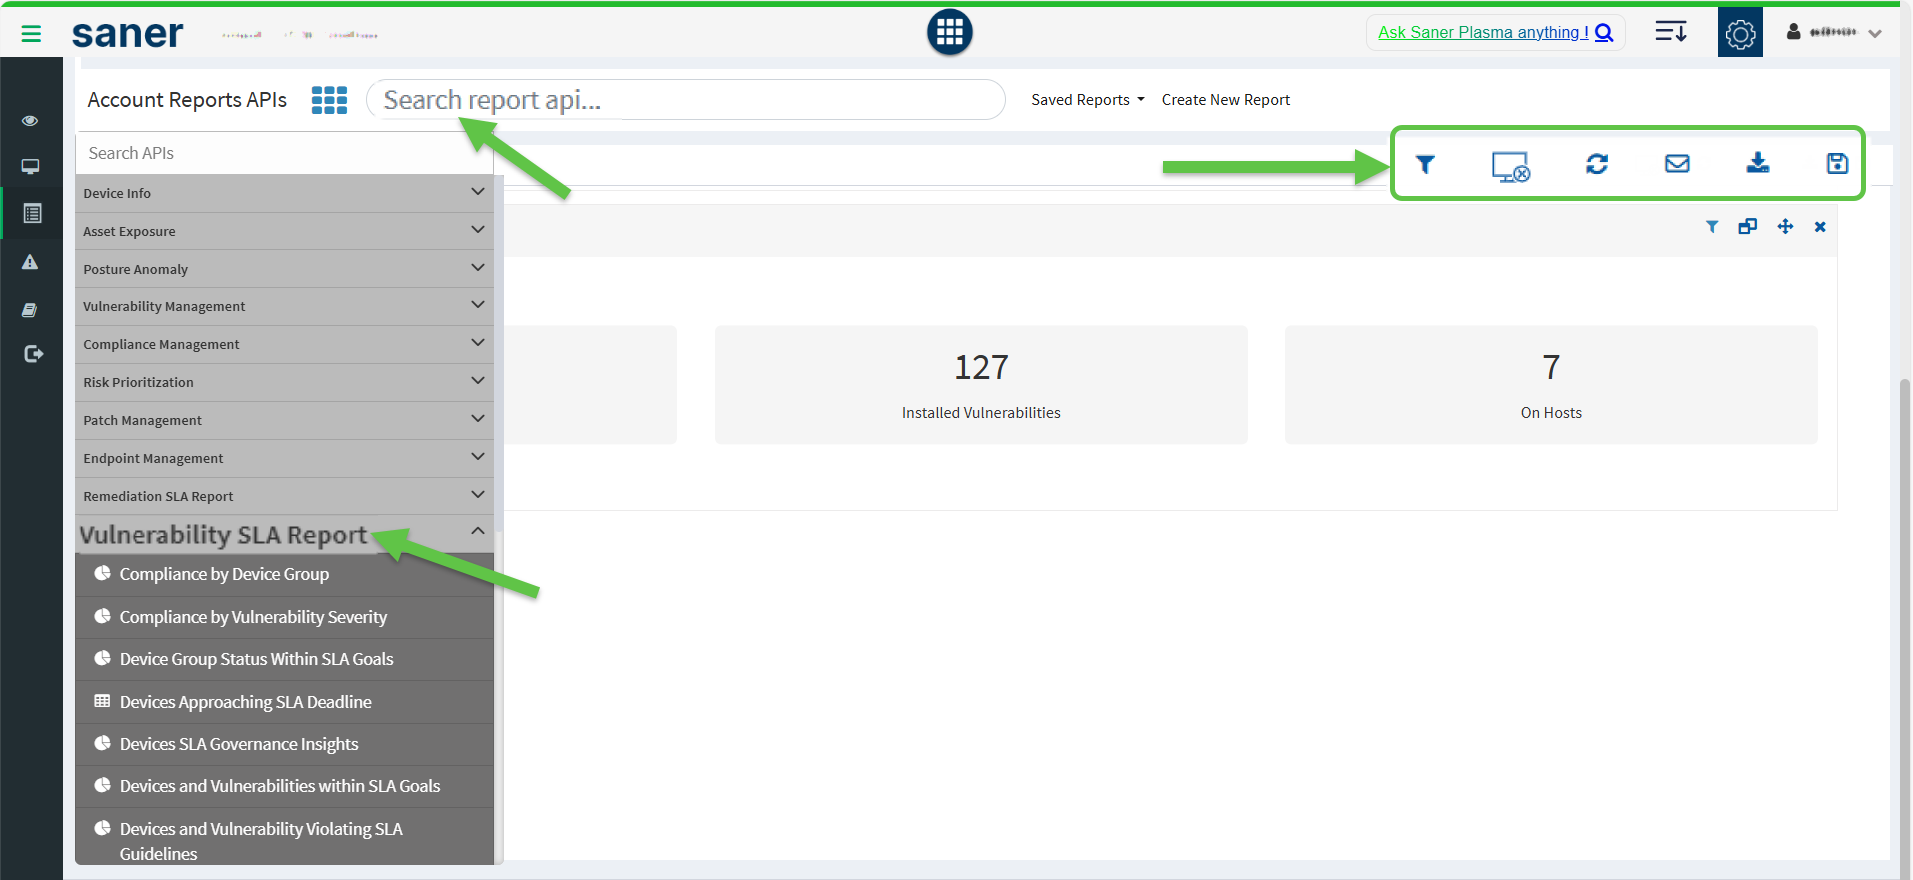
You can build SLA reports by dragging and dropping the required Report APIs into the designated workspace to create a customized Vulnerability Management SLA Report. Alternatively, key in the report name within the Search report api textbox. The system extracts and embeds the report on the page. Once you build the report, you have an option to download, back up through mail, reload the report or clear the screen.
Setting Alerts for Vulnerabilities
The Alerts section sends a notification alert to the specified email on the detection of new vulnerabilities after a scheduled scan. This setting must be set before the first scheduled scan. The notification for vulnerabilities is based on their criticality.
To set alerts for vulnerabilities:
- Select the Alerts option on the left pane.
- Turn on Subscription Status to enable vulnerability alerts.
- Specify an email address to which the alerts will be sent and the category of vulnerability on which notifications will be based. You can also specify a custom condition based on CVEs.
- Click on the Update button.
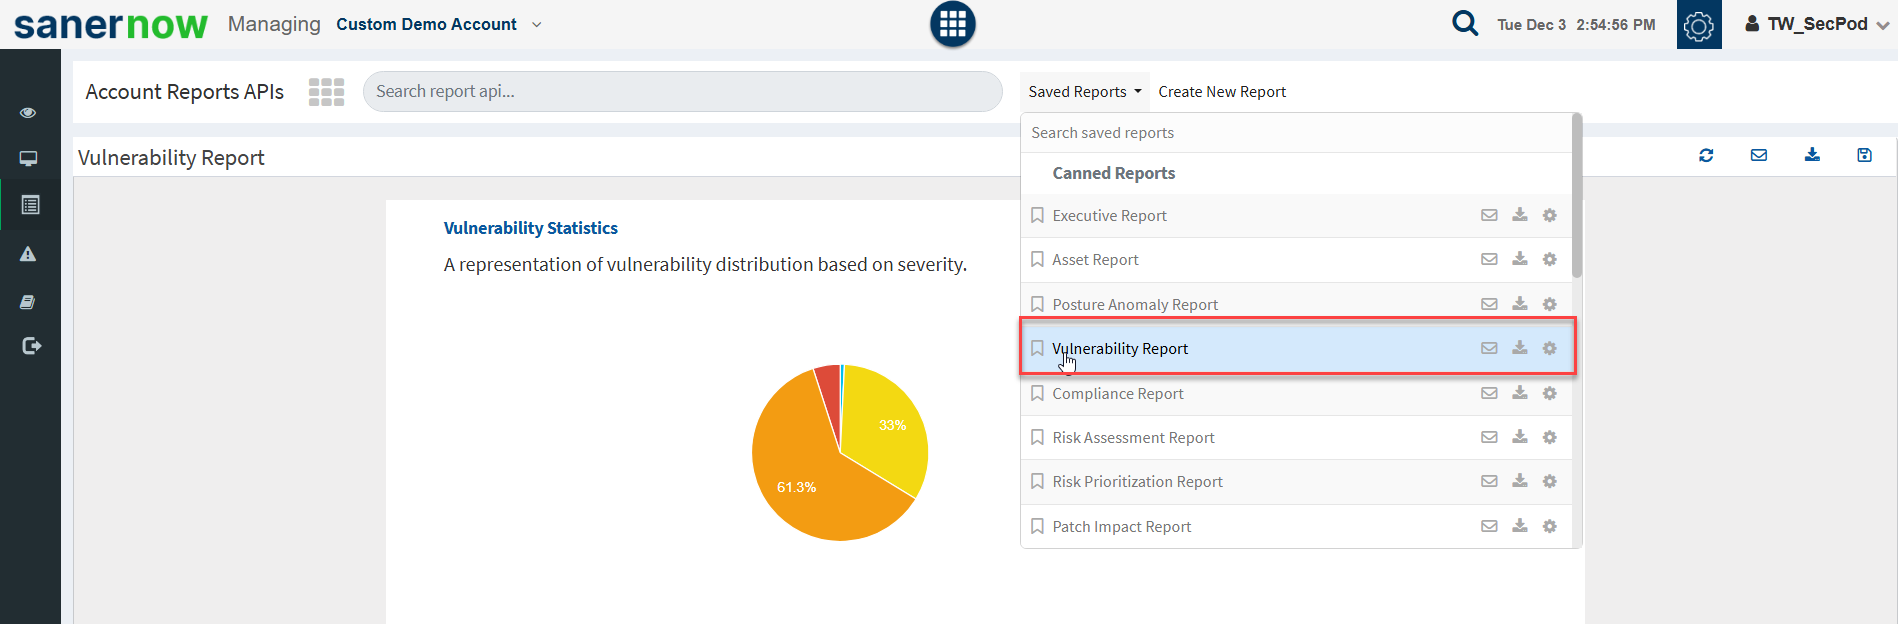
Vulnerability Reports
Saner VM provides an extensive range of reports to understand the vulnerability process. Go to the Reports option on the visibility dashboard to check the reports. You will get two types of reports: Canned reports and customizable reports. Users can access the available vulnerability reports from the Canned reports section.
The user can customize the report by clicking on the Create New Report option. Select a vulnerability report builder APIs and drag them to the Custom Report page to build a new report. Once the report is created, save, and configure a backup for that report.
To Generate the Endpoint Management Report
- Click Reports > Saved Reports > Vulnerability Report.
To export the report to a PDF.
- Click on the download icon beside the vulnerability report to download the PDF report.
To export the report and send it via email
- Click on the Mail icon in the saved report section to email the report.
- Specify the email addresses.
To Backup Vulnerability Reports
The backup settings under Reports allow IT, administrators, to obtain a report backup. The report backup can be scheduled daily or weekly to run automatically.
To configure backup settings for reports:
- Click the Reports option on the left pane.
- Click the Saved Reports > Canned Reports > Vulnerability Report.
- Select the Settings icon beside the Vulnerability Report.
- Report Settings (Vulnerability Report) pop up will be displayed.
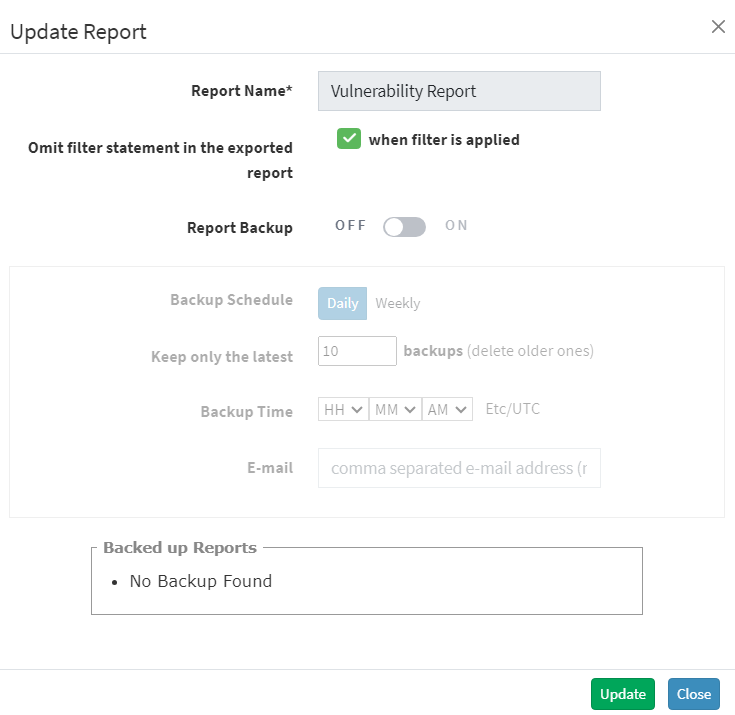
- Click the Omit filter statement in the exported report check box, and you can set the on/off button to back up the report or not.
- If the backup is on, select the weekly or daily option.
- Set a number in the Keep only the latest entry box. The report for the specified number of days is archived. If the number is three and the backup option is daily, then the reports from the last three days are maintained. Older files are deleted. You can maintain backups for a maximum of 30 days.
- Specify Email ID address. You can enter more than one email address comma separated.
- Select the organization and accounts you want to apply these settings.
- Click on the Save button.
About SecPod, Inc.
SecPod is a leading provider of endpoint security and management solutions. SecPod (Security Podium, incarnated as SecPod) has created a revolutionary Saner platform and tools used by MSPs and enterprises worldwide. SecPod also licenses security technology to top security vendors through its SCAP Content Professional Feed.
303 Twin Dolphin Drive,6th Floor, Redwood City,California 94065, USA.
To learn more about SecPod, visit:
Contact
| Sales | : | [email protected] |
| Support | : | [email protected] |
| Phone | : | (+1) 918 625 3023 (US) |

