Overview
This guide explains how to integrate ServiceNow with Saner Platform to streamline patch management and change request workflows. It focuses on automating the deployment of patches, tracking vulnerabilities, and managing assets through ServiceNow’s Change Request framework.
How the Integration Works
The integration coordinates activities between Saner Platform and ServiceNow. Saner CVEM detects vulnerabilities and initiates patch workflows, which are sent to ServiceNow as change requests for automated tracking and management.
Vulnerability Findings and Patch Deployment
Saner CVEM identifies vulnerabilities and applicable patches on the endpoints and creates a change request in ServiceNow. This can be triggered either on-demand or based on a scheduled sync between the two platforms.
Change Request Creation
Saner CVEM automatically generates Change Requests when vulnerabilities are detected or patches are required. These requests include comprehensive details about the vulnerable assets and patches that need to be applied.
Change Task Assignment
IT administrators can configure the assignment of tasks based on the users set in Saner CVEM’s configuration. This ensures the appropriate team or authorized person is responsible for handling the remediation.
Remediation and Verification
Once remediation is executed, either automatically or manually, the status of the Change Request is updated. remJob status from Saner CVEM is reflected in ServiceNow for further tracking, including states like “Ongoing”, “Verifying Remediation”, “Success”, or “Failed”.
Change Request Closure
After successful remediation and verification, the Change Request is updated with the relevant success details and automatically closed.
Key Benefits of Integration
- Automation of Patch Deployments: Patches are automatically deployed as part of the Change Request workflow, resulting in minimized manual intervention and improved endpoint security and compliance.
- State-Based Actions: The system executes tasks according to the state of the Change Request (For example, when a request reaches the “Implement” state, a remJob is created in Saner CVEM). This ensures that each stage of the patch management process is tracked and executed systematically.
- Visibility and Tracking: The synchronization between ServiceNow and Saner CVEM offers clear visibility into patch statuses, from deployment to success or failure, ensuring tasks are properly tracked and documented.
Integration Prerequisites
Prerequisites
1. Key stakeholders involved in integration:
- Administrators from Saner CVEM and ServiceNow
- Architecture Representatives(SMEs from both the Saner CVEM and ServiceNow platforms)
- Implementation team
- Owners of Change Request Process
2. Tools combination you need to automate patch deployments:
Automatic creation, processing, and closure of Change Requests is feasible when users have purchased and subscribed to both the Vulnerability Management(VM) and Patch Management(PM) tools.
3. For bi-directional sync:
Make sure to have the appropriate ServiceNow domain and credentials.
Roles Required for Contact User in ServiceNow
There are certain roles required in ServiceNow to perform the necessary change request tasks. By default, users with the following roles can completely manage the Integration process of Saner CVEM with ServiceNow.
- user_admin
- cmdb_inst_admin
- change_manager
Configure Saner CVEM for ServiceNow Integration
Configuration involves several key tasks:
- Syncing the CMDB to maintain up-to-date device details
- Scheduling Change Request sync to process Change Requests
- Setting up Group and User configurations to determine the appropriate Change Request Assignee when processing requests
| Note(s): Configuring is a one-time activity. |
Step 1: Launch ServiceNow for Setup and Configuration
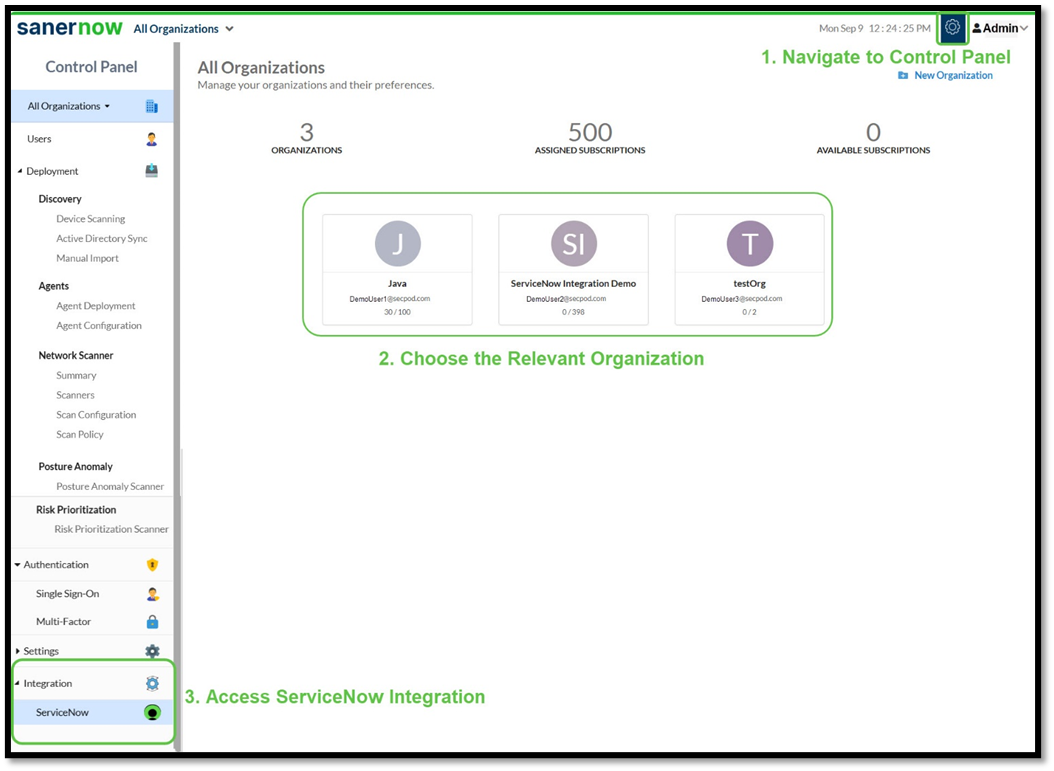
Pre-requisite: Make sure to have logged into Saner CVEM with administrator privileges.
- From the Control Panel, choose the relevant organization
- Navigate to the Integrations section on the left-hand-side panel
- Select ServiceNow
The page to setup the ServiceNow configuration opens.
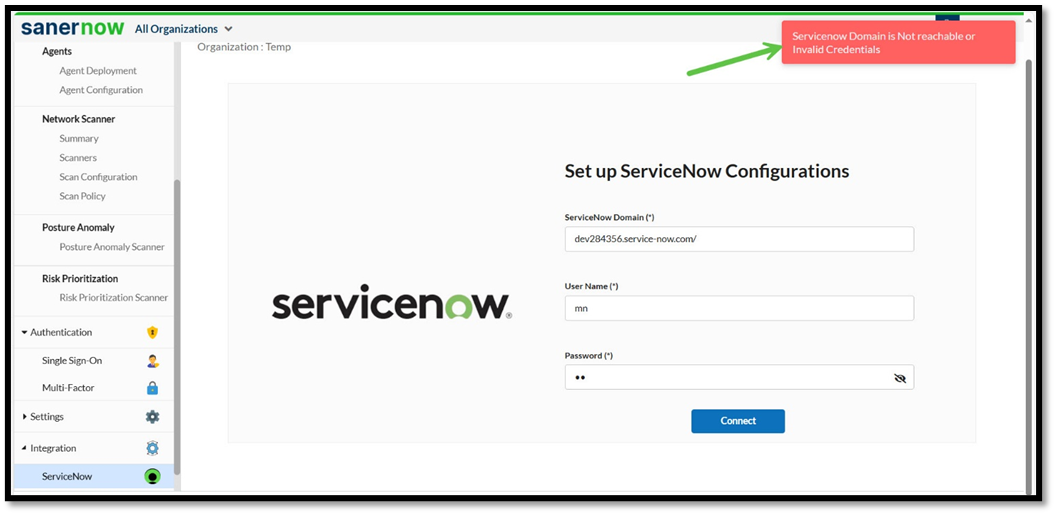
Step 2: Create a Connection
- [Mandatory*]Key in the valid credentials — User Name and Password
- [Mandatory*]Provide the domain details of ServiceNow
- Click Connect
On successful authorization, the ServiceNow Configurations page opens to setup and enable the configuration parameters.
If you enter incorrect domain or credentials, the authorization is not successful and the related error message displays. Make sure to provide the correct information in-order to proceed further.
Step 3: Setup the ServiceNow Integration Parameters
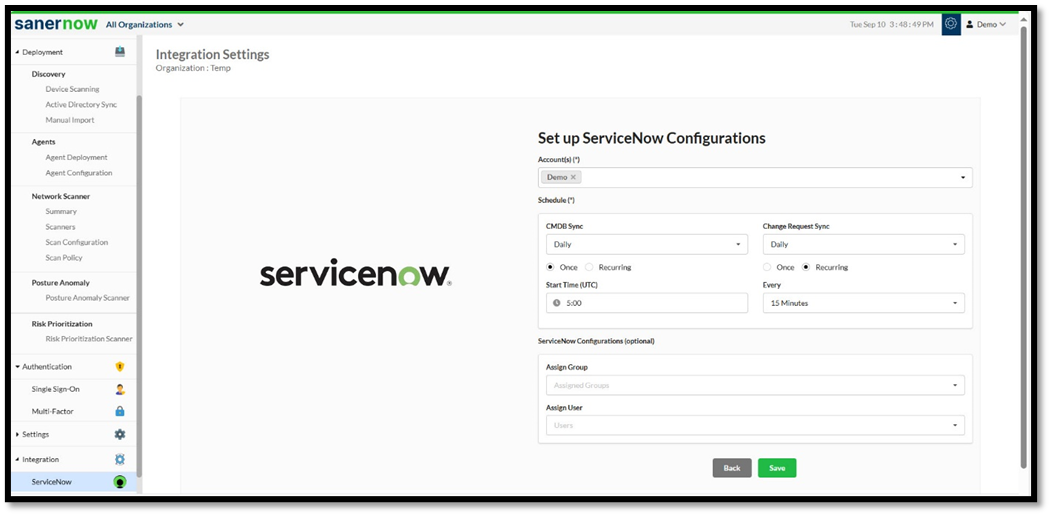
- [Mandatory*] From the Account(s) drop-down list, choose the accounts for which Change requests are raised for any missing patches
- [Optional] Specify the Group or User to which the tickets must be assigned from the “Assign Group” and “Assign User” drop-down lists
| Assign User/Group is the User or Group assigned to own and implement the change request. |
Step 4: Configure Schedules for Automatic Sync
The sync schedules are set to Daily by default. You have an option to modify the default sync settings.
| Note(s): Make sure the sync takes place only for the selected organization and account specified in the configuration. |
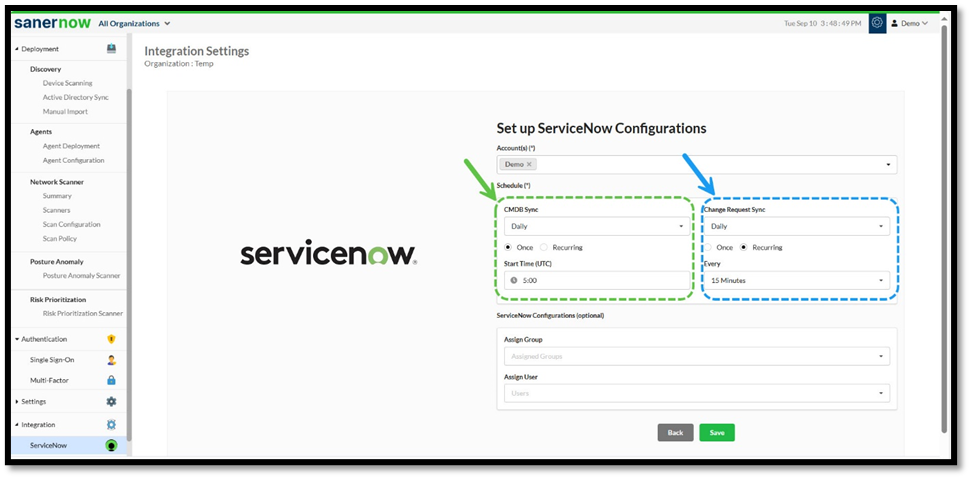
Configure CMDB Sync Schedule
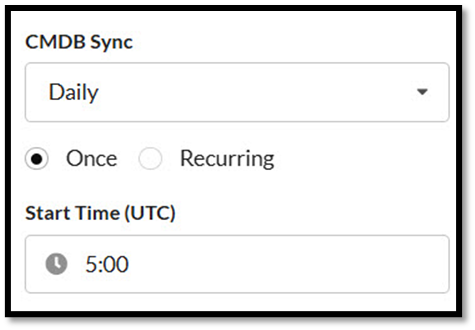
The CMDB Sync options allows for flexibility depending on how often you need the CMDB updated with the latest data.
You can set up the sync to run on a daily or recurring basis and also alternate between weekly or monthly intervals.
Here’s a breakdown of the options:
- Daily: The sync takes place every day at the same time(UTC) you specify, ensuring that the CMDB is updated with the latest information every 24 hours.
- Once: The CMDB sync triggers only one time. This is particularly useful if you only need to sync the data at a specific point in time without the need for regular updates.
- Recurring: The CMDB sync triggers repeatedly at a specific interval
- Weekly: The sync runs for the specified week, day(s) at the same time
- Monthly: The sync takes place once a month, on the specified day(s), date, and time
Configure Change Request Sync Schedule
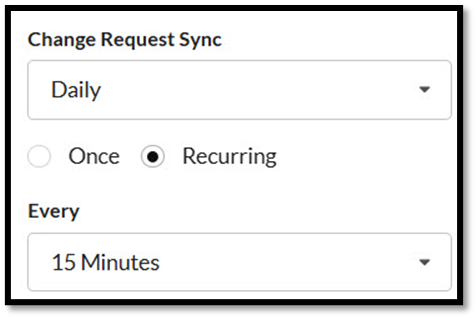
Setting up the automated sync mechanism, ensures that the update status of Change Requests take place in real-time or at scheduled intervals.
You can set up the sync to run on a daily or recurring basis and also alternate between weekly, or monthly intervals.
Here’s a breakdown of the options:
- Daily: The sync takes place every day at the same time(UTC) you specify, ensuring that the CMDB is updated with the latest information every 24 hours.
- Once: The CMDB sync triggers only one time. This is particularly useful if you only need to sync the data at a specific point in time without the need for regular updates.
- Recurring: The CMDB sync triggers repeatedly at a specific interval
- Weekly: The sync runs for the specified week, day(s) at the same and time
- Monthly: The sync takes place once a month, on the specified day(s), date, and time
Step 5: Save Your Settings
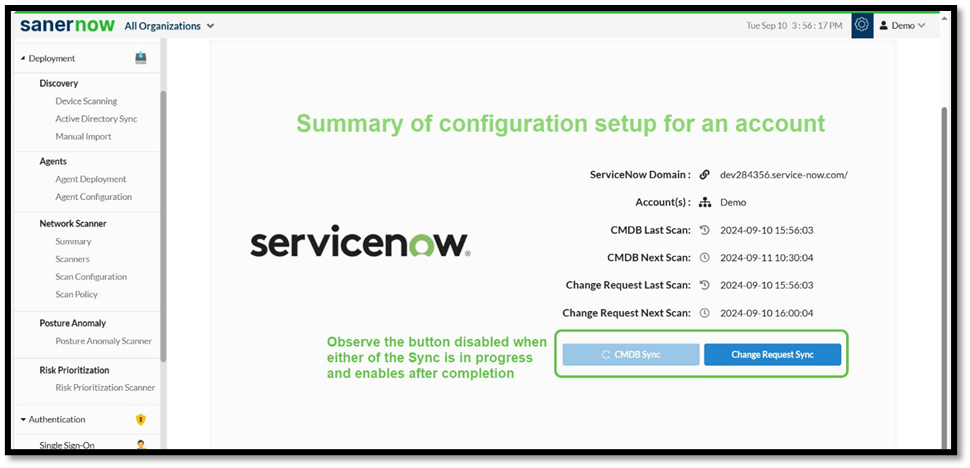
After completing the configuration, click the Save button. The sync process starts automatically and details of the sync displays on the Summary page.
[Optional]Start the OnDemand Sync
When you want to start the sync process immediately and not wait for the schedule intervals, then click the relevant button — CMDB Sync or ChangeRequest Sync — from the Summary page.
Modify the Integration Setup
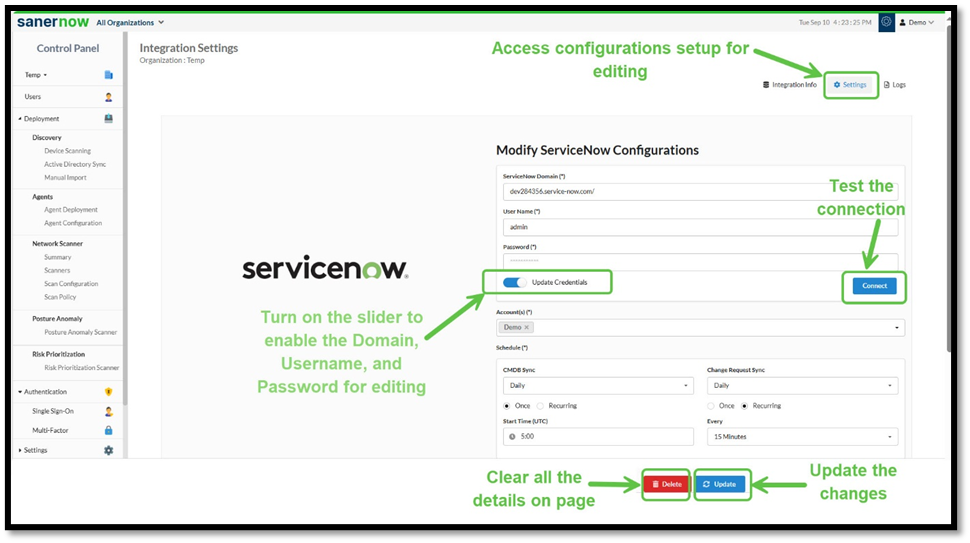
- Click the Settings button to open the created ServiceNow Configuration
- [Optional] To edit the domain details and credentials, turn on the Update Credentials slider
The fields get enabled for editing. - Make the relevant changes to domain or credentials(username and password)
- Click the Connect button.
On successful authorization, the Connect button displays as Connected. - [Optional] Make changes to the Schedule sync settings as needed
- Click the Update button to save your changes
- [Optional] Click the Delete button if you want to clear the details and key in again.
The following message displays:
“Are you sure you want to delete the configurations? Please note that this action will not remove the data from the ServiceNow instance. Do you wish to continue?”
Click Yes and begin creating a new connection again.
| Note(s): If you enter incorrect domain or credentials, the authorization is not successful and the related error message displays. |
Auto Sync Vulnerabilities and Patches into ServiceNow
This section provides a detailed process for managing Assets and Change Requests between ServiceNow and Saner CVEM, ensuring synchronization, tracking, and updates between the two platforms.
CMDB Sync
The CMDB synchronization with ServiceNow involves:
- Pre-configuring Synchronization schedules to execute at the appropriate time
- Maintaining an up-to-date inventory of various data sources such as network devices, servers, and applications
- Continually identifying and updating all changes including missing IT assets across the network into the CMDB database
During the CMDB sync process, predefined fields can be linked to the corresponding Configuration Item (CI) so that the change reflects all relevant data for troubleshooting, updates, or patch application.
The predefined Configuration Items(CI) include:
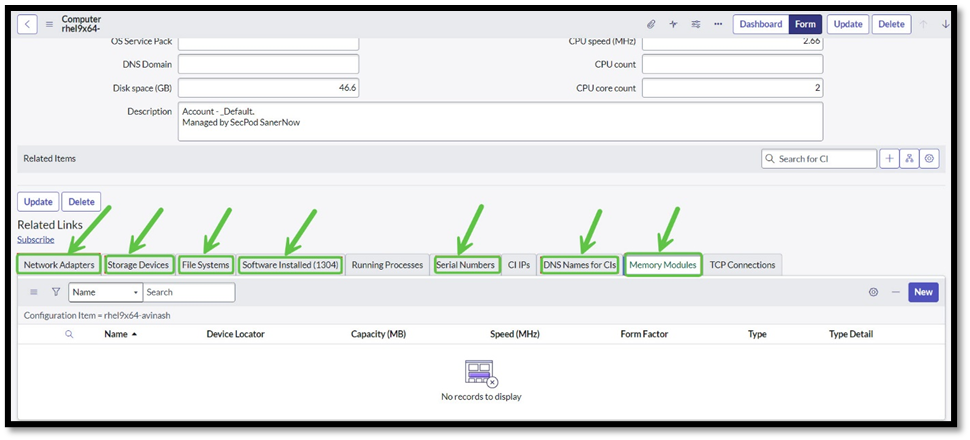
- Network Adaptors: CMDB sync ensures that the network adapter information (like MAC addresses, IP configurations, and other adapter-related details) is captured as part of the asset’s hardware profile.
- Storage Devices: Information such as disk type, size, partitions, and usage included as part of the asset’s storage configuration to manage and track disk failures or storage-related updates.
- File Systems: Details about file systems added to the storage CI data. This helps identify any file system vulnerabilities or necessary updates.
- Software Installed: Ensure the CI sync process captures details of all installed software, including versions, vendors, and installation dates. This information is vital for patch management and vulnerability tracking.
- Serial Numbers: Serial numbers of devices, such as the hardware’s motherboard, storage devices, or network adapters added for accurate identification of the physical assets.
- DNS Names for CIs: Captures the DNS names associated with each device to facilitate better tracking and remote management.
- Memory Modules: information about the type, size, and number of memory modules installed in the hardware profile of the device. This helps monitor hardware health and performance.
These details enhance the visibility and control over assets, allowing for more accurate tracking and patching.
Change Request Sync
The Change Request synchronization with ServiceNow involves:
- Pre-configuring Synchronization schedules to execute at the appropriate time
- Viewing the Change Request tasks in ServiceNow
- Assigning Change Request to the authorized owners or groups
- Scheduling the Patch based on Priorities
- Implement(Apply) Patch Updates
View Change Request Tasks
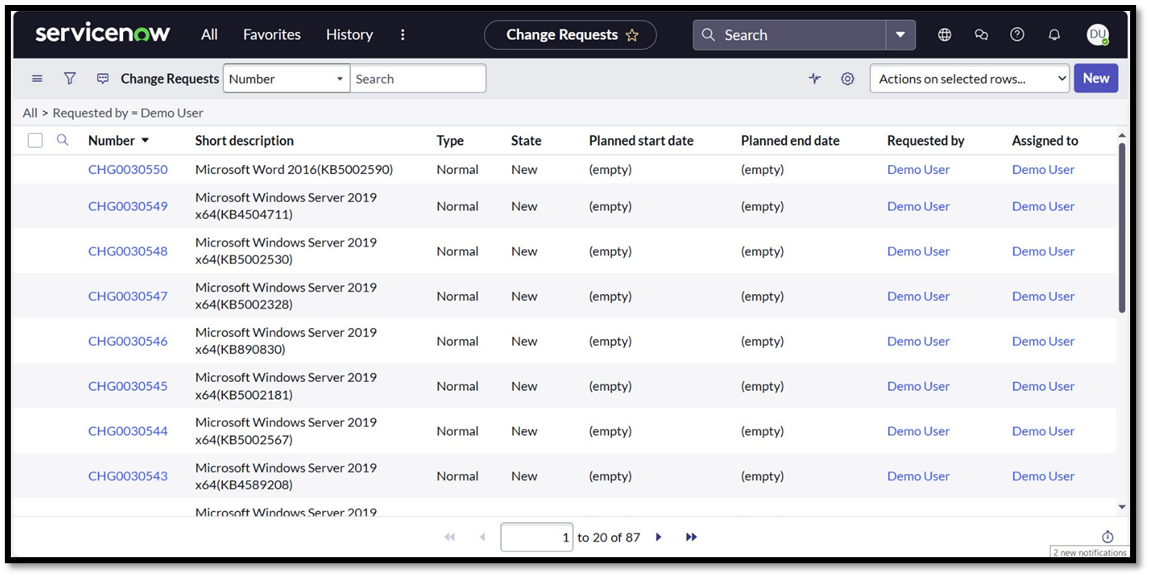
After setting up the connection details for ServiceNow, the scan runs and presents all relevant vulnerability findings in the change request, allowing IT teams to promptly start working.
Triggers that Automatically Create a Change Request in ServiceNow
| ONLY Vulnerability Management(VM) enabled for an account | Change Request created in ServiceNow for all the assets having Security Patches. However, remediation job does not execute automatically when the Change Request moves to IMPLEMENT state due to unavailability of the patch management tool. What this means is… Automatic closure of Change Requests is not feasible without enabling the Patch Management tool. |
| ONLY Patch Management(PM) enabled for an account | Change Request created in ServiceNow for all the assets having both the Security and Non-Security Patches. . However, remediation job executes automatically when the Change Request moves to IMPLEMENT state and automatically closes the change request. |
| BOTH Vulnerability Management(VM) and Patch Management(PM) enabled for an account | Change Request created and processed automatically in ServiceNow for all the assets having either the Security or Non-Security Patches |
| Managed Devices within Saner CVEM contains applications with patches | Change Request created in ServiceNow |
| Note(s): Change Request is not created for a device available within Saner CVEM but not present in ServiceNow. However, the CMDB Sync compares the device details fetched from both Saner CVEM and ServiceNow and includes the missing device in ServiceNow change management database. |
Interpret the Different States in Change Request Workflow
In the Change Request workflow, different states represent the various stages the request goes through in a sequence, from initiation to completion.
Following is an interpretation of the Change Request workflow states:
State: New
Change Request just got created automatically but not yet reviewed or acted upon. This is the starting state for the request and awaits further action.
You have an option to make as many iterations as possible as the change request is still an initial draft.
Once you have completed the updates and ready to submit, click the Request Approval button.
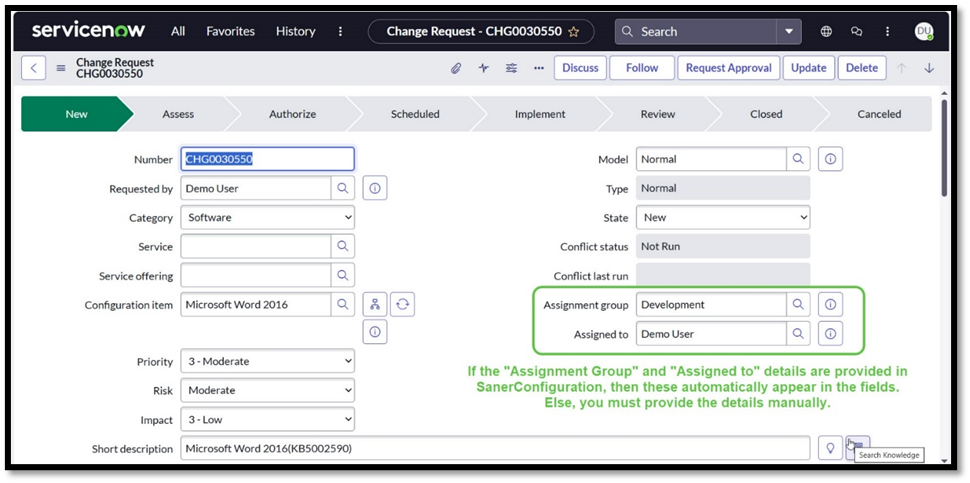
After the creation of change requests, it’s crucial to assign these to the authorized individual or group so that the vulnerability remediation tasks can be executed smoothly.
Saner CVEM tracks and remediates all change requests appropriately by using metadata such as category, configuration item, to route them to the correct team. For example, if the category is Software, then the ticket is assigned to the Development team.
| Note(s): “Assignment Group” and “Assigned to” details are automatically displayed if configured in Saner CVEM. Else, you must provide the details manually. |
Essential Fields to Process the Change Request
| Field Name | Significance |
|---|---|
| Assignment group | Group responsible to handle the change request |
| Assigned to | Individual owner assigned to implement or process the change request |
| Priority | Determines urgency of the change based on the risk and impact. Incase Risk Prioritization tool is not enabled in Saner CVEM, the Priority is set to Low by default. |
| Impact | Level of effect the change has |
| Short Description | Brief overview of the change, typically mentioning the asset or service |
| Description | Detailed explanation including the reason and expected outcome |
| Schedule – Planned Start and End dates | Time frame when the change is planned to begin and finish |
[Optional]Exclude a Device from the Change Request
| Note(s): |
| 1. The system allows you to exclude device(s) ONLY when the Change Request is in the NEW state. 2. You can exclude ONLY DEVICES and NOT SOFTWARE APPLICATIONS. |
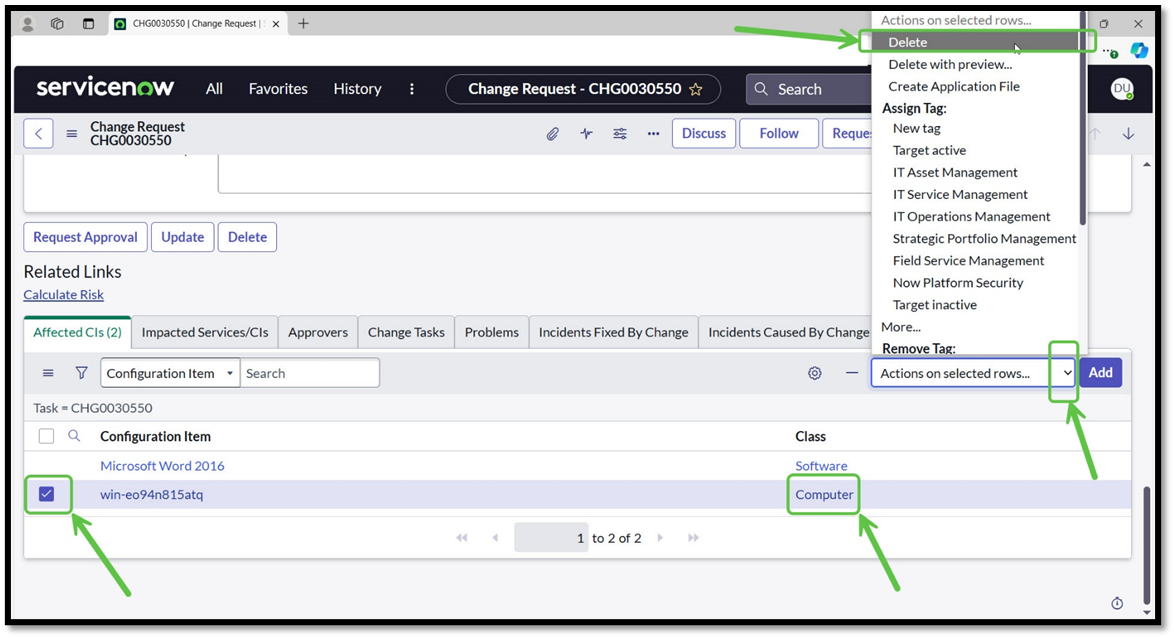
To exclude a device from the Change Request:
Step 1: Open the relevant Change Request from ServiceNow
Step 2: Identify the devices or assets associated with the Change Request and listed under Affected CIs section
To exclude a device from the Change Request:
Step 3: Click the checkbox(es) under the Configuration Item column and choose the device you want to exclude
Step 4: Select the Delete option from the Actions on selected rows drop-down on the bottom right-hand side of the Affected CIs section
Step 6: In the Confirmation dialog box, click Delete.
The selected device(s) disappears from the list.
| Note(s): If you choose to include the deleted device once again into the list, then click the Add button and specify the necessary criteria to retrieve the deleted items and include those into the list. |
State: Assess
This is the first and foremost approval requested for the Change Request in the Assess state. Change Request is evaluated and reviewed by relevant teams for remediation.
The authorized member reviews the change and confirms if the details are acceptable to proceed for next level approval.
| If the Authorized Member | Then… |
|---|---|
| Rejects the Change | Authorized member must include a comment explaining the reason for rejection. As a result, Change request returns the New state. |
| Approves the Change | Workflow pushes the change to the next state if there are no outstanding or pending approvals. |
On receiving all the approvals, the change automatically moves to the Authorize state.
State: Authorize
In the Authorize state, Change Request is awaiting approval from designated stakeholders, such as Change Managers or CAB (Change Advisory Board). Based on the priority(High/Medium), the Change Request automatically goes for CAB approval. Additionally, the scheduled dates for a change are fully confirmed in the “Authorize” state.
| If the CAB Team | Then… |
|---|---|
| Rejects the Change | CAB member must include a comment explaining the reason for rejection. As a result, Change request returns to the New state. |
| Approves the Change | The change automatically moves to the Scheduled state once all approvals are received. |
On receiving all the approvals, the change automatically moves to the Scheduled state.
[Optional]Schedule Patches Manually based on Priorities
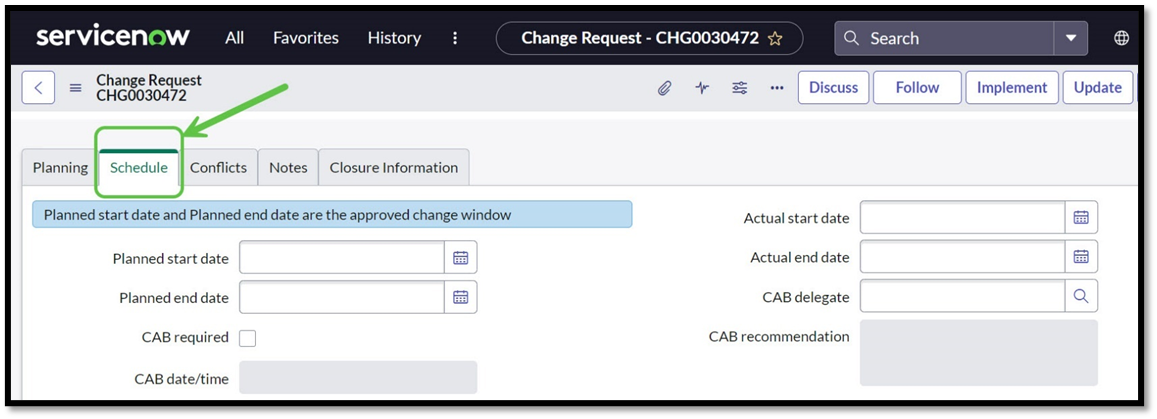
If CAB members decide to reschedule the change based on the priority, then the most critical patches can be scheduled manually ahead of less essential updates.
Just access the Schedule tab within the change request and provide the dates.
State: Scheduled

No specific activities take place in this state. Only all the necessary approvals are obtained and Change Request is ready for implementation at the Scheduled date/time.
If the scheduled time is blank, then remJob triggers immediately. However, users can specify the Start/End date and time in the schedule to implement the patch remediation.
The change can be moved to the Implement state using the Implement button.
State: Implement
The change request is in the process of being implemented. Note that in this state, the remJob triggers based on the configured schedule. However, option exists to Start the OnDemand Sync.
When the Change Request moves into the Implement state, the Actual start date field is automatically displayed with the date and time.
Additionally, the change request moves to the Closed state or Review state based on the remJob.
| If remJob…. | Then Close Code is… | Change Request moves to… |
|---|---|---|
| fails | unsuccessful | Review state automatically |
| succeeds | successful | Closed state automatically |
| partially succeeds | successful with issues | Review state automatically |
| initiated/ongoing state | none | Continues to remain in Implement state |
| Note(s): You can override the actual dates manually if they differ from the automatically displayed dates. |
On completion of patch remediation, the Change Request moves to Closed state automatically.
State: Closed
Change Request is completed and considered resolved either based on the remJob success or when its decided that no further action is needed.
When the remJob succeeds, the Change Request is updated with the success details and closed, indicating that the issue is resolved.
Monitor Progress of the Patch Update
You have an option to monitor the details from the Close notes field that’s fetched from the Patch Management tool. Alternatively, you can observe the status directly from the Patch Management(PM tool). Click here to read more on how to check the status of the patching activity.
Process Flow for remJob Execution and Status Updates in Change Request
1. Auto-Trigger Patch for a Change Request
Remediation job triggers only when the change request reaches the “Implement” state after completing the relevant approvals.
2. Automatic Status Reflection
When remJob is initiated from a Change Request, the following status of the remJob automatically syncs with the Change Request:
- Ongoing
- Verifying Remediation
- Success
- Failed
- Partial Success
3. Schedule Integration
If schedule details are included in the Change Request, they are applied when creating the remJob and dispatching it to the relevant agents according to those schedules.
4. Error Handling and State Transitions
If the remJob encounters an error (Failure or Partial Success), the failure details are logged into the Change Request, and the Change Request moves to the “Review” state for further analysis.
5. Successful Execution and Auto-Closure
If the remJob succeeds, the system updates the Change Request with the success details, and the ticket is automatically closed to indicate the completion of the remediation.
Troubleshooting with Logs
To troubleshoot issues such as change request creation, scan scheduling, or ticket closure, review the Info logs for relevant details.
Frequently Asked Questions
Who participates in the Integration Process?
Administrators from both the ServiceNow and Saner CVEM, enterprise architecture representatives, and implementation teams engage during the integration process.
How is the patching schedule setup for automatic sync?
Patching schedule is setup to execute on a daily basis. You have an option to configure the schedule on a recurring basis as needed. Click here to read more on how to configure.
What is the criteria to close the ChangeRequest automatically?
Change Request must be in the IMPLEMENT state for the remediation job to execute automatically. When the job succeeds, it automatically updates with the success details and closes to indicate the completion of the remediation.
What happens to the Change Request if a patch does not execute properly?
Review the change request and take appropriate action.
Can I reschedule a patch and how?
Within the Change Request, you can manually schedule patches based on your business priorities.
When Iam in the middle of executing different change requests, does it impact the patch execution?
Change Requests are independent of each other and you should be able to handle patch remediation for bulk change requests simultaneously without any difficulty.
If the remJob is terminated during the patching activity, what happens to the change request?
Change Request continues to remain in the state its currently in until the remJob resumes processing.

