The Saner Endpoint Management tool provides total visibility over the managed endpoints. Built-in actions help to keep the endpoints compliant with regulations and up to date with software and hardware patches. You can use queries to check the health of the endpoints. Automated actions enable you to debug and resolve issues and control the deployment or uninstallation of applications and service packs.
Automated actions enable you to debug and resolve issues and control the deployment or uninstallation of applications and service packs.
To access the Endpoint Management tool:
- Log in to the Saner account with credentials.
- Suppose an account already exists and the Saner Agent has been deployed on the endpoints; the organization level dashboard is displayed.
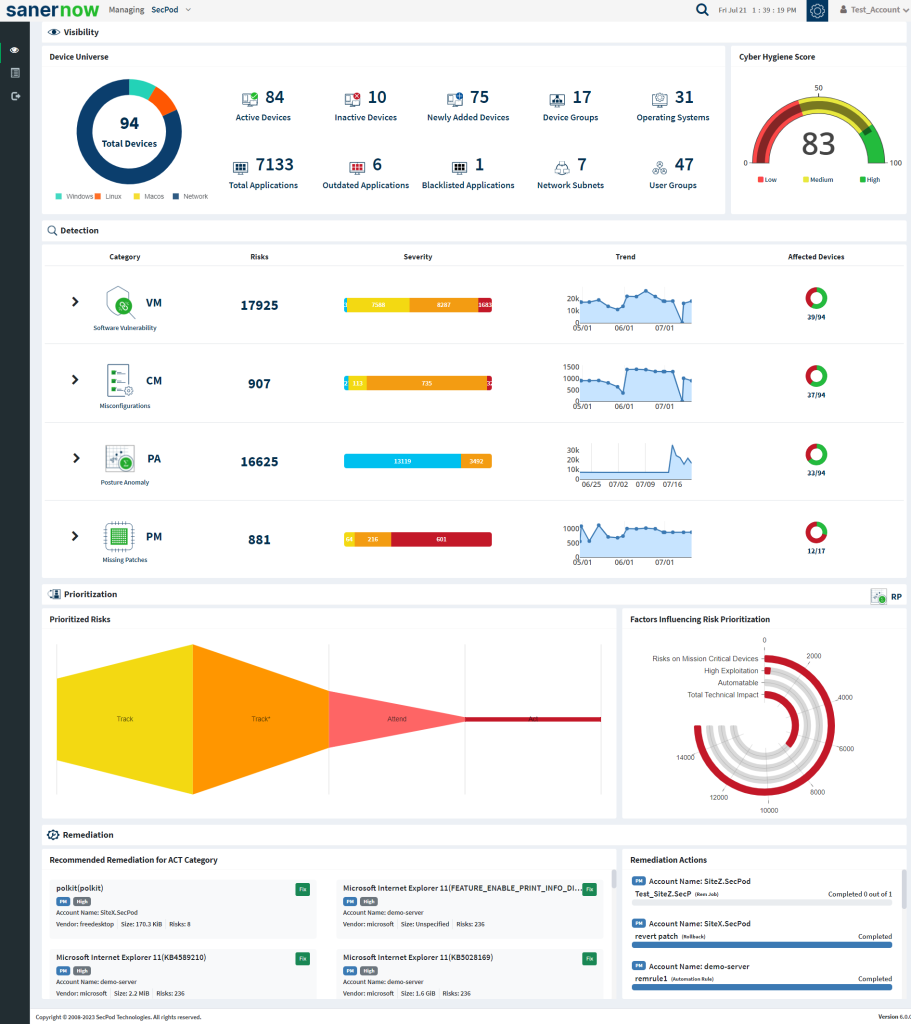
- To select an account, click All Organizations on the top left corner of the dashboard. All Organization section lists all the organizations. You can see the list of organizations as Org1, Org2, and Org3, as shown below. Select the account, and a dashboard with the summary view of the account is displayed.
- Click the Saner tools on the header. It will display all the provision tools, as shown below.

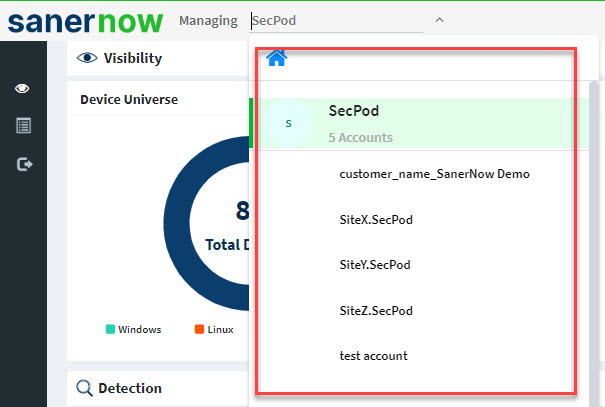
- Click the Endpoint Management icon. The Endpoint Management dashboard is displayed, which shows at a glance the total number of devices on the network with a breakdown by OS, the number of devices with the Saner Agent running, and the number of currently active devices.
Newly Added Devices
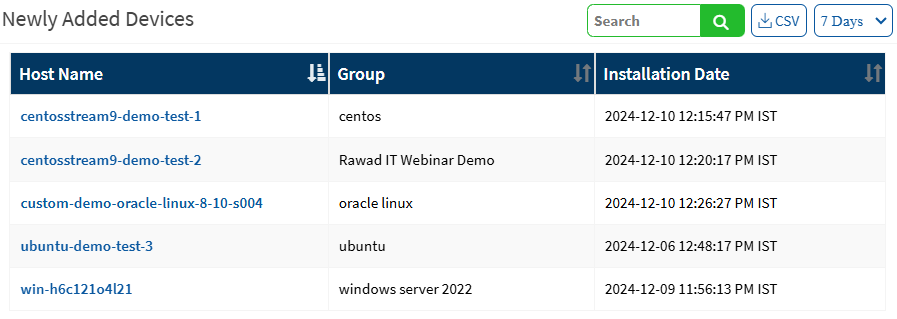
This page shows the list of devices that have been recently added to the network, based on the date and time. You can search the devices based on the hostname, group, date, and time. You can download the excel sheet that lists newly added devices by clicking on the CSV icon. You can choose to view devices newly added seven days, 15 days, or 30 days back.
Not Scanned Devices
This page shows the list of devices on the network that have not been scanned for 24 hours or longer based on the date and time. You can choose to view devices not scanned for over one day, three days, or five days and then troubleshoot why the device is not being scanned. You can download the excel sheet that lists not scanned devices by clicking on the CSV icon. You can search the devices based on the hostname, group, date, and time.

Devices Based on Groups
This Page shows devices based on default (classified by OS) and user-created groups. Clicking a segment on the chart shows the number of devices in the group. You can download the excel sheet that lists newly added devices by clicking on the CSV icon.

Devices Based on OS
This page shows the number of devices in each OS group. You can download the excel sheet that lists devices distributed based on OS by clicking on the CSV icon.

All Devices
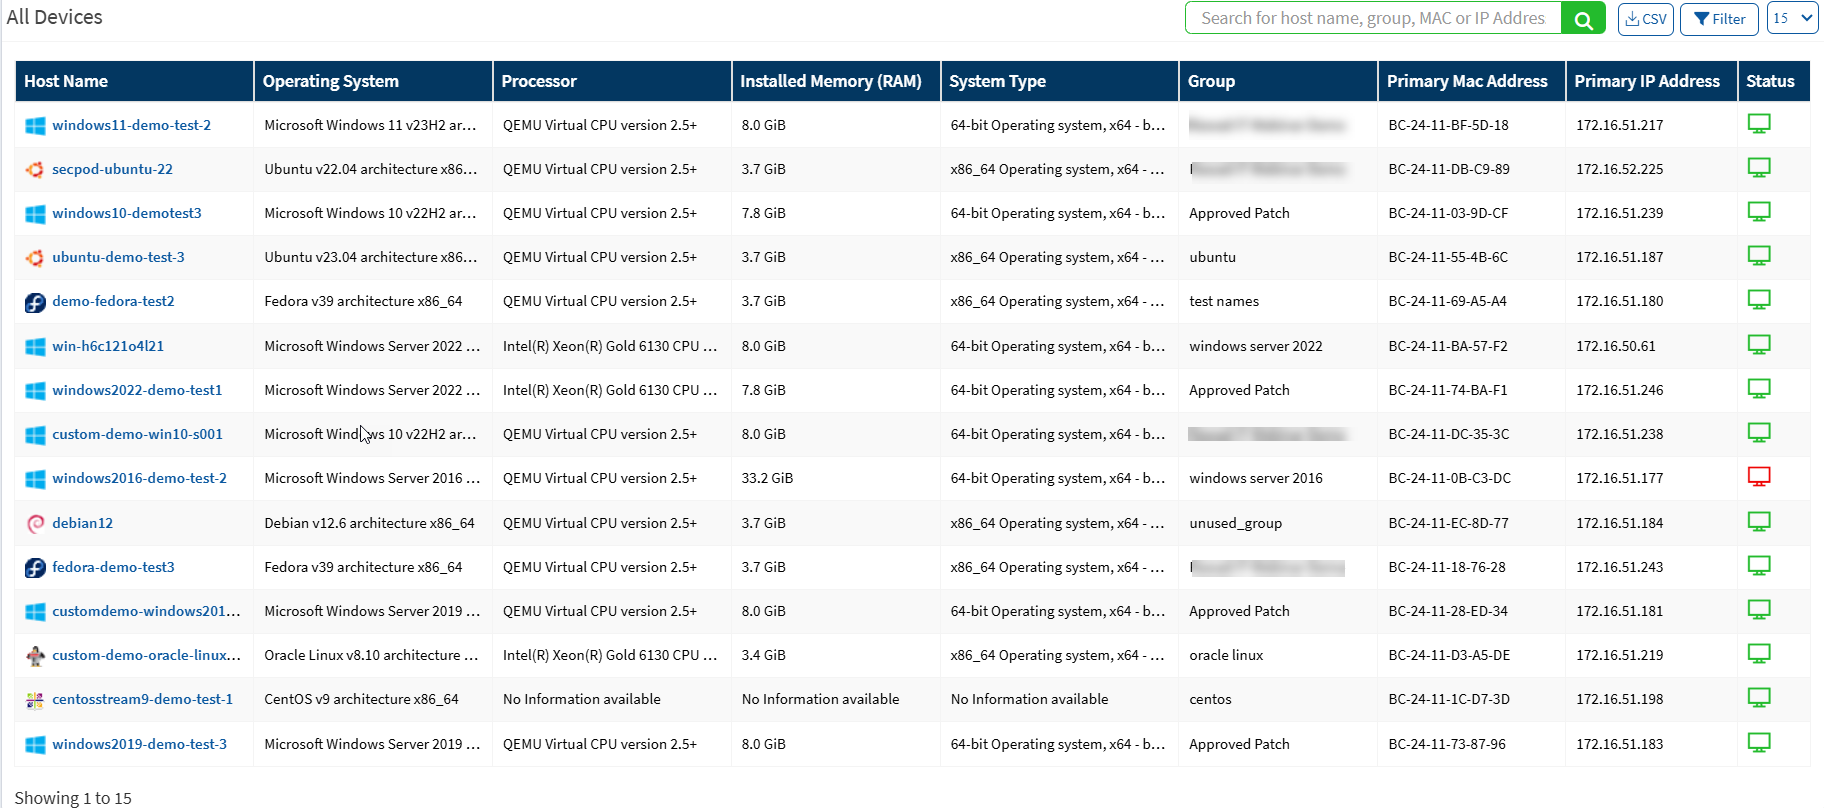
This page shows all devices on the network and details for each device, such as operating system, memory, processor, group, IP address, etc. You can search for a particular device or filter this list by groups or OS. If you want to download all details for all endpoints on the network, click the CSV icon.
Actions and Checks
Checks are predefined queries for the most routine probes that the IT Security team may want to execute regularly. They provide a way to save time and make it simpler and faster to do repetitive checks. Actions are predefined responses to remediate the results of the checks. For detailed information, click on the arrow.

Checks
Click on the Checks option at the top of the right corner or click on the arrow on the Checks Page. You can select the OS and the type or category of checks from the drop-down to display a set of relevant queries. For example, you may wish to check if a user has installed a torrent on their system. A list of available checks is given below.
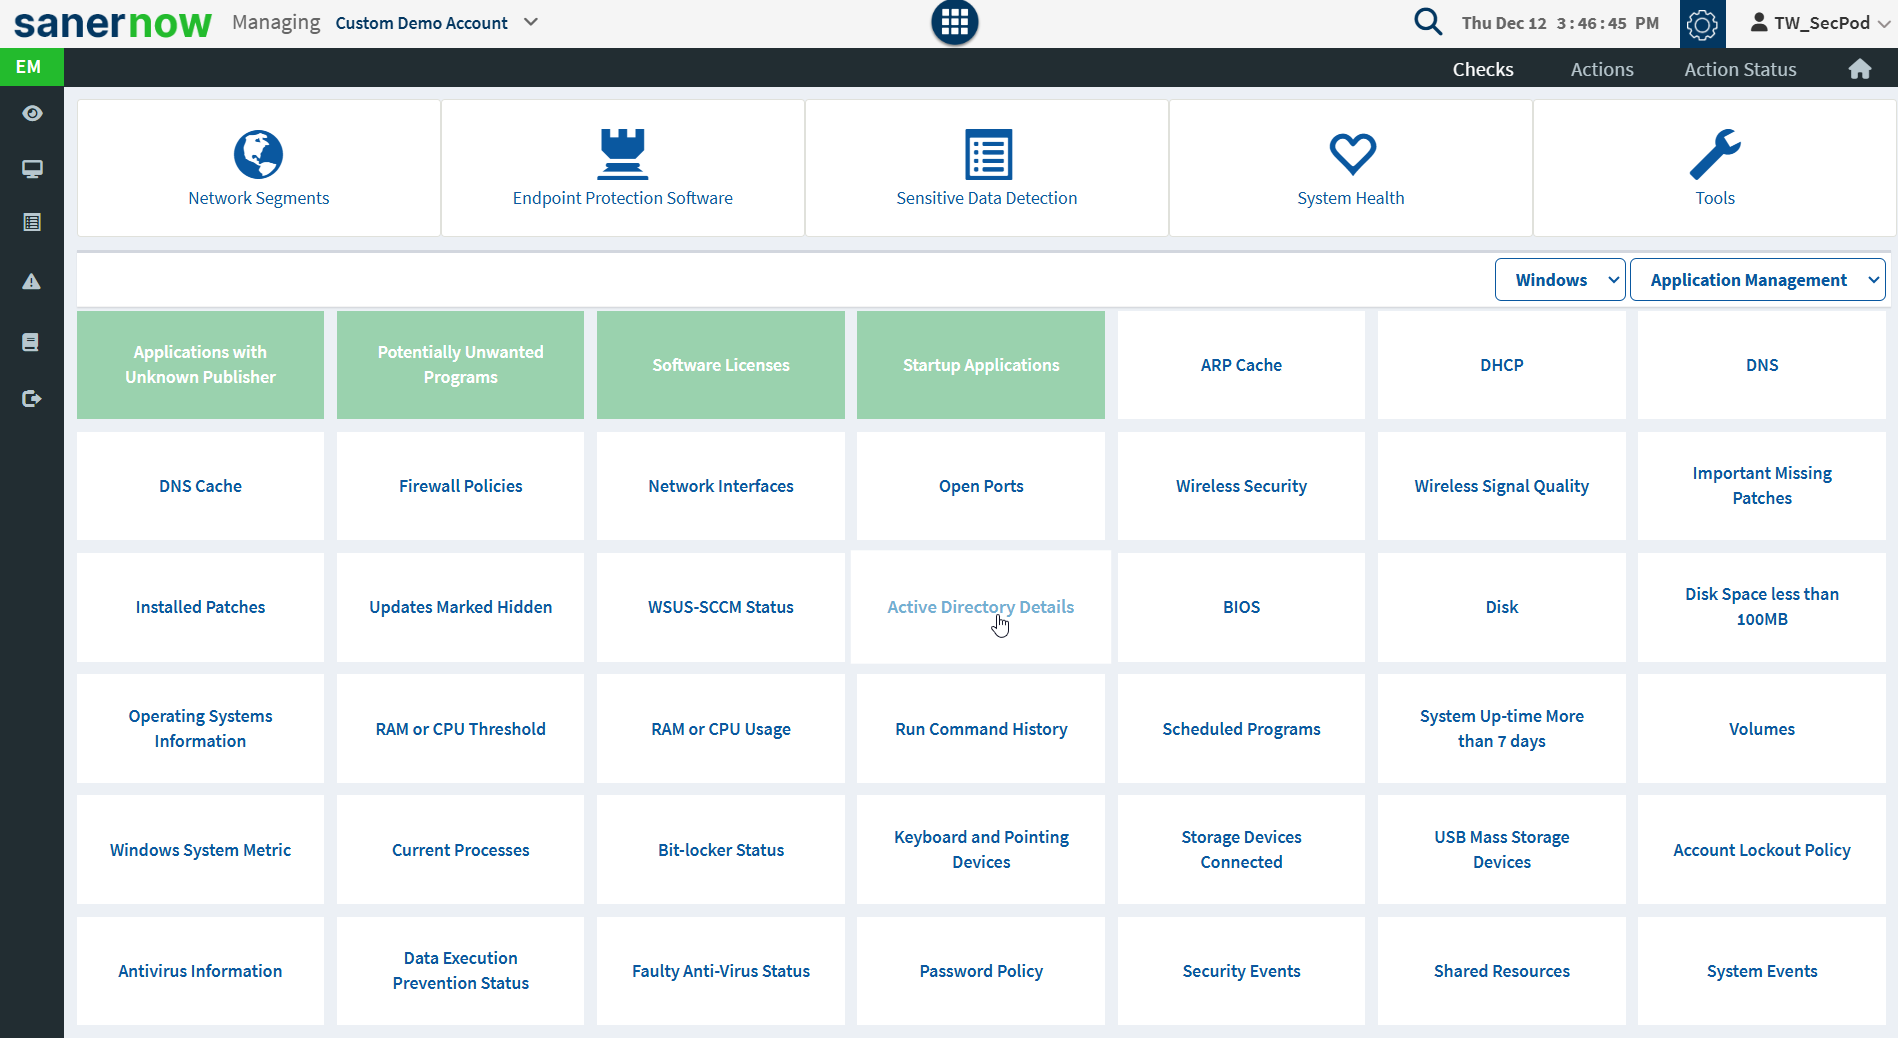
Some of the extremely important or routine checks are displayed at the top of the Checks page.
- Network Segments – Checks for the different network segments and lists the number of devices on each segment and the device details.

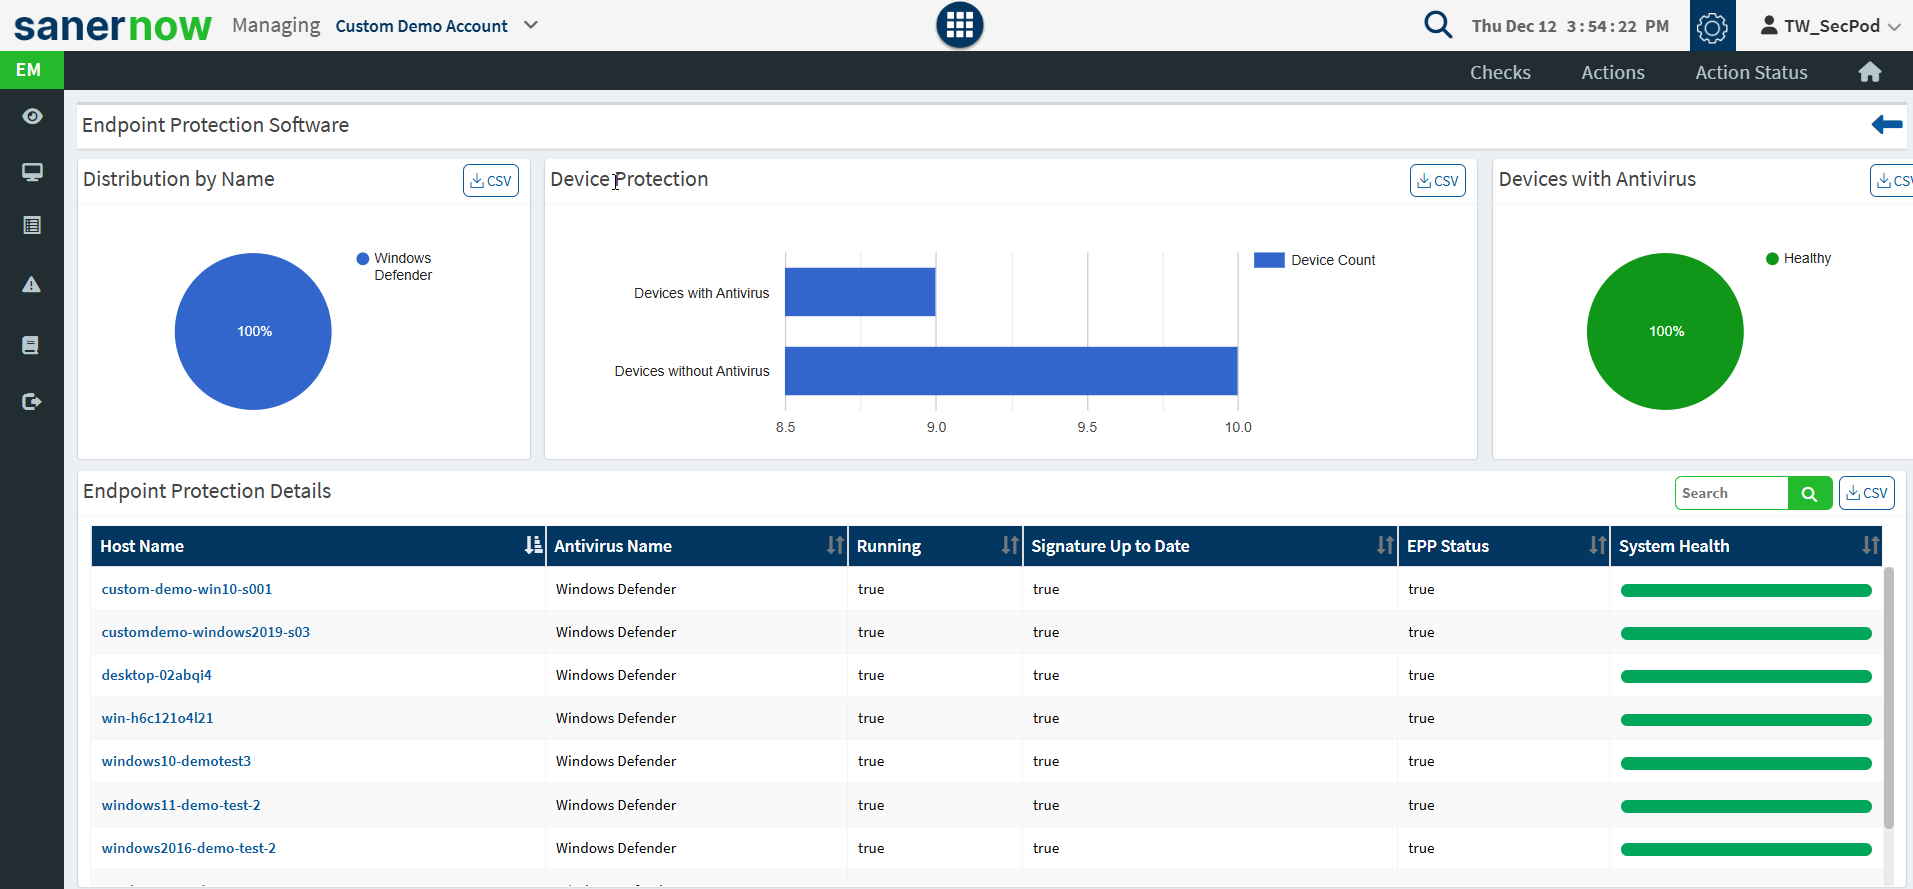
- Endpoint Protection Software – Checks if antivirus protection is running on devices and shows a distribution of the different types of protection on devices, how many devices are protected, how many devices are at risk, and the system health of individual devices.
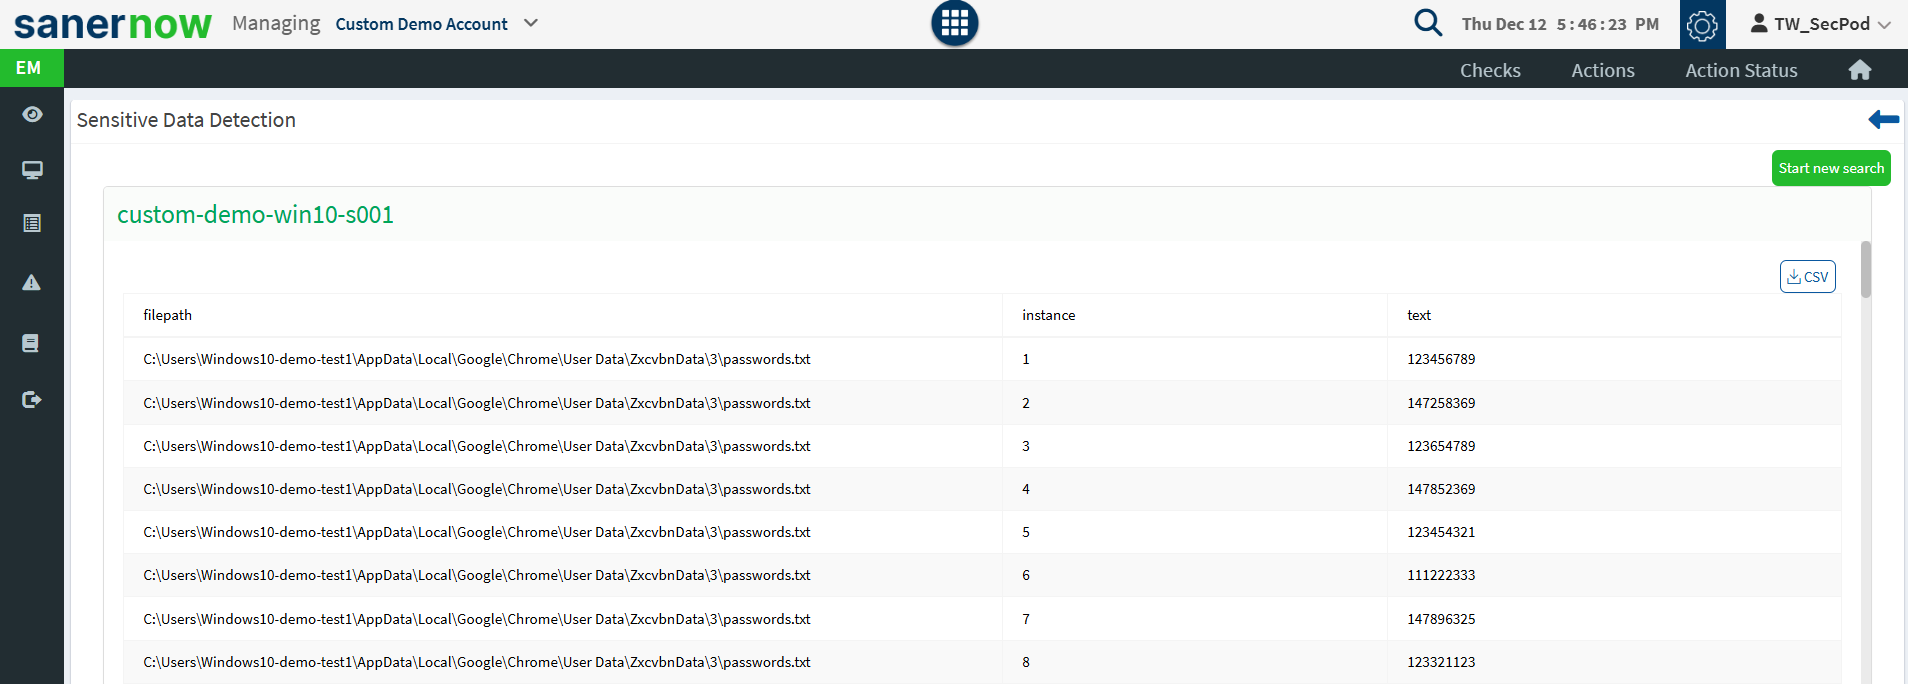
- Sensitive Data Detection – Checks if the user has stored credit card or social security numbers as a text file. Running this check may take a long time as the query has to go through the entire data on the disk. This could be a time-intensive check depending on how much data a user has.
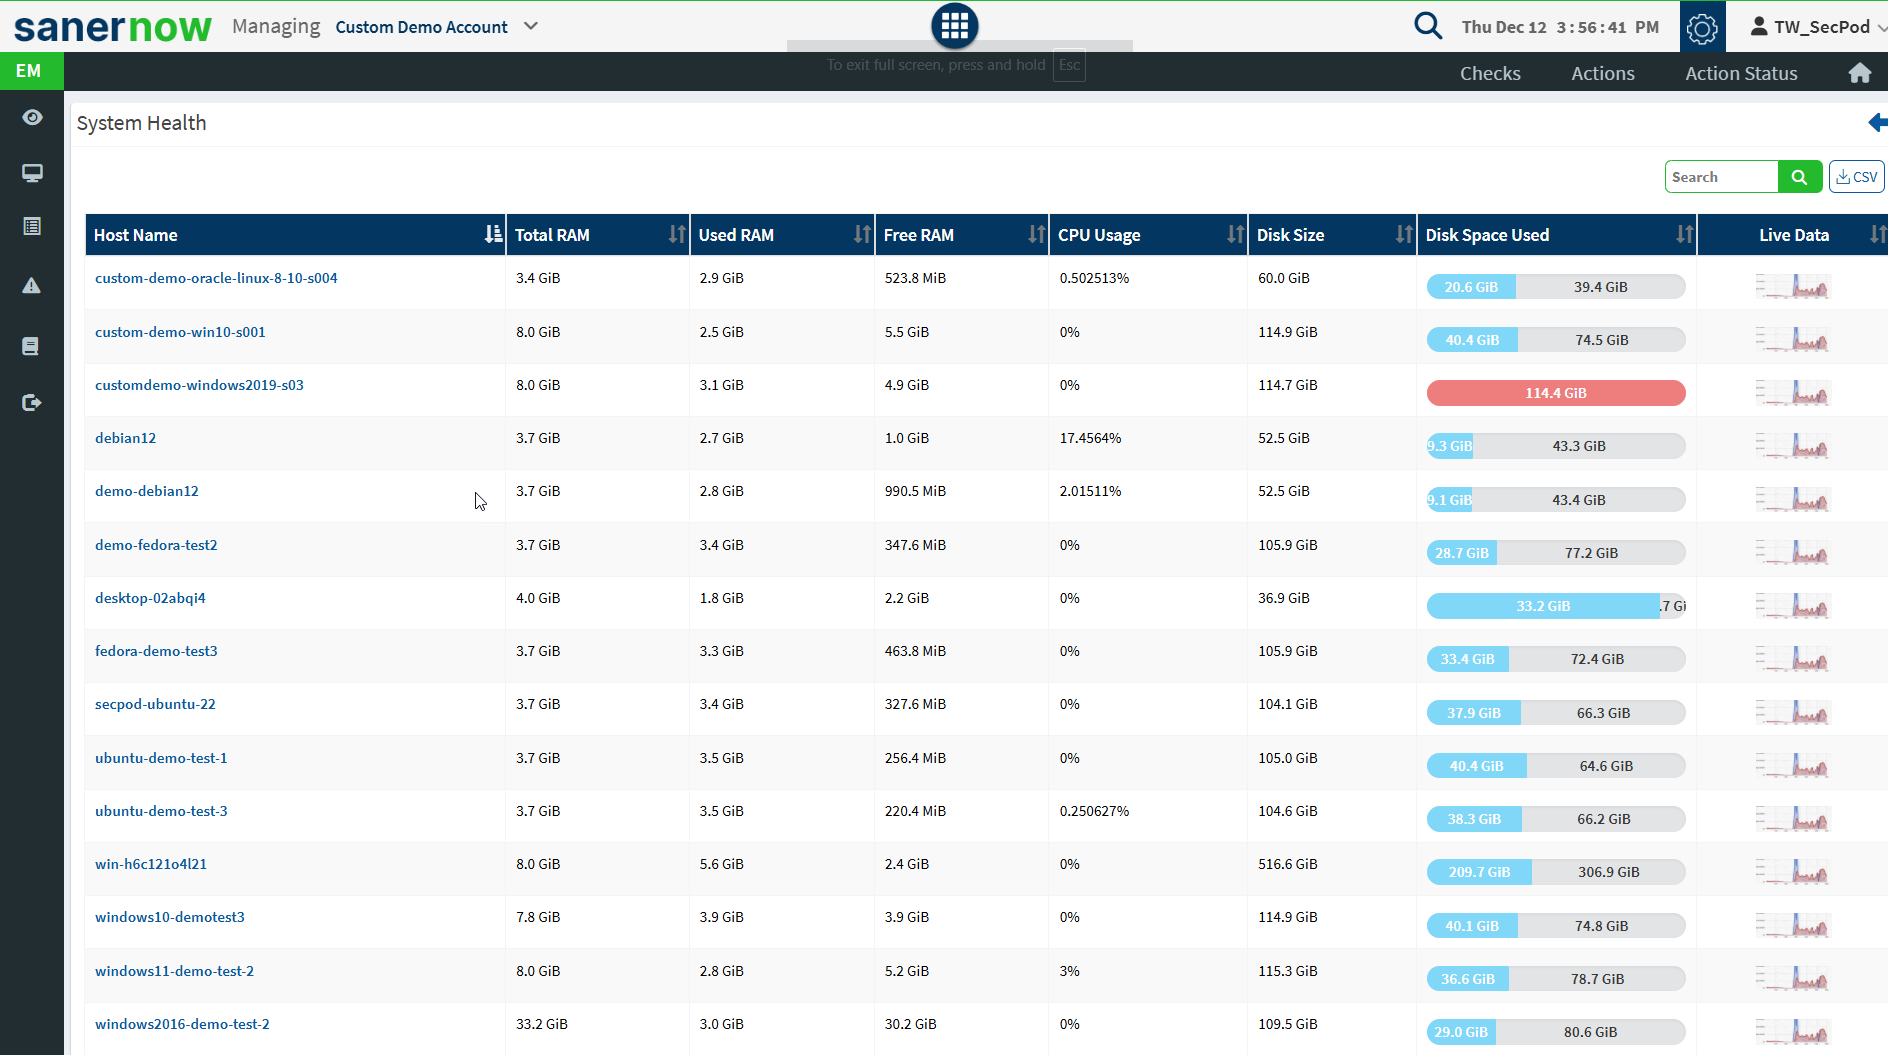
- System Health – Checks for the total RAM, free RAM, used RAM, CPU usage, free disk space, etc. For instance, having very little disk space is a system health issue. Click Update real-time data for the latest system health information. Specify how many times you want the query to be executed, at what time intervals, and for which devices. This helps you monitor the system health of devices for a specific reason, such as unnatural system behaviour that may indicate an attack in progress.
- Tools – Several tools are available, such as checking for files larger than 1GB on devices. You can modify or update the queries to refine your search further. These tools may impact resources, so they must be used after you achieve clarity on the scope.

Note: Some of these checks below may apply only to Windows Systems.
- Application Management Checks:
- Applications with Unknown Publisher – Lists all applications that have no known publisher.
- Potentially Unwanted Programs – Identifies potentially unwanted programs such as torrent downloaders or unnecessary toolbars running on Windows systems.
- Start-up Applications – Lists the applications started when you boot your computer.
- Software Licenses – Collect all software license information.
- Network Management Checks
- Wireless Security – Checks wireless security on devices.
- ARP Cache – Collects ARP entries created when a hostname is resolved to an IP address and then to a MAC address, so the computer can effectively 7communicate.
- DNS – The Domain Name System (DNS) translates Internet domain and hostnames to IP addresses and vice versa. Collects the DNS information on devices.
- Wireless Signal Quality – Checks wireless signal quality on devices.
- DNS Cache – Investigates the DNS cache on systems.
- Open Ports – Collects all available port information on devices.
- Network Interfaces – Collects all network interface information from devices.
- Firewall Policies – Checks all firewall policies on systems.
- DHCP – Collects all Dynamic Host Configuration Protocol (DHCP) information on systems.
- Patch Management Checks
- WSUS-SCCM Status – Checks the status of the Windows Update Server (WSUS/SCCM).
- Updates Marked Hidden – Lists all software patches hidden in the Windows Updates server.
- Installed Patches – Lists all installed patches on systems.
- Important Missing Patches – Lists all critical missing patches on systems.
- Computer Information Checks
- Disk – Windows. Description Collect and investigate disk information on Windows systems.
- Scheduled Programs – Windows. Description Collect all scheduled programs set in Windows systems.
- Windows System Metric – Retrieve the specified system metric or system configuration setting on Windows systems.
- Volumes – Collect all volume information on systems.
- Operating Systems Information – Collects operating systems information.
- RAM or CPU Usage – Investigates total RAM or CPU usage on systems.
- RAM or CPU Threshold – Investigates total RAM or CPU threshold (greater than or equal to 80%) on systems.
- System Up-time More than seven days – Checks for systems up and running for seven days.
- Run Command History – Checks the run command history on systems.
- Disk Space less than 100MB – Investigates disks running out of space (<100 MB) on systems.
- Active Directory Details – Checks all active directory details on systems.
- BIOS – Collects BIOS information such as serial number, version, and system manufacturer.
- Process Management Checks
- Current Processes – Identifies all current processes running on systems.
- Device Management Checks
- Keyboard and Pointing Devices – Collects all keyboard and pointing devices connected to systems.
- Bit-locker Status – Checks if Bit-locker protection is OFF on systems.
- USB Mass Storage Devices – Lists all USB mass storage devices connected to systems.
- Storage Devices Connected – Lists all storage devices connected to systems.
- System Security Checks
- Shared Resources – Lists all shared resources on systems.
- Antivirus Information – Checks for Anti-Virus (AV) status on systems. It is required to keep AV up-to-date and running.
- Data Execution Prevention Status – Data Execution Prevention or DEP is a security feature that can help protect your computer by monitoring programs to use system memory safely.
- Faulty Anti-Virus Status – Checks for faulty Anti-Virus(AV) system status. It is required to keep AV up-to-date and running.
- User Access Control UAC – Checks the User Access Control (UAC) level on systems found under registry HKLM\SOFTWARE\Microsoft\Windows\CurrentVersion\Policies\System.
- Account Lockout Policy – Checks the account lockout policy on systems.
- Password Policy – Checks the password policy set on systems.
- System Events – Collects all system events that may require your attention from the Events Log.
- Security Events – Collects all security events that may require your attention from the Events Log.
- Service Management Checks
- Deviation in Co-existing Services – Checks for only one primary function per server to prevent functions that require different security levels from co-existing on the same server. For example, web
- Running Services – Collect all services that are currently running on systems.
- User Management Checks
- Auto-logon Enabled Users – Checks if Auto-login is enabled on systems.
- Last-logon Users – Lists the last-logon details of users on systems.
- Administrator Accounts – List all Administrator accounts on systems.
- Groups – List all the Groups on systems.
- System Users Identification – Identifies all users on systems.
- Inactive Users – Lists all inactive users on systems.
- Guest Accounts – Lists all Guest accounts on systems.
Actions
Click the arrow icon from the Actions Page or click the Actions option at the top of the right corner of the EM dashboard. Actions are predefined responses to remediate the results of the checks. For example, suppose a predefined check has detected that a user is using uTorrent, a blacklisted application. You can run the Application and Device Control Response to block the torrent application or run the Software Deployment Response to uninstall the application.

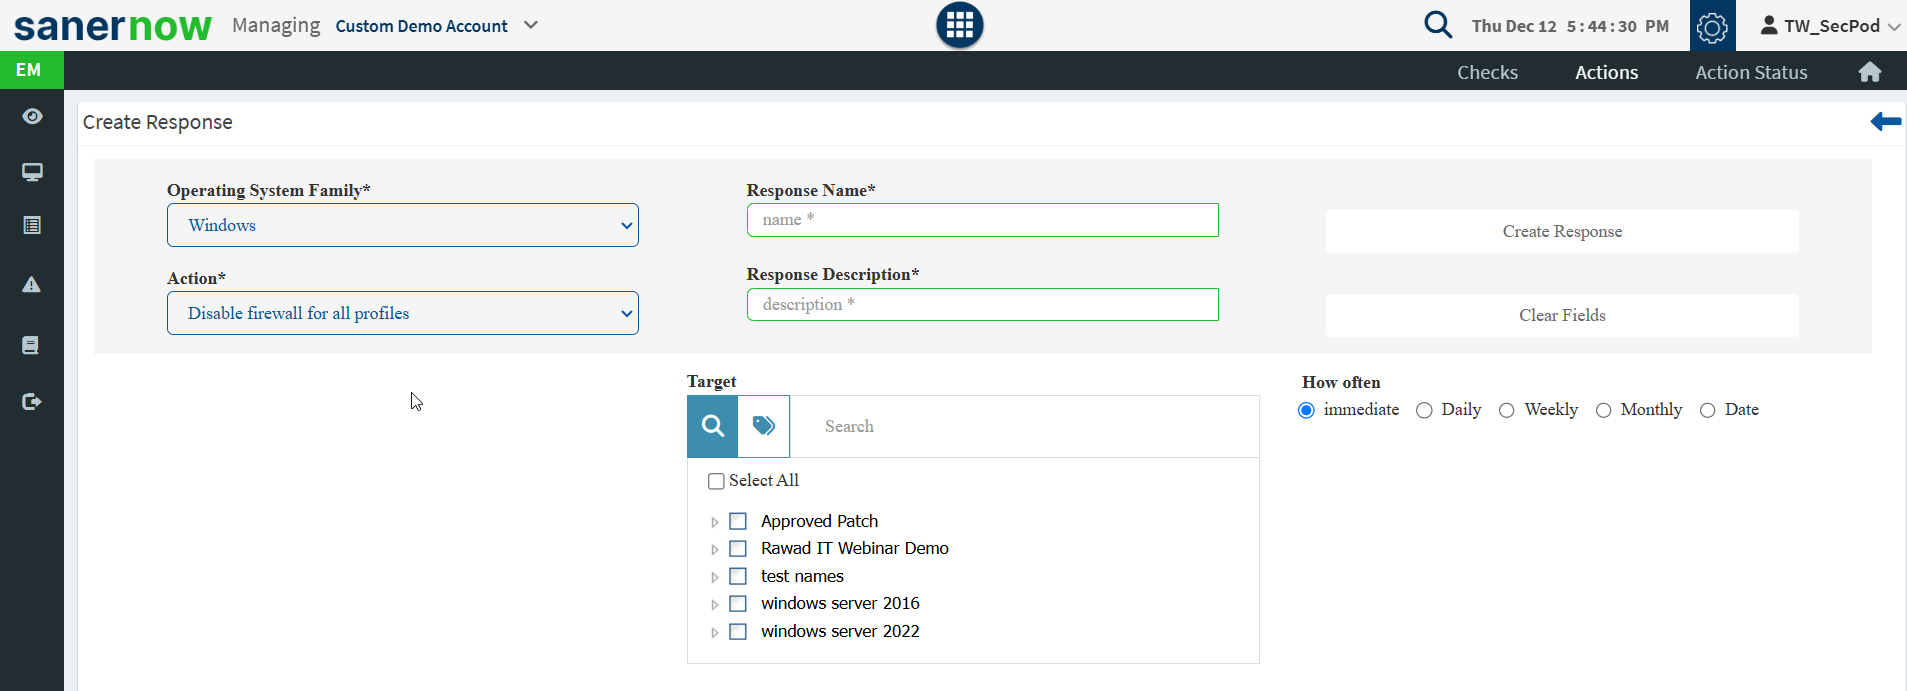
The predefined actions are listed on the Actions page. You can choose to enforce some of the actions as an organization rule, for example, blocking a USB mass storage device. You can also customize the response to run at specified intervals as many times as required.

Following is the list of predefined actions:
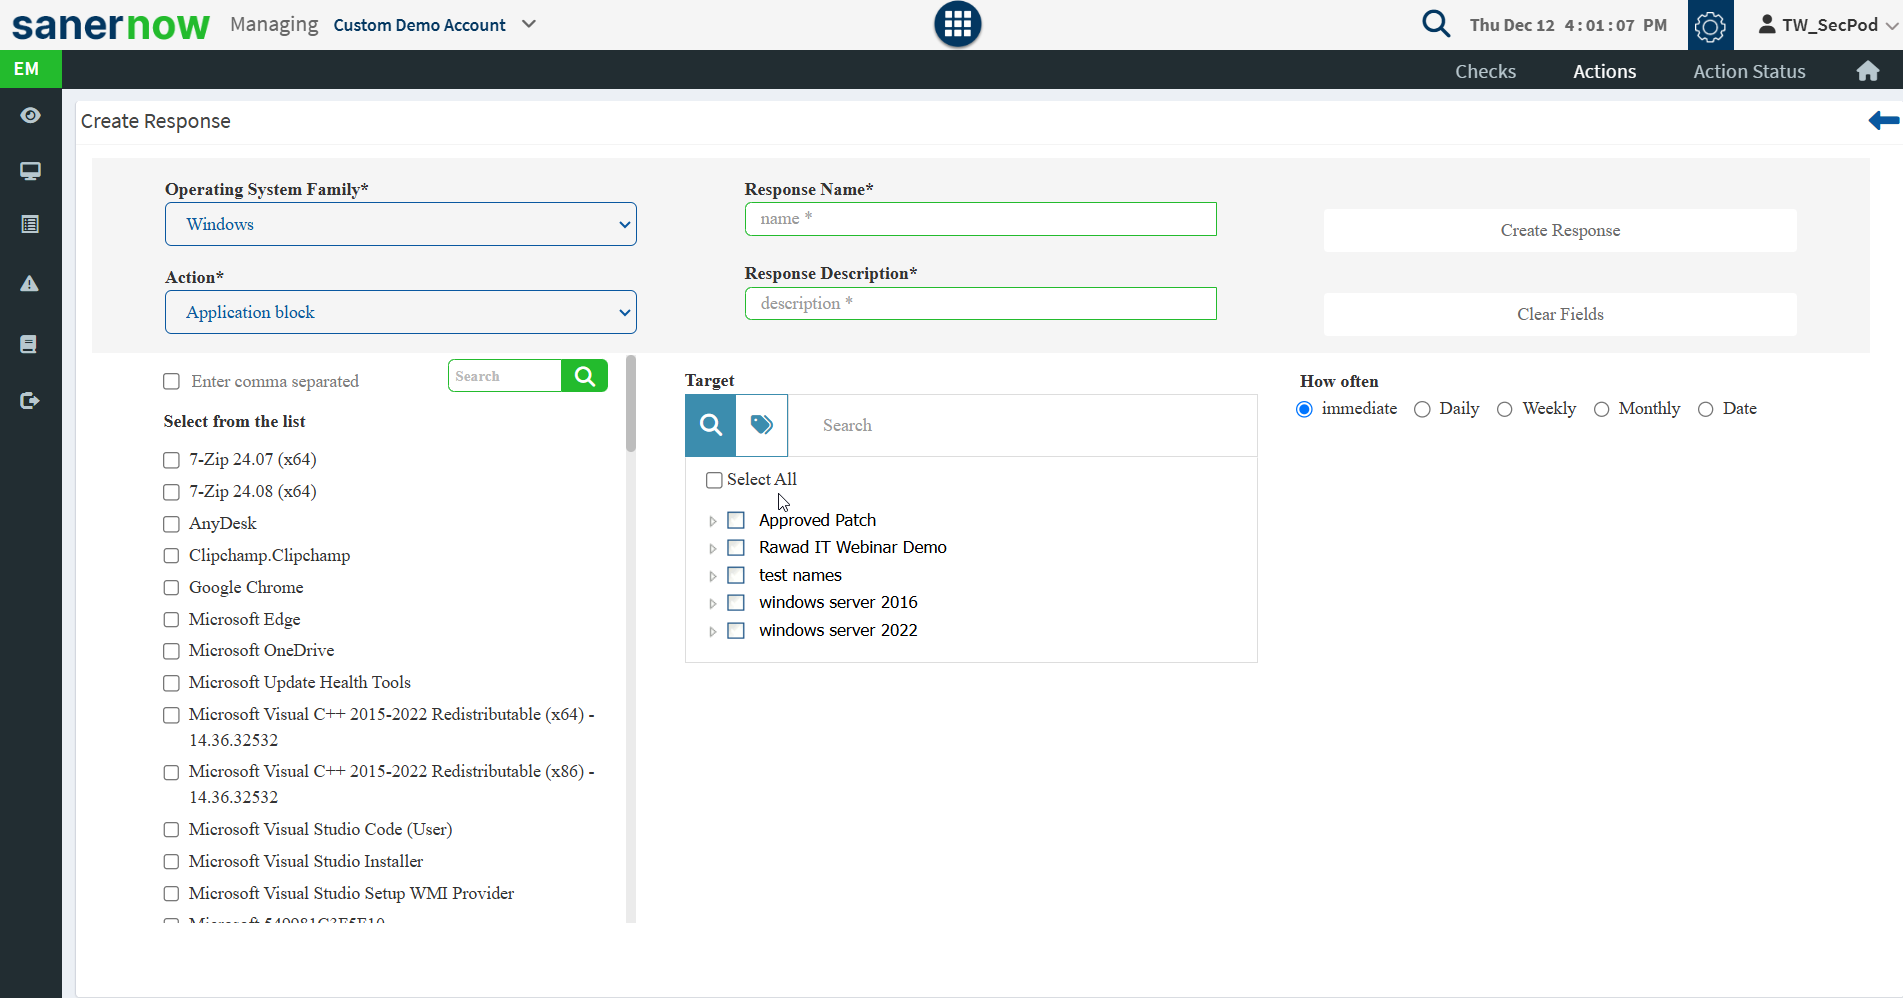
- Application and Device Control – Block or unblock applications and enable or disable devices.
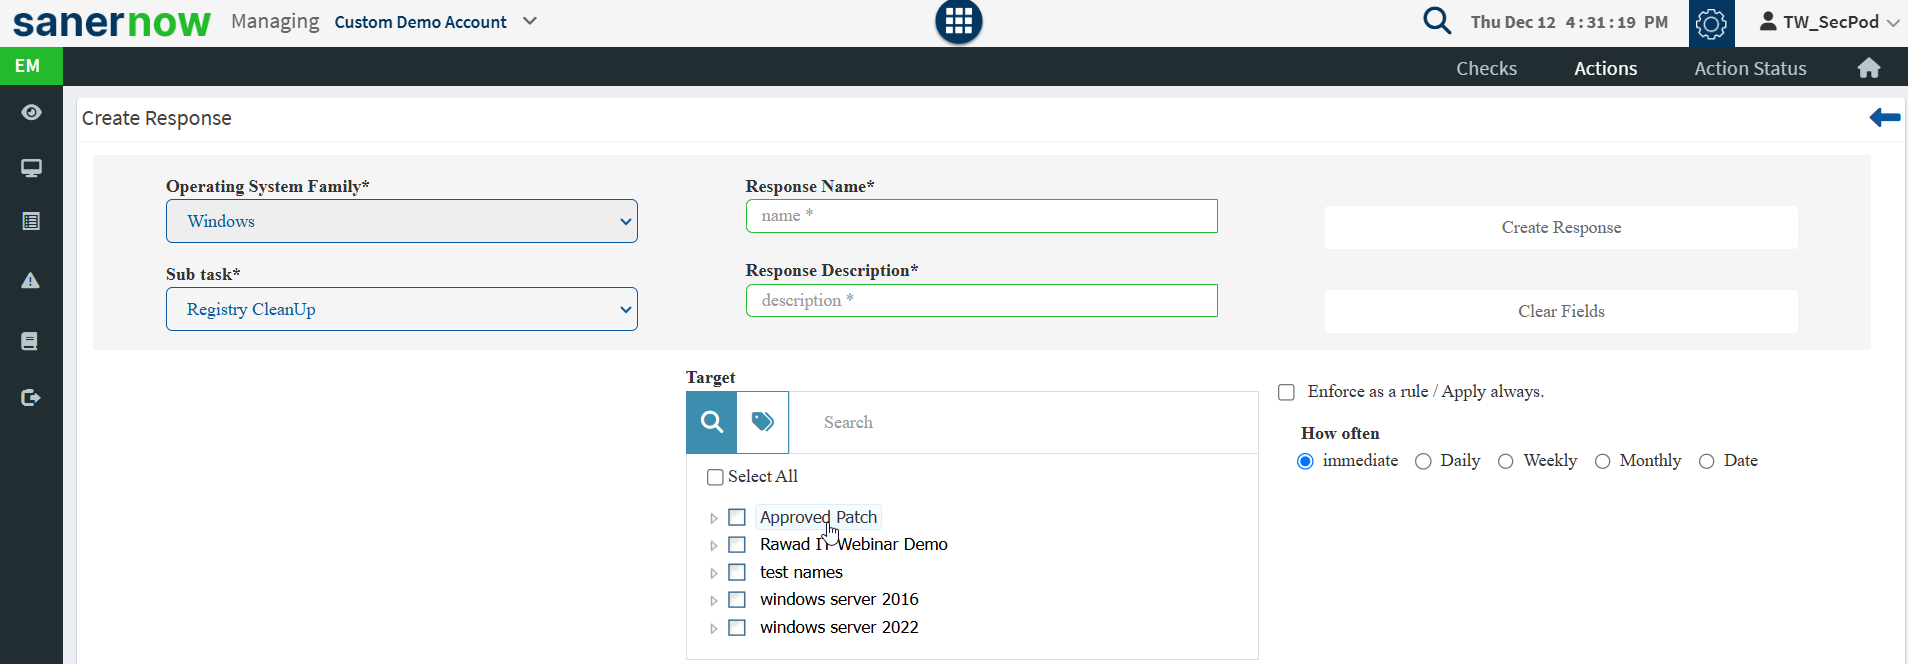
- Tune-Up– Clean up the system or the registry to improve the performance of devices.
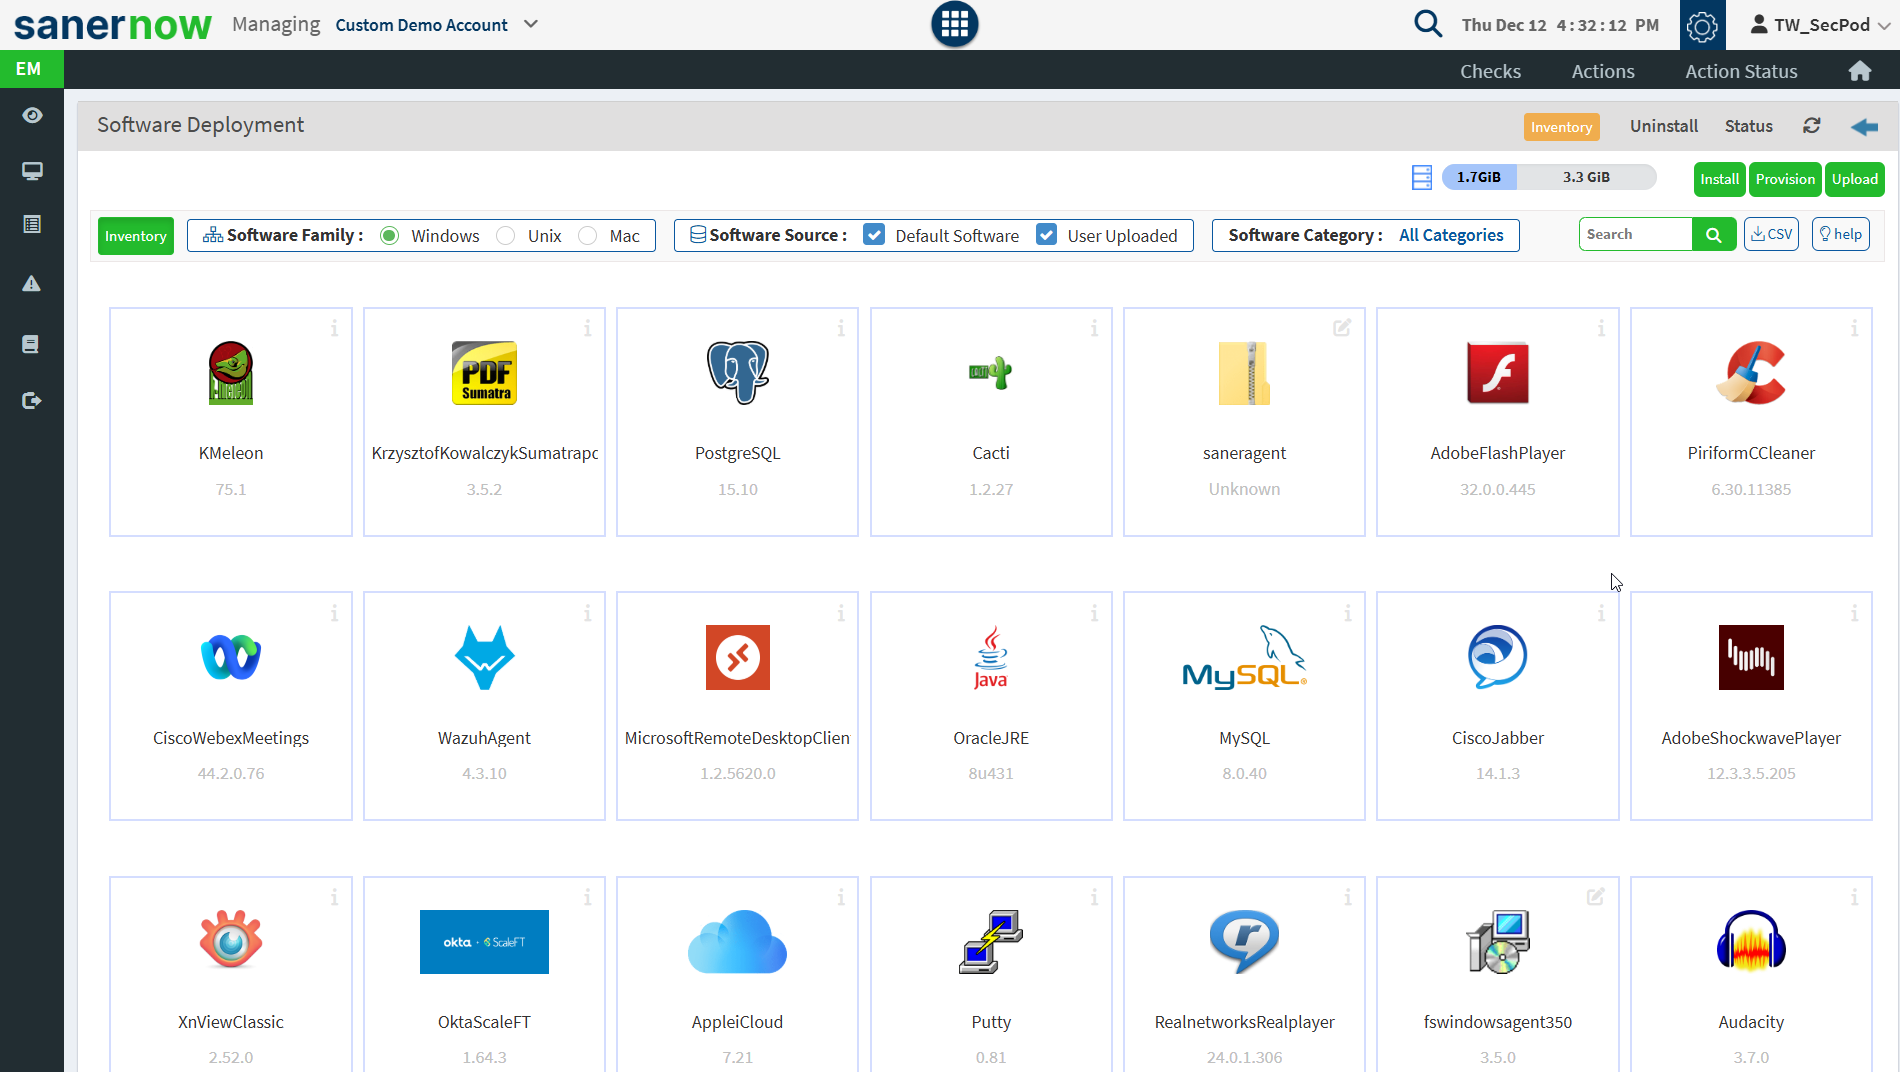
- Software Deployment – Install or uninstall applications or install patches. Check out the software deployment technical document for more information.
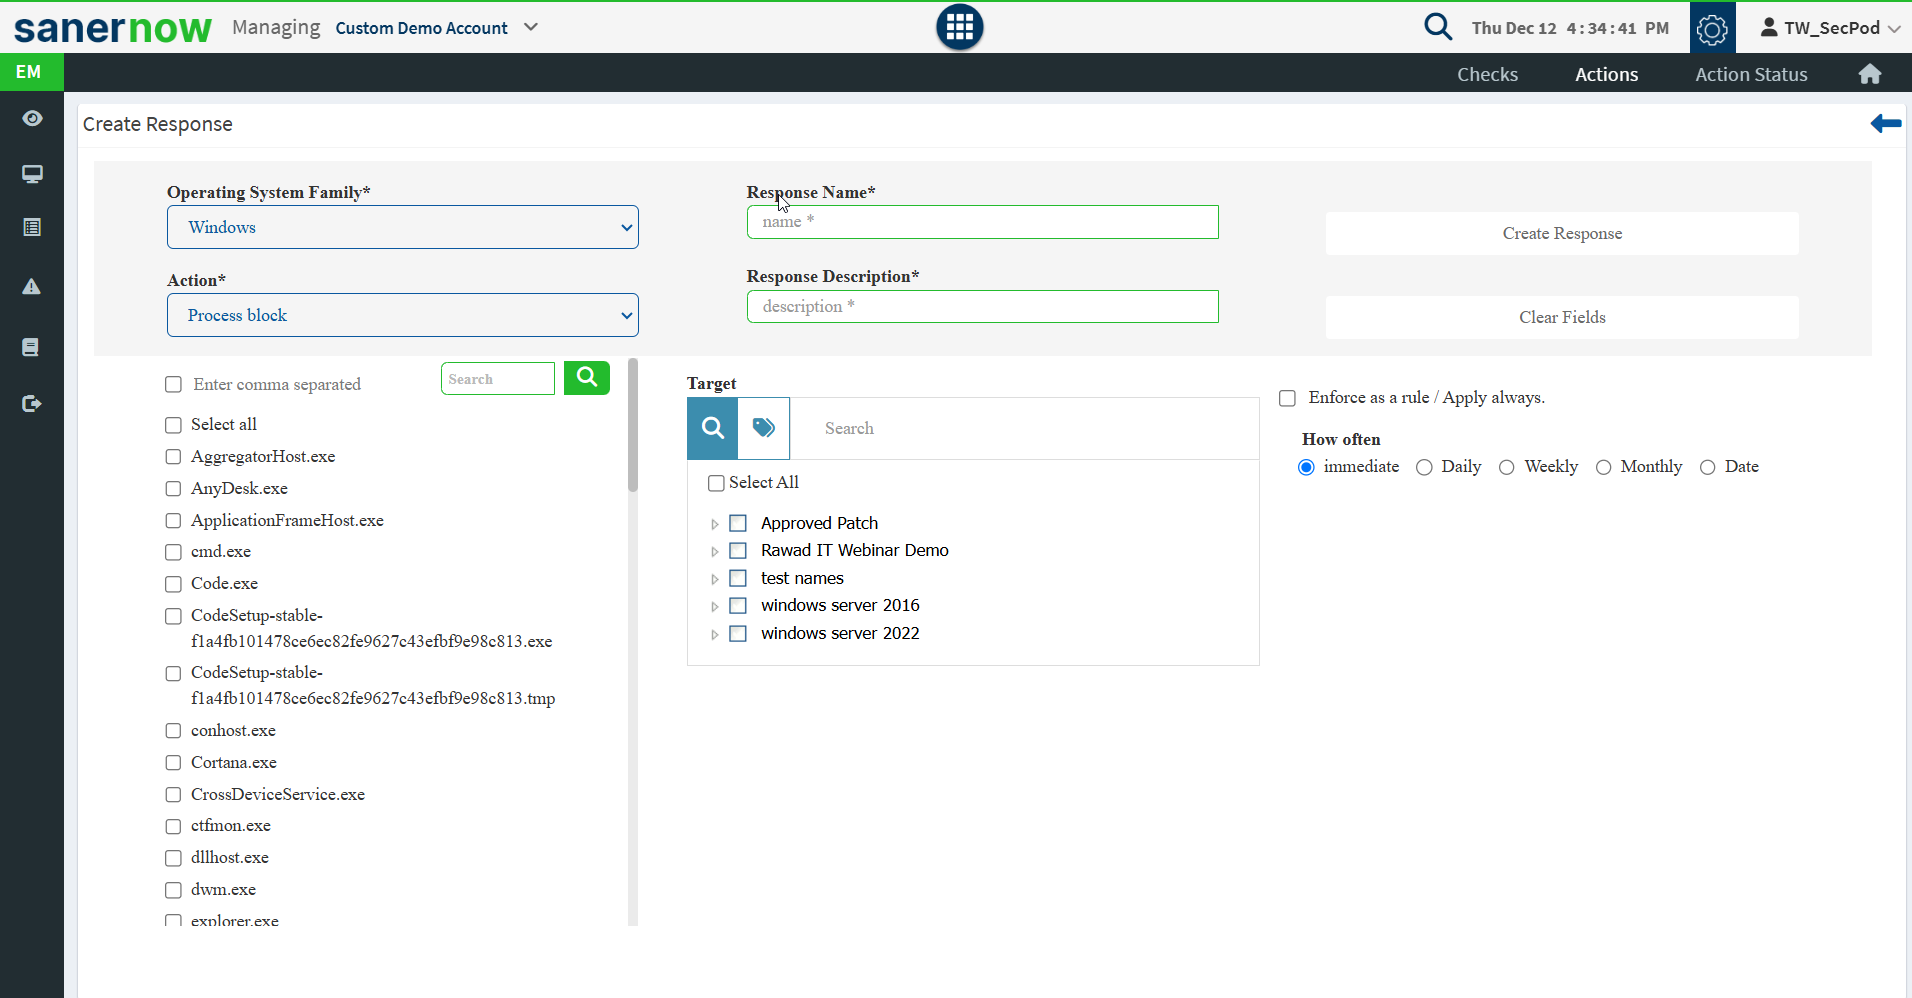
- Process – Unblock or start required processes or block or stop unwanted processes running on devices to prevent attacks.
- Registry – Add, modify, or delete registry keys.
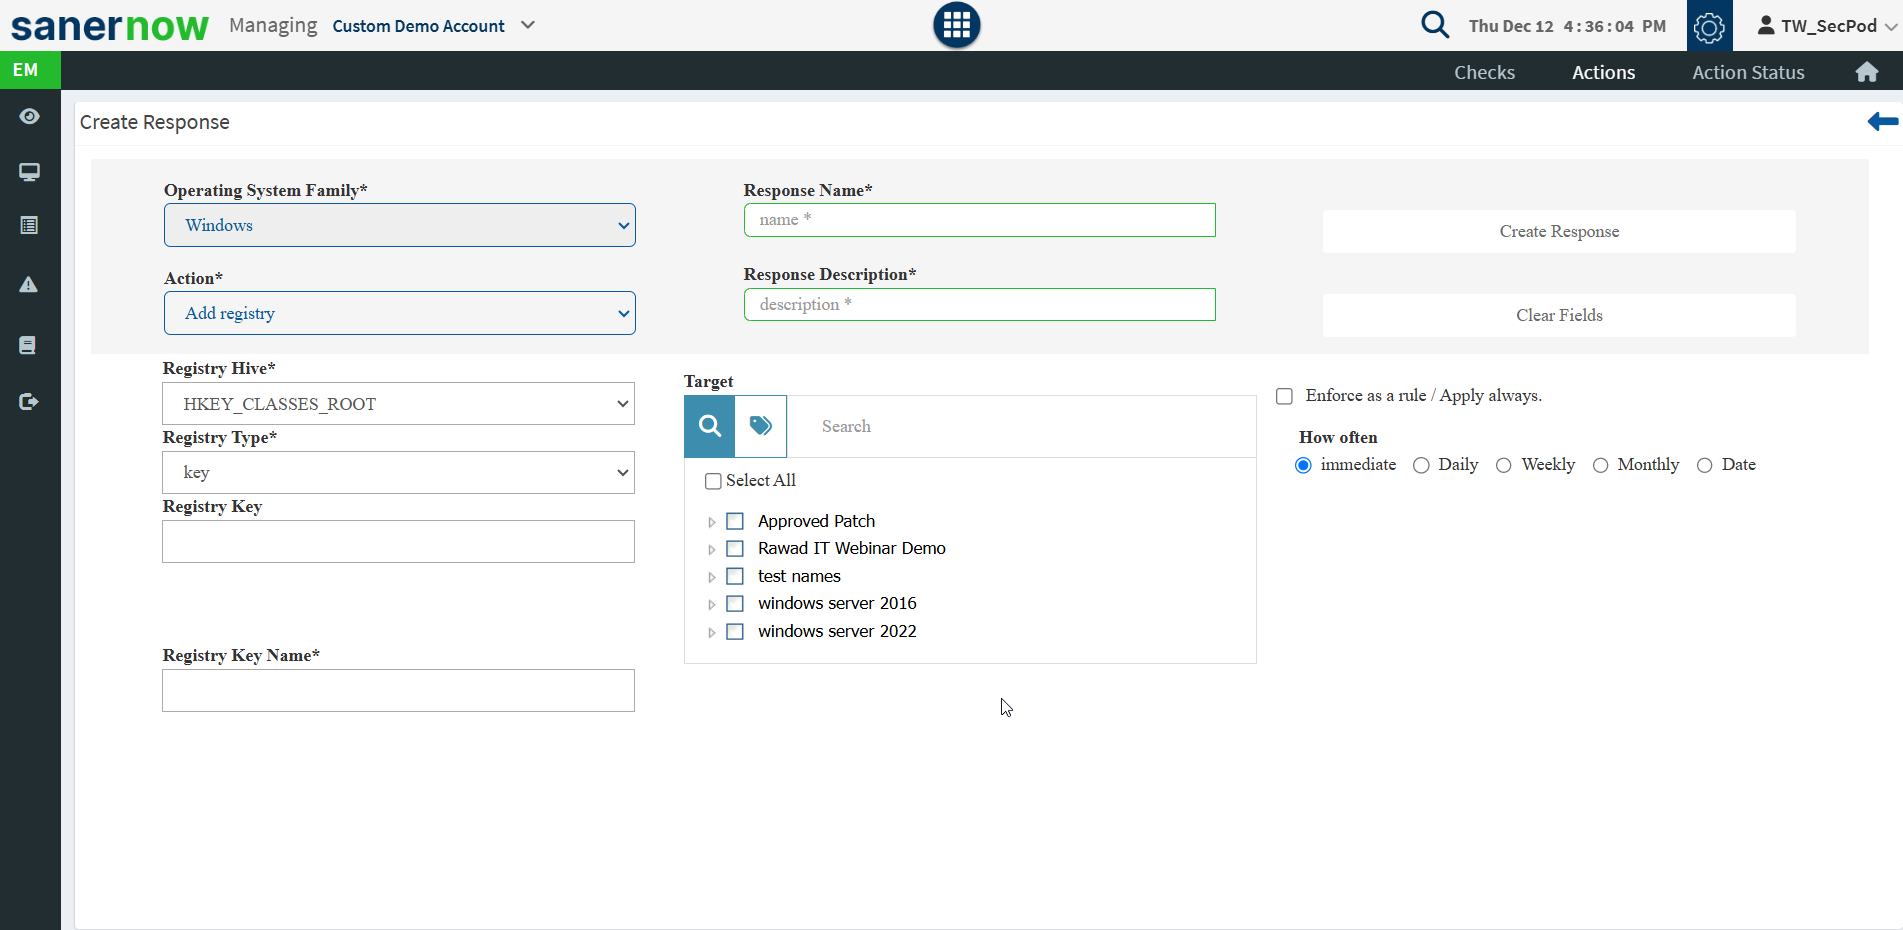
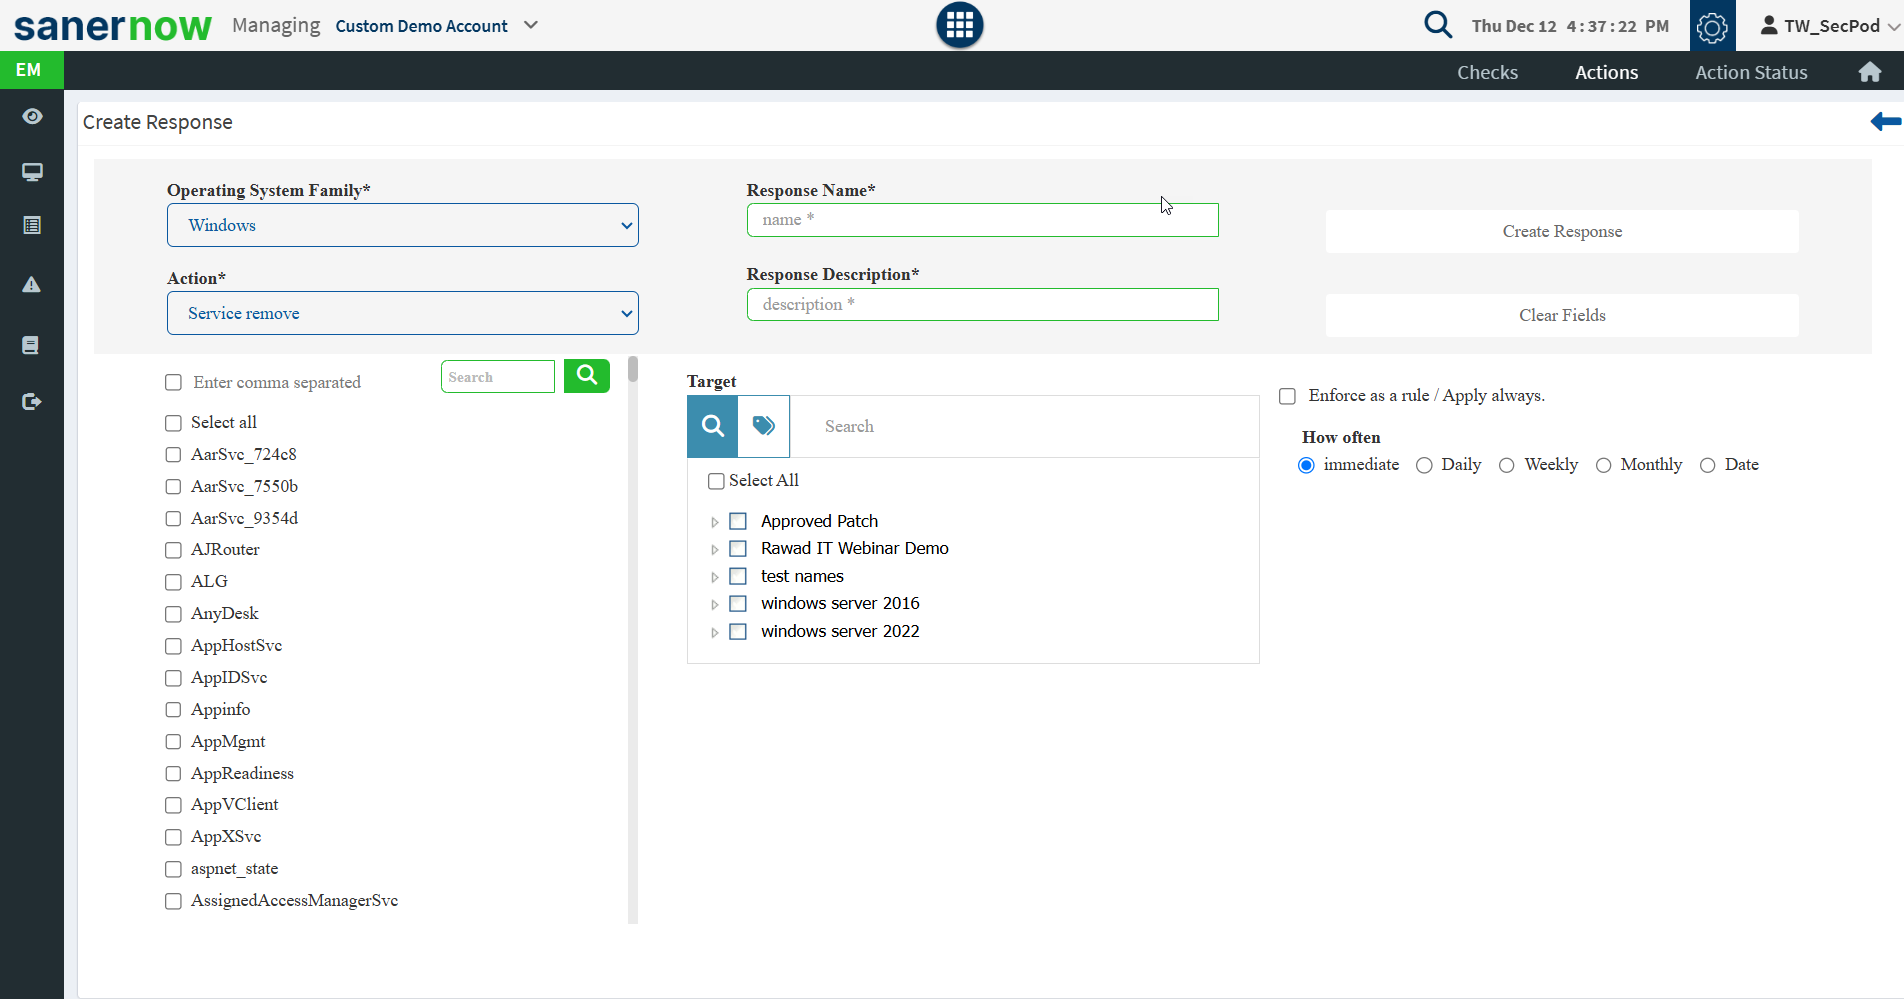
- Service – Start, restart, stop, or remove services.
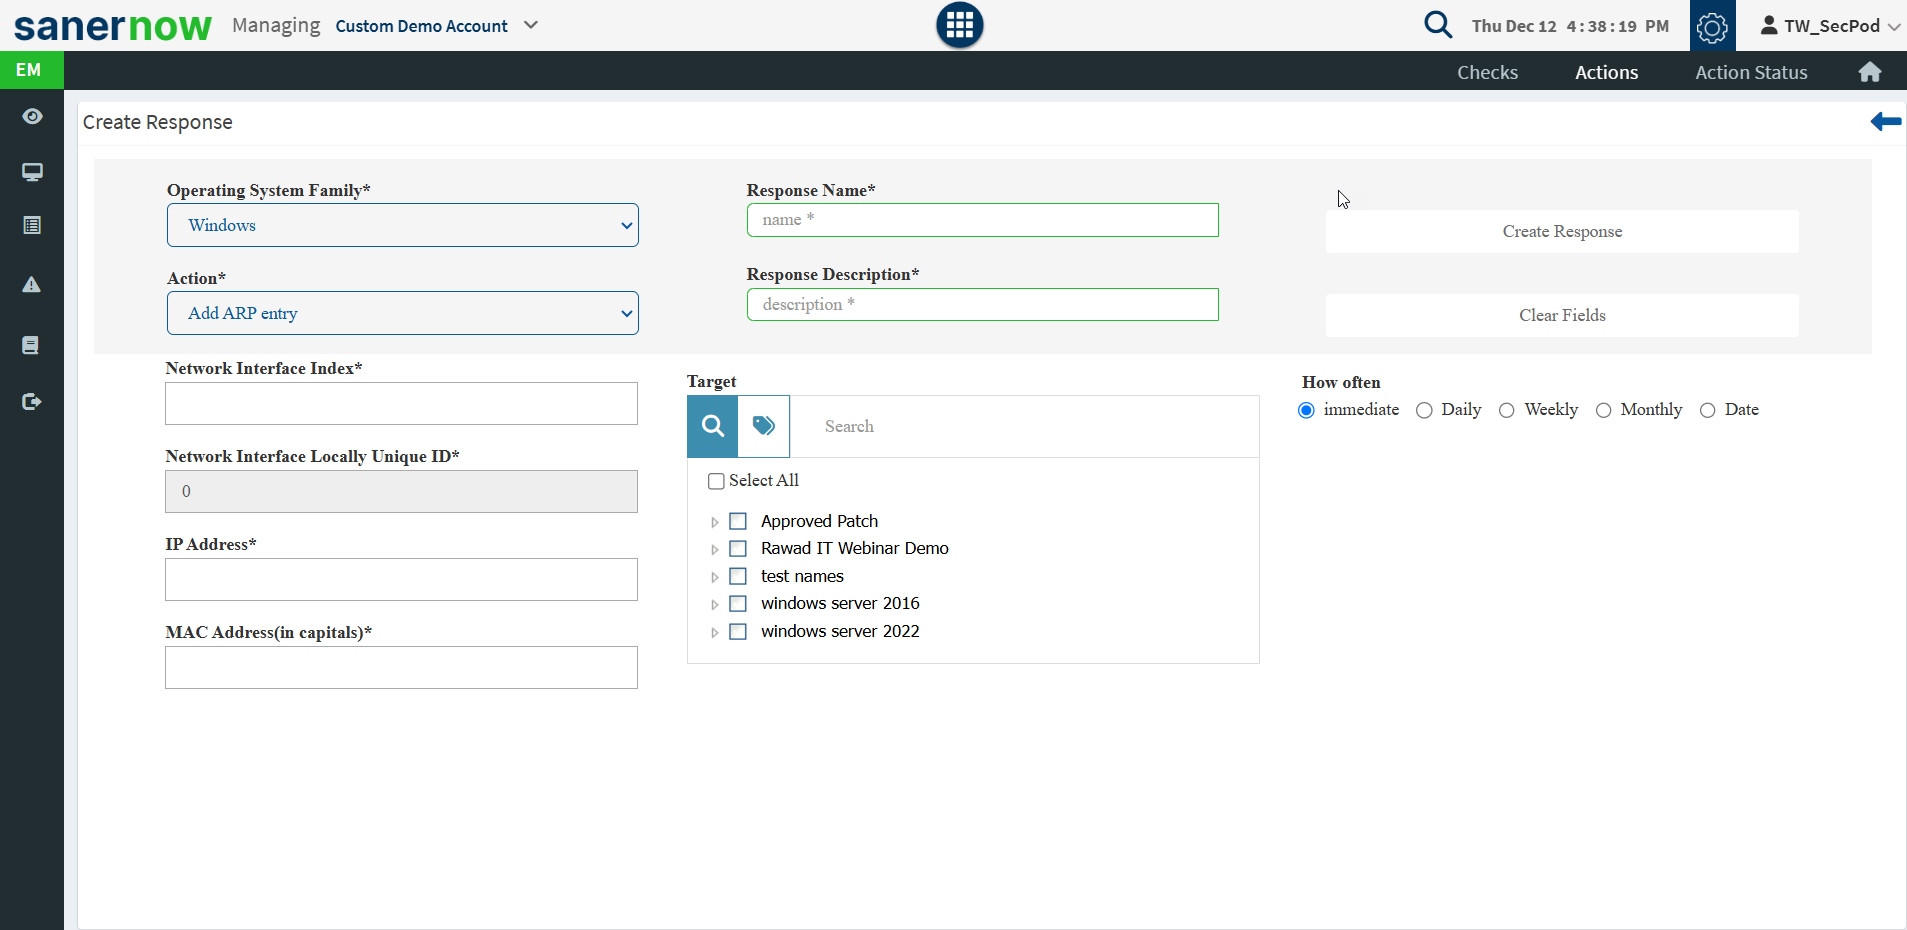
- Network – Block or unblock domains, flush ARP entries, set a static IP address, etc.
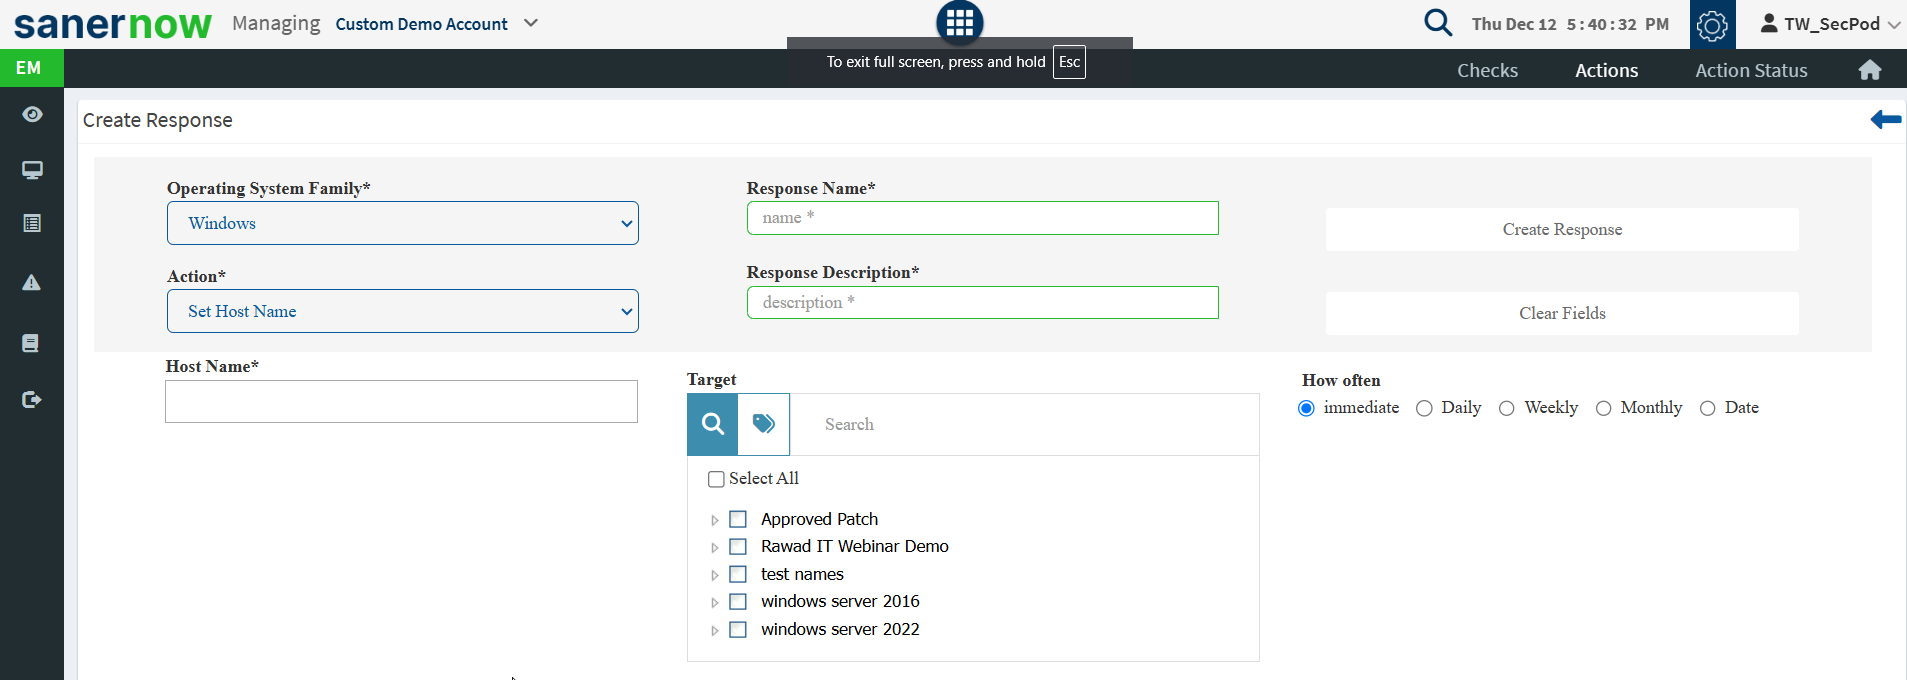
- System – Reboot systems after patch or application installation, or shutdown systems that are being attacked by malware to prevent the spread of the vector or protect the device, set the hostname, mount file systems, etc.
- File – Delete infected files, or quarantine them if you cannot delete them.
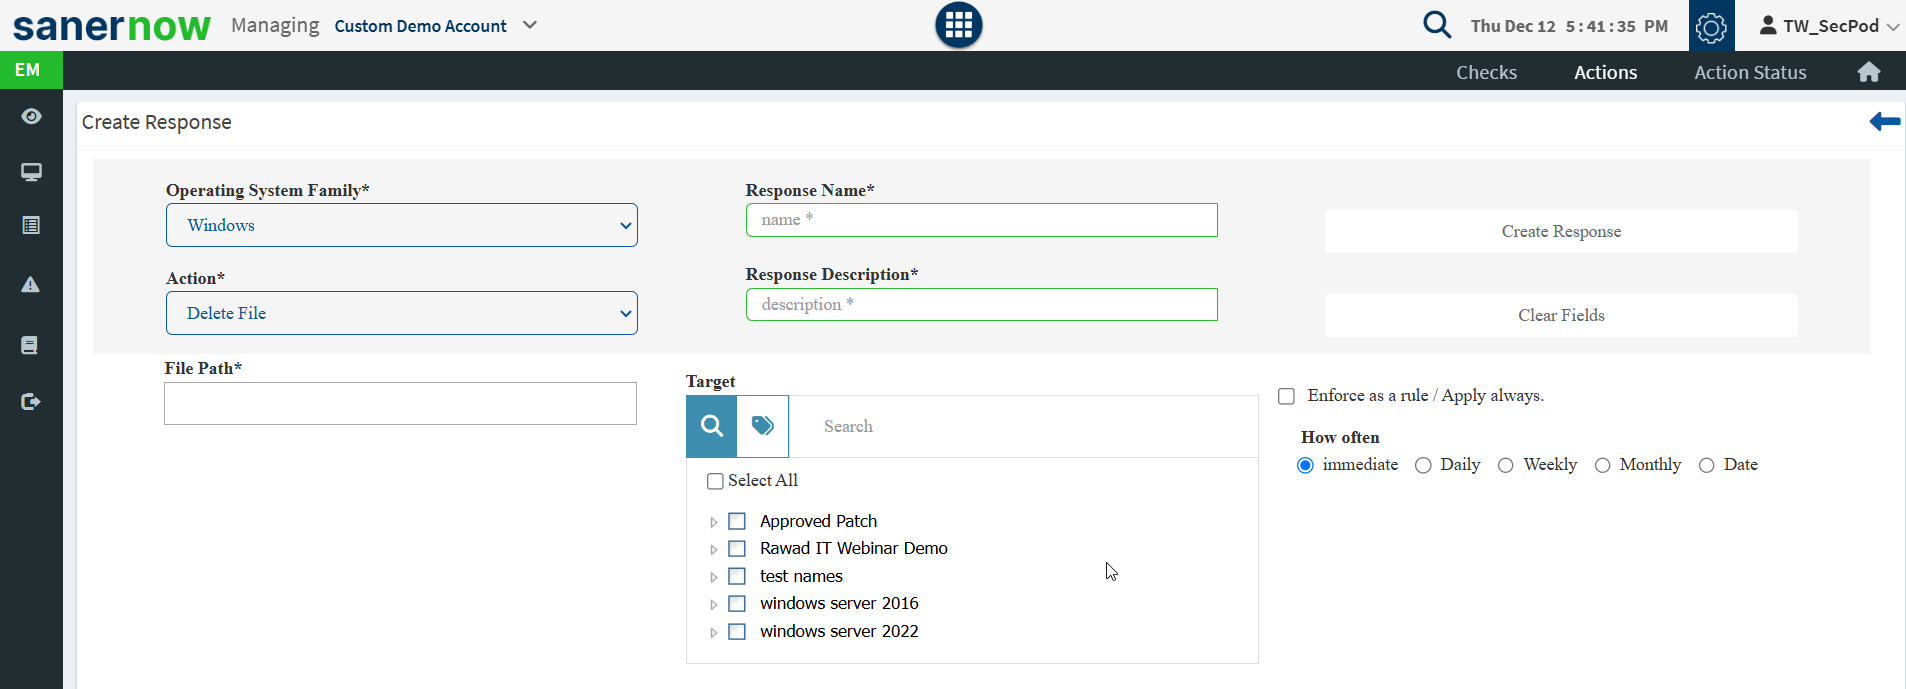
- Start-up Programs – Specify programs that you want to automatically start during a system reboot or as scheduled, for example, when the application has finished executing a task, or remove programs from the start-up.
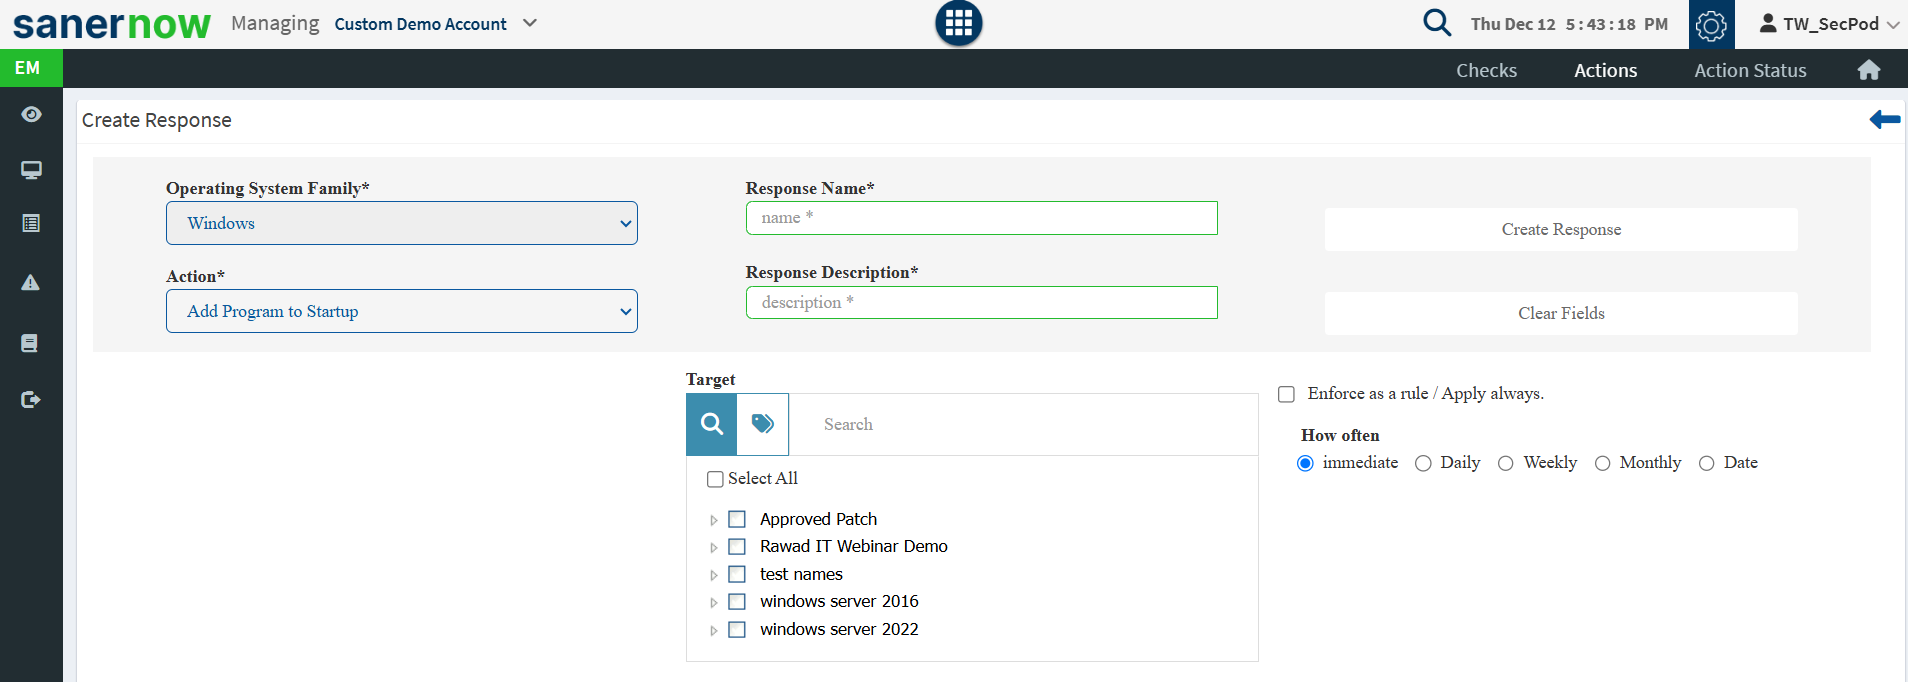
- Security – Disable or enable firewalls.
Remote Access
Saner Remote Access is an easy-to-use, highly secure, on-demand remote support tool in Saner Endpoint Management (EM) that helps IT administrators resolve end-user issues remotely. Using Remote Access, you can assist users using Windows, macOS, and Linux devices without installing additional software.
Features of Saner Remote Access
Graphical and CLI Support: Saner Remote Access lets you connect to a device’s graphical and command-line interfaces. While initiating a remote support session, the IT administrator can choose which interface they want to connect to the device.
Built-in User Approval: Saner Remote Access has a built-in user approval feature that asks for user consent before starting the remote session. Similarly, the end user can terminate the session at will once the remote session is established.
Auto-connect with End-user: Saner Remote Access allows IT administrators to auto-connect with end users in the future to help them fix issues if the end-user has opted in for it.
Share Files with End-user and vice versa: Saner Remote Access allows you to share files with the end users remotely. At the same time, the end users can also share files with the IT technician remotely.
Unattended Remote Access: Using Saner Remote Access, IT administrators can set up unattended remote access on server-class devices. This allows them to launch a remote command prompt or terminal window and work on these devices anytime.
To learn more about Saner Remote Access, click here.
Detection Summary
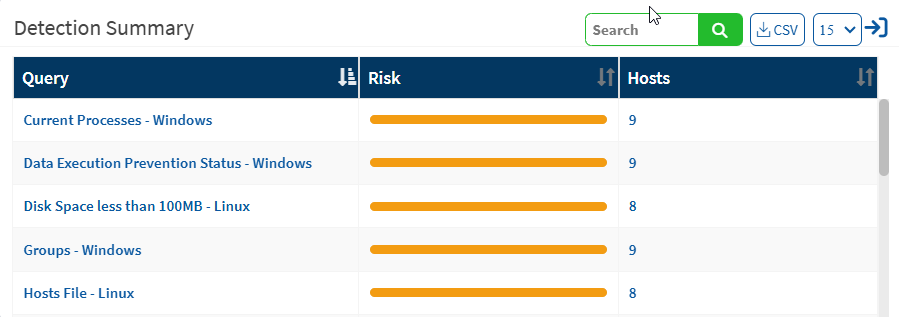
This page shows the list of all checks that have been executed and corresponding devices. Only checks with results are displayed. Yo
u can download the excel sheet that lists queries with the risk details by clicking on the CSV icon. Click on the expand icon to get more information about the predefined checks.
Response Summary
This page shows the list of all responses that ran to remediate the results from checks, the response status, the type of response, and the date and time of execution.
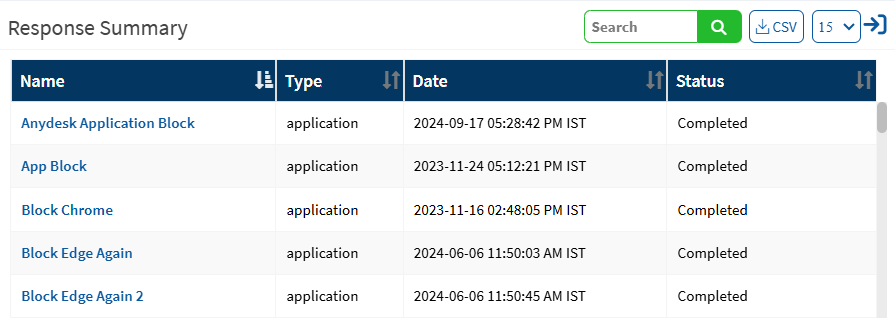
Click the Expand icon to view details of individual response actions. The Actions Status provides Status View and Creation View. Status View provides information on the Host Name and the Overall Status. Click on the plus icon to get the full details about the action. The Creation View shows the type, creation date, action, hostname, values, and the scheduled details of the action.

Setting Alerts for Endpoint Management
The Alerts feature is used to monitor the health of your endpoints or to view newly added endpoints.
To Set Alerts for Endpoint Management
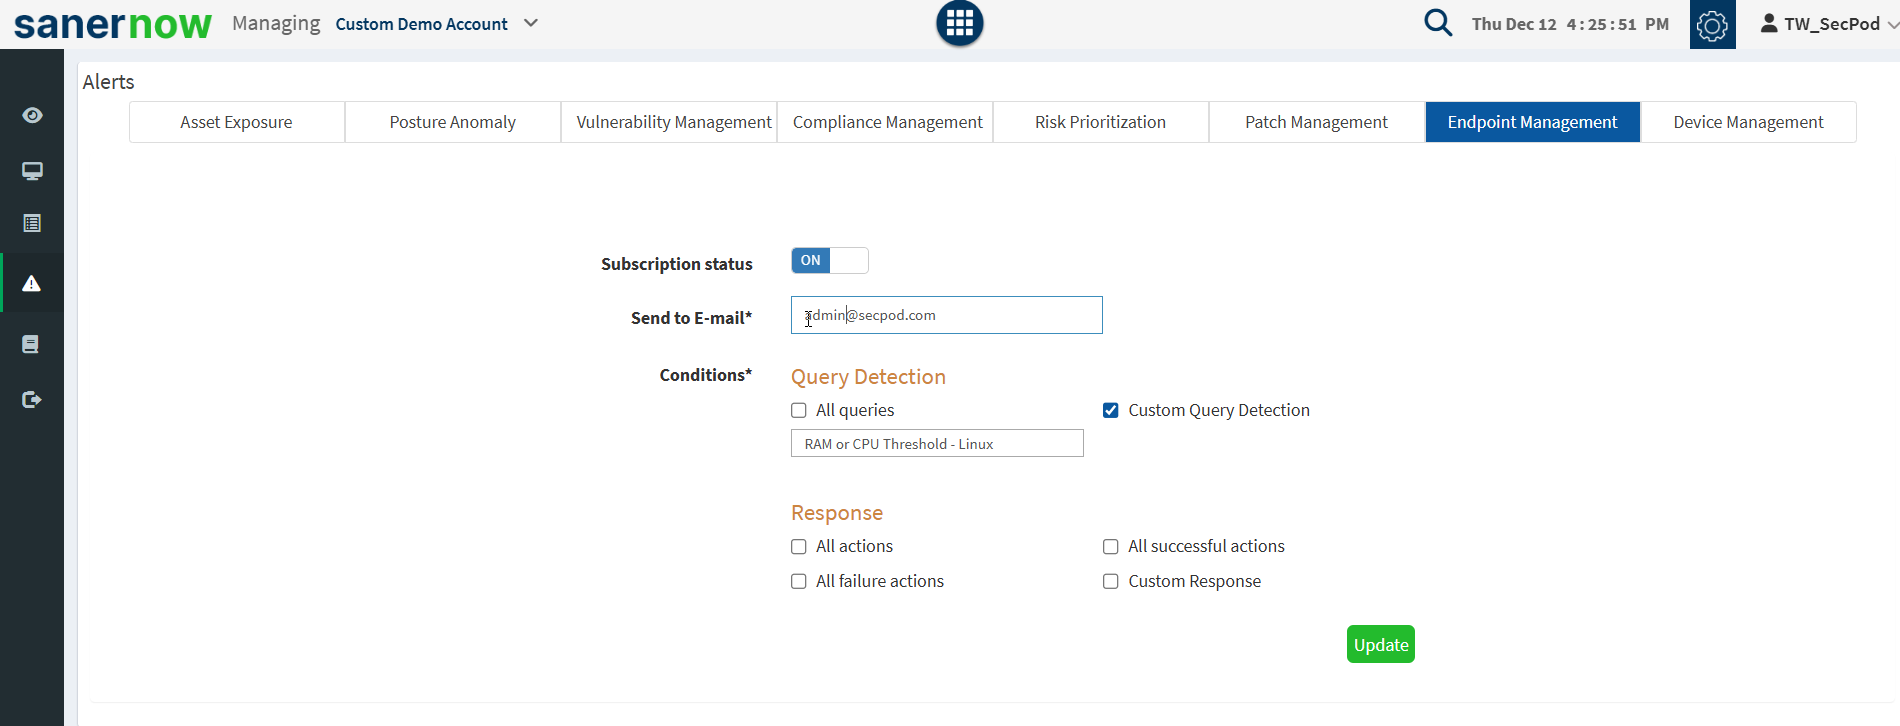
- Click Alerts > Endpoint Management.
- Set the Subscription status to On.
- Specify the email address to which you want the alerts sent.
- Specify the conditions for which you want the alerts sent:
- Query – You can choose to receive alerts for all queries executed on the endpoints or for custom queries. If you select the custom option, you must specify the condition.
- Device – You can choose to receive alerts for Inactive devices or when devices are added to the network.
- Response fields – You can choose to receive alerts when actions on endpoints pass, fail, or for a custom condition.
- Click on the Update button to complete.
Endpoint Reports
Endpoint Reports provide a comprehensive view of the devices on the network, newly added devices, unscanned devices, groups and types of devices, details of each device, and the status of the jobs for each device.
To Generate the Endpoint Management Report
To export the report to a PDF
To export the report and send it via email
To Back Up Reports
The backup settings under Reports allow IT, administrators, to obtain a backup report showing the history. The backup time should be scheduled. The backup report can be scheduled to run automatically daily or weekly.
- Select the Settings icon at the endpoint management report from the Saved Reports section.
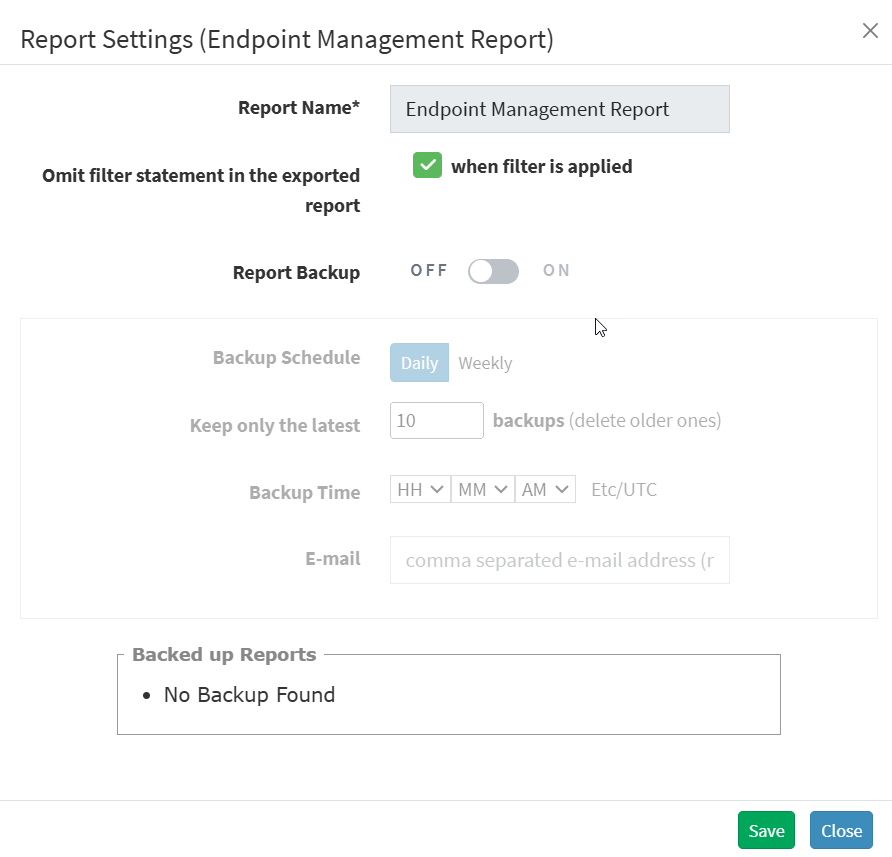
- Click the Omit filter statement in the exported report check box, and users can set the on/off button whether they want to back up the report.
- Select the weekly or daily option to back up the reports if the backup is ON.
- Set a number in the Keep only the latest entry box. The report for the specified number of days is archived. If the number is three and the backup option is daily, then the reports from the last three days are maintained. Older files are deleted. You can maintain backups for a maximum of 30 days.
- Specify the Email ID address.
- Select the organization and accounts you want to apply these settings.
- Click on the Save button.


