Pre-requisites
Users can onboard one or more GCP projects to a single Saner Cloud GCP account. Note that these projects must be linked to an Active billing account. The onboarding process creates a GCP Service Account in only one project. Users must have Editor, Project IAM Admin, and Role Administrator privileges for this project. For additional Projects that need to be onboarded along with the main Project, the user must have Project IAM Admin and Role Administrator privileges. Additionally, user must have Super Admin access to the Google Workspace Admin Console.
Notes:
- Keep the Domain Name, Organization ID, and Project IDs handy as that’s needed for the Onboarding Process.
- In the Top navigation bar, click on your organization or project name
- Select “All Resources” to view Organization ID and Project IDs required for Onboarding
- After service account credentials are generated, scopes need to be added through “GCP Workspace Admin Console” to the Service Account by the super Admin.
- Make sure the project where the Service Account gets created has lesser than 100 existing Service Accounts. GCP limits each project to a maximum of 100 Service Accounts, so onboarding fails on exceeding the limit.
Create a New Account in Saner Cloud
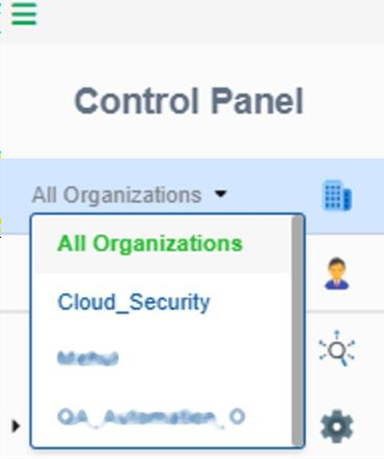
Step 1: In the Control Panel, open the All Organizations dropdown menu and select the organization for which you want to create the new account.
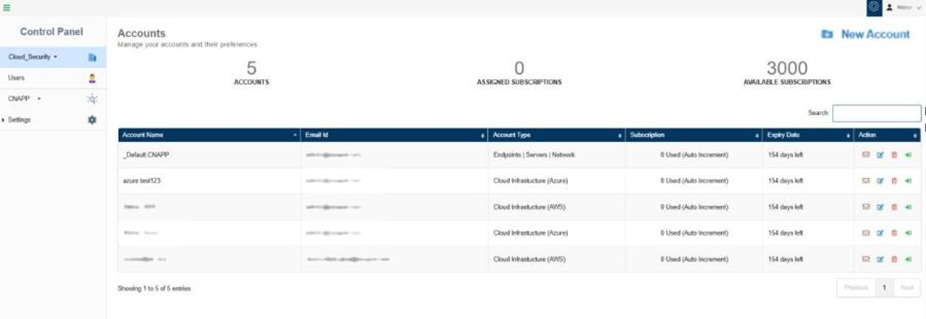
Step 2: To create a new account, click the New Account button on the top-right of the page.
Step 3: Complete all the details required to create the New Account.
- Provide the name of the cloud account
- Key in a valid email address
- Choose the account type “Cloud infrastructure” from the drop-down list
- Choose the cloud provider as “GCP” from the drop-down list
- Turn on the slider to provision the relevant tool for the account
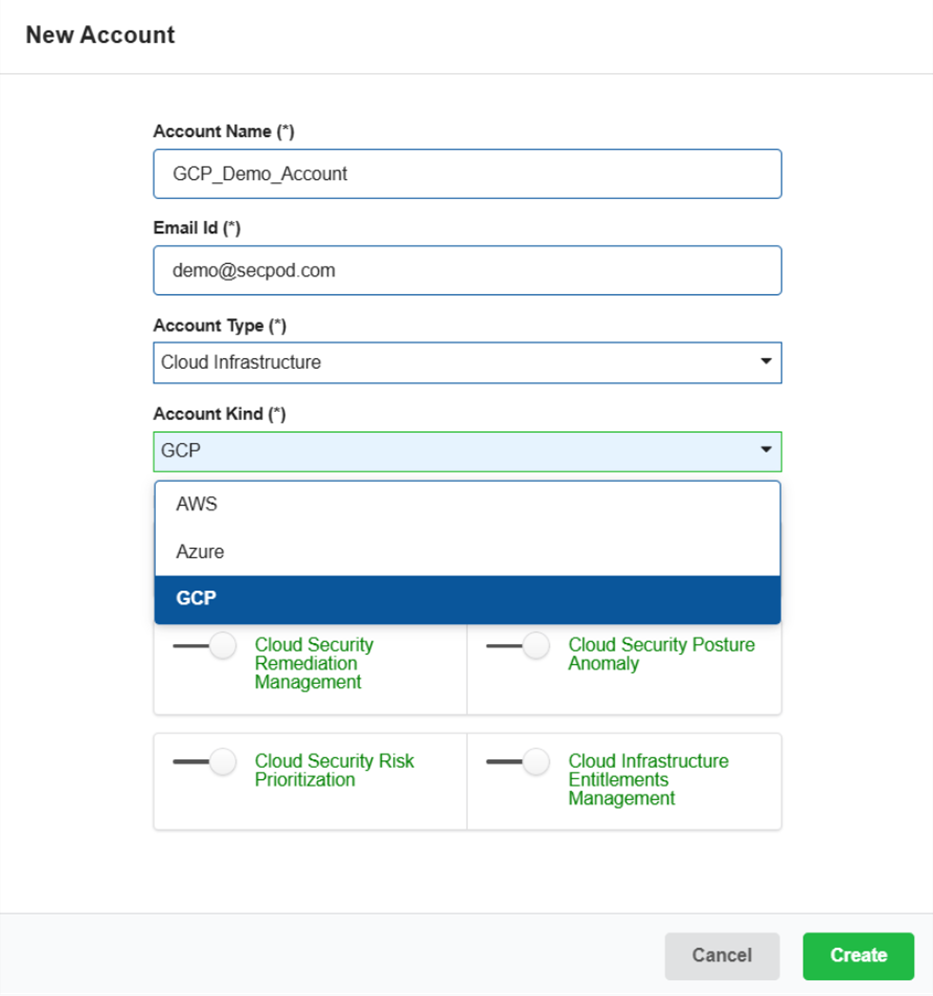
Step 4: Click the Create button.
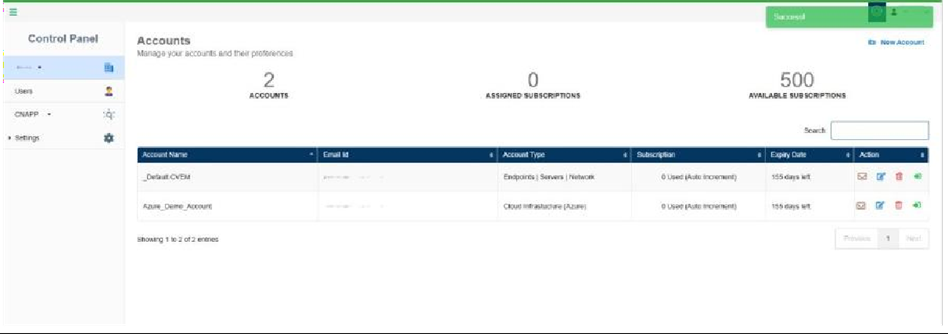
The newly created account displays in the Accounts page within a tabular format with the following details:
- Account Name
- Email ID
- Account Type
- Subscription
- Expiry Date
- Action
Note: In the Action column, you have the facility to set up the mail settings for the corresponding account, edit the current account details, delete the account, and redirect to the dashboard view of this account.
Download the Project Onboarding Script “.py” OR “.sh”
Just make sure to have logged into the application with administrator privileges. You can download the .py or .sh files from the GCP Onboarding page in Saner Cloud Security Deployment.
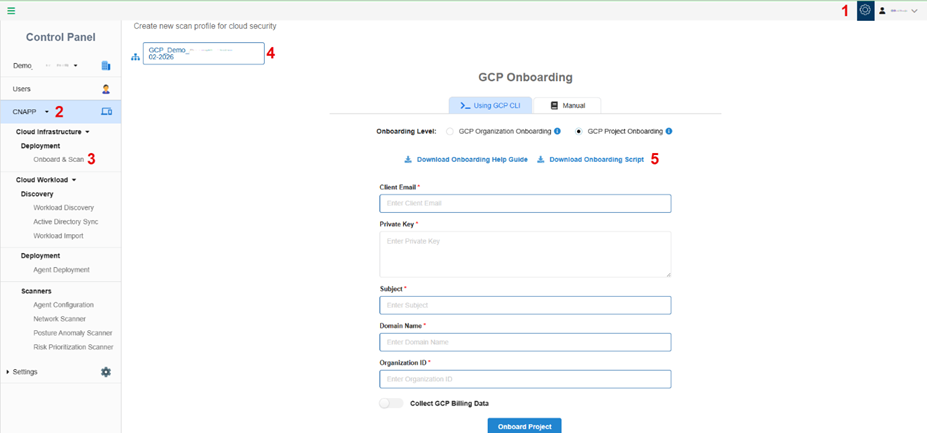
- Access the Control Panel and choose the relevant organization.
- Click on the CNAPP menu from the sidebar.
- Choose Onboard and Scan under Cloud Infrastructure Deployment.
- Choose the Account Name that you want to onboard. The GCP Onboarding page opens.
- Click the link “Download Onboarding Script” and click the script you choose to download.
Note: Make sure you extract the script files from the compressed (.zip) folder.
Onboard GCP Project to Saner Cloud
Step 1: Generate Onboarding Credentials using GCP Cloud Shell
From the GCP Console:
- Log in to GCP portal. At the top bar, click Activate Cloud Shell.
Note: If this is your first time using the Cloud Shell, you’ll be prompted to learn more about the shell. Click Continue to proceed. Review the GCP Documentation.

2. Upload the script to GCP CLI. Click the More (vertical ellipsis), then click Upload,and select the onboarding script (either python or a shell script) from its downloaded location, and then click Upload.
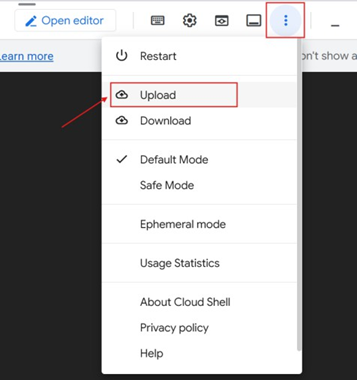
Once the script is uploaded to the terminal, look for the message on the terminal for successful uploading of the script.
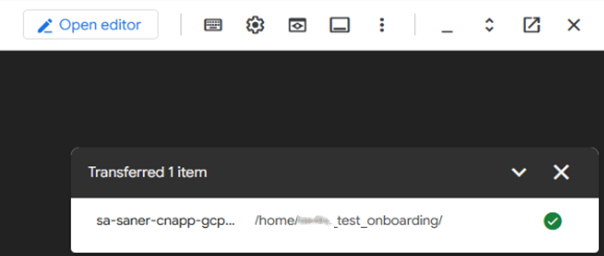
3. Verify with the ls command to check whether the script has been successfully uploaded on the terminal.

4. Run the command below to switch to the main project where you want to create a service account.
gcloud config set project <project-a>

5. Onboard GCP Projects to Saner Cloud.
You can onboard your GCP projects to Saner Cloud by executing the provided .sh or .py scripts.
A. Execute “.sh” Script
Pre-requisite:
Ensure execute permission is granted to the script:
chmod +x sa-saner-cnapp-gcp-enable-onboarding-permissions-project-level.sh
USAGE HELP:
To view usage instructions, run the script with –help for .sh file
./sa-saner-cnapp-gcp-enable-onboarding-permissions-project-level.sh –help
i. Onboard a Single GCP Project:
- Replace <project-a> with the actual Project ID and execute the command.
./sa-saner-cnapp-gcp-enable-onboarding-permissions-project-level.sh –main-project <project- a>
- After successful execution, proceed to Point #6.
ii. Onboard Multiple GCP Projects:
- Replace:
- <project-a> → Project where the service account gets created
- <project-b, project-c> → Actual Ids of the additional projects
- Execute the command
- After execution, proceed to Point #6.
./sa-saner-cnapp-gcp-enable-onboarding-permissions-project-level.sh –main-project <project-a> — target-projects <project-b, project-c>

B. Execute “.py” Script
USAGE HELP:
To view usage instructions, run the script with –help for .py file
python3 sa-saner-cnapp-gcp-enable-onboarding-permissions-project-level.py –help
i. Onboard a Single GCP Project:
- Replace <project-a> with the actual Project ID (where the service account will be created):
python3 sa-saner-cnapp-gcp-enable-onboarding-permissions-project-level.py –main-project <project- a>
- After execution, proceed to Point #6.
ii. Onboard Multiple GCP Projects:
- Replace the <project-a> (where the service account gets created) and <project- b, project-c> with actual IDs of the projects in the below command and execute.
- After execution, proceed to Point #6.
python3 sa-saner-cnapp-gcp-enable-onboarding-permissions-project-level.py –main-project <project- a> –target-projects <project-b,project-c>

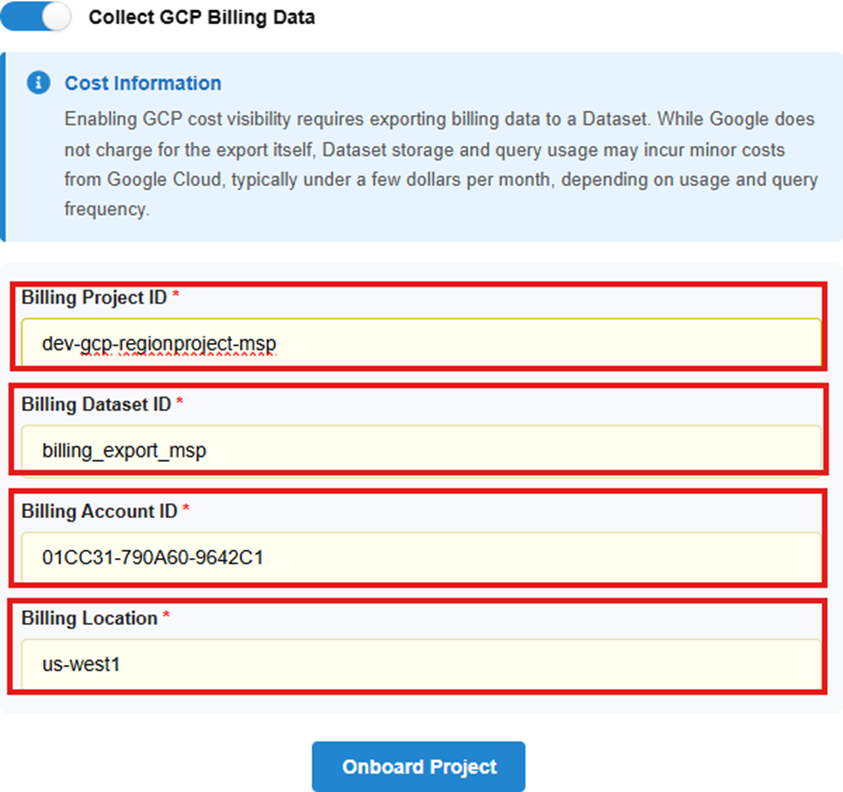
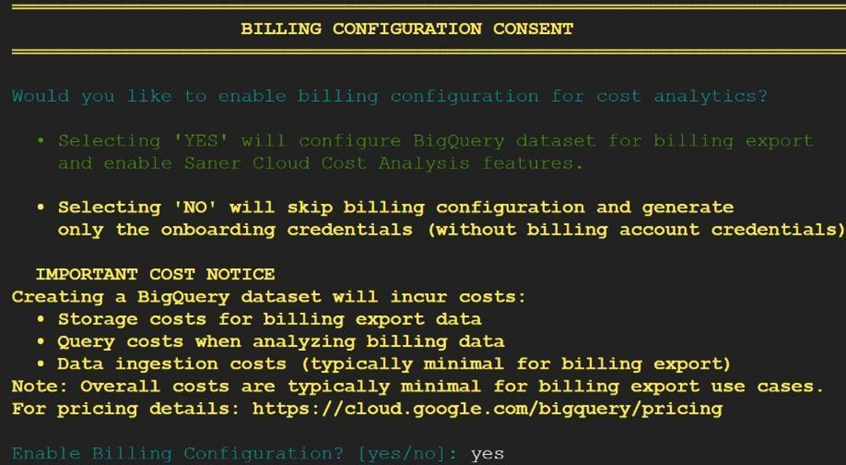
6. Configure Billing for CSAE Dashboard (Optional)
To view billing information in the CSAE dashboard, you must configure a BigQuery dataset for billing exports.
The script assists in:
- Creating a dataset in your desired GCP region
- Generating required credentials for onboarding
What Happens:
- Script initializes with billing configurations.
2. You select a dataset location/region from CLI options.
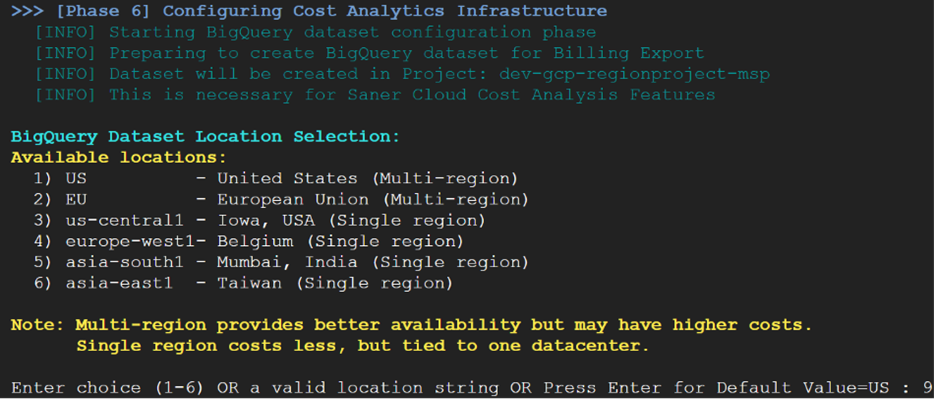
3. A JSON file is generated with credentials:
sa-saner-cnapp- onboarding-credentials-<time_stamp>.json.
Skip Billing Configuration
If you do not wish to see the Billing information on CSAE Dashboard, type No, when prompted by the script and follow the on-screen instructions.
i. Script initializes without the billing configurations.
ii. A JSON file is generated without billing setup.
sa-saner-cnapp- onboarding-credentials-<time_stamp>.json
Recommendations
- Copy the credentials from the JSON file to your Secure Vault.
- DELETE the credentials file after copying.
- DELETE the service account key file.
Clean Up Command
To delete the files run rm <file_name>
Step 2: Enable Domain-Wide Delegation (DWD)
Carry out the next few required steps, to add scopes to the service account that just got created.
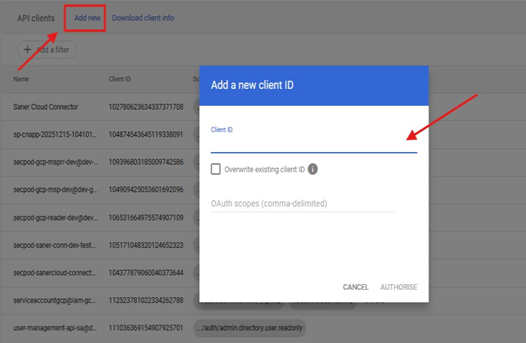
- Log in to admin.google.com and go to Security > Access and data control > API controls and click on Manage Domain Wide Delegation.
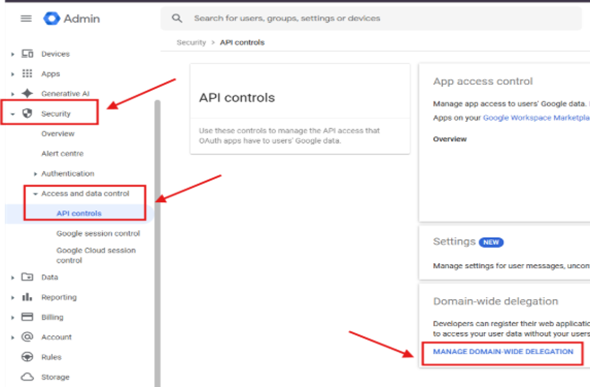
2. Add Scopes in Admin Console (Manual Steps)
- Click “Add new”
- Client ID: Copy the Client ID from the credentials from Step-1
- OAuth Scopes: Add scopes mentioned below to the Client Id
Note: The Scopes could be added one by one to separate fields or they could also be added in a single field with comma separated values.
https://www.googleapis.com/auth/admin.directory.user
https://www.googleapis.com/auth/admin.directory.group
https://www.googleapis.com/auth/cloud-identity
https://www.googleapis.com/auth/cloud-platform
https://www.googleapis.com/auth/admin.reports.audit.readonly
https://www.googleapis.com/auth/cloudplatformprojects
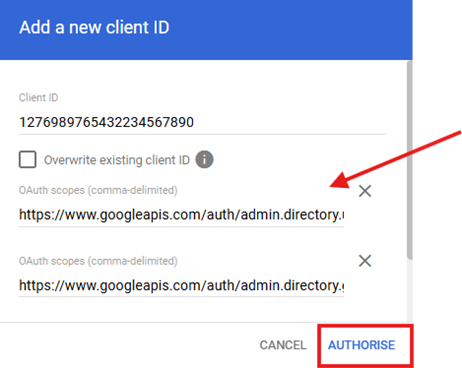
- Once all the Scopes are added, click on AUTHORIZE to update the Scopes
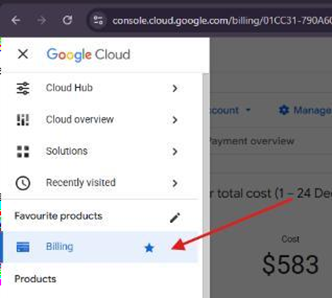
Step 3: MANUAL STEP REQUIRED FOR COST TRACKING
- Navigate to your cloud console, choose Billing from the left-hand side navigation menu.
2. Click on the Billing export from the left panel under the Billing Overview section.
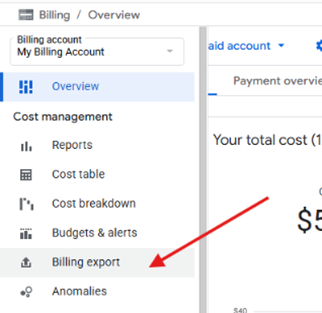
3. Click Edit settings under Detailed usage cost.
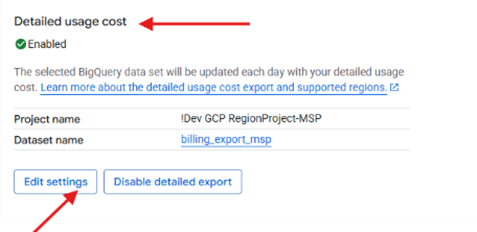
4. Select the following configuration:
- Project: From the Project Drop-down
- Dataset: From the Dataset Drop-down

5. Click Save.
Google Cloud billing data is added covering the current and previous month from the time the data is being populated in the dataset. During the first data backfill, it can take up to five days for your Cloud Billing data to begin with exporting. You will start seeing your usage data only after this process is complete. Wait for 5 days for first billing data to appear on your Saner Cloud Dashboard. Please note that this is a one-time setup. After data linking activity is done, new data will be exported automatically.
Go through the GCPGuide for more details.
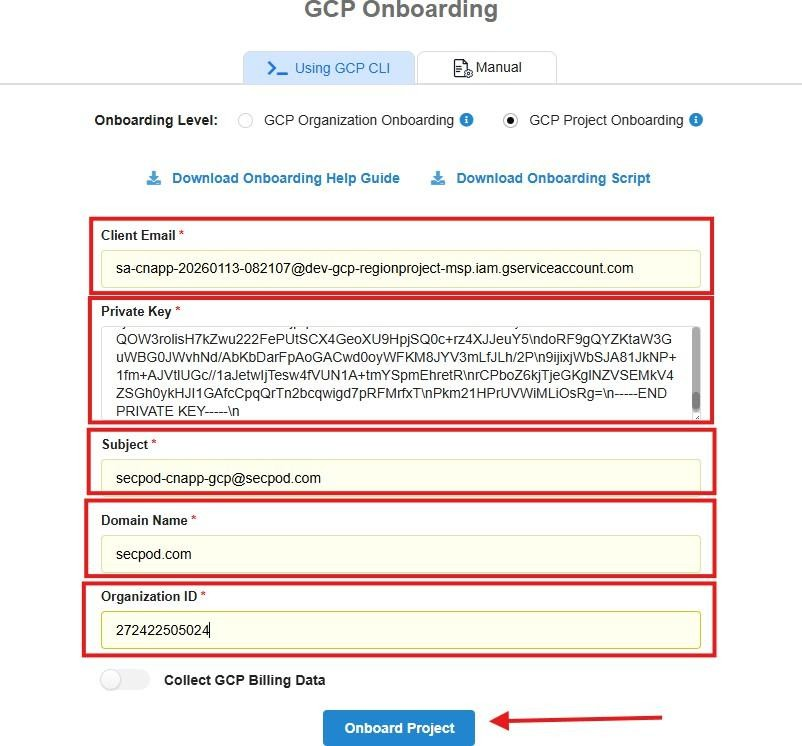
Step 4: Complete the Onboarding on Your Saner Cloud Account
- Return to the Saner Cloud Onboarding Portal.
- Enter the Service Account JSON (Client Email, Private Key) generated in Step 1.
- Subject Email: Enter the email address of a Super Admin user in your Google Workspace.
- Click Connect / Finish Onboarding.
[Optional] Enable Billing