
The Saner Container Orchestration Posture Management(COPM) tool provides a comprehensive framework to assess, monitor, and enhance the security posture of your environments. It combines powerful dashboard analytics with flexible benchmark management capabilities to ensure continuous compliance and visibility into security risks.
Through interactive dashboard views, you can analyze findings by severity, evaluate overall compliance status, and track security issue trends over time. The dashboard also helps you to analyze issues by namespace, view all security findings in detail, monitor compliance overviews for primary benchmarks, and assess affected resources by resource type, helping you quickly identify and prioritize remediation actions. In addition, you can create and manage benchmarks to define your container security standards.
On the whole, Saner Container Orchestration Posture Management provides end-to-end orchestration, monitoring, and improving security and compliance across your environments.
Get Started
This guide walks you through every stage of using COPM, from initial setup to advanced monitoring. You’ll learn how to manage container orchestration security benchmarks, run scans, analyze findings, evaluate overall compliance status, analyze issues by namespace, and more.
By the end of this guide, you would have tapped into COPM’s full capabilities for intelligent, data-driven management of your Kubernetes and container ecosystems.
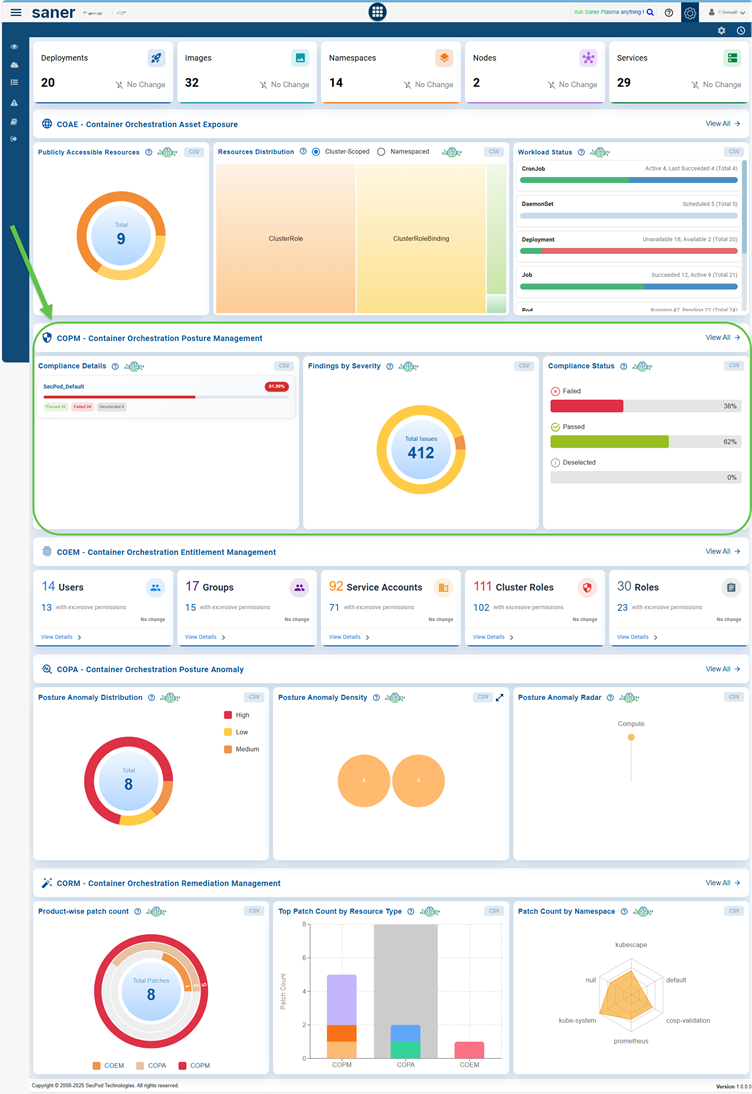
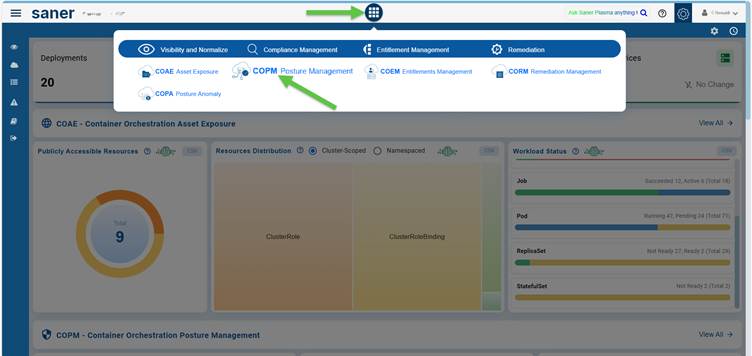
Access the Container Orchestration Posture Management (COPM) Dashboard or directly via the App Launcher.
You can access the COPM Dashboard through 2 entry points: the overall COSP Dashboard or directly via the App Launcher.
EntryPoint 1: From the Overall COSP Dashboard
EntryPoint 2: From the App Launcher
Manage Container Orchestration Security Benchmarks
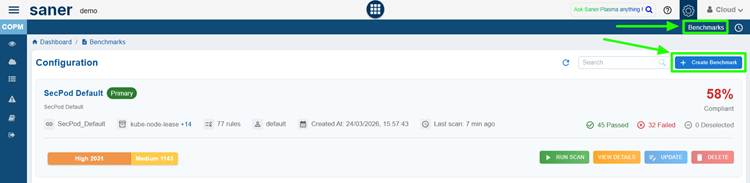
Create a Benchmark
Creating a benchmark involves a straightforward 3-step process: selecting a template, choosing the security rules to include in the custom benchmark, and configuring benchmark settings, such as the name, description, and target namespace.
Once you have created a benchmark, you can view all configured benchmarks, run scans to assess compliance, and analyze detailed results. The module also provides the option to modify existing benchmarks or delete those that are no longer necessary, ensuring effective and continuous management of your container security posture.
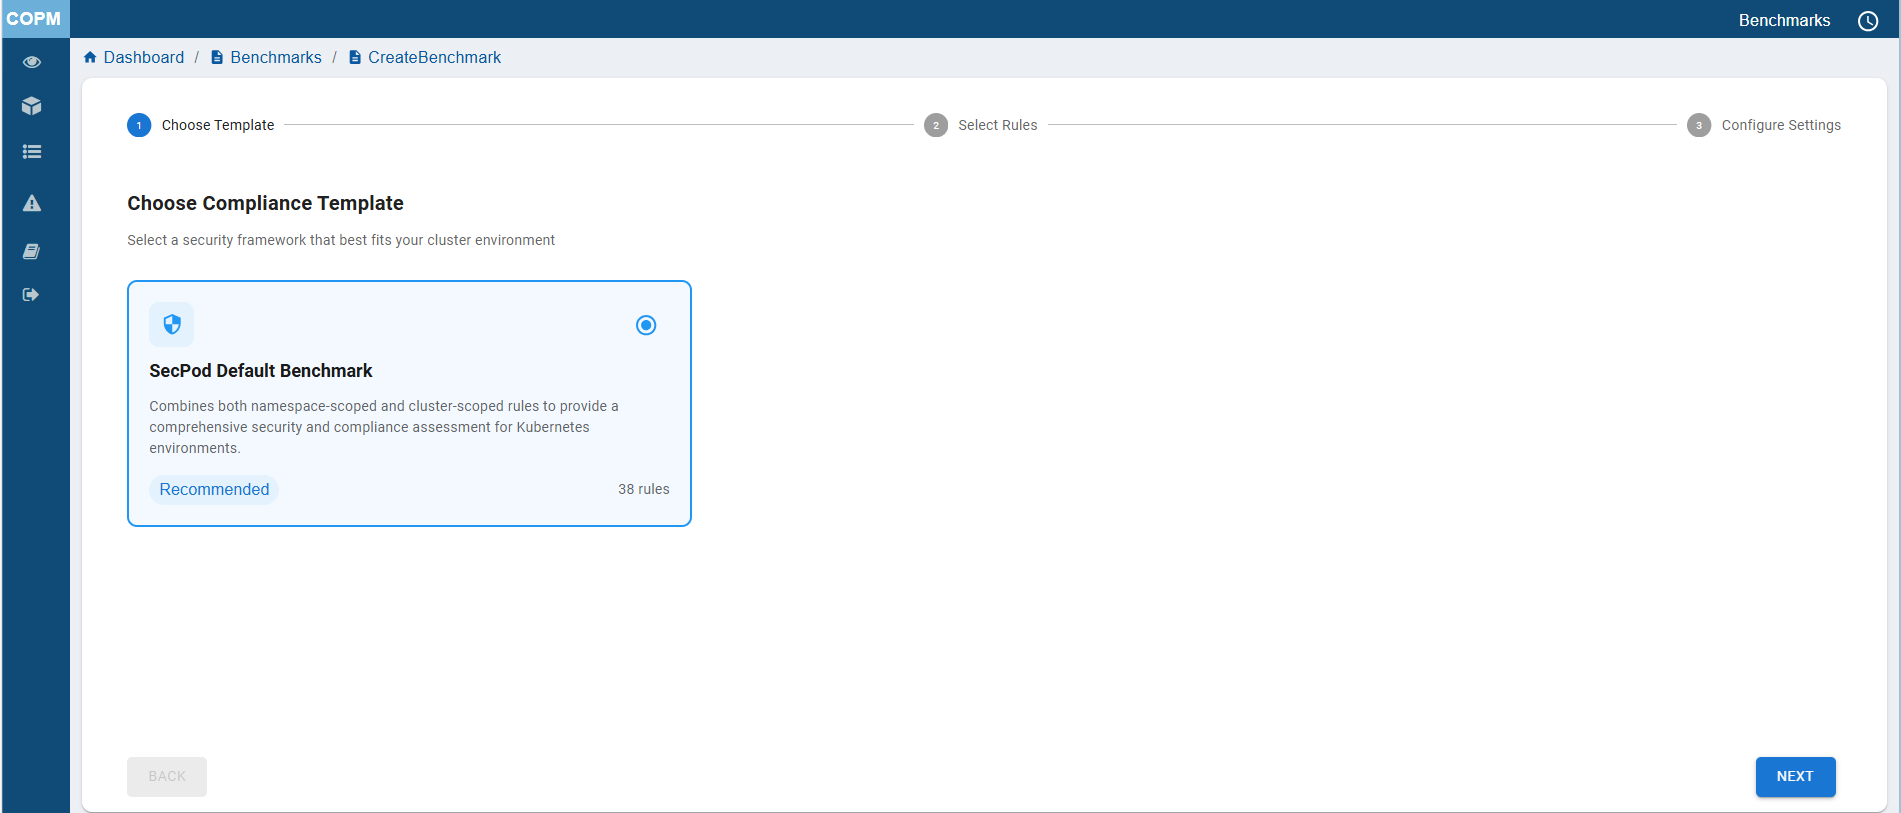
Step1: Choose Template
To begin the benchmark creation process, you must first select an appropriate template that outlines the baseline configuration and set of controls for evaluation.
SecPod Default Benchmark
This is a comprehensive benchmark that combines rules that evaluate both namespaced resources and cluster-wide resources for a complete assessment of container orchestration security, for example, Kubernetes security, and compliance.
Step2: Select Rules
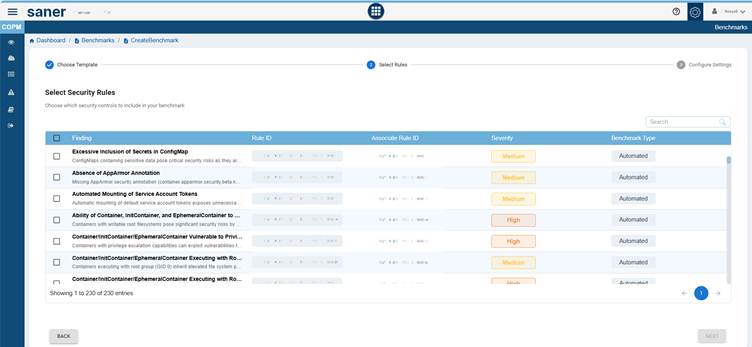
In the second step of benchmark creation, select the security rules to include in your custom benchmark from the list of benchmarks and rules. To do this, click the checkbox under the “Finding” column for each desired rule.
You can also view additional details, including the Rule ID, Severity, and Benchmark Type associated with each finding.
If necessary, you can update the severity level (Critical, High, Medium, or Low) by clicking the “Edit” button and selecting the appropriate level.
Additionally, review the Rule Type assigned to each benchmark:
- Manual Rules require human verification, such as checking physical security policies or manually reviewing configurations
- Automated Rules can be validated programmatically using scripts or security tools; for example, you can verify whether disk encryption is enabled through automated scans
You can also search for a specific rule by entering the keyword in the Search box.
Step3: Configure Settings
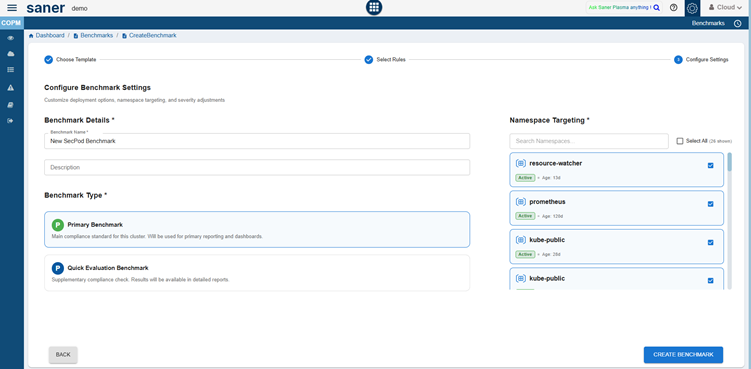
In this step, configure the benchmark settings to define how the compliance assessment gets executed.
Set the deployment preferences(name and description), namespace targeting, and benchmark type as required.
Enter the mandatory details as follows:
- Provide a unique and descriptive name for the benchmark
- Add a brief summary explaining the purpose of the benchmark
- Specify the namespaces to which the benchmark applies in the Namespace Targeting field. Click the Select All checkbox if you want to include all the namespaces in the benchmark.
- Choose one of the benchmark type options:
- Primary Benchmark: The main compliance standard for the cluster
- Quick Evaluation Benchmark: A supplementary compliance check. The results will be available in the detailed reports.
- After filling in all the required information, click Create Benchmark to complete the setup
View All the Configured Benchmarks
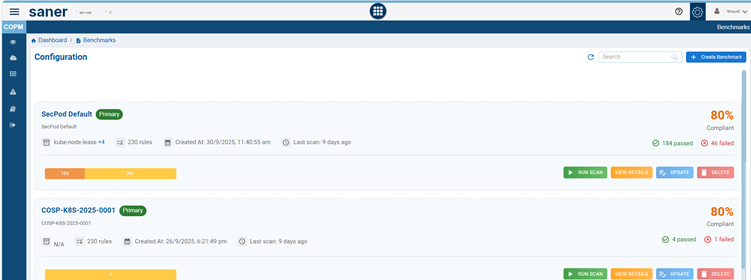
From the Benchmark Configuration list, you have an option to view all the configured benchmarks, update rules, run scan, and delete the benchmark as needed.
Just click the appropriate button and perform the requisite action.
Run Scans
Click the Scan button on the Benchmark Configuration details page and completed, the severity of the benchmark displays as applicable.
View Details
Clicking the button redirects you to the All Findings page, allowing you to view the detailed issue information and proceed with the required patch remediation tasks.
Modify the Benchmark
From the Benchmark Configuration details page, click the Update button corresponding to a benchmark and proceed to modify the Benchmark Rules.
Delete the Benchmark
From the Benchmark Configuration details page, click the Delete button corresponding to a Primary or Quick Evaluation Benchmark.
Analyze Findings by Severity
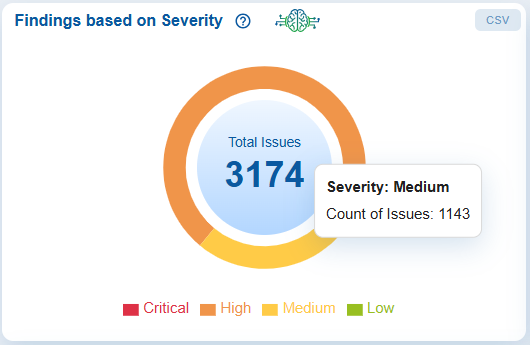
The Findings based on Severity chart visually represents the total number of detected issues, categorized by Critical, High, Medium, and Low severity levels.
The pie chart allows users to quickly assess the distribution of issues based on their risk impact. By moving your cursor over the chart, users can view the exact count of issues within that category, providing greater insight into the overall security posture.
Additionally, users have the option to export the data to a CSV file for further analysis.
Clicking on the chart redirects you to the All Findings page, allowing you to view the detailed issue information and proceed with the required patch remediation tasks.
Evaluate Overall Compliance Status
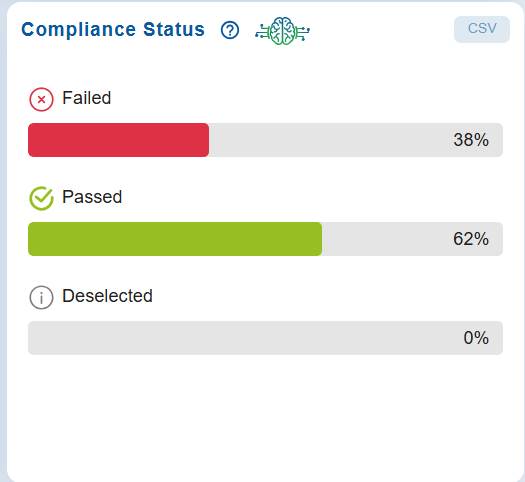
The Compliance Status dashboard presents a horizontal bar chart view of compliance results for all evaluated resources. It shows the count and percentage of items categorized as Passed, Failed, or Deselected, allowing you to assess the overall adherence to compliance standards.
This visualization helps identify areas that meet compliance requirements and highlights those that need immediate attention or further review.
Clicking on the chart redirects you to the All Findings page, allowing you to view the detailed issue information and proceed with the required patch remediation tasks.
Analyze Issues by Namespace
A Namespace in Kubernetes is a logical partition within a cluster used to group and isolate resources. It can include multiple components such as pods, deployments, services, and configurations, typically organized by application, environment (such as development, testing, or production), or team.
On the other hand, Issues represent security findings, compliance violations, or configuration errors detected within these resources, such as misconfigured network policies, insecure container images, overly permissive access policies, and non-compliance with CIS or organizational benchmarks.
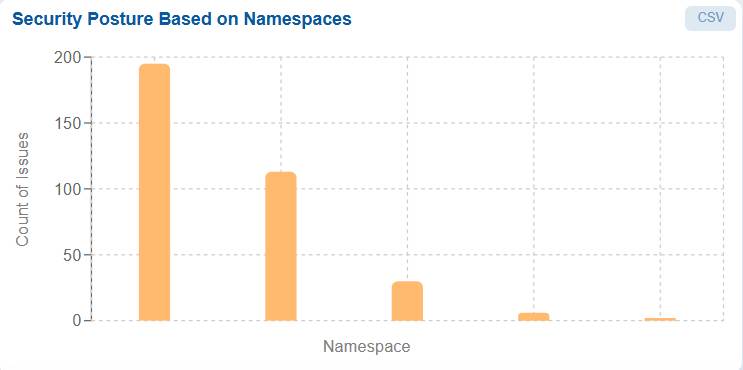
Saner Container Orchestration Posture Management(COPM) provides a bar chart view of Namespace versus Count of Issues, where the x-axis represents namespaces and the y-axis represents the total count of issues. Clicking on any bar redirects you to the All Findings page, allowing you to view the detailed issue information and proceed with the required patch remediation tasks.
View and Analyze All Security Findings
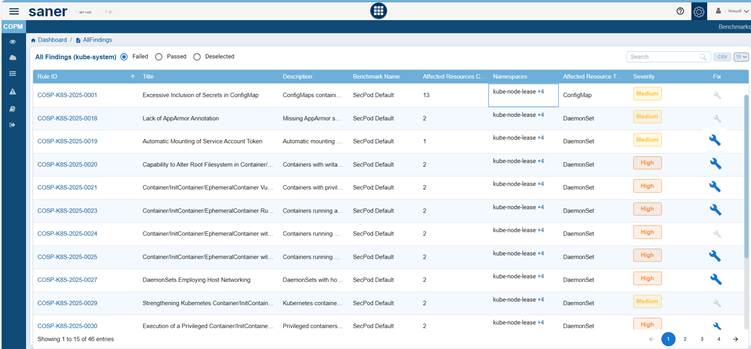
The All Findings page presents a comprehensive and filterable table of Kubernetes security and compliance findings. It displays which resources and namespaces are affected, the severity of the issues, and if automated fixes are available.
From the top bar, you can filter findings by the following statuses: Passed, Failed, or Deselected. You can easily locate findings using the search box or download the results as a CSV file for further analysis. Additionally, you can adjust the number of findings displayed per page using a drop-down menu (for example, 15 records per page).
This page lists security findings detected during a compliance scan, with each row representing a rule or control evaluated against cluster or namespace resources.
Here’s a brief overview of what each column represents:
Rule ID
A unique identifier for each compliance rule (e.g., COSP-K8S-2025-0018).
Title
Describes the specific issue or security misconfiguration (for example, Automatic Mounting of Service Account Token).
Description
Provides a brief summary of the issue.
Benchmark Name
Indicates the benchmark or policy set that defined the rule (for example, SecPod Default, COSP-K8S-2025-0001).
Affected Resources Count
The number of resources impacted by the issue.
Namespaces
Lists the Kubernetes namespaces where the affected resources are located (for example, default, kube-node-lease). You can view and select the appropriate namespace by clicking the + symbol next to the Namespace value.
Affected Resource Type
The type of Kubernetes object impacted (for example, ConfigMap, DaemonSet).
Severity
The risk level (Low, Medium, or High) assigned to the finding, accompanied by color coding for quick visibility.
Fix
Displays a wrench icon if a remediation or fix is available. Click to read more on how to initiate patch remediation.
Monitor Compliance Overview for Primary Benchmarks
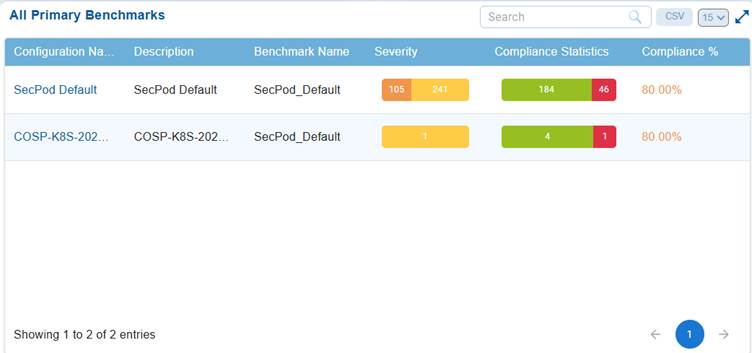
The “All Primary Benchmarks” chart displays a summary of compliance performance for benchmarks that have been marked as Primary during configuration. This dashboard view allows security teams to compare compliance performance, identify benchmarks with lower adherence, prioritize remediation based on severity and failures, and continuously monitor alignment with standards like CIS or NIST.
The chart presents an overview of primary benchmark configurations, detailing the configuration name, description, benchmark name, severity, compliance statistics, and compliance percentage.
The severity column categorizes findings by risk level, high, medium, or low, with color-coding for quick identification.
Compliance statistics indicate the number of controls that have passed, failed, or remain unchecked, while the compliance percentage provides a quick view of how closely each benchmark aligns with security standards.
For example, benchmarks with an 80% compliance rate show that 80% of controls have passed, and 20% either failed or were not evaluated.
Clicking on the Configuration Name link redirects you to the All Findings page, allowing you to view the detailed benchmark information and proceed with the required patch remediation tasks.
Analyze Affected Resources by Resource Type
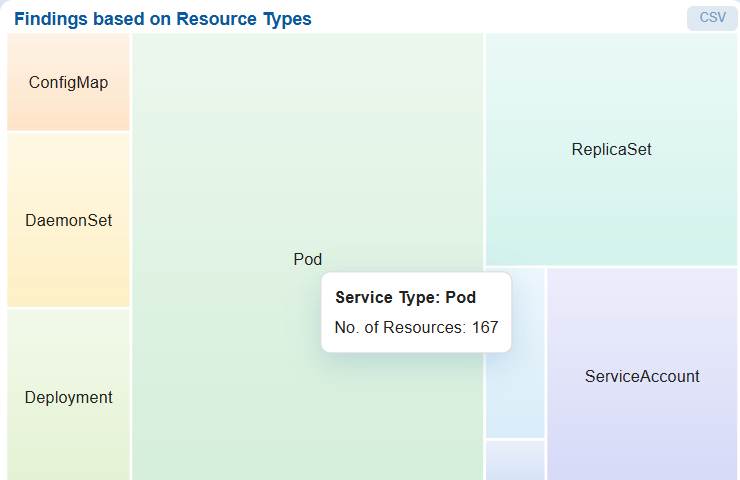
The Findings based on Resource Types chart uses a heat map to illustrate the distribution of affected resources across various service types. Each block in the chart represents a specific service category, with its size and shading reflecting the relative number of affected resources.
Move your cursor over the chart to see the count of resources within a specific service category. For example, the service type Pod may include 167 affected resources.
This visualization helps identify which service categories contribute most to the organization’s overall risk exposure, allowing teams to prioritize remediation efforts more effectively across different resource types. Additionally, you also have an option to export the data into CSV(available on top-right of the block) for further analysis.
Clicking on the chart redirects you to the All Findings page, allowing you to view the detailed issue information and proceed with the required patch remediation tasks.
Track Security Issue Trends by Severity Over Time
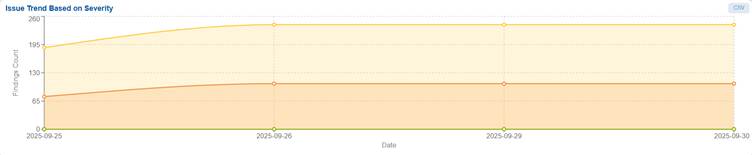
The Issue Trend Based on Severity chart provides a visual assessment of how well misconfigurations get managed over time, if issues get fixed, persists, or increases in number.
Th chart represents the classification of security findings as Critical, High, Medium, and Low, and how it changes over time following the most recent scan.
For example, the trend indicates that identified issues have not significantly reduced, implying limited remediation activity or recurring issues. This helps teams monitor remediation effectiveness, detect persistent risks, and prioritize actions for high-severity issues.
By hovering over any data point, you see the latest count of issues for each severity category on that specific date.
This trend analysis is crucial for tracking the progress of remediation, identifying recurring issues, and evaluating the effectiveness of security measures over time.
Additionally, you also have an option to export the data into CSV(available on top-right of the block) for further analysis.
Commonly Asked Questions
What are the steps involved in creating a benchmark in COPM?
Benchmark creation in COPM follows a 3-step process:
Step1: Choose Template: Select a predefined benchmark template.
Step2: Select Rules: Pick relevant security and compliance rules.
Step3: Configure Settings: Define benchmark metadata, scope, and execution preferences.
Which benchmark template do I get started with?
The choice depends on your security objective. Use Default Benchmark for comprehensive coverage.
What is the difference between manual and automated rules?
- Manual rules require human validation (e.g., reviewing policies).
- Automated rules are validated programmatically using scans or scripts.
How does COPM evaluate overall compliance status?
The Compliance Status dashboard shows:
- Passed
- Failed
- Deselected
It provides both count and percentage views to measure adherence to defined benchmarks.
How does COPM help prioritize remediation?
COPM enables prioritization through:
- Severity-based classification
- Resource type analysis
- Namespace-level insights
- Fix availability indicators
How do I compare benchmark effectiveness and identify weak compliance areas?
By looking at the “All Primary Benchmarks” dashboard, you get to know the :
- Compliance percentage per benchmark
- Pass/fail statistics
- Severity distribution
This helps compare benchmark effectiveness and identify weak compliance areas.
How does COPM analyze affected resources?
Using a heat map, COPM:
- Displays affected resources across different resource types (for example, Pods, ConfigMaps)
- Highlights high-risk resource categories
- Helps focus remediation on critical services
Can COPM data be exported for external analysis?
Yes, multiple sections (Findings, charts, reports) provide CSV export options for further analysis and reporting.
Related Topics

