
The Container Orchestration Asset Exposure(COAE) tool allows organizations to efficiently monitor and manage containerized environments through a unified platform. It enables the configuration and viewing of watchlists, tracking Kubernetes cluster health and resource status, and assessment of open port exposures to enhance security.
COAE provides insightful visibility into resource distribution across clusters and namespaces, monitors workload performance, and categorizes resources for better organization. It also visualizes the relationships between containers and images, analyzes fluctuations in both cluster-scoped and namespaced resources, and tracks trends in images and workloads over time.
With detailed visibility and export options for container resources, COAE empowers users to maintain optimized, secure, and well-organized container infrastructures.
Get Started
This guide walks you through every stage of using COAE, from initial setup to advanced monitoring and analytics. You’ll learn how to configure and manage watchlists, assess resource utilization, analyze open port exposures, and track workload and image trends over time. With COAE, you gain actionable insights that simplify complex container orchestration operations, ensuring better reliability, scalability, and compliance.
By the end of this guide, you would have tapped into COAE’s full capabilities for intelligent, data-driven management of your Kubernetes and container ecosystems.
Access the Container Orchestration Asset Exposure (COAE) Tool
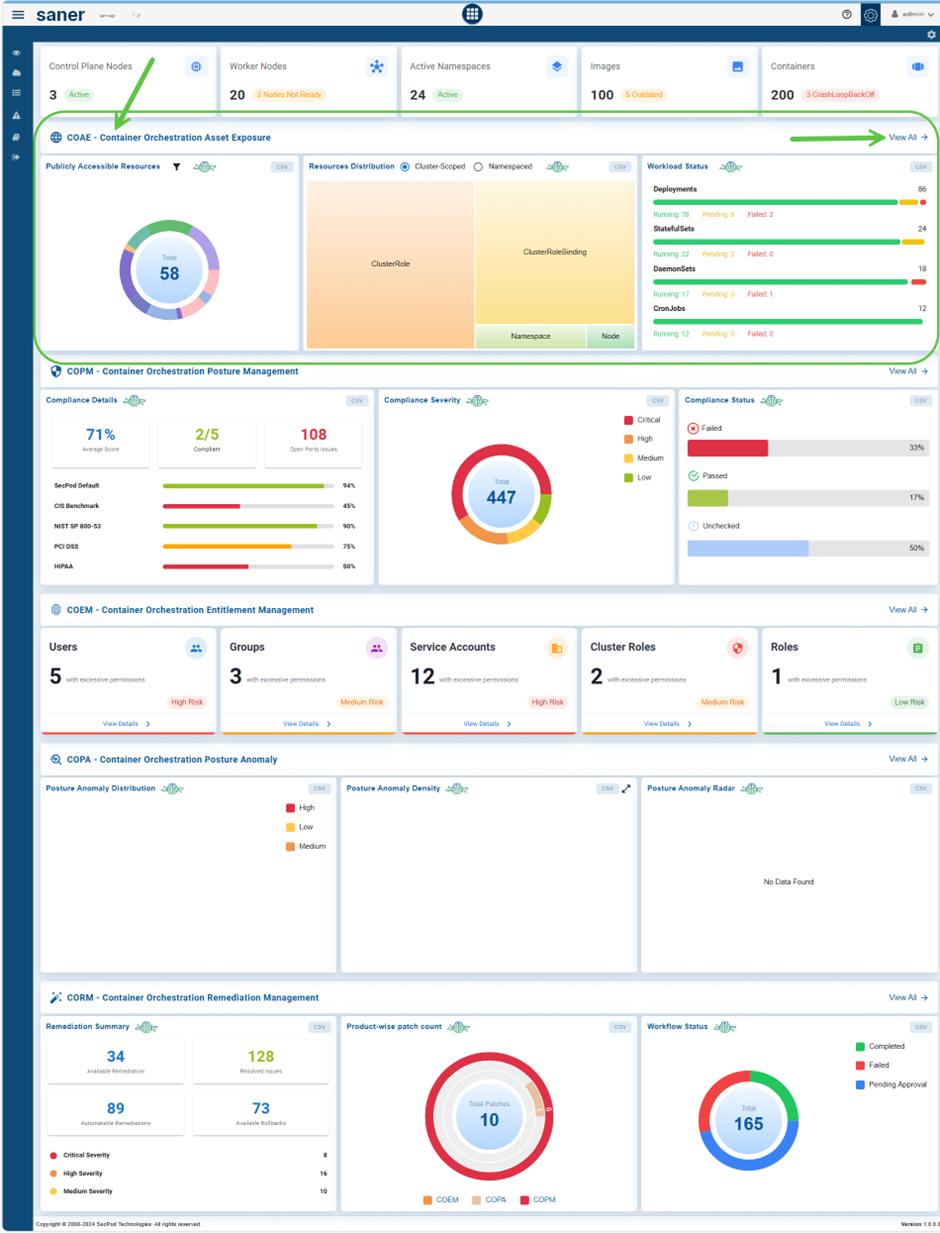
You can access the COAE Dashboard through 2 entry points: the overall COSP Dashboard or directly via the App Launcher.
EntryPoint 1: From the Overall COSP Dashboard
EntryPoint 2: From the App Launcher

Configure Watchlist
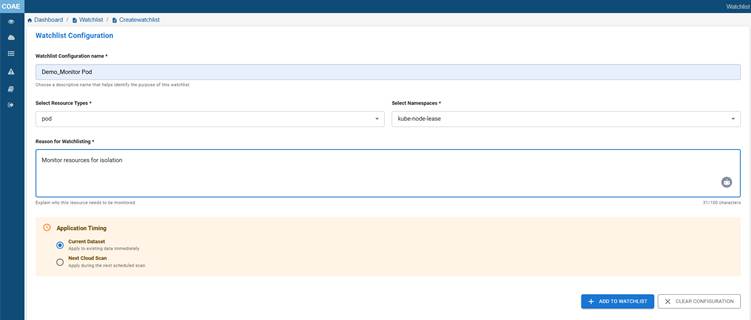
Configuring watchlists in container orchestration asset exposure allows users to proactively monitor critical namespaces and resource types. This paves way for early detection of misconfigurations, unauthorized access, and more.
Watchlists help prioritize scanning either on the current dataset or the next scheduled scan, while providing audit traceability through a required reason for monitoring. By focusing on selected resources, they simplify management in complex environments and support compliance with organizational security policies.
Note: All fields in the watchlist configuration are mandatory except the Application Scan Timing.
Here’s how to Configure a Watchlist:
Firstly, access the watchlist by clicking the link on the top-right of the COAE dashboard page and complete the configuration by following the mentioned steps.
Step1: Provide a Name
Enter a meaningful name for the watchlist configuration to help you identify it later.
Step2: Choose Resource Types
Select one or more resource types associated with the chosen namespace from the drop-down list.
Step3: Select a Namespace
From the drop-down menu, choose the namespace you want to monitor.
Step4: Provide a Reason
Enter a valid reason for creating this watchlist. This helps with audit tracking and documentation.
Step5: Specify Scan Time
Specify if the watchlist must apply to:
- Current dataset: applies immediately to the existing scanned data
- Next container scan: applies when the next scheduled container scan runs
Step6: Add to Watchlist
After completing your watchlist configuration, click the Add to Watchlist button to save your configuration and use it when you need it again.
Step7[Optional]: Clear Configuration
If you want to set up the configuration all over again, just go ahead and click the Clear Configuration button to clear all the data.
Monitor Kubernetes Cluster Health and Resource Status

The dashboard view provides a quick health and status overview of key Kubernetes resources such as Deployments, Images, Namespaces, Nodes, and Services so that issues such as node failures, deprecated images, or exposed services can be identified and acted upon immediately.
Identify and Investigate Publicly Accessible Resources
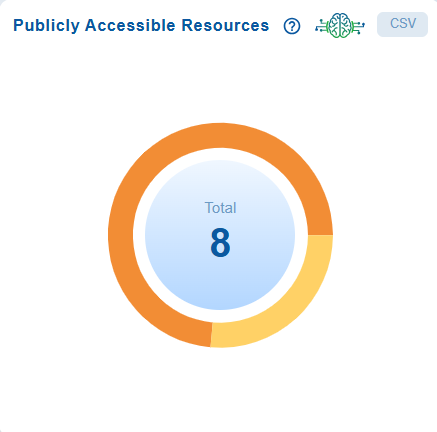
The Publicly Accessible Resources widget on the Container Orchestration Asset Exposure dashboard provides visibility into resources that are exposed to public networks. By highlighting publicly accessible resources, the widget helps administrators quickly identify workloads that may require additional security review and reduce the risk of unauthorized external access.
View Publicly Accessible Resources
The Publicly Accessible Resources widget is displayed as a pie chart that summarizes the total number of resources based on their public accessibility status across different container orchestration services.
Hover over a segment of the pie chart to view the number of publicly accessible resources for each service.
The center of the pie chart displays the total number of resources represented in the widget.
View Resources With Their Public Accessibility Status
Click the Publicly Accessible Resources pie chart to open the All Resources (Service) page. This page lists all resources along with their public accessibility status and includes the following columns:
ID – Unique identifier of the resource
Name – Name of the resource
Namespace – Kubernetes namespace in which the resource resides
Resource Type – Type of Kubernetes resource
Resource Category – Category to which the resource belongs
Publicly Accessible – Indicates if the resource is exposed to public networks
Understand the Public Accessibility Status
Resources are visually distinguished based on their exposure status, making it easy to identify those that require attention.
Orange – Exposed Resources: These resources are actively utilizing public network interfaces and are potentially accessible from external networks. They should be reviewed to ensure that the exposure is intentional and appropriately secured.
Grey – Non-Exposed Resources: These resources are not exposed to public networks and therefore present a lower external security risk.
View Public Accessibility Details
Click the Publicly Accessible status icon for a resource to view detailed information about its accessibility. The details are available in:
Summary View – Displays key information about the resource and its public accessibility.
JSON View – Displays the complete resource configuration in JSON format for detailed analysis and troubleshooting.
View Resource Details
Click the Resource ID link to open the Resource Details panel. This panel provides comprehensive information about the selected resource, including:
- Resource metadata
- Configuration details
- Specifications
- Current status
- Additional resource-specific properties
This information enables administrators to investigate exposed resources, validate their configurations, and take appropriate remediation actions where necessary.
Analyze Kubernetes Resources Distribution for Cluster and Namespace
The dashboard view provides visibility into Resources Distribution, helping administrators quickly identify the type and proportion of resources in the cluster. This supports tasks such as security auditing, capacity planning, and governance enforcement by showing how roles, bindings, namespaces, and nodes are structured across the cluster.
By toggling between Cluster-Scoped and Namespaced views, users can understand how resources are allocated and managed at different scopes within the cluster.
Analyze Cluster-Scoped Resource Distribution in Kubernetes
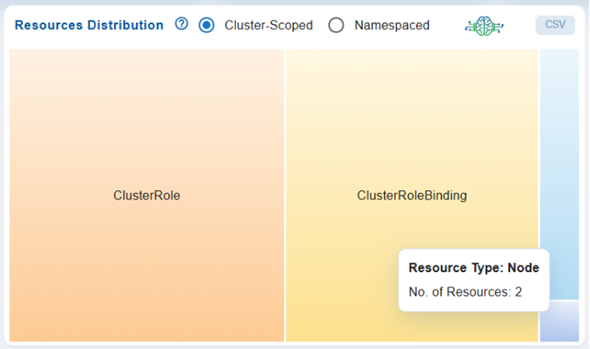
The visualization shows the distribution of cluster-scoped resources within the Kubernetes environment. It highlights key entities such as ClusterRole, ClusterRoleBinding, Namespace, and Node, with their relative sizes reflecting their count or usage.
Analyze Namespaced Resource Distribution in Kubernetes
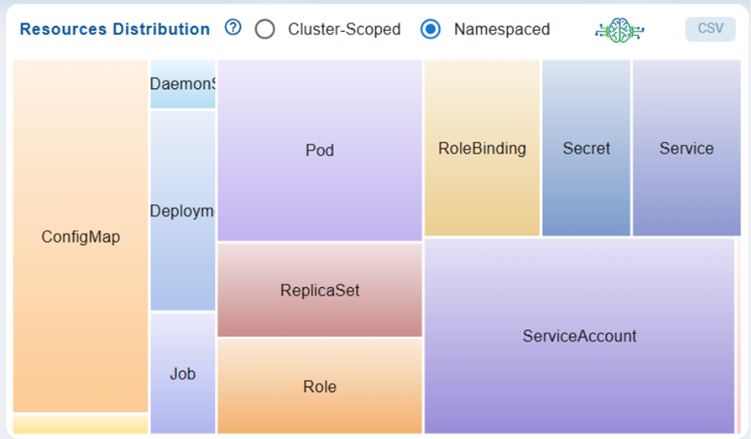
The visualization shows the distribution of Namespaced resources within the Kubernetes environment. It highlights key entities such as Pod, Role, ServiceAccount and more with their relative sizes reflecting their count or usage.
How is Data Captured and Presented in Workload Status?
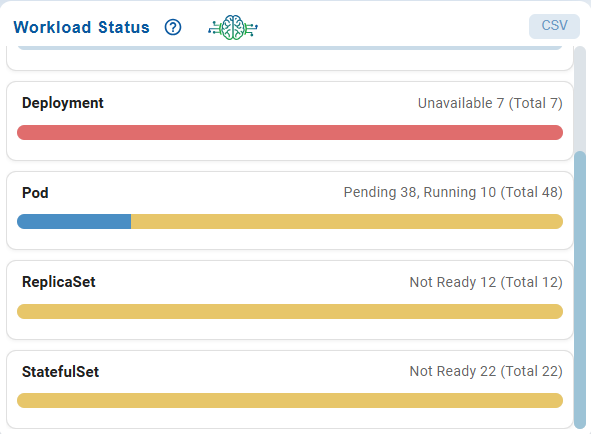
The workload status dashboard in Kubernetes collects data directly from the cluster to display the health and progress of various controllers.
For Deployments, it monitors the desired, updated, ready, and unavailable replicas to reflect the progress of rollouts. For StatefulSets, it shows the desired, current, ready, and updated replicas, ensuring that pods are created in order and align with the latest template.
The Pod section provides an overview of the operational status of pods in the cluster, showing how many are Running, Pending, or in other states, enabling administrators to quickly identify scheduling or resource-related issues affecting workloads.
The ReplicaSet section displays the readiness status of ReplicaSets, indicating whether they are successfully maintaining the desired number of pod replicas. ReplicaSets marked as Not Ready require attention, as they may have unavailable or unhealthy pods. Together, these widgets help administrators monitor workload health, identify deployment issues, and ensure application availability across the cluster.
Understand and Organize Resources through Categorization
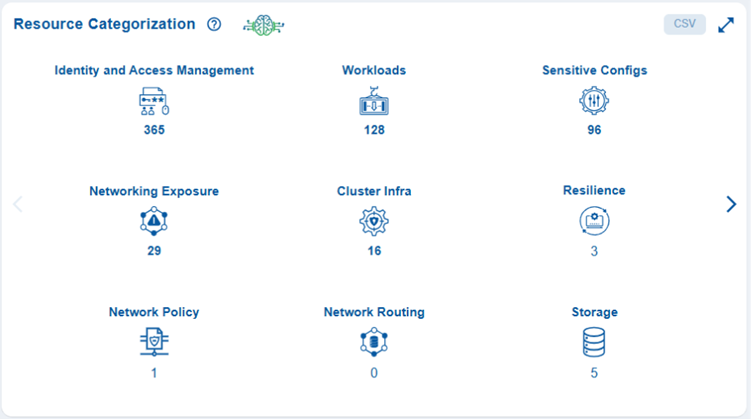
The Resource Categorization view provides a clear overview of how container orchestration assets are distributed across various categories. It provides a comprehensive perspective of all resources within a cluster using a standardized categorization language. This common terminology helps make sense of resources allocated across different container orchestration platforms, such as Kubernetes and OpenShift, as well as public infrastructures like AWS and Azure. This approach facilitates the development of a simplified mental model that is both concise and consistent with various types of infrastructure and their unique terminologies.
As an example, for a team that manages AWS resources and Kubernetes workloads through AWS EKS, this sample visualization can prompt important questions such as, how do the 196 IAM resources within the Kubernetes cluster relate to the IAM resources in the associated AWS account? why are there no storage resources allocated in the cluster? Is it intentionally designed to run only compute workloads? and so on.
Additionally, the dashboard snapshot also highlights where resources are concentrated, identifies areas with higher exposure risks, and points out critical gaps. High counts in categories like Identity and Access Management (IAM) and Workload Management indicate areas that need closer security attention.
In contrast, low or zero counts in categories such as Monitoring/Logging and Admission Control suggest a lack of necessary observability and enforcement controls.
How Resource Categorization Works?
Resource categorization organizes Kubernetes assets into functional groups. This helps teams to quickly see what kind of assets are present, their volume, and where the exposure risk exists.
Here’s how it works:
Capture Orchestration Resource
The orchestration system queries the Kubernetes API server to collect all active resources across namespaces, extracting details about workloads, services, and policies for further analysis.
Categorize Resources by Function
Each resource is mapped to a functional group, such as IAM, Workload Management, Networking, Storage, or Monitoring, based on its role in managing access, workloads, configurations, or cluster operations.
Visualize Asset Distribution in Dashboard
The results are presented in a dashboard view, showing counts per category to reveal large surface areas, most allocated resource category, and missing components such as Monitoring or Admission Control.
How are Resources Grouped into Categories?
The resources are organized by their functions and roles within the container orchestration platform, such as Kubernetes. This structure enhances visibility into the most populated functional areas, helps identify potential exposure risks, and highlights where coverage may be insufficient.
The grouping is done by mapping Kubernetes resource kinds to predefined functional categories:
Identity and Access Management (IAM)
Resources that manage user, service, and workload access (for example, Roles, ClusterRoles, RoleBindings, ServiceAccounts).
Workload Management
Resources that define and operate workloads (for example, Deployments, ReplicaSets, StatefulSets, DaemonSets, Jobs, CronJobs).
Configuration Management
Objects that hold configuration and sensitive data (for example, ConfigMaps, Secrets).
Cluster Management
Cluster-wide objects used for governance and structure (for example, Nodes, Namespaces, ResourceQuotas, Limits).
Networking
Resources that control communication and exposure (for example, Services, Ingress, NetworkPolicies, Endpoints).
Core Resource
Fundamental building blocks like Pods and essential controllers.
Admission Control
Resources enforcing runtime policies (for example, ValidatingWebhookConfiguration, MutatingWebhookConfiguration, PodSecurityPolicy).
Monitoring and Logging
Observability-related resources such as Events, metrics servers, or custom logging CRDs.
Storage
Resources tied to persistence and volumes (for example, PersistentVolumes, PersistentVolumeClaims, StorageClasses).
Monitor and Manage Container Resources with Detailed Visibility and Export Options
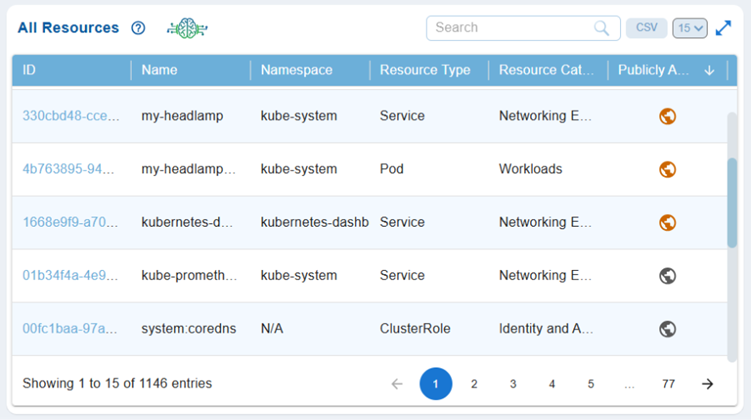
All Resources provides a detailed overview of the resources available in the environment, allowing you to quickly identify, categorize, and assess resource details, including accessibility status, for more effective inventory management and security oversight.
The dashboard presents a column view of all the resources along with their Resource ID, Resource Name, Resource Type, Namespace, Resource Category, and if the resource is Publicly Accessible.
By clicking on the Resource ID link, users can access additional details including Account ID, Provider, Profile Name, Region Name, Resource Category, Service Type, and a detailed summary covering Reservations, Groups, Instances, and more.
You can take various actions from the view, such as sorting or filtering, searching for keywords, selecting the number of records to view, and exporting the records into a spreadsheet (CSV). Additionally, you can adjust the number of records shown, making navigation easier.
Visual indicators assist you to monitor the status of Publicly Accessible resources, with exposed resources displayed in orange and non-exposed resources in grey. This setup allows for quick identification of which instances are actively utilizing public network interfaces, aiding in security and resource management decisions. The visualization and linked data provide a comprehensive tool for monitoring environments, ensuring informed security decisions and effective resource management.
Monitor Image and Container Workload Trends Over Time
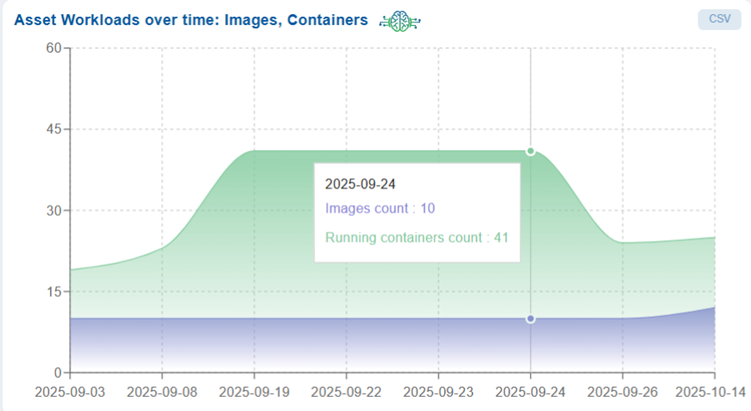
Asset Workloads Over Time: Images and Containers helps you to monitor and analyze workload trends by tracking the variation in the number of images and running containers over a selected time period, enabling better visibility into workload growth, utilization, and operational patterns.
The dashboard block presents a line chart that visualizes workload trends over a selected period. The chart displays dates (in the format yyyy-mm-dd) on the x-axis and workload counts on the y-axis, making it easy to track changes in the number of images and running containers over time.
By hovering over the chart, you can see precise counts for each date. As an example, the “Asset Workloads over Time” chart highlights the number of images and running containers from September 3 to October 14, 2025. It shows a steady increase beginning around September 8, peaking on September 24 with a total of 10 images and 41 running containers. Following this peak, the workload declines and stabilizes by mid-October. This visualization reveals how container activity fluctuates in relation to the availability of images, making it easier to track workload scalability and deployment trends over time.
Additionally, you have an option to export the data to CSV format, allowing for further analysis or reporting.
Track Container to Image Mapping
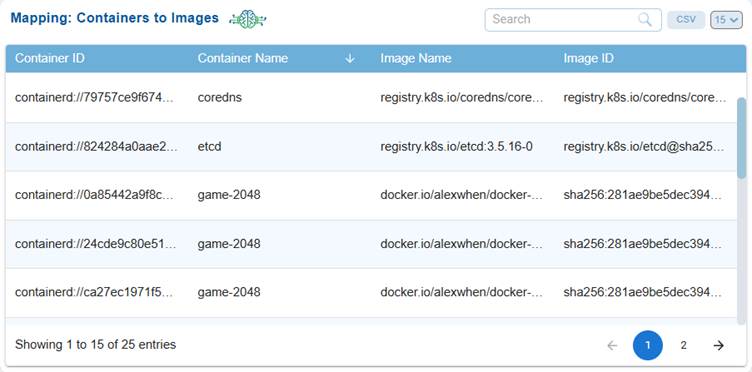
The Mapping: Containers to Images clarifies the connection between containers and their underlying images. This aids users in tracking image usage, identifying outdated or vulnerable images, and ensuring compliance and operational integrity within Kubernetes environments.
The dashboard block helps you monitor and understand the relationship between deployed containers and their underlying images. It offers insight into which images are currently in use, helps identify outdated or vulnerable images, and supports operational auditing and compliance within Kubernetes environments.
This view presents a tabular mapping between running containers and their associated container images and includes the following columns:
Container ID
A unique identifier for each running container instance.
Container Name
The name assigned to the container(for example, coredns, etcd, game-2048).
Image Name
The source image repository and tag from which the container was created(for example, registry.k8s.io/coredns, docker.io/alexwhen/docker-2048).
Image ID
The digest or unique identifier of the image used.
At the bottom of the table, you see the pagination information(for example, showing entries 1–15 of 25) and options for exporting to CSV, as well as a selection for the number of entries displayed per page.
Monitor Fluctuations in Cluster-scoped and Namespaced Resources Over Time
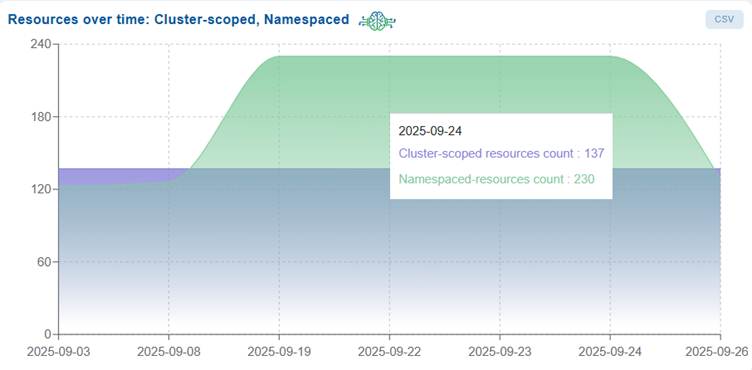
Resources Over Time: Cluster-Scoped, Namespaced helps you tomonitor and analyze the growth and variation of cluster-scoped and namespaced resources over time, providing insights into resource utilization trends and helping to identify changes in cluster activity or configuration.
The dashboard block presents an area chart that visualizes resource trends over time. The chart displays dates (formatted as yyyy-mm-dd) on the x-axis and resource counts on the y-axis, enabling you to track fluctuations in both cluster-scoped and namespaced resources.
By hovering over the chart, you can see detailed resource counts for specific dates. Additionally, you have an option to export the data as a CSV file is available for further analysis and reporting.
View Watchlist Resources
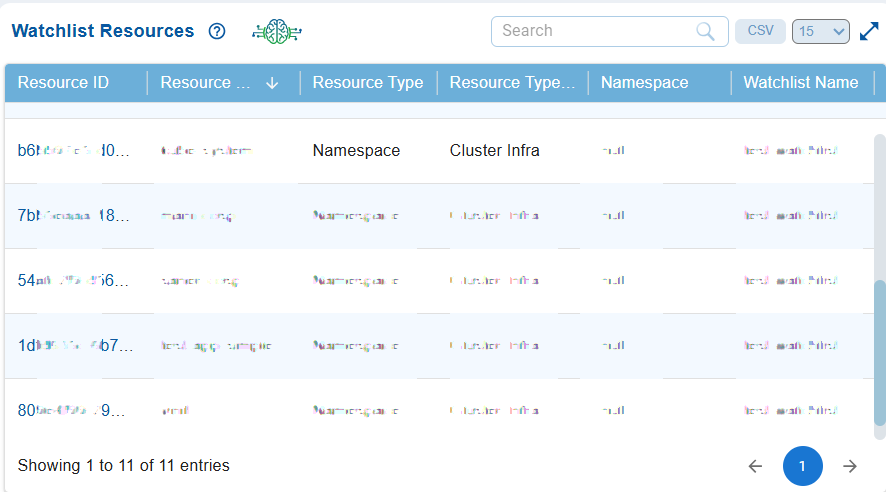
The Watchlist Resources view on the Container Orchestration Asset Exposure dashboard provides a consolidated view of resources that have been added to one or more watchlists. This enables administrators to continuously monitor critical resources, track high-priority assets, and quickly access watchlisted resources from a single location.
The Watchlist Resources widget displays all configured watchlist resources in a tabular format. The table includes the following information:
Resource ID – Unique identifier of the resource.
Resource Name – Name of the resource.
Resource Type – Type of the Kubernetes resource.
Resource Category – Category to which the resource belongs.
Namespace – Kubernetes namespace where the resource resides.
Watchlist Name – Name of the watchlist to which the resource has been added.
This view helps administrators efficiently monitor important resources, verify their watchlist assignments, and quickly locate assets that require ongoing observation or special attention.
Commonly Asked Questions
Are all fields mandatory while configuring a Watchlist?
Yes, all fields are mandatory except the “Application Scan Timing”, which is optional.
What happens when I select a Namespace?
When you select a namespace, the system automatically displays the Resource Types dropdown with relevant resource types associated with that namespace.
Is there a limit to select resources in a Watchlist?
No, you can select one or more resource types from the available list based on your monitoring requirements.
Why is providing a reason mandatory for Watchlist creation?
The reason field ensures:
- Audit traceability
- Proper documentation of monitoring intent
- Compliance with organizational security policies
What are the available scan timing options?
You can choose:
- Current dataset – applies the watchlist immediately to existing scanned data
- Next scan – applies the watchlist during the next scheduled scan
Where can I view my configured Watchlists?
You can view them in the Watchlist Resources dashboard, which provides a tabular view of all monitored resources.
Can I export Watchlist data for analysis?
Yes, the dashboard allows you to export the data in .csv format for further analysis and reporting.
How do I look for specific Watchlist entries?
Use the search box in the dashboard to quickly locate specific resources based on your criteria.
Can I control how many records are displayed in the dashboard block?
Yes, you can adjust the number of records displayed using the dropdown available at the top-right corner of the dashboard block.
How do Watchlists help in compliance and governance?
Watchlists support compliance by:
- Enforcing focused monitoring of critical resources
- Providing audit-ready documentation (via reasons)
- Enabling traceability of monitored entities
I want to take a quick glance at the Kubernetes cluster health? How’s that possible in COAE?
The COAE dashboard provides a centralized, real-time overview of the health and operational status of key Kubernetes components such as control plane nodes, worker nodes, namespaces, images, and containers. It enables rapid detection of failures, misconfigurations, and runtime issues.
Which Kubernetes components are monitored in the health dashboard?
The dashboard tracks:
- Control plane nodes (API server, scheduler, controller manager)
- Worker nodes
- Namespaces
- Container images
- Running containers and pods
I want to quickly identify cluster issues and take corrective actions?
The dashboard highlights anomalies such as node failures, unhealthy pods, deprecated or vulnerable images, and container runtime errors, allowing administrators to take immediate corrective action.
Can COAE detect image-related risks?
Yes, the tool identifies deprecated or potentially vulnerable container images and displays on the dashboard to help teams enforce secure image usage policies.
I want to understand the network exposure within the Kubernetes environment? How does the dashboard support this?
The “Open Port Distribution” block on the dashboard provides a visualization that categorizes open ports across cluster assets based on risk levels (high, medium, low), helping teams understand network exposure within the Kubernetes environment.
How does COAE take care of the open port risks?
The COAE tool evaluates port-related risks by categorizing them into distinct risk levels, and displaying on the dashboard:
- High Risk: Ports that expose critical services such as the Kubernetes API, etcd, or databases
- Medium Risk: Ports that expose internal tools or administrative interfaces
- Low Risk: Ports with minimal direct impact but that still contribute to the overall attack surface
What does a high number of open ports indicate?
A large number of open ports suggests increased attack surface and potential misconfigurations, making the environment more vulnerable to external threats.
How can organizations reduce open port exposure?
Recommendation is to Restrict access using firewall rules and security groups, Implement Kubernetes NetworkPolicies, Review service types (NodePort, LoadBalancer, Ingress), and Continuously monitor and audit open ports.
How does open port monitoring support a zero-trust model?
By continuously validating and restricting access to only required ports, organizations ensure that no implicit trust is granted, minimizing lateral movement and unauthorized access.
What is the difference between cluster-scoped and namespaced resources?
Cluster-scoped resources exist at the cluster level and are not bound to a namespace (e.g., Nodes, ClusterRoles). On the other hand, Namespaced resources exist within a specific namespace (e.g., Pods, Services, RoleBindings).
Which resources are considered cluster-scoped?
Common cluster-scoped resources include:
- ClusterRole
- ClusterRoleBinding
- Namespace
- Node
What insights does cluster-scoped distribution provide?
It helps identify:
- Role-based access control (RBAC) structure
- Node distribution and scaling
- Namespace organization across the cluster
- Namespaced Resource Distribution
Which resources are considered namespaced?
Typical namespaced resources include:
- Pods
- Roles
- ServiceAccounts
- Services
How does combining health monitoring and resource distribution improve security?
By correlating runtime health data with resource allocation, administrators can quickly pinpoint misconfigurations, unauthorized access patterns, and potential vulnerabilities.
How frequently should cluster health and port exposure be monitored?
Continuous monitoring is recommended, with real-time alerts for critical issues and periodic audits for compliance and governance.

