Overview
COSP supports OIDC-based onboarding for Kubernetes clusters, allowing the platform to authenticate through an external Identity Provider (IdP) instead of relying on long-lived Kubernetes Service Account tokens. This improves security and aligns cluster onboarding with enterprise identity practices.
This guide explains how to onboard a Kubernetes cluster using the OIDC Onboarding flow in COSP.
Pre-requisites
You must have sudo permissions on the cluster’s master node CLI and have k8s cluster-admin permissions.
You must also have IdP specific permissions for granting access:
• For KeyCloak:
o realm-admin on their specific realm or master realm admin(preferred)
• For Azure AD:
o Application Administrator or Global Administrator (preferred)
Also make sure you have the following details ready:
- Identity Provider details
- OIDC Issuer URL
- Client ID
- Client Secret
- OIDC Issuer CA certificate, if the IdP uses a private or self-signed certificate
Note: For example, here are the steps to help you fetch this information from your infrastructure for Azure AD.
Steps for Azure AD
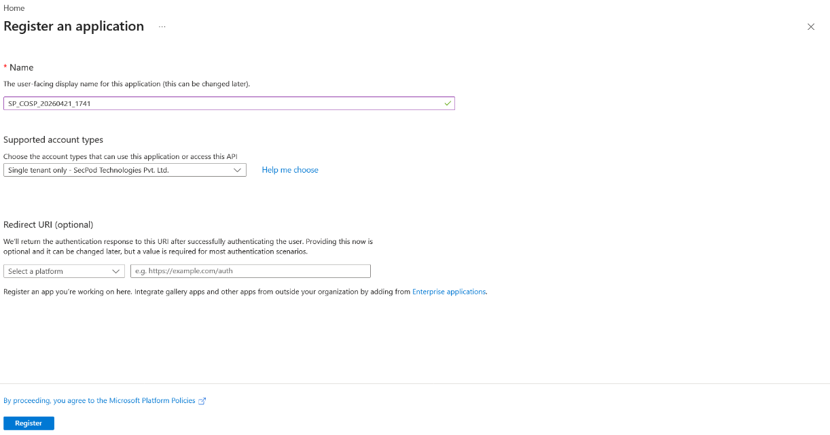
Step 1: Create App Registration
- Navigate to Azure Portal → Microsoft Entra ID → App Registrations → New Registration
- Provide the following details:
- Name: sp-cosp-<cluster-name> (example: sp-cosp-k8smastercluster)
- Account type: Single tenant
- Redirect URI: could be left blank
- Click Register
- Note: (These will be used in later steps)
- Application (client) ID = CLIENT_ID
- Directory (tenant) ID = TENANT_ID
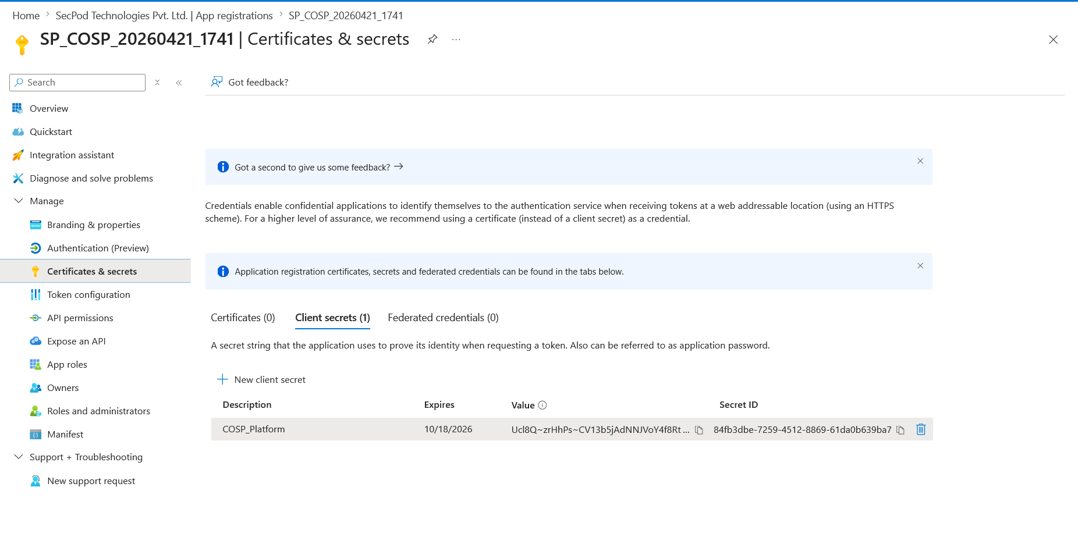
Step 2: Create Client Secret
- Navigate to the newly created app in “App Registration”.
- Navigate to “Manage” Tab.
- Click on “Certificates & Secrets” and then click on “New Client Secret”.
- Provide the following information:
- Description: cosp-platform
- Expiry: 6 months
- Click Add. The client secret displays only once so make sure you copy and save it.
Secret Value = CLIENT_SECRET
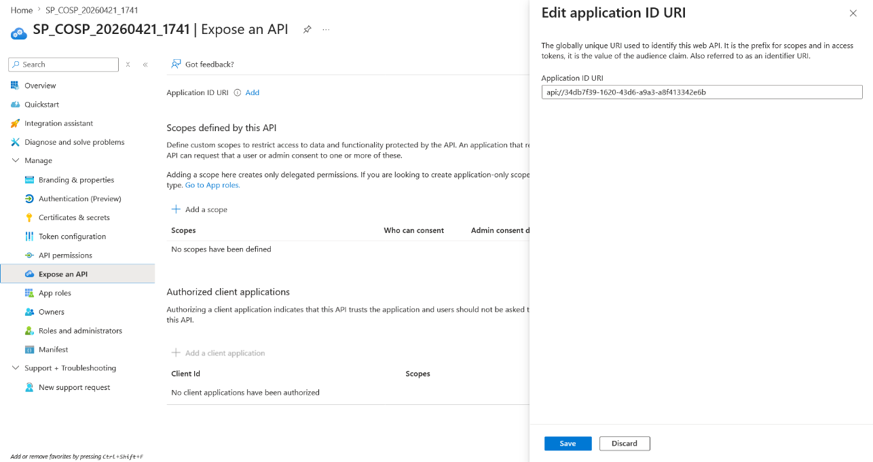
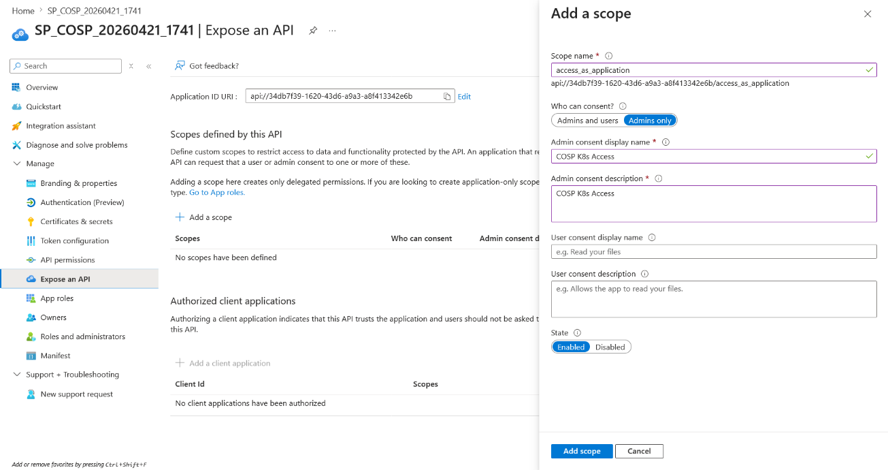
Step 3: Expose an API
- Navigate to “App Registration → Expose an API”.
- Set Application ID URI to accept default (api://CLIENT_ID).
- Add the Scope details as follows:
- Name: access_as_application
- Consent: Admins only
- Display: COSP K8s Access
- Description: Allows COSP to access Kubernetes
- State: Enable
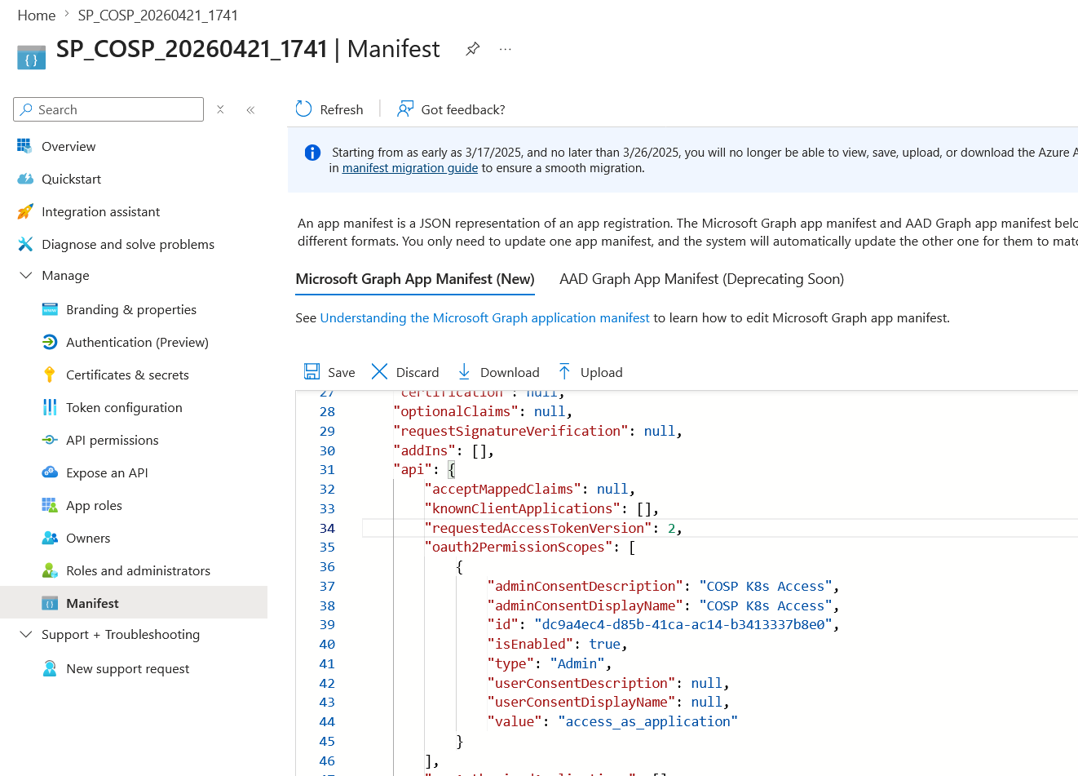
Step 4: Set Token Version to v.2.0
- Click on the Manifest section on the left-hand side panel in “Manage” tab.
- Go to “api” section in the JSON displayed.Set requestedAccessTokenVersion = 2.
Step 5: Create App Role
- Navigate to App Registration → App Roles and click on Create.
- Provide the following details:
- Display Name: COSP K8s Scanner
- Allowed Types: Applications
- Value (App role value): cosp-scanner
- Description: COSP platform access
- Tick the check box which says “Do you want to enable this API role”.

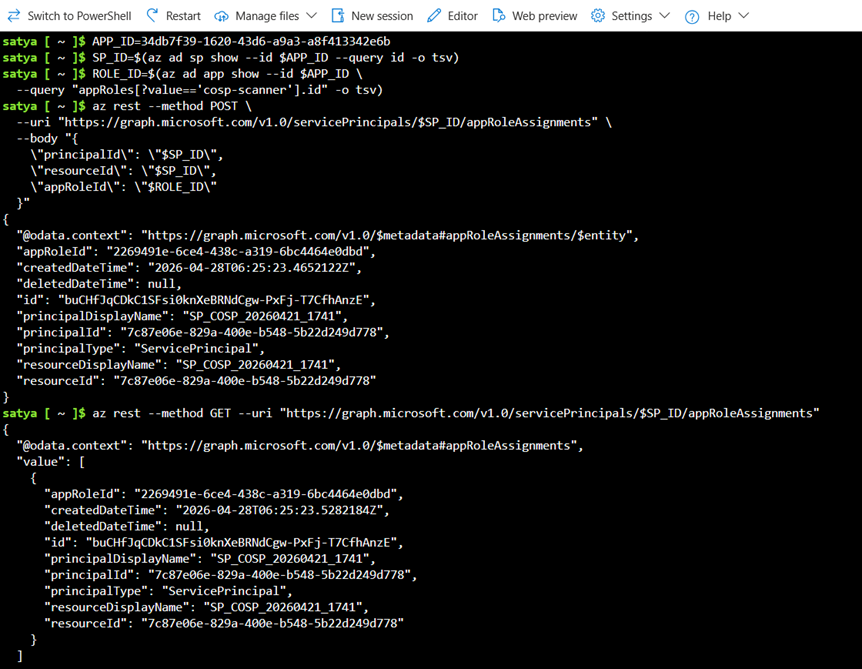
Step 6: Assign Role
Azure Portal does not reliably support assigning application roles to a Service Principal for client credential flows through the UI.
While roles can be defined in the portal, assigning them to the Service Principal is best performed using the Azure CLI.
Note: The “Users and groups” section in the portal is primarily for user-based assignments and may not display the Service Principal for application role assignment.
Recommended Approach
Use Azure CLI to assign the role:
# Set variables
APP_ID=<APP_CLIENT_ID>
Note: Use the APP_CLIENT_ID mentioned in step 1 of this prerequisite.
# Get the SP Object ID
SP_ID=$(az ad sp show –id $APP_ID –query id -o tsv)
# Get the Role ID
ROLE_ID=$(az ad app show –id $APP_ID \
–query “appRoles[?value==’cosp-scanner’].id” -o tsv)
# Assign the app role to the SP
az rest –method POST \
–uri “https://graph.microsoft.com/v1.0/servicePrincipals/$SP_ID/appRoleAssignments” \
–body “{
\”principalId\”: \”$SP_ID\”,
\”resourceId\”: \”$SP_ID\”,
\”appRoleId\”: \”$ROLE_ID\”
}”
# Verify
az rest –method GET \
–uri “https://graph.microsoft.com/v1.0/servicePrincipals/$SP_ID/appRoleAssignments”
Step 7: Create Kubernetes RBAC
Pre Flight Check::
Ensure the following flags in the API-Server by going to the file path as shown below.
# /etc/kubernetes/manifests/kube-apiserver.yaml
– –oidc-issuer-url=https://login.microsoftonline.com/<TENANT_ID>/v2.0
– –oidc-client-id=<APP_ID>
– –oidc-username-claim=sub # or “preferred_username”
– –oidc-groups-claim=roles # maps JWT “roles” → K8s groups
– –oidc-username-prefix=oidc:
– –oidc-groups-prefix=oidc:
- Create ClusterRoleBinding
- Group = cosp-scanner
- Role = cluster-admin (use least privilege in production)
Step A: Download the required Manifest Files
wget https://sp-saner-cnapp-prod-public.s3.us-west-2.amazonaws.com/SP-COSP-Manifests.zip
Step B: Unzip the downloaded compressed manifest
unzip SP-COSP-Manifests.zip -d manifests/
Note: Perform the actions in the same directory level.
Step C: Download the Shell Script for Role Creation
wget https://sp-saner-cnapp-prod-public.s3.us-west-2.amazonaws.com/SP-COSP-OIDC-Onboarding.sh
Note: In-order to run the “.sh” script, it’s mandatory that you provide the execute permission using the following command:
chmod +x ./SP-COSP-OIDC-Onboarding.sh
Step D: Role Creation for Saner
For onboarding K8s cluster to a Saner Account with only scan permissions:
./SP-COSP-OIDC-Onboarding.sh scan
With Scan and Remediation permissions:
./SP-COSP-OIDC-Onboarding.sh rem (if you want to grant rem permissions)
Notes
Steps 1 to 9 provides the following details that you need to enter in COSP UI for onboarding.
- OIDC Issuer URL
- Client ID
- Client Secret
- Kubernetes API endpoint
- CA Certificate (if required)
Kubernetes cluster details
- Cluster name
- Kubernetes API server URL
- Cluster CA certificate
- The Kubernetes API server must already be configured with OIDC flags
- The configured IdP must be able to issue tokens for the client
- Kubernetes RBAC must allow the OIDC-authenticated identity to access the cluster
The above requirements are important because successful token generation alone does not guarantee cluster access. COSP Platform need both:
- Authentication: whether a valid OIDC token can be obtained and accepted
- Authorization: whether the token identity has enough RBAC permissions in the cluster
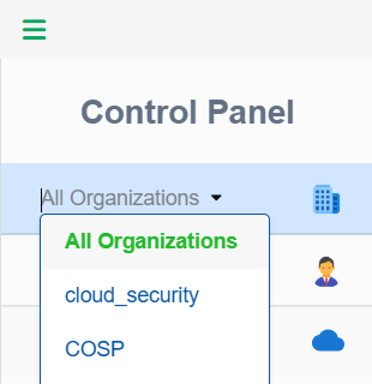
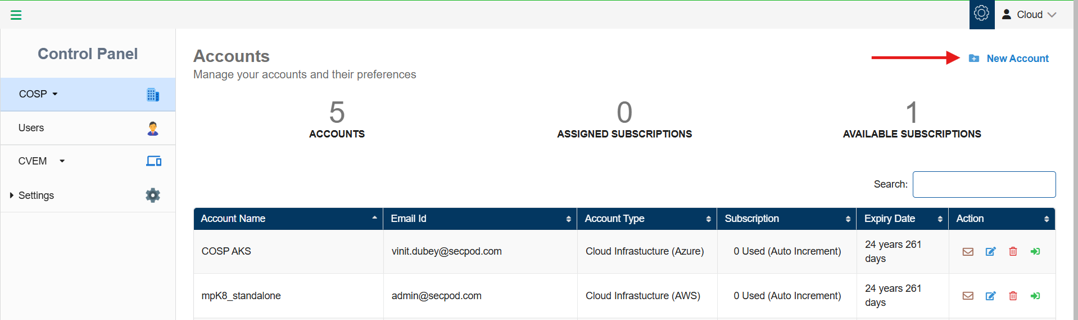
Create a New Account in Saner COSP
Step1: In the Control Panel, open the All Organizations drop-down menu and select the organization for which you want to create the new account.
Step2: To create a new account, click the New Account button on the top- right of the page.
Step3: Complete all the details required to create the New Account.
- Provide the name of the COSP account
- Key in a valid email address
- Choose the account type “Container Orchestration” from the drop-down list
- Choose Account Kind as the orchestration platform that you wish to onboard to this account from the drop-down list. For e.g. “Kubernetes”
- Turn on the slider to provision the relevant tool for the account
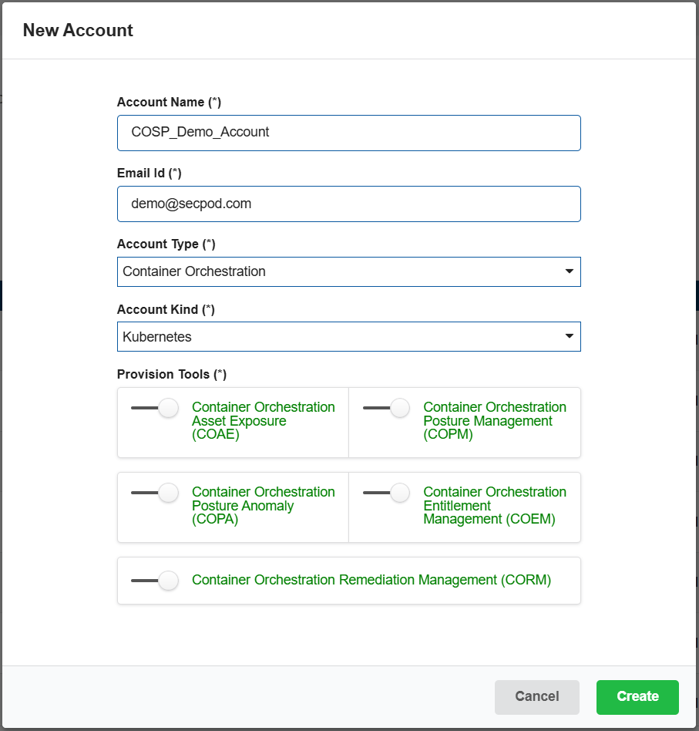
Step4: Click the Create button.
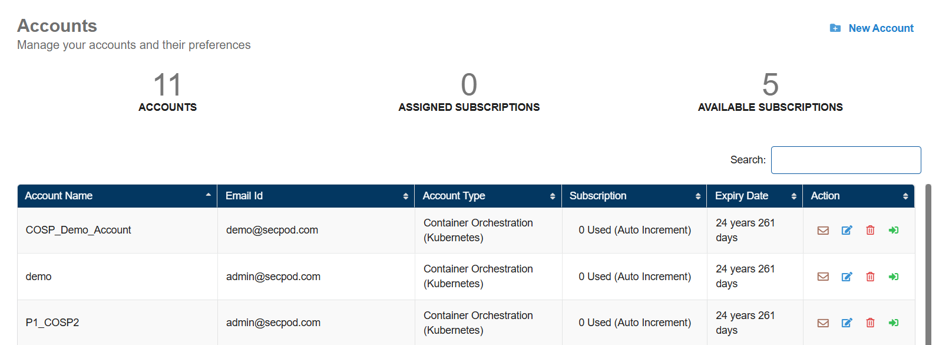
The newly created account displays in the Accounts page within a tabular format with the following details:
- Account Name
- Email ID
- Account Type
- Subscription
- Expiry Date
- Action
Note: In the Action column, you have the facility to set up the mail settings for the corresponding account, edit the current account details, delete the account, and redirect to the dashboard view of this account.
Onboarding K8s Cluster to Saner COSP Platform
Navigate to the Account onboarding page as shown in below example.
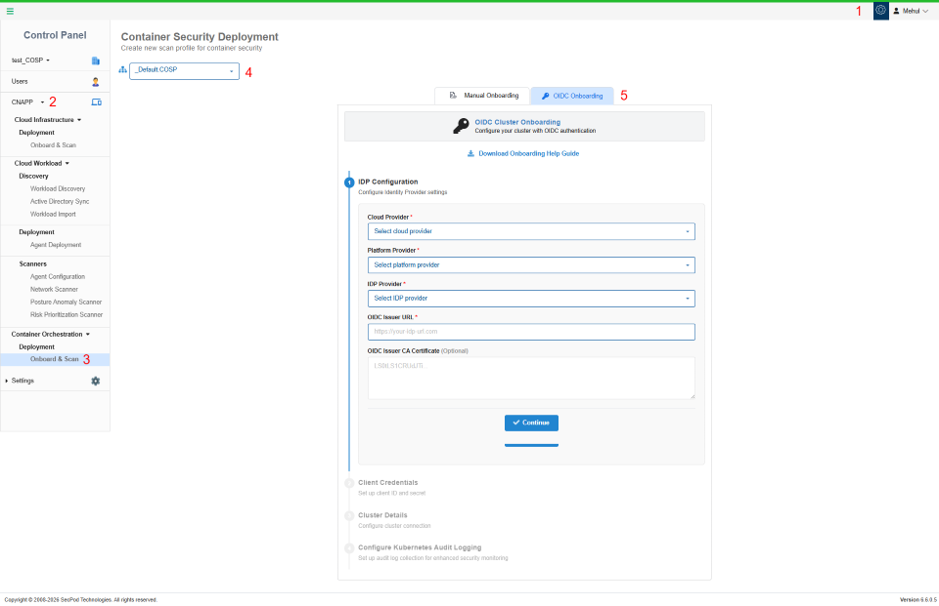
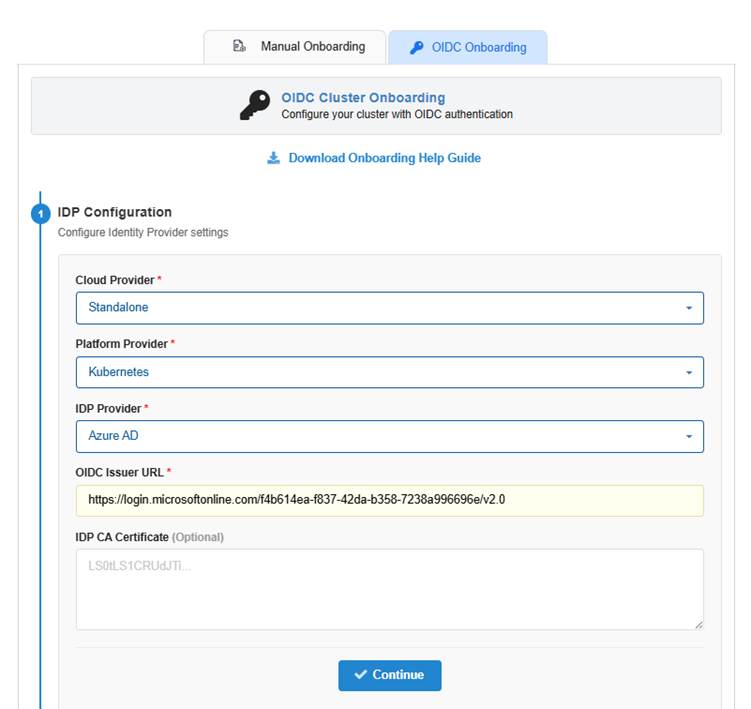
Step 1: IdP Configuration
In the OIDC Onboarding tab, begin with IdP Configuration by providing below information.
- Cloud Provider
- Select the environment type for the cluster
- For self-managed clusters, choose Standalone
- Platform Provider
- Select Kubernetes
- IdP Provider
Choose your Identity Provider such as:
- Azure AD / Entra ID
- Keycloak
- Generic OIDC provider
- OIDC Issuer URL (Steps to fetch these details are mentioned in the prerequisites)
Examples:
- Azure AD / Entra ID
https://login.microsoftonline.com/<tenant-id>/v2.0 - Note
Your Azure AD setup used an issuer URL in the /v2.0 format.
- Keycloak
https://<host>/realms/<realm>
- OIDC Issuer CA Certificate (Optional)
Paste the PEM encoded CA certificate only if your IdP uses a private CA or self-signed certificate.
Note
This is commonly needed for self-hosted IdPs like KeyCloak, but usually not needed for managed IdP like Azure AD because it uses public CA trust.
- Click Continue to move to next step.
Note
Once clicked on Continue, COSP should verify if:
- the issuer URL is reachable
- OIDC discovery is available
- issuer metadata is valid
- token endpoint is present
Step 2: Client Credentials
Enter the client credentials which will be used by COSP to obtain a token from the IdP.
(Steps to fetch these details are mentioned in the prerequisites)
- Client ID
Enter the application or client ID configured in your IdP.
Example from your Azure AD setup:
55601e02-aa6e-41fa-8809-e887366c03c1
- Client Secret
Enter the client secret associated with the application.
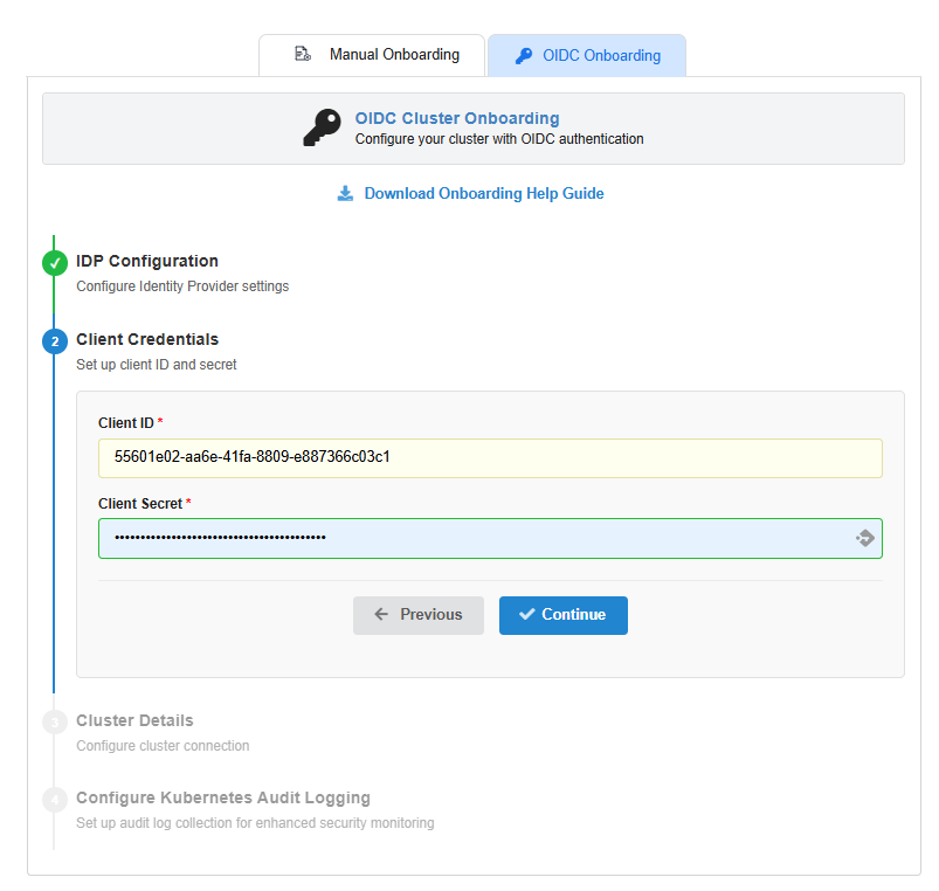
- Click Continue
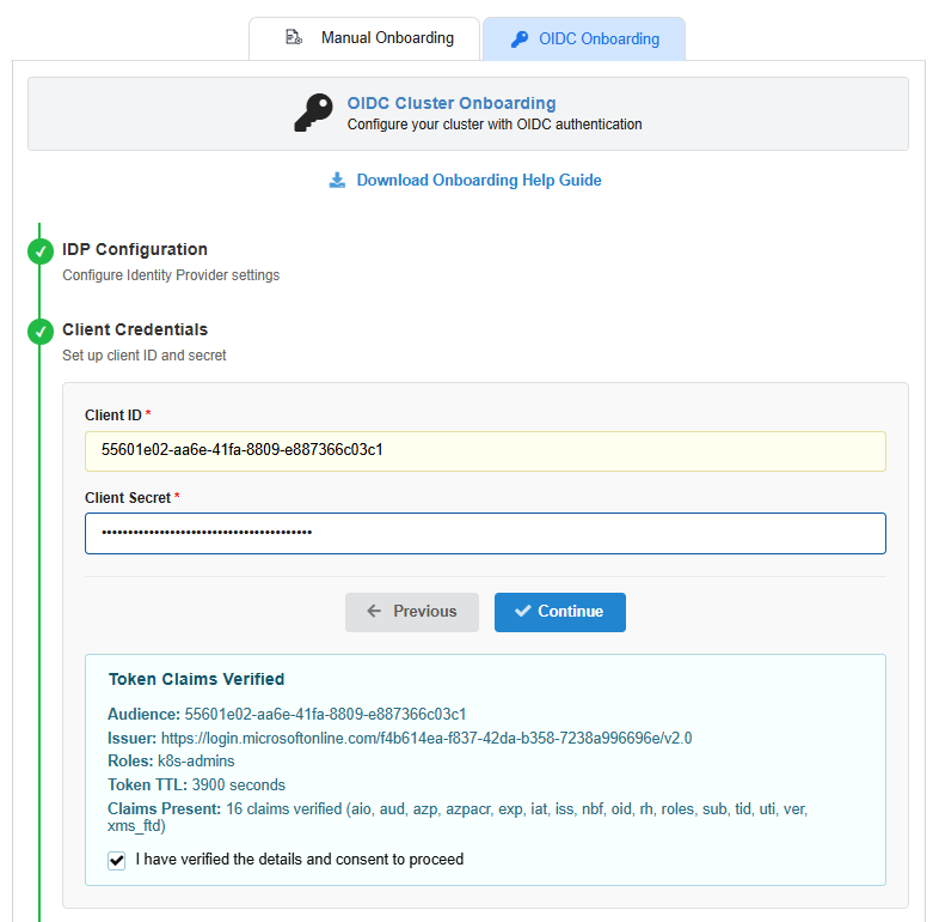
- Token Claims Verification
After the credentials are submitted and clicked on Continue, COSP retrieves a token and verifies its claims.
A successful validation will confirm below checks in background:
- token retrieval succeeded
- issuer matches the configured IdP URL
- audience matches the client ID
- token expiry is valid
- an authorization claim is present
- a username claim can be identified
Once the token verification is completed, COSP will show below verification details as shown in the screenshot:
- Audience
- Issuer
- Roles or Groups
- Token TTL
- Claims Present
Note: Please note that this step is important because claim names differ across Identity Providers.
Example Claim Patterns:
Keycloak
- authorization claim: groups
- username claim: preferred_username
Azure AD / Entra ID
- authorization claim: roles
- username claim: sub
- token version: 2.0
COSP should treat the token as the source of truth when determining the effective issuer, audience, username claim, and authorization claim.
- After reviewing the detected values, acknowledge the consent checkbox saying, “I have verified the details and consent to proceed” and click on Continue to proceed to the next step.
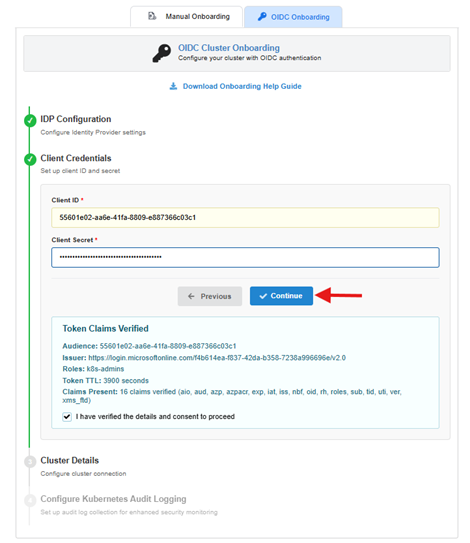
STEP 3: CLUSTER DETAILS
Configure how COSP connects to the Kubernetes API server.
In the Cluster Details step, enter values for below fields which were derived from the guiding steps mentioned above.
- Cluster Name
Enter a relevant name of your liking for the cluster. Note that this name is only for your ease to identify and visualise it on the Saner COSP tool and it will not be used for any verification purposes.
The Cluster Name supports Alpha numeric, – and _
Example: k8sc04m01
- Cluster Base URL
Enter the Kubernetes API server endpoint.
For example, these details can be gathered by going to /etc/kubernetes/manifests/kube-apiserver.yaml and looking for the values.
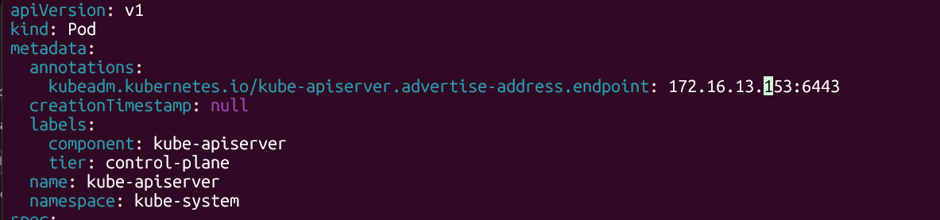
Example from your setup:
https://<Host_IP_Add>:6443
- Cluster CA Certificate. Paste the PEM-encoded cluster CA certificate.
Note: This certificate is used to validate the Kubernetes API server during TLS connection.
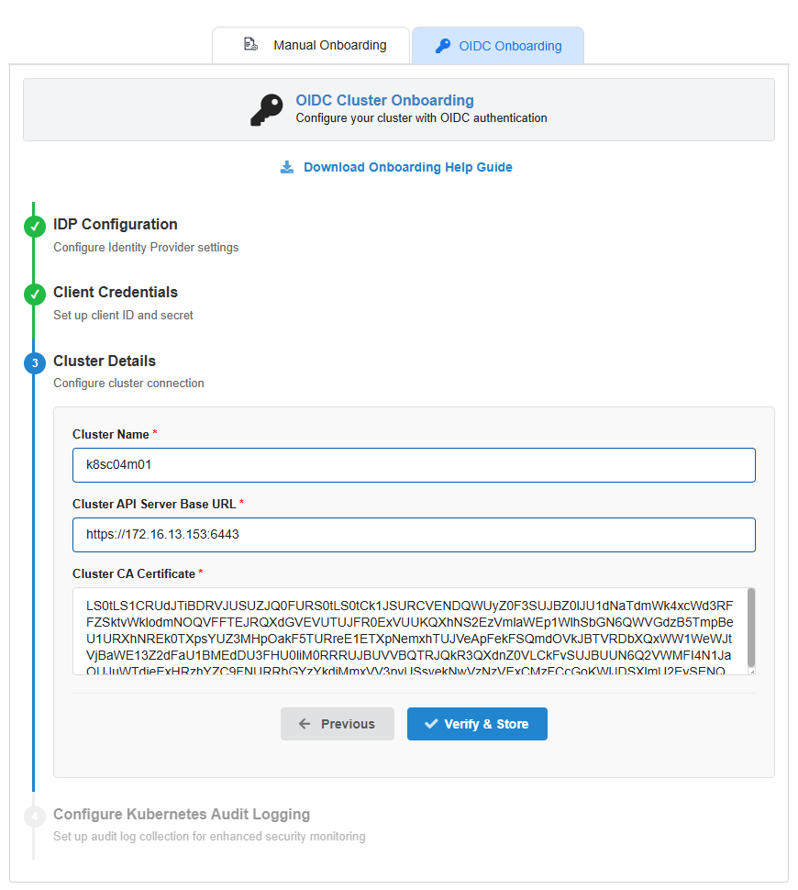
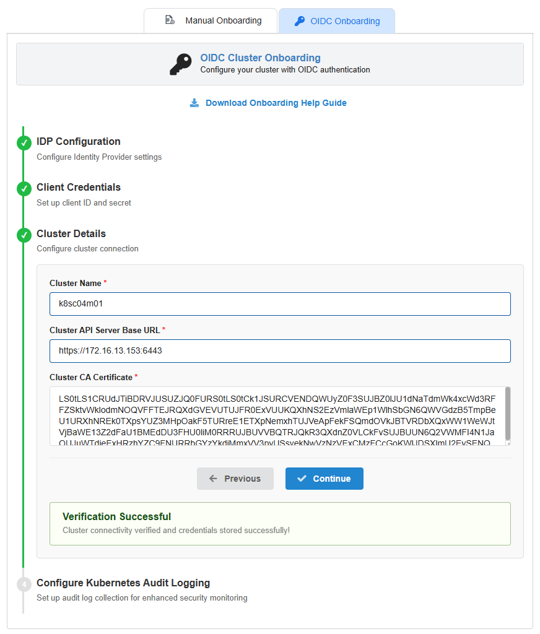
- After entering all the details as shown in above screenshot, Click Verify & Store.
Note
This is the main validation stage of the onboarding process where the COSP will validate the cluster in below order:
1. Connectivity
Confirms that the Kubernetes API server is reachable.
2. TLS validation
Confirms that the cluster CA certificate can validate the API server certificate.
3. Authentication
Confirms that the OIDC token is accepted by the kube-apiserver.
4. Authorization
Confirms that the authenticated identity has sufficient Kubernetes RBAC permissions.
5. Access checks
Optionally confirms access to required resources such as:
- nodes
- namespaces
- pods
- workloads
- RBAC objects
- Post verification, look for the “Verification Successful” message and click on “Continue”
IdP-Specific Notes
- Azure AD / Entra ID
For Azure AD onboarding, verify the following:
- issuer URL uses /v2.0
- token version is 2.0
- the token includes the expected roles claim
- Kubernetes is configured with –oidc-groups-claim=roles
- Your Azure AD setup used app roles for authorization rather than standard group claims.
- Keycloak
For Keycloak onboarding, verify the following:
- realm issuer URL is correct
- groups mapper is configured
- the audience includes Kubernetes
- the username claim is present
- Kubernetes trusts the Keycloak CA if self-signed
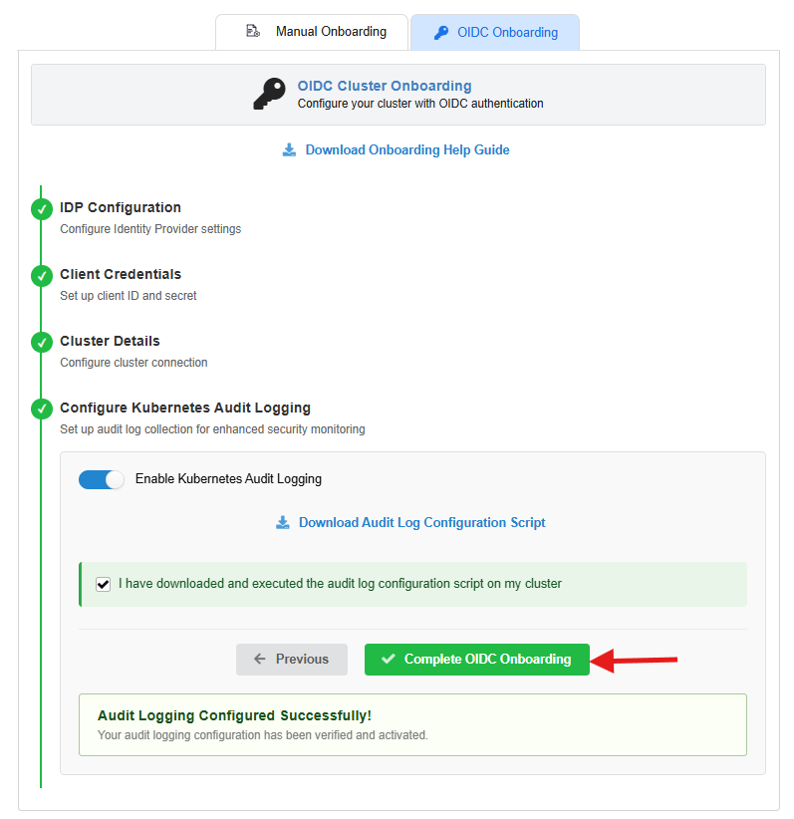
[Optional] Configure K8s Audit Logging
You can set up audit log collection for enhanced security monitoring and for visibility purposes.
To activate this functionality, use the toggle button “Enable gathering Kubernetes audit logs”.
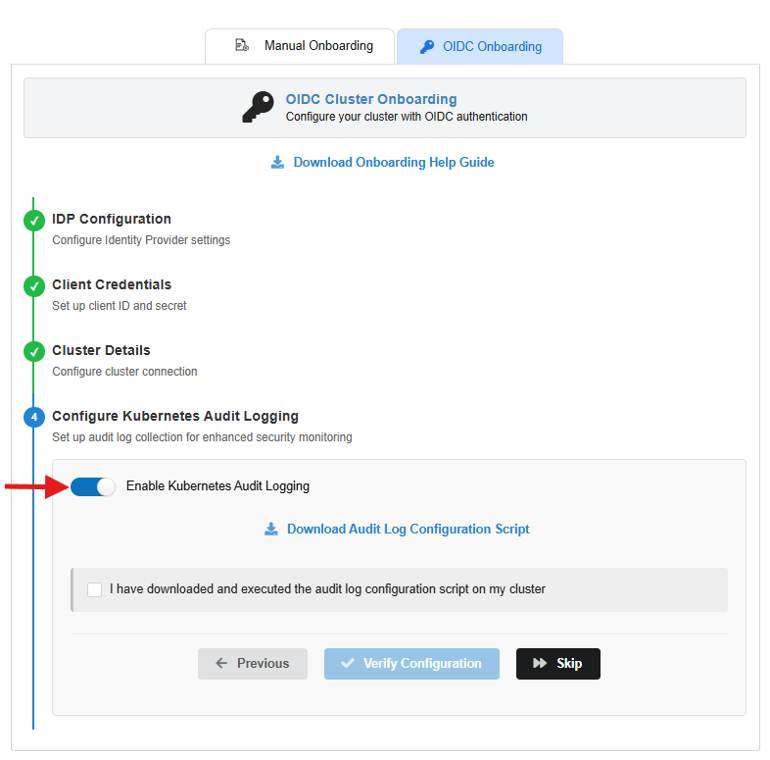
Else, click on the “Skip” button to complete the onboarding process without Kubernetes audit logs.
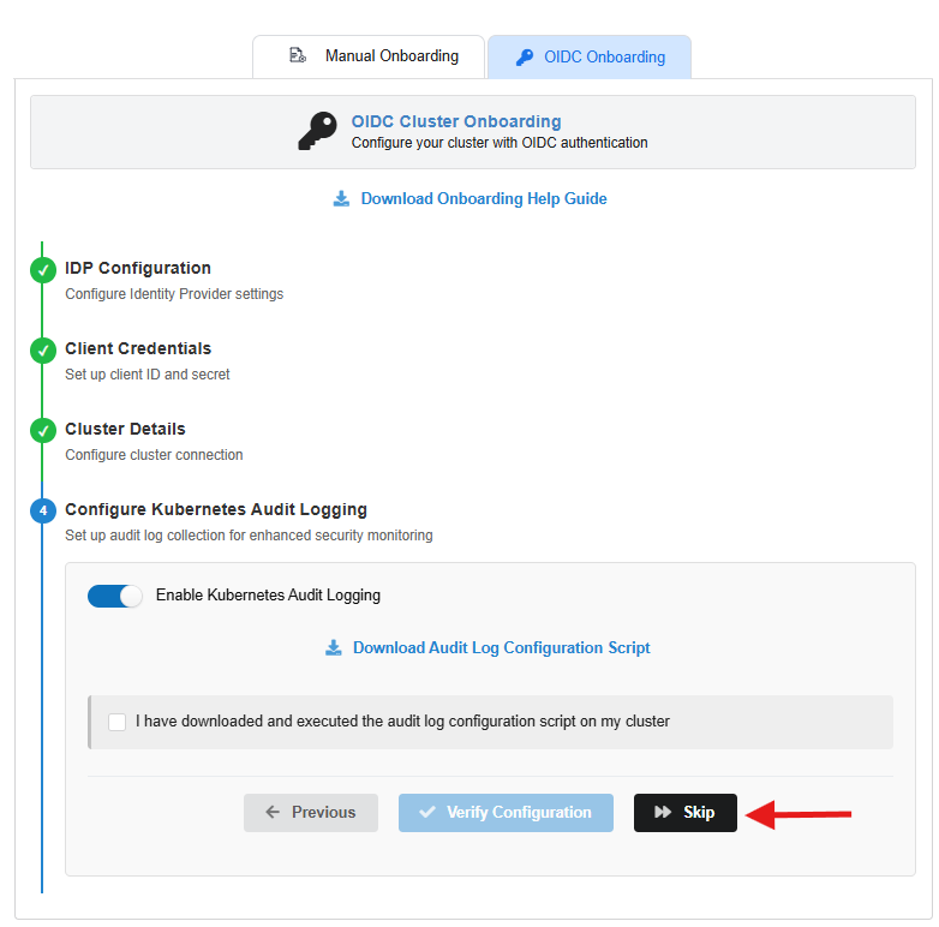
Setting up Kubernetes Audit Logging on Saner COSP
After enabling the audit logging functionality by using the toggle button “Enable gathering Kubernetes audit logs”, follow below steps:
Step 1: Configure Audit Logging using K8s master node CLI
Download the audit_logging script (“.sh” OR “.py”) by clicking on the link as shown in the screenshot. Make sure that the file is extracted before using it.

From the K8s Marster node’s CLI:
- ssh into one of the K8s master node’s CLI.
- Upload the audit_logging script to K8s master node’s CLI.
- Verify with the ls command to check whether the script has been successfully uploaded on the terminal.
- Configure audit logging of K8s cluster to Saner by executing the bellow command with the uploaded “.sh” OR “.py” Scripts.
Configure the Kubernetes Audit logs by executing “.sh” Script
Note that in-order to run the “.sh” script, it’s mandatory that you provide the execute
permission using the following command:
chmod +x saner-cosp-k8s-audit-log-enable-onboarding-permissions.sh
For configuring audit logging of K8s cluster to a Saner Account run the below command:
./saner-cosp-k8s-audit-log-enable-onboarding-permissions.sh
./saner-cosp-k8s-audit-log-enable-onboarding-permissions.sh

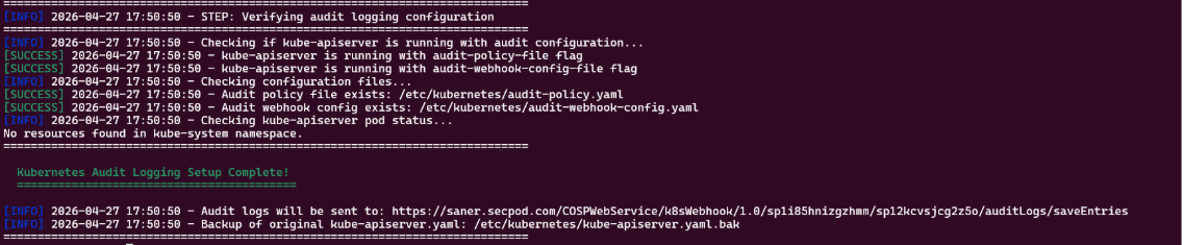
Once the script has finished executing with success message, continue from Step #2.
Configure the Kubernetes Audit logs by executing “.py” Script
For configuring audit logging of K8s cluster to a Saner Account run the below command:
python3 saner-cosp-k8s-audit-log-enable-onboarding-permissions.py
Once the script has finished executing a success message, continue from Step #2.
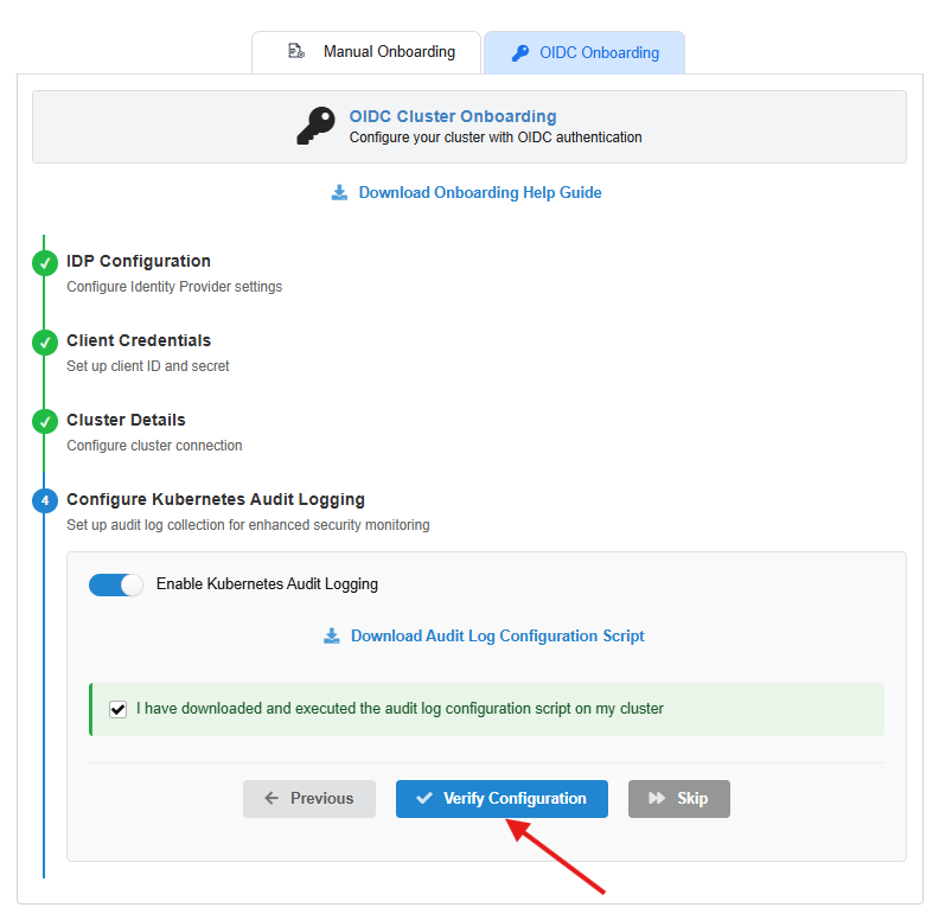
Step 2: Complete the Configuration on your Saner COSP Account
- Return to the Saner COSP Onboarding Portal.
- After the script has been run successfully, acknowledge the checkbox “I acknowledge that I have downloaded and successfully executed the audit logging configuration script on my Kubernetes cluster” and click on “Verify Configuration.”
- Once onboarded successfully, you will be greeted with “Audit Logging Configured Successfully” message.
- Click on “Complete Onboarding” button and you will be redirected to Scan page where you can run the scan on demand as well as schedule or pause a scan.